Deploying SEE Machines
This chapter discusses the deployment of SEE machines after their development is complete. It includes information about Feature Enabling as this applies to SEE.
Deploying a SEE machine involves the following steps:
-
Sign and encrypt the SEE machine. See Signing methods and Encryption.
-
Obtain an export certificate for the SEE machine from Entrust and incorporate the certificate in the distribution. See Obtaining and using export certificates.
-
Distribute the SEE machine to customers.
About the Feature Enabling Mechanism (FEM)
Entrust provides a Feature Enabling Mechanism (FEM) that controls the software that any given HSM can use.
This is used to control access to the SetSEEMachine command that loads the SEE machines.
The SetSEEMachine command can be authorized in either of the following ways:
-
The
GeneralSEEstatic feature is set with a bit in the EEPROM. If this bit is set, the command can load any SEE machine without further certificates or authorization. -
If the
GeneralSEEstatic feature is not applied, the command requires a dynamic Feature Enabling certificate chain to load a SEE machine.
All CodeSafe development environments have the GeneralSEE static feature.
However, to deploy an already-developed SEE machine, you require the dynamic Feature Enabling certificate chain.
Customers who require the dynamic certificate chain can load a SEE machine only when the key used to sign the SEE machine is export approved by Entrust through the provision of a signing certificate (an ADDER certificate). See Obtaining and using export certificates.
The SEE machine signing (ADDER) certificate authorizes SetSEEMachine on any HSM, but the dynamic Feature Enabling certificate chain is valid only on the specified HSM.
Obtaining and using export certificates
| You must understand and agree to the conditions for exporting SEE machines. Contact Entrust for full details of these conditions. |
To obtain an export certificate for a SEE machine:
Users with a Restricted SEE, [SEE(R)], enabled Connect will need to run update world files to pull the ADDER cert onto the Connect file system to load a SEE machine.
|
-
Generate a signing key and send the hash to Entrust together with a description of the SEE machine.
Entrust approves the SEE machine for export and sends you an ADDER certificate to allow the SEE machine signed by the specified key to run.
-
Sign the SEE machine with the signing key supplied to Entrust and, optionally, encrypt it.
-
Develop an installation process that places the certificate in the
/opt/nfast/femcerts(Linux systems) or%NFAST_CERTDIR%(Windows) directory. -
Distribute the signed SEE machine and the certificate to end-users with the appropriate installation instructions.
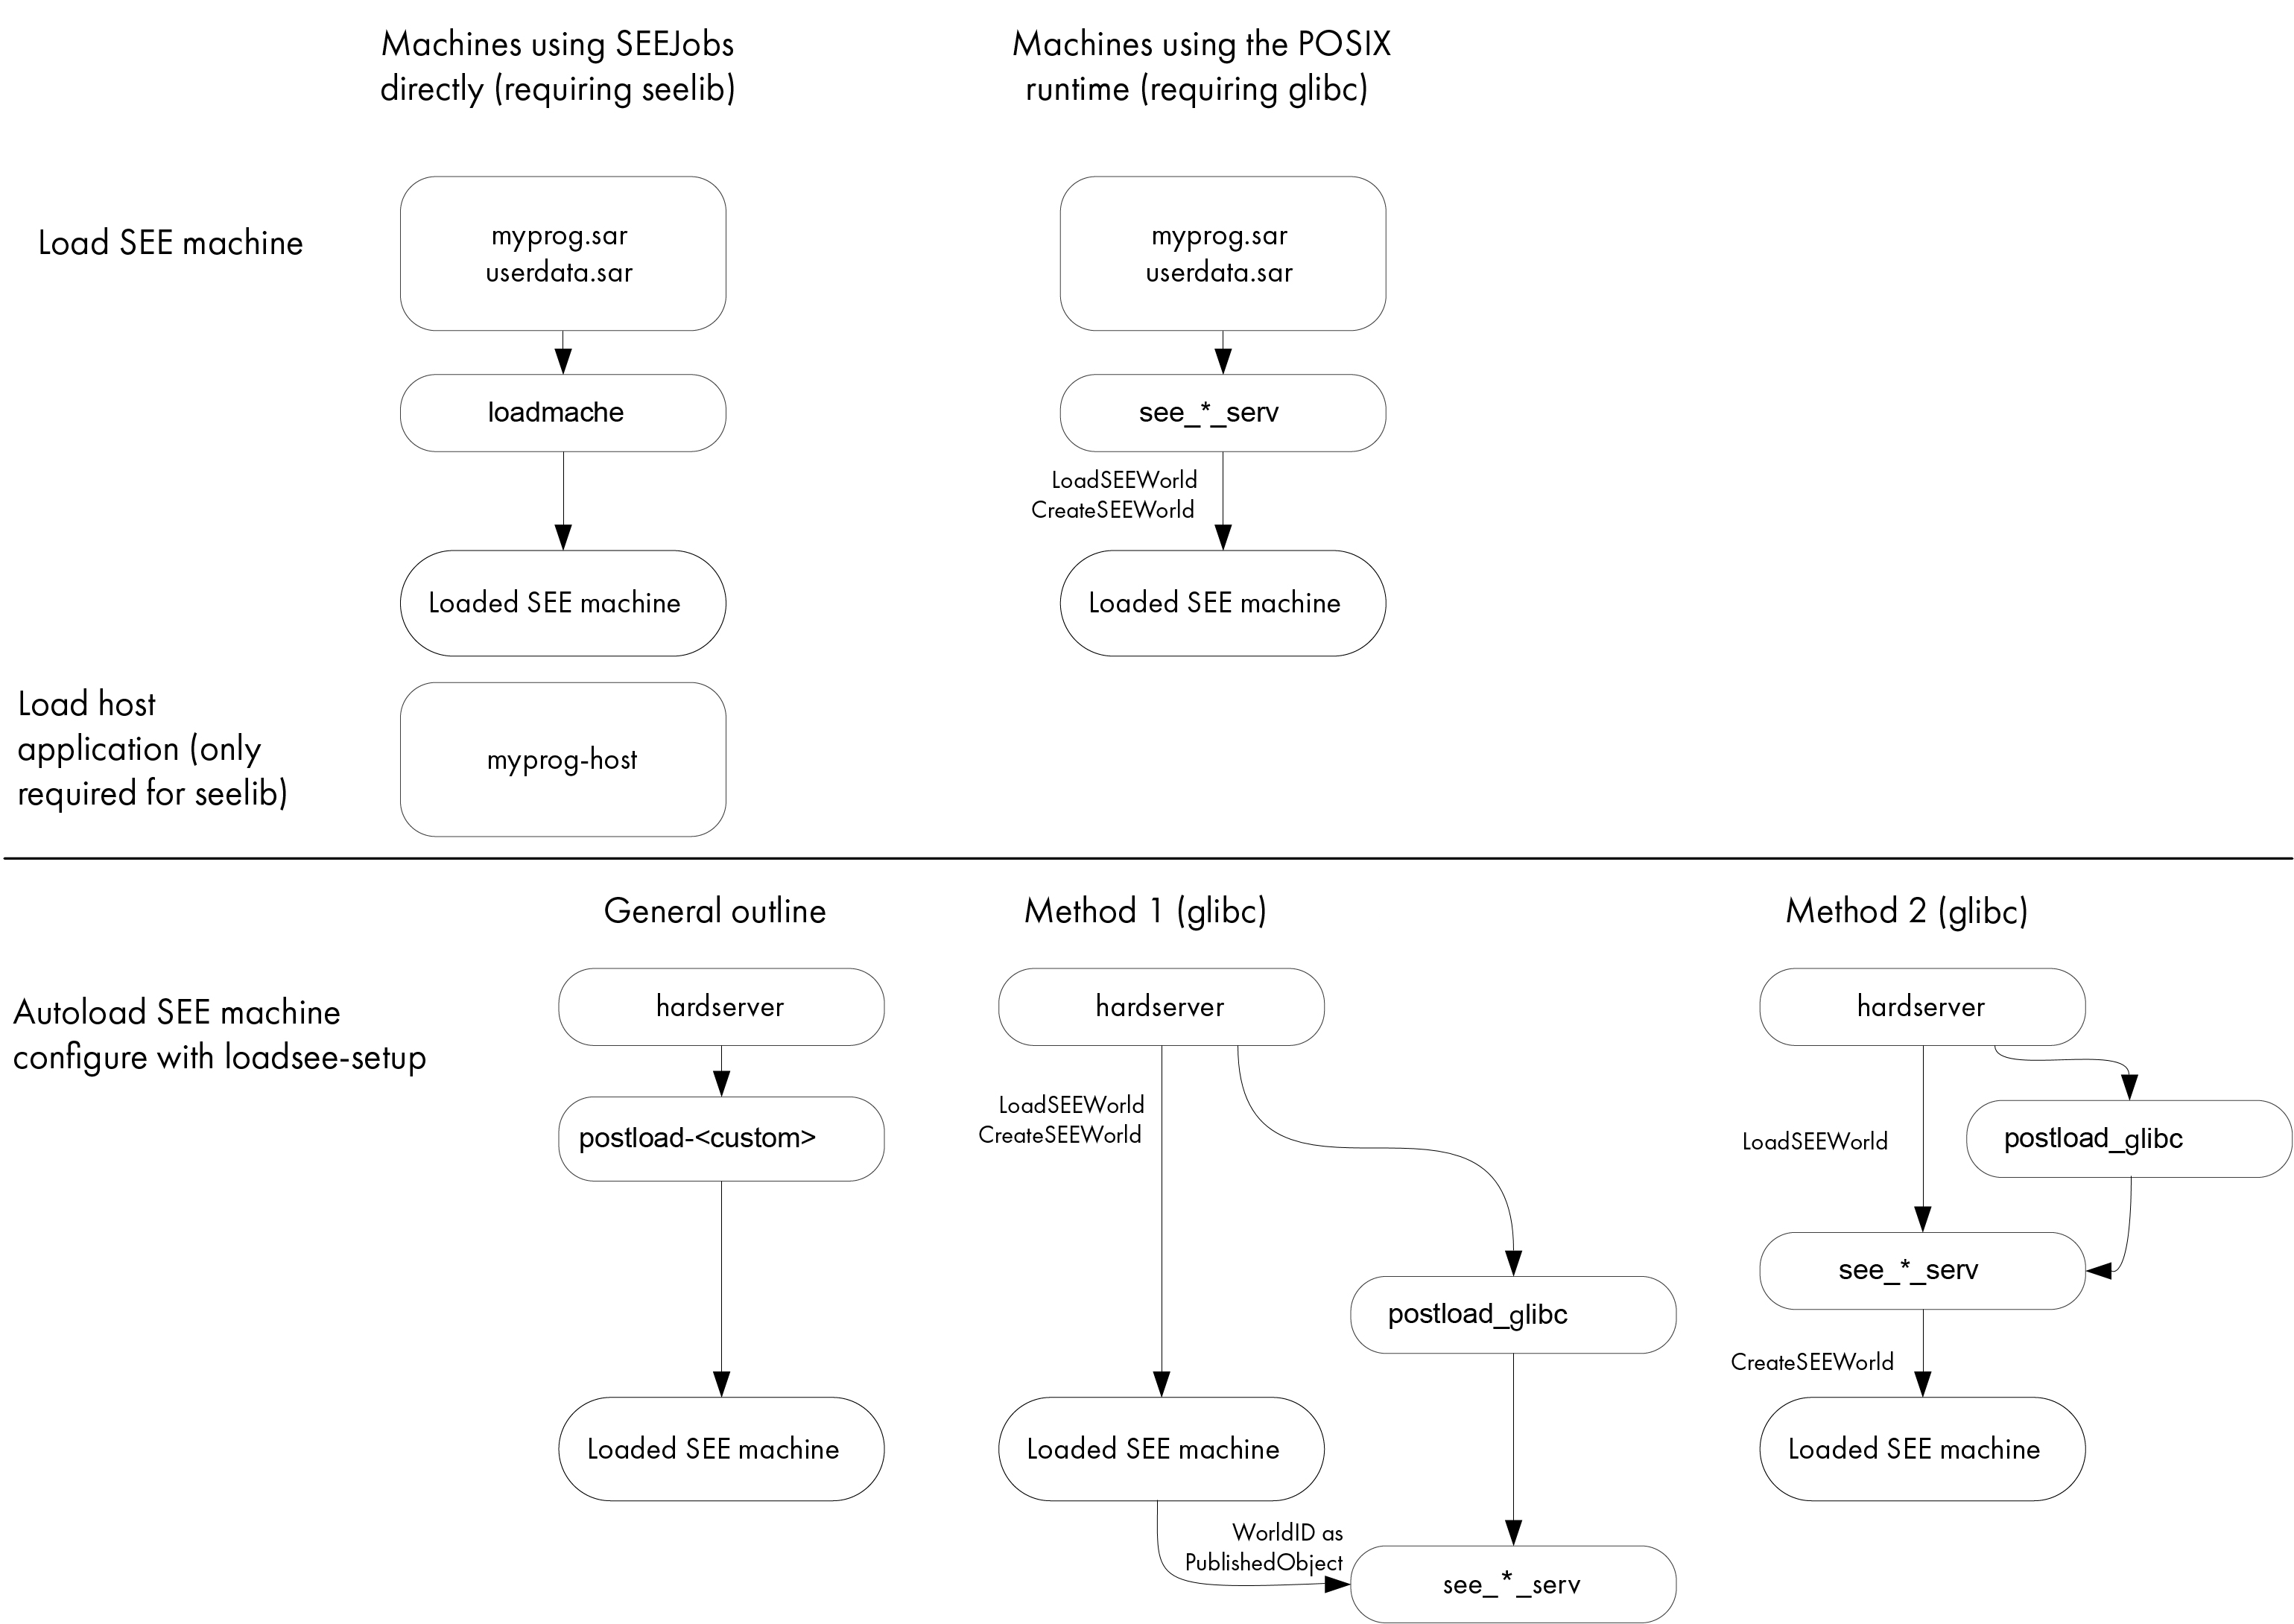
Automatically loading a SEE machine
The figures below outline different methods for loading a SEE machine.
Loading SEE machines for Solo XC:
Loading SEE machines for Solo PCIe:

You can load SEE machines manually by running the loadmache command-line utility or, optionally, you can load SEE machines that require support from a host-side see-*-serv utility by specifying the -M option when you run the utility.
However, you can also configure the hardserver to load SEE machines automatically whenever the HSM is initialized (that is, when the hardserver starts, or restarts, or after the HSM receives a ClearUnit command).
To configure the hardserver to load a SEE machine automatically, you must edit the settings in the host systems hardserver configuration file. Entrust provides the loadsee-setup command-line utility to help you set up, display, and remove settings in the hardserver configuration file that control the automatic loading of SEE machines.
For a usage description of the loadsee-setup command-line utility, see Loadsee setup.
For more information about the configuration files, see the User Guide.
|
The loadsee-setup utility configures the hardserver settings that specify:
-
The name of the SEE machine file to be automatically loaded
-
If appropriate, the name of an accompanying
userdatafile. -
If appropriate (if
userdatais specified), the published-object name for the SEE machine -
The name of an appropriate post-load program (to perform setup and initialization tasks for the SEE machine) and any necessary arguments for it (a
-moption to specify an HSM is automatically added)
For SEE machines that require support from a host-side see-*-serv utility, Entrust provides the postload-bsdlib post-load program, which runs the appropriate host utility, in restricted mode, while returning control back to the hardserver.
The postload-bsdlib program takes the same arguments as the see-*-serv host utilities (see see-*-serv utilities), together with a --provision argument that takes one of the following parameters to specify which utility to run:
-
stdoe -
stdioe -
sock -
stdioesock
For SEE machines using the SEElib architecture, it is usually necessary to write a custom post-load program.
Automatically loading a glibc/bsdlib SEE machine with userdata
To configure the hardserver configuration file to automatically load a glibc/bsdlib SEE machine and its accompanying userdata file, run a command similar to the following example:
loadsee-setup -m1 -M C:\MySEEMachine.sar -U C:\MyUserdata.sar -p MyPublishedObjectName -P glibc -A "--provision sock -p MyPublishedObjectName"In this example, MySEEMachine.sar is the SEE Machine (packed as a SAR file), MyUserdata.sar is the userdata (packed as a SAR file), MyPublishedObjectName is the name to use for publishing the KeyID of the started SEE machine, and the glibc/bsdlib parameter specifies use of the postload-bsdlib post-load program.
The sock parameter in this example tells postload-bsdlib to run the see-sock-serv host utility.
If a different host utility were necessary, you would specify the appropriate parameter for the appropriate utility (stdoe, stdioe, or stdioesock).
When running a command of this form, ensure that the parameters specifying name of the published object (in this example, MyPublishedObjectName) are the same for both the loadsee-setup utility and the postload-bsdlib program.
|
For more information about the loadsee-setup command-line utility, see Loadsee setup.
Automatically loading a glibc/bsdlib SEE machine without userdata
To configure the hardserver configuration file to automatically load a glibc/bsdlib SEE machine without its accompanying userdata file (which instead is to be loaded by the host utility), run a command similar to the following example:
loadsee-setup -m1 -M C:\MySEEMachine.sar -P glibc -A "--provision sock --userdata-sar C:\MyUserdata.sar"In this example, MySEEMachine.sar is the SEE Machine (packed as a SAR file) and the glibc/bsdlib parameter specifies use of the postload-bsdlib post-load program.
The sock parameter in this example tells postload-bsdlib to run the see-sock-serv host utility.
If a different host utility were necessary, you would specify the appropriate parameter for the appropriate utility (stdoe, stdioe, or stdioesock).
The MyUserdata.sar parameter in this example, passed to the postload-glibc/postload-bsdlib program, specifies a userdata file (packed as a SAR) that is to be loaded by the host utility.
To specify userdata that has not been packed as a SAR file, use the --userdata-raw option instead of --userdata-sar.
|
To turn on SEE debugging, pass one of the options --trace or --plain-trace as an argument for the post-load program.
See also Debugging SEE machines.
|
The host utility will be run in restricted mode, using the -r option.
|
Configuring the nShield Connect to use CodeSafe Direct
The CodeSafe client can be any OS platform (including mainframe, Non-Stop or embedded device). The use of CodeSafe Direct eliminates proxy devices, complexity and points of failure.
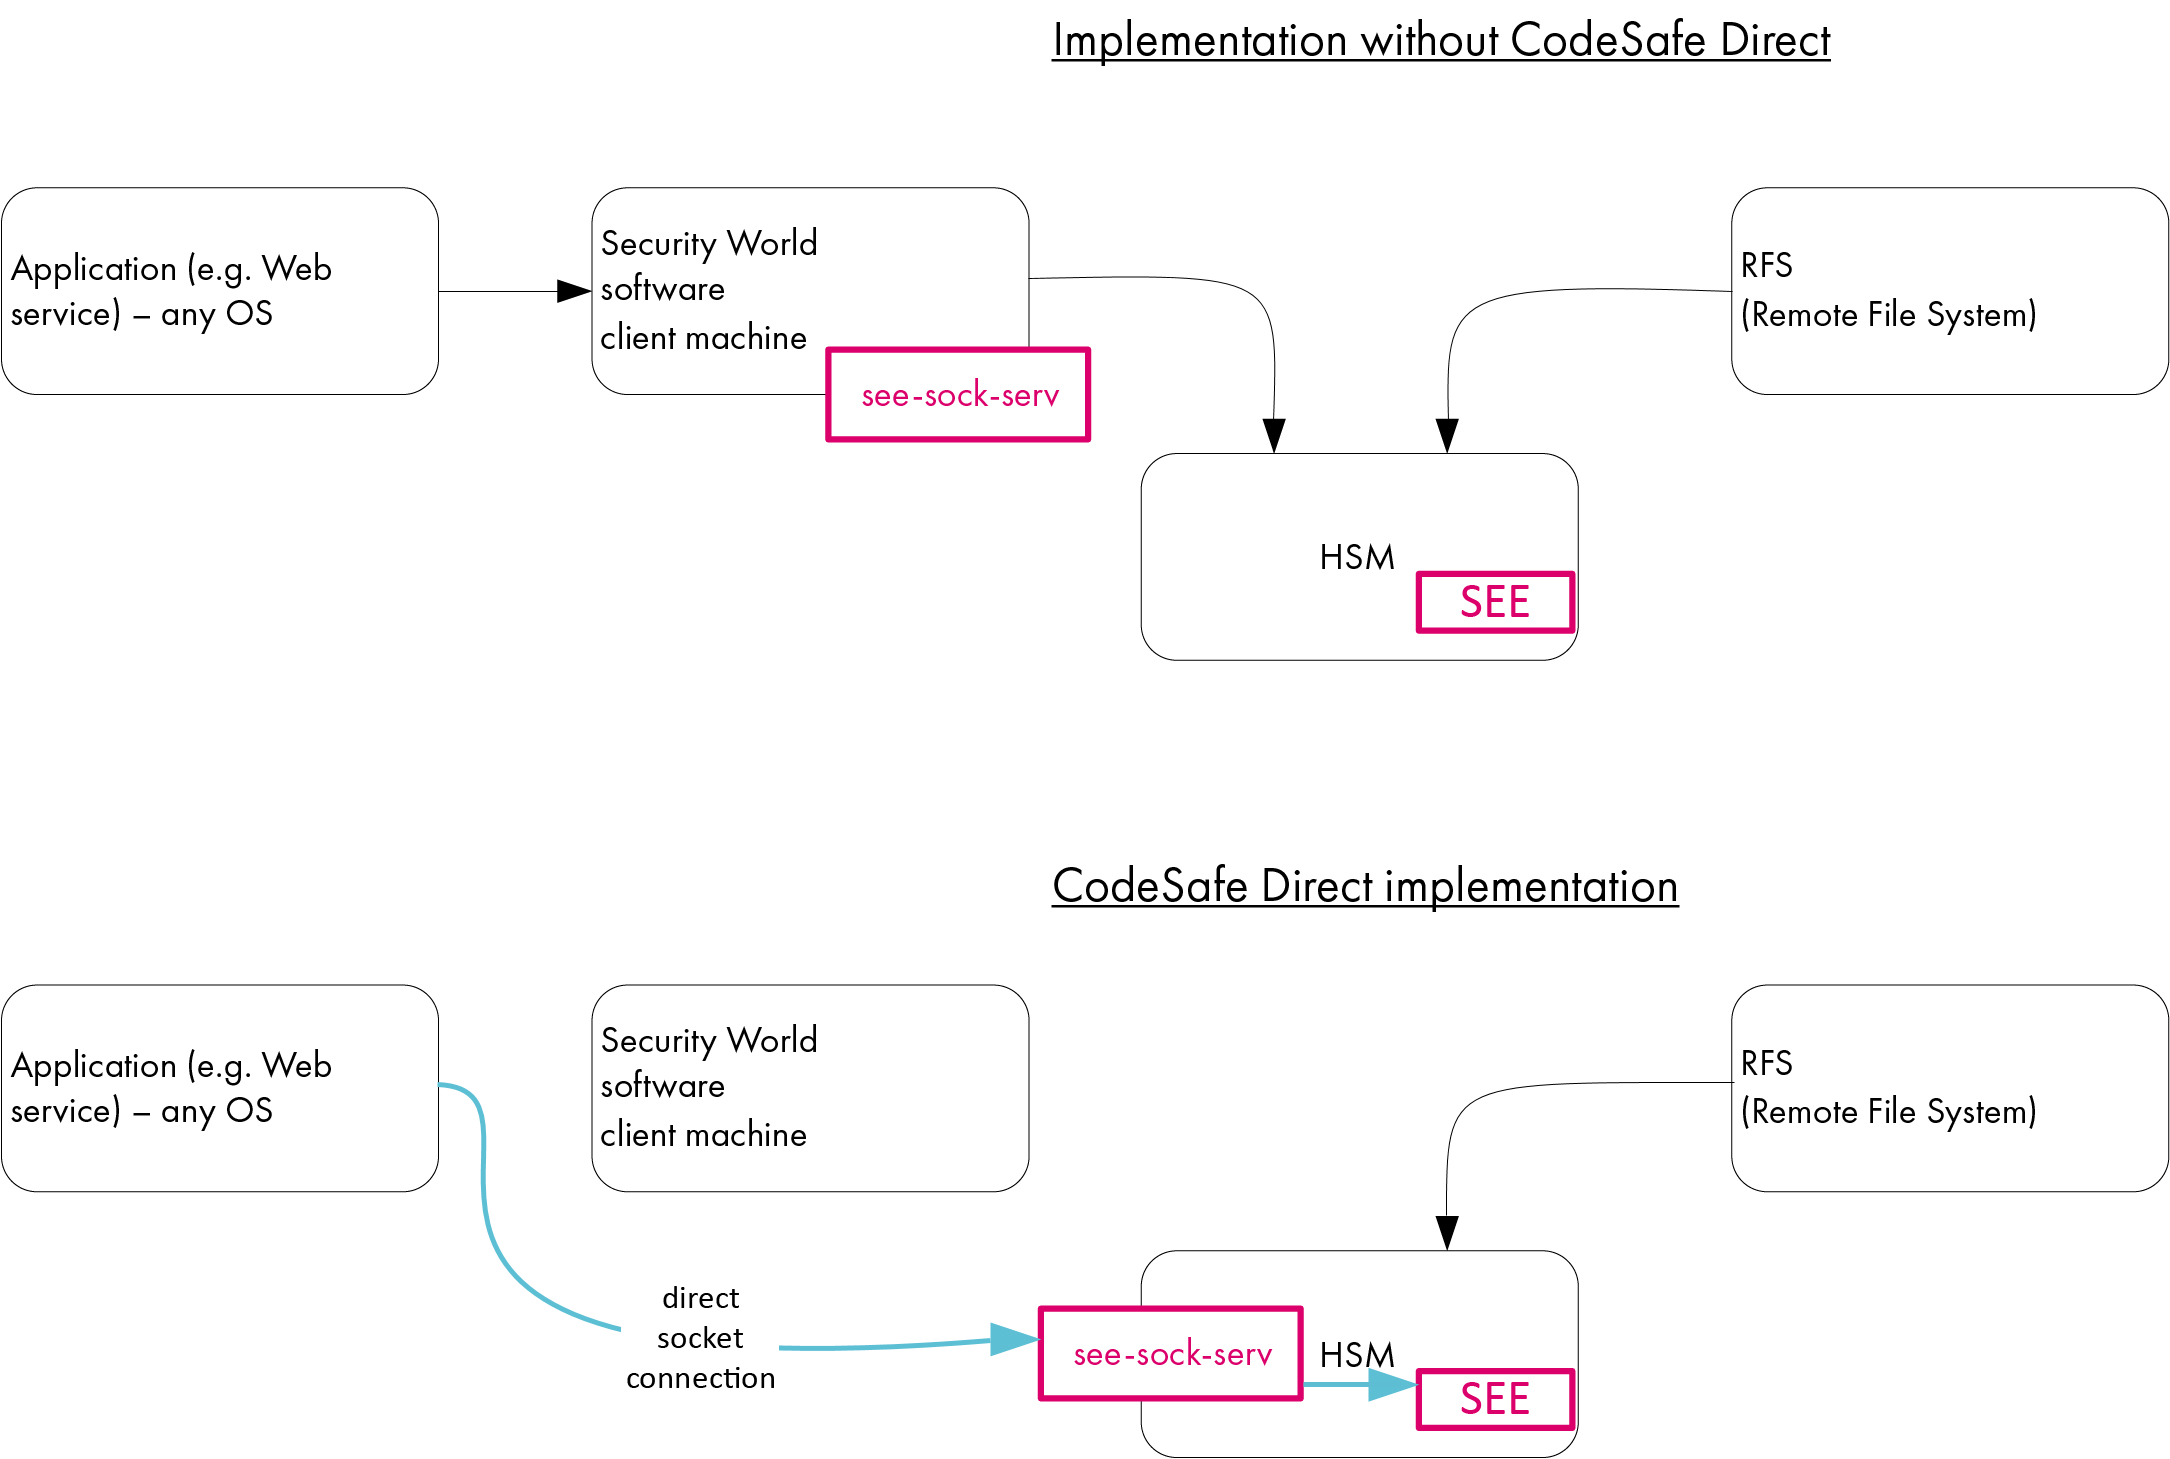
The nShield Connect can be configured to receive direct socket connections from the SEE machine via see-sock-serv, removing the need for a client machine.
You do this by specifying postload_prog and postload_args in the load_seemachine section of the nShield Connect hardserver configuration file, located in NFAST_KMDATA/hsm-<ESN>, where <ESN> is the Electronic Serial Number of the HSM. (For more information about this section of the configuration file, see the User Guide.)
| CodeSafe Direct is supported on bsdlib-based/glibc-based SEE machines only: the functionality is not available on SEElib-based machines. |
The configuration file can be managed in two ways: via the front panel of the nShield Connect (see Configuring a SEE machine using the front panel), and by using the remote configuration functions to push a config.new file, containing the postload_prog and postload_args settings, to the HSM.
| For more information, see Configuring the HSM with configuration files and HSM and client configuration files in the User Guide. |
Configuring a SEE machine using the front panel
To use see-sock-serv directly, you must create a bsdlib/glibc SEE machine.
|
Ensure that the SEE machine for the application is in the directory
%NFAST_HOME%\custom-seemachines
on the remote file system.
| If a SEE machine has previously been loaded on a network-attached HSM with a front panel, such as an nShield Connect, press the Clear button on the front of the HSM before proceeding to the next step. This clears the current SEE machine from memory. |
Configuring a glibc/bsdlib SEE machine
Select the CodeSafe menu option, and enter the following information when prompted:
-
The name of the SEE machine file.
-
The name of the userdata file.
For CodeSafe Direct, the userdatafile must be packed as a SAR file. -
The type of custom SEE machine you are using (
glibc/bsdlib sockserv). Worldid_pubname, postload_prog, and postload_args will be passed toload_seemachine. For detailed descriptions of the options in this section, see the User Guide.
Configuring a SEElib SEE machine
Select the CodeSafe menu option, and enter the following information when prompted:
-
The name of the SEE machine file.
-
The name of the userdata file, if required.
The userdatafile must be packed as a SAR file. -
The type of custom SEE machine you are using (
SEElib). -
The ID of the SEE World to create.
Remotely loading and updating SEE machines
The SEE remote push facility allows the remote deployment of CodeSafe SEE machines to an nShield Connect, negating the need to physically visit the HSM to load or update the SEE machine.
This is achieved by editing the configuration file on the RFS for a specific nShield Connect to specify the new SEE machine, then setting a configuration flag in the config file to true.
Before configuring an HSM to autonomously run a SEE machine and accept updates using the RFS, that HSM must first be set up to accept remotely-pushed configurations; see Pushing configuration files to the nShield Connect in the nShield Connect User Guide.
For more information about configuring log file storage options, see Configuring the HSM with configuration files in the nShield Connect User Guide.
Both SEElib and glibc/bsdlib sockserv SEE machines are supported on the nShield Connect.
|
To configure an nShield Connect to autonomously run a SEE machine and accept updates using the RFS:
-
Copy the existing config file to a new file called
config.new. -
In the
load_seemachinesection of theconfig.newfile for the remote HSM, add or amend the following settings:pull_rfs=true machine_file=mymachinename.sar userdata=myuserdata.sar worldid_pubname=publ_nameThese settings specify the type, name and user data of the SEE machine you wish to load. For more information about each setting, see load_seemachinein Hardserver configuration files, in the nShield Connect User Guide.For CodeSafe Direct, the userdatafile must be packed as a SAR file.The remote HSM will load the new SEE machine in place of any existing SEE machine. If no machine_filevalue is set, then pushing the config file will remove any existing machines on the HSM. -
In the
sys_logsection of theconfig.newfile for the remote HSM, add or amend the following settings:behaviour=push push_interval=1These settings control how and where log messages are written. Using the example above, messages will be written to the system.logandhardserver.logfiles of the HSM, which are accessible using the remote file system. You may wish to revise thepush_intervalto a higher value once the nShield Connect has successfully loaded the new SEE machine.
-
Run
nopclearfailto clear the HSM, followed byenquiryto check that the HSM is ready. -
Run
cfg-pushnethsmto push the new config file to the HSM.For more information about the cfg-pushnethsmutility, see the User Guide.
To load a new SEE machine to multiple nShield Connects, we recommend scheduling down time for each HSM, upgrading them on a per HSM basis. Each nShield Connect configuration file is specific to an individual HSM and each configuration file should be updated separately to load the new SEE machine.