Use the Remote Administration Client (RAC) software
This chapter describes how the Remote Administration Client can be used to participate in a quorum remotely.
-
Example: load a Security World with quorum members presenting their cards via RACs gives an example of the server-side user experience. This is for the user who will connect to the Remote Administration Service and execute the administration task for which the quorum is required. This user needs the RAC client and a TVD on their local machines, but must also be able to connect to the Remote Administration Server via a secure connection.
-
Use the RAC GUI to create an association with a dynamic slot and Use the raccmd command-line utility to create an association with a dynamic slot describe how to join a quorum remotely. These options are for the quorum members who are authorizing the task but are not executing it. They only need the RAC client and the TVD.
Requirements
For all quorum members:
-
Remote screen sharing tools such as WebEx, VNC or RDP. Should be able to pass RDP session to each Smartcard holder in turn and make the presenter.
-
IPv6 link-local address with the interface, IPv6 address, IPv4 address or hostname to the Remote Administration Service.
-
Port number or numbers at which the Remote Administration Service accepts calls from Remote Administration Clients.
For the quorum member who will execute the HSM administration task:
-
Tool to connect from the local machine to the Remote Administration Service.
Use the RAC GUI to create an association with a dynamic slot
The wizard-based GUI consists of a series of dialogs that enable you to associate a TVD with the appropriate HSM using one of its Dynamic Slots.
When you are using the GUI, keep in mind the following:
-
If you click Exit, or close the RAC GUI at any time, you must restart the nShield Remote Administration Client and repeat all steps.
-
If you click Back on the Use Card Reader page, the slot on the HSM will be released for use by another card reader.
-
If the network connection is lost, an error message displays.
-
If you disconnect the TVD while using the nShield Remote Administration Client, an error message displays and you are returned to the Select Card Reader (step 3 of 3) page to select a new reader.
-
Windows 8.1+ only
If you disconnect the TVD while you are on the Use Card Reader screen, the Windows Smart Card service
SCardSvrdisplays an error and terminates.
-
Launch the remote screen sharing tool that will be used between the quorum members.
-
Start the RAC:
-
On Windows, double-click the Remote Administration Client icon.
-
On Linux:
-
Make sure the
pcscdservice is running. -
Navigate to
/opt/nfast/bin/racgui, or the appropriate installation directory.
-
-
On macOS, open the Launchpad and click the RemoteAdminClient icon.
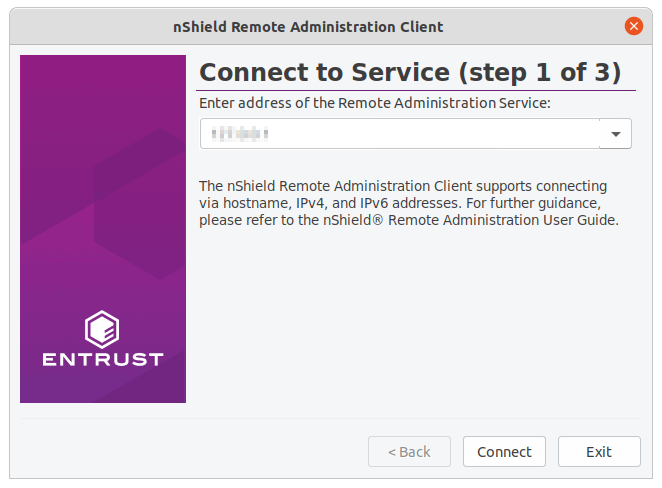
The Connect to Service (step 1 of 3) wizard page displays.
-
-
Enter the IP address or hostname of the required Remote Administration Service, or select the appropriate entry in the drop-down list that stores the last 10 connections that have been used. Examples of supported IP address types are:
-
IPv4 address: 194.3.4.106
-
IPv6 address: 2001:db8::2:1
-
Link-local IPv6 address with interface name: fe80::1%eth0
-
Link-local IPv6 address with interface number: fe80::1%2
If the communication port has been changed from the default 9005, you can also enter the correct number here, separated by a colon. For example, Hostname:Port, 192.0.2.146:9006.
Please note you need square brackets to distinguish between IPv6 and its port. For example:
-
IPv6 address: [2001:db8::2:1]:9006
-
Link-local IPv6 with interface name: [fe80::1%eth0]:9006
-
Link-local IPv6 with interface number: [fe80::1%2]:9006
Square brackets are not required but are permitted for IPv4 addresses and hostnames.
-
-
Click Connect to connect with the Remote Administration Service.
An error message displays if a connection cannot be established with the IP address or hostname. You can retry or connect to a different Remote Administration Service.
Depending upon your network environment, there may be a short delay in establishing a connection.
-
On the Choose HSM (step 2 of 3) wizard page, select the appropriate HSM from the list, according to its ESN, and click Next.
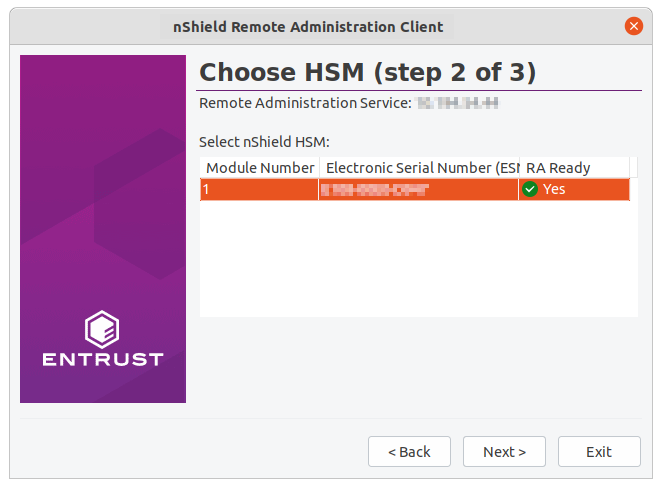
HSMs that do not support Dynamic Slots because they do not have the appropriate firmware, or do not have any dynamic slots configured, cannot be selected. However, they still appear in the list. -
Ensure that an nShield Trusted Verification Device is connected to your local computer. The tool shows that no Smartcard have been inserted yet in nShield TVD:
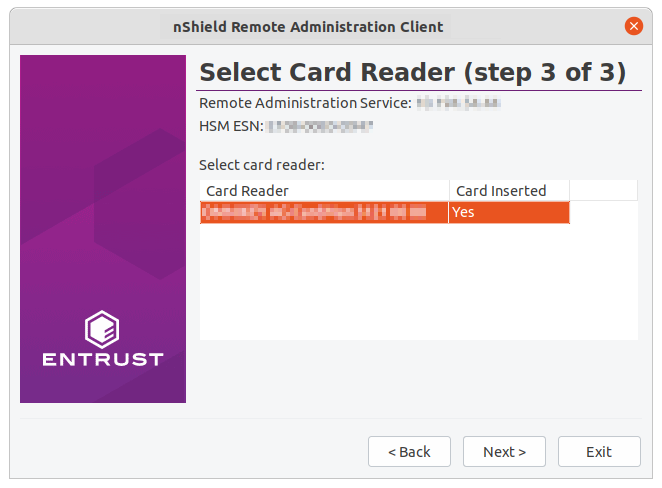
Select the Card Reader, insert the Smartcard in the nShield TVD slot, and click Next.
You can connect the Trusted Verification Device after the nShield Remote Administration Client has been started. But you must connect it either before you reach the Select Card Reader (step 3 of 3) page, or while it is still being displayed, to be able to proceed. -
Check the displayed ESN against an independent record of the expected ESN.

Do not just check the ESN against the one displayed on the last wizard page of the GUI. -
If the ESN is correct, press OK on the nShield Trusted Verification Device to confirm. The screen of the device displays Accepted.
-
If there is a problem with the ESN, press C on the nShield Trusted Verification Device. The screen of the device displays Abort OK?. Press OK. The Card Status field on the Use Card Reader page displays Unknown card.
-
If you have selected the wrong HSM, return to the Choose HSM (step 2 of 3) page and select the correct one. Otherwise, proceed according to the security policies of your organization.
If you remove and reinsert the card after you have confirmed the ESN of the HSM, the secure channel connection window re-displays. Select the HSM by its ESN again. -
-
The Use Card Reader dialog is displayed with information about the Remote Administration:
Remote Administration Service <ip-address> of the Remote Administration server
HSM ESN <hsm-esn>
Slot Number Number of the dynamic slot used by the card
Card Inserted Yes when the card is inserted in the TVD
Card Serial Number <serial-number> of the Smartcard
The Remote Administration connection is now set up. All remote users will have to enter there passphrases as and when they are instructed to do so.
| Do not exit or close the Use Card Reader dialog until you want to terminate the session. |
Use the raccmd command-line utility to create an association with a dynamic slot
The raccmd command line utility is available on the machine on which the Remote Administration Client was installed.
It enables you to:
-
List all available HSMs and select the appropriate one
-
List all locally available TVDs
-
Associate a TVD with an HSM, if a Dynamic Slot is available
Run the following command:
raccmd [-h] [--address ADDRESS] [--port PORT] [-v] [--version] {listhsms,listreaders,associate} ...On macOS, you need to explicitly specify the path to the command-line utility:
/Applications/RemoteAdminClient.app/Contents/Resources/raccmd [-h] [--address ADDRESS] [--port PORT] [-v] [--version]
    {listhsms,listreaders,associate} ...
If the Remote Administration Client application has been installed for only the current user, then use ~/Applications/….
Example to connect to an HSM using raccmd
-
At the command prompt, execute the
listreadersandlisthsmscommands to check or confirm the information you will need for parameters of theraccmdcommand.c:\Program Files\nCipher\nfast\bin>raccmd.exe listreaders 1. name_of_TVD 2. name_of_another_card_reader_attached_to_machine c:\Program Files\nCipher\nfast\bin>raccmd.exe --address Remote_Admin_Service_IP_Address listhsms 1. esn_numberIn this example, the TVD is listed as the first reader so the value of TVD_ID will be 1 for the
raccmdcommand. -
Connect to the HSM:
c:\Program Files\nCipher\nfast\bin>raccmd.exe --address Remote_Admin_Service_IP_Address associate -
interactive esn_number TVD_ID
Associated with slot 2
Reading...
Confirm HSM ESN on TVD
smartcard_ID
Options
The following options are available:
| Option | Description |
|---|---|
|
Show this help message and exit |
|
Address of the Remote Administration Service |
|
Port of the Remote Administration Service |
|
Increase the verbosity of the output |
|
Print the version number of the nShield Remote Administration Client utility |
Arguments
| You should only use one argument at a time. |
| Argument | Meaning |
|---|---|
|
List HSMs attached to a Remote Administration Service. |
|
List readers connected to your computer. |
|
Associate an nShield Trusted Verification Device connected to your computer with an HSM, identified by its ESN. One of the Dynamic Slots belonging to the HSM is used for the duration of the session, when the HSM is associated with a device. |
The associate argument
When the associate argument is used, further command-line options and arguments are available.
Options
The following options are available:
| Option | Description |
|---|---|
|
Show this help message and exit |
|
Run with interactive output |
|
Exit on first card removal |
|
Create this file containing the associated slot, and exit when it is deleted |
Example: load a Security World with quorum members presenting their cards via RACs
-
All quorum members connect through a remote screen sharing tool.
-
One quorum member connects to the Remote Administration Service, for example with ssh.
-
All quorum members who need to present their cards remotely launch their Remote Administration Client and connect to the Remote Administration Service. See:
-
The quorum member who is connected via ssh can confirm with the
slotinfocommand that dynamic slots have been configured so that other quorum members can present their cards remotely:Linux:
#/opt/nfast/bin/slotinfo -m2Windows:
C:\Program Files\nCipher\nfast\bin>slotinfo.exe -m2The following example is an output that shows a card present in the physical slot (Slot #0) of the HSM and a card presented via the Remote Administration client in a dynamic slot (here identified as Slot #2 with Flags ADa where D is dynamic).
Module 2: Slot Type Token IC Flags Details #0 Smartcard present 1 A #1 Software Tkn - 0 #2 Smartcard present 5 ADa #3 Smartcard - 0 AD -
The quorum member who is connected via ssh changes the HSM mode to Initialization remotely using the
nopclearfailcommand:Linux:
#/opt/nfast/bin/nopclearfail --initialization -m2 Module 2 command ClearUnitEx: OKWindows:
C:\Program Files\nCipher\nfast\bin>nopclearfail.exe --initialization -m2 Module 2, command ClearUnitEx: OK -
The quorum member who is connected via ssh executes the
new-worldcommand.Linux:
#/opt/nfast/bin/new-world -l -m2Windows:
C:\Program Files\nCipher\nfast\bin>new-world.exe -l -m2 -
The following message will be displayed:
18:16:43 WARNING: Module #2: preemptively erasing module to see its slots! Indoctrinating Module: Module 2: 0 cards of 2 read Module 2 slot 0: empty Module 2 slot 2: empty Module 2 slot 3: empty Module 2 slot 2: Admin Card #3 -
Each quorum member is now prompted to present their card. Members who are connected through RAC are prompted to use insert the Smartcard in the nShield TVD when the RAC Use Card Reader window appears.
-
The quorum member connected via ssh can monitor the status of the remote cards in the messages:
Module 2 slot 2:- passphrase supplied - reading card Module 2: 1 card of 2 read Module 2 slot 2: Admin Card #3: already read Module 2 slot 2: empty Module 2 slot 2: Admin Card #4 Module 2 slot 2:- passphrase supplied - reading card Card reading complete. security world loaded on 1 module; hknso = 78abcd62770e79eba69f556c4b596b9ed1d59e87 -
When all cards were read, the HSM can be changed back to Operational mode with the
nopclearfailcommand:Linux:
#/opt/nfast/bin/nopclearfail --operational -m2 Module 2 command ClearUnitEx: OKWindows:
C:\Program Files\nCipher\nfast\bin>nopclearfail.exe --operational -m2 Module 2, command ClearUnitEx: OK -
The mode of the HSM can be confirmed with the
enquirycommand on the ssh prompt:Linux:
#/opt/nfast/bin/enquiryWindows:
C:\Program Files\nCipher\nfast\bin>enquiryThe Module#2 part of the configuration file is shown below:
Module #2: enquiry reply flags none enquiry reply level Six serial number 49D5-C944-F159 mode operational ..... -
The remote task has been completed. Remote quorum members can disconnect their Remote Administration Clients and the ssh connection can be closed.