The front panel interface
This chapter describes the nShield HSM user interface, including the front panel controls. You are also shown how to use a keyboard to control the unit.
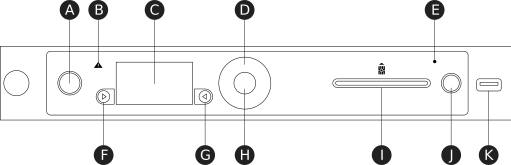
Front panel controls
| Label | Description |
|---|---|
A |
Power button |
B |
Warning LED (orange) |
C |
Display screen |
D |
Touch wheel |
E |
Status indicator LED (blue) |
F |
Display navigation button (left) |
G |
Display navigation button (right) |
H |
Select button |
I |
Slot for smart cards |
J |
Clear button |
K |
USB connector |
Display screen and controls
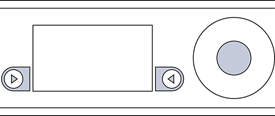
When the unit is powered, the display screen displays a menu or a dialog.
Each menu or dialog includes onscreen navigation labels that appear at the bottom of the display screen, on either side next to the display navigation buttons. Press the button next to the label to perform the action specified by the label.
To go back to the previous dialog or menu screen, use the navigation button to the left of the screen. To confirm a dialog value or select a menu option, either:
-
Press the navigation button to the right of the screen.
-
Touch the Select button.

Use the touch wheel to changes values or move the cursor on the display screen. To confirm a value, touch the Select button.
Menu screens
You can access menus from the display screen.
Menus are displayed as a list of selectable options. An onscreen arrow points to the currently selectable option. If the menu has more than four options, an arrow indicates the direction in which more options are available.
To select a menu option:
-
Move the indicator arrow up or down with the touch wheel.
-
When the indicator arrow points to the option you want to select, either:
-
Press the navigation button to the right of the screen (labeled onscreen as SELECT).
-
Touch the Select button.
-
At the top right of the display screen, a number sequence indicates the path to the current option. The last digit of the sequence shows the location of the menu you are currently viewing. The top level menu has no numbers, but when you select the System menu, the number 1 is shown.
The preceding digits in the sequence show the position of each option in turn that was selected in previous menu screens to reach the current menu. For example, the sequence 1-2 shows that the indicator is on the second option of the menu that was reached by selecting the first option on the top-level menu.
For a map of the menu screens, see the Installation Guide.
Dialogs
For some tasks, a dialog is displayed onscreen. When the dialog opens, the cursor is in the first field. To change and then enter values:
-
Use the touch wheel to change the displayed value of the fields.
-
Touch the Select button to enter the displayed value and move to the next field in the dialog.
Repeat the procedure to enter all necessary values in the dialog.
Information display
When you use a dialog to request information (for example, a log or details of a key), there is often too much information to display onscreen. In such cases, only the first part of the information is displayed.
To view the rest of the information:
-
Use the touch wheel to scroll the displayed information in the direction indicated by the onscreen arrows.
-
When an Options label is displayed, press the right-hand navigation button to see a menu of navigation options. You can normally choose to go to the top, to the bottom, or to a specified line in the display.
The numbers of the lines currently being displayed onscreen are shown at the left of the screen. They are followed in parentheses (( )) by the total number of lines available for display.
Using the front panel controls
You can use the front panel controls to configure the unit and to perform other tasks described in this guide. When the unit is working over the network with another computer (a client computer), you can program and control the unit as if it were part of the client computer.
| If the unit is powered down while you are logged in, you are logged out automatically. |
Start-up information
When you turn on power to the unit and it has completed its initialization, the lower part of the display screen shows basic start-up information about the unit.
There is a series of start-up information topics available. By default, the first displayed topic is the current System time. Use the touch wheel to view the other start-up information topics.
Administrative control of the unit
You can view and control the status of the unit by using the front panel controls and menu options.
| Tasks | Action |
|---|---|
Understand and control the power status of the unit |
Use the Power button to power up the unit. If the Power button is not illuminated, the unit is not powered. The Power button flashes intermittently as the unit powers up. It also flashes when the unit is in standby mode. For more information about the Power button, see the Installation Guide. |
Control access to the unit |
You can control access to the menus on the unit and the Power button on the front panel by using System > System configuration > Login settings. When UI Lockout with OCS has been enabled, you must log in with an authorized Operator Card before you can access the menus. You can still view information about the unit on the start-up screen. When you are logged in, you can log out and leave the unit locked. When UI Lockout without OCS has been enabled, you cannot access the menus, but you can still view information about the nShield HSM on the start-up screen. The only way to disable this setting (apart from returning the HSM to factory state) is to push an updated configuration file to the nShield HSM. See About user privileges and ui_lockout for more information. Power button lockout can be enabled and disabled independently when UI Lockout allows access to the menus. |
Unlock the unit |
When UI Lockout with OCS has been enabled and you have logged out, the display screen displays the label Login next to the right-hand navigation button. Press the right-hand navigation button, then insert an Operator Card that has been authorized for login, and follow the onscreen instructions. |
Log out of the unit |
Select Logout. This option is not available if UI Lockout with OCS has not enabled. |
Put the unit in standby mode |
Press the Power button or select System > Shutdown/Reboot > Shutdown. |
Restore the unit to its original configuration |
Select System > System configuration > Default config. |
Restore the unit to its factory state |
Select System > Factory state. |
Clear the memory of the internal hardware security module |
Use the Clear button or select HSM > HSM reset. |
View information about the current state of the internal hardware security module |
Select HSM > HSM information. |
View information about the current state of the system |
See the next section. |
Set the Real-Time Clock on the unit |
Select Security World mgmt > Admin operations > Set secure RTC. |
Change the mode of the unit |
Select HSM > Set HSM mode.
|
Viewing the current status of the unit
To view information about the current state of the system, from the main menu select System > System information. Select an option to view the associated information as follows:
| Option | Description |
|---|---|
View system log |
Displays the system log. |
View hardserver log |
Displays the module hardserver log. |
Display tasks |
Displays the tasks that the system is currently performing. |
Component versions |
Displays the version numbers of the various system software components. |
View h/w diagnostics |
Displays the following environmental information about the module:
|
View tamper log |
Displays the tamper log. |
View unit id |
Displays the ID of the unit. |
Using a keyboard to control the unit
You can connect a keyboard to the USB connector on the front panel. You can connect either a US or a UK keyboard. To configure the unit for your keyboard type, select System > System configuration > Keyboard layout and then choose the keyboard type you require.
When you have connected a keyboard and configured the unit for its use, you can enter numbers and characters directly into the display. You can also control the unit by using the following keystrokes:
| Keystroke | Use |
|---|---|
F1 |
Same as pressing the left-hand navigation button on the front panel. |
F2 |
Same as pressing the right-hand navigation button on the front panel. |
F3 |
Same as touching the Select button. |
Esc |
Same as pressing the left-hand navigation button on the front panel. |
Enter |
Where the Select button is active, same as pressing Select: where Button B is active, same as pressing Button B. |
Up arrow |
Moves the indicator upwards in a menu. |
Down arrow |
Moves the indicator downwards in a menu. |
Tab |
Moves the cursor to the next field in a dialog. |
Shift-Tab |
Moves the cursor to the previous field in a dialog. |
PgUp |
Displays the previous screen. |
PgDn |
Displays the next screen. |