Designing SEE machines and SEE-ready HSMs
This manual addresses SEE for both the Solo XC and the Solo PCIe.
For Solo XC, see Writing SEE machines - Solo XC
For Solo PCIe, see Writing SEE machines - Solo PCIe
Writing SEE machines - Solo XC
This chapter describes how to write a SEE machine for use on SEE-Ready HSMs.
An SEE machine is an executable binary file of a type appropriate for the HSM that communicates with the nShield core (which runs in kernel mode) using a defined set of software interrupts. These interrupts, and their wrapper functions, provide a run-time environment that includes memory and thread management as well as an interface for accepting and returning jobs and calling nCore API commands.
C source code is compiled using one of the GCC cross-compilers supplied with the CodeSafe Developer Kit. For details of required compiler options; see Example SEE machines and the makefiles supplied with the examples.
The compiled code can then be signed, packed, and encrypted by using the Trusted Code Tool (tct2 utility) to produce a secure archive; see Utilities.
| In CodeSafe versions prior to 13.3, the Solo XC only supports SEE machines smaller than 70 MB. From 13.3 onwards, the Solo XC can support SEE machines up to 800 MB. |
Designing the glibc architecture
The GNU C library glibc is supplied together with libpthreads, librt and a system call underlay for use with Codesafe SEE development.
A rich set of C function calls is available to use in SEE machine development. Native support for Unix-based system calls is provided, only restricted by a whitelist of the system calls (SEE Machines Whitelist) allowed in the SEE environment.
A subset of the Unix-based system calls, implemented in terms of the inter-process communication interface (IPC), allows access to the cryptographic HSM kernel. The provided system calls include a virtual file system and associated set of input and output devices with which you interact in the standard manner.
The virtual file system is supported as an extension to the file system.
Also provided are some link-time plug-ins that extend the virtual file system to provide additional capabilities:
-
hoststdioe.o: stdin,stdout, andstderrfacility hooks;seestream_stdio(7see) -
hoststdoe.o: stdoutandstderrfacility hooks;seestream_stdio(7see) -
hostinetsocks.o:TCP socket facility hooks;seestream_inet(7see) -
hoststdioeinetsocks.o:TCP socket facility andstdin,stdout, andstderrfacility hooks;seestream_inet(7see)seestream_stdio(7see)
The link-time plug-in vulnerability.o is provided for the purposes of debugging (see Vulnerability test harness).
Entrust recommends that you do not link vulnerability.o into a production SEE machine.
|
Designing the SEElib architecture
This section describes how to design SEE machines using the SEElib architecture.
This kind of architecture requires host-side software to create the SEE World and communicate with the HSM.
To start the SEE machine running with a particular SEE userdata, the host application calls the nCore API command CreateSEEWorld.
This command creates a SEE World using data previously loaded into the HSM with the LoadBuffer command from a buffer created with the CreateBuffer command.
See the nCore API Documentation (supplied as HTML) for information about the nCore API commands.
You can also use or adapt the supplied example Java class SEEWorld to initialize the SEE machine.
When the host application calls CreateSEEWorld, the HSM allocates memory for the SEE World and sets up its input and output job queues.
It then runs the SEE machine’s main() function.
The SEE machine’s main() function must:
-
Call
SEElib_init()before any other SEE library function to initialize the SEE library and to check that the HSM is running the expected version of the library -
If the machine accepts
userdata:-
call
SEElib_GetUserDataLento determine the length of the byte block that was passed withCreateSEEWorld -
call
SEElib_ReadUserDatato load the byte block -
determine whether the byte block is valid
-
initialize any required structures
-
-
Start at least one thread which receives and processes commands (this thread must call
SEElib_AwaitJob)The SEElib_StartProcessorThreadsfunction can be used for this purpose. -
Call
SEElib_InitCompleteand return a status.
The status passed to SEElib_InitComplete is returned to the calling application in the reply to CreateSEEWorld
The application can determine the status values, with one exception: if the machine fails before calling SEElib_InitComplete(), the CreateSEEWorld command returns a value of 1 (SEEInitStatus_MachineFailed) in this field.
You should therefore avoid choosing the value 1 to indicate successful initialization.
When the application receives the reply to CreateSEEWorld with Status_OK and an acceptable initstatus, it can start to submit jobs with the nCore API command SEEJob.
You can also use or adapt the supplied example Java class SEEJob to submit jobs to the SEE machine.
The SEEJob command takes a byte block, which is passed to the SEElib_AwaitJob function without being interpreted in any way.
It is up to the host application to assemble this byte block and the SEE machine to interpret it.
After the job has been processed, assemble the reply into a byte block and call SEElib_ReturnJob to return it using the nShield core.
The nShield core assembles this byte block into a reply and returns it to the host application.
Provided that the job is returned before the command times out, the reply has the status OK.
The SEE machine must include any necessary status information within the byte block it returns.
The calling application must remember to check this status as well as the status of the SEEJob nCore API function and the transport call, for example NFastApp_Transact().
The SEE machine can call nCore API functions with SEElib_Transact or SEElib_MarshalSendCommand and SEElib_GetUnmarshalResponse.
It may submit these as part of its initialization, before it calls SEElib_InitComplete().
However, if it does not call SEElib_InitComplete() within 30 seconds of start-up, the CreateSEEWorld command returns SEEInitStatus_MachineFailed.
For this reason, you should not perform (for example) lengthy key generation operations during initialization.
SEElib_Transact has syntax equivalent to the NFastApp_Transact function in the C generic stub.
It takes a command structure and returns a reply structure.
SEElib_MarshalSendCommand takes a command structure and submits it.
SEElib_GetUnmarshalResponse reads a response from a buffer and returns a reply structure.
SEElib_StartTransactListener must be called successfully before you use SEElib_Transact to communicate with the nShield core.
|
SEE machines for new algorithms
In addition to being able to perform basic cryptographic operations, any SEE machine that implements an algorithm must also be able to:
-
Generate keys
-
Import keys
-
Store keys as key blobs.
The SEE machine can use the nCore API functions GenerateRandom and GeneratePrime to acquire random numbers and random prime numbers from the HSM’s hardware random number generator.
The SEE machine can perform its own multiprecision arithmetic.
Otherwise, it can use the nCore API BignumOp command to perform multiprecision arithmetic and the ModExp and ModExpCrt commands to perform modular exponentiation.
If you are using keys as session keys, there is no requirement for them ever to be placed in the nShield core. The only time that you need to transfer a key to the core is if you need to create a key blob for long-term storage. However, if you need to keep track of several keys, you may want to make use of the nShield core’s object store rather than having to create a similar structure in your own code.
For an example of how See machines can implement a non-standard algorithm, see A3A8 example.
Key type
The SEE machine stores keys using the random key type.
This is a plain byte block with no structure.
If the key contains several values, for example, exponent and modulus, the SEE machine must implement its own routines for marshalling and unmarshalling the byte block into the correct structure.
SEE machines using standard algorithms do not use the random key type.
Instead, they use standard nCore key types.
|
ACL
The ACL needs to be constructed so that the SEE machine and only the SEE machine can access the key.
To transfer a key from the nShield core to the SEE machine, the key must have the ExportAsPlain flag set in its ACL.
The permission group with ExportAsPlain must be protected by a certifier so that this operation can only be performed by the SEE machine.
Although one obvious solution is to use the key that was used to sign the SEE machine, KInteg, as the certifier, using KInteg in this way means that whoever signed the SEE machine could potentially access any key for this algorithm.
A better solution is to add an extra signature to the SEE machine by using a second key, KAuth
The KInteg signature proves that the code has not changed since it was signed.
The KAuth signature is then used to control access to keys.
You can use the generatekey command-line utility to generates keys for use as KAuth and KInteg by specifying the seeinteg application as a key generation parameter.
The ACL must also have the correct MakeBlob permissions.
If you want to use the standard Security World tools for key management and recovery, the host application can use these tools to create the ACL.
| SEE machines using standard algorithms generally do not need to get the key as plain text in the SEE machine. |
Storage
For long-term storage, the key needs to be encapsulated in a key blob that is protected by the Security World or an OCS. To provide OCS replacement and recovery, you may also require additional key blobs protected by other card sets.
You could write a function where your SEE machine calls MakeBlob and returns the blob to the host.
Alternatively, you could write a method that returns a key ticket and have the host application create the key blobs.
If you are using a Security World, the host application can use nfkm library calls to create and store the key blobs.
Loading stored keys
In general, it is easier for the host application to manage tokens, because it has direct access to the user interface and can prompt the user to insert cards and enter passphrases.
When the token has been loaded, the host application can load the key and pass a key ticket to the SEE machine.
The SEE machine can then redeem the key ticket for a KeyID and use this to access the key.
If you have several keys that are protected by a token, it usually makes sense to pass a ticket for the KeyID of the logical token, rather than passing tickets for each key.
You should also pass in a ticket for the logical token if the host application that loads the token exits afterwards. When it exits, it destroys the logical token’s ID, which invalidates all loaded keys that were using it. Passing the logical token’s ID in to the SEE machine prevents its destruction when the application exits.
Run-time library
We supply a customized C run-time library (librtusr.a) and a corresponding set of header files (in the
include-see/module/rtlib
subdirectory) for programs operating in the SEE environment.
This library contains most commonly used ANSI C functions, with the addition of the following proprietary extensions:
-
Thread creation and control functions documented in
sys/threads.h -
Thread synchronization primitives (events, semaphores, spin-locks), also documented in
sys/threads.h
However, the librtusr.a library excludes:
-
Any file or directory access functions
-
User input functions (for example,
stdinandscanf()) -
Floating-point math library functions (in
math.h), although basic floating-point types and arithmetic are supported -
Time/date and locale-specific functions (
time.h,locale.h).Multiplexing is not available with the rtlib/SEElibruntime library.
Access to the raw (IPC) interface between the SEE machine and the kernel is by means of the SWIcall() function, documented in
sys/swis.h.
The comments in this file are provided mainly for information, because all useful SWIs have C wrapper functions presented in other header files.
See SEElib functions for reference information about glibc functions.
Signing userdata for additional security
Signing userdata files can help increase the security of CodeSafe SEE applications.
Both types of SEE machine architecture, using glibc and using SEElib, can take advantage of the security benefits offered by signing userdata files.
For example, if your SEE machine is intended to perform some cryptography functions using a given key, it would be advantageous to prevent that key from being accessed by any unauthorized SEE machines.
This can be achieved by signing the userdata file for your SEE machine.
The following figure provides an overview diagram of the process of signing a SEE machine’s userdata file.
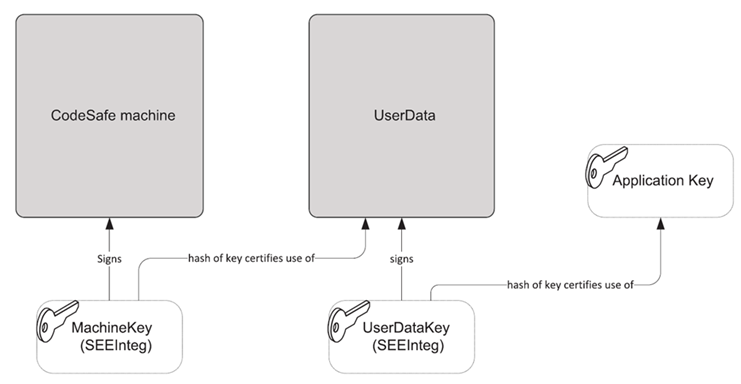
The following sequence, in which an original SEE machine is represented by machine.elf and an original userdata file is represented by userdata.bin, demonstrates the process of signing a SEE machine’s userdata file:
-
Create the key
Kseemach of typeseeintegto sign the SEE machine by running a command similar to:generatekey seeinteg plainname=seemach ... -
Create the key
Kuserdata of typeseeintegto sign theuserdataby running a command similar to:generatekey seeinteg plainname=userdata ... -
Run the
generatekeycommand-line utility to create a keyKcrypto (the key with which your SEE machine is to perform its cryptography functions), specifyingKuserdata for itsseeintegname:generatekey simple plainname=crypto --seeintegname=userdata ...This example assumes Kcrypto is being created as a Triple DES key. -
Run the
tct2command-line utility to sign theuserdatafile for your SEE machine with the keyKuserdata, specifyingKseemach as the SEE machine key:tct2 --sign --key=userdata --machine-key-ident=seemach --infile=userdata.bin --outfile=userdata.sarFor information about the tct2command-line utility, see tct2. -
Run the
tct2command-line utility to sign the SEE machine with the keyKseemach:tct2 --sign --key=seemach -- machine-type=PowerPCELF --is-machine --infile=machine.elf --outfile=machine.sar
The result of the process demonstrated in this sequence of steps is that no SEE machine can use the key Kcrypto unless at least one of the following conditions is met:
-
It has been signed by the correct
Kseemach and is used in conjunction with the correctuserdatafile -
You make use of the key recovery feature (see the User Guide).
Building your SEE machine and host-side application
The following steps provide an overview of the process you follow to use your application with SEE:
-
If you want to sign or encrypt your application, generate code-signing and confidentiality keys as applicable.
-
Compile and link the host application’s source files using the native compiler on the host. See the diagram in the following step.
-
Compile and link the SEE machine source using the GCC cross compiler. See the following diagram.
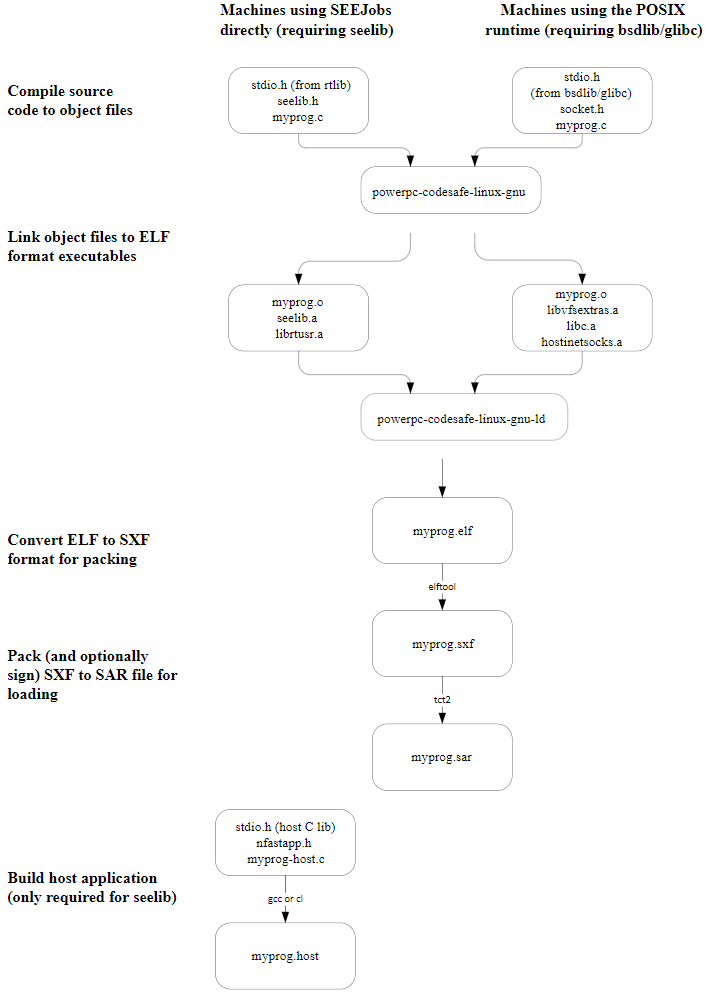
-
If required, use the Trusted Code Tool (
tct2) to sign the SEE machine with the code-signing keys. See Utilities for additional information. -
Use the Trusted Code Tool (
tct2) to pack the HSM files and create a SAR file. You must pack the binary file even if signatures are not required. See Utilities for additional information. -
Use the Trusted Code Tool (
tct2) to pack (and, if required, sign with the code-signing keys) theuserdatafile and create a SAR file. You must pack theuserdatafile even if signatures are not required (unless you use one of thesee-*-servhost utilities with the--userdata-rawoption. See Utilities for additional information.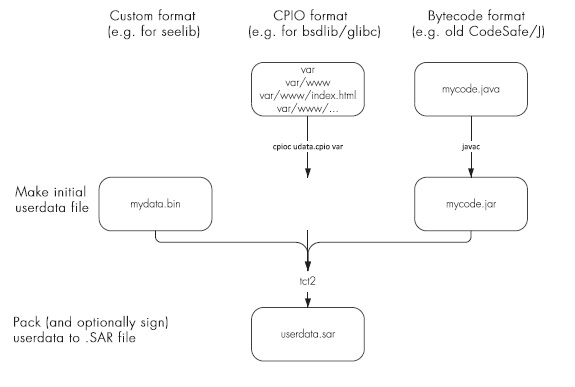
-
If required, use the Trusted Code Tool (
tct2) to encrypt theuserdatafile, using the confidentiality key. -
Place the
userdataSAR file and the host application in an appropriate location to be used at runtime. -
For SEE machines using the
SEElibarchitecture,userdatafile can either be either loaded automatically or can be loaded by running theloadmachecommand-line utility.For SEE machines that require support from a host-side
see-*-servutility, the host utility loads theuserdatafile automatically.The following diagram shows these different methods for loading a SEE machine.
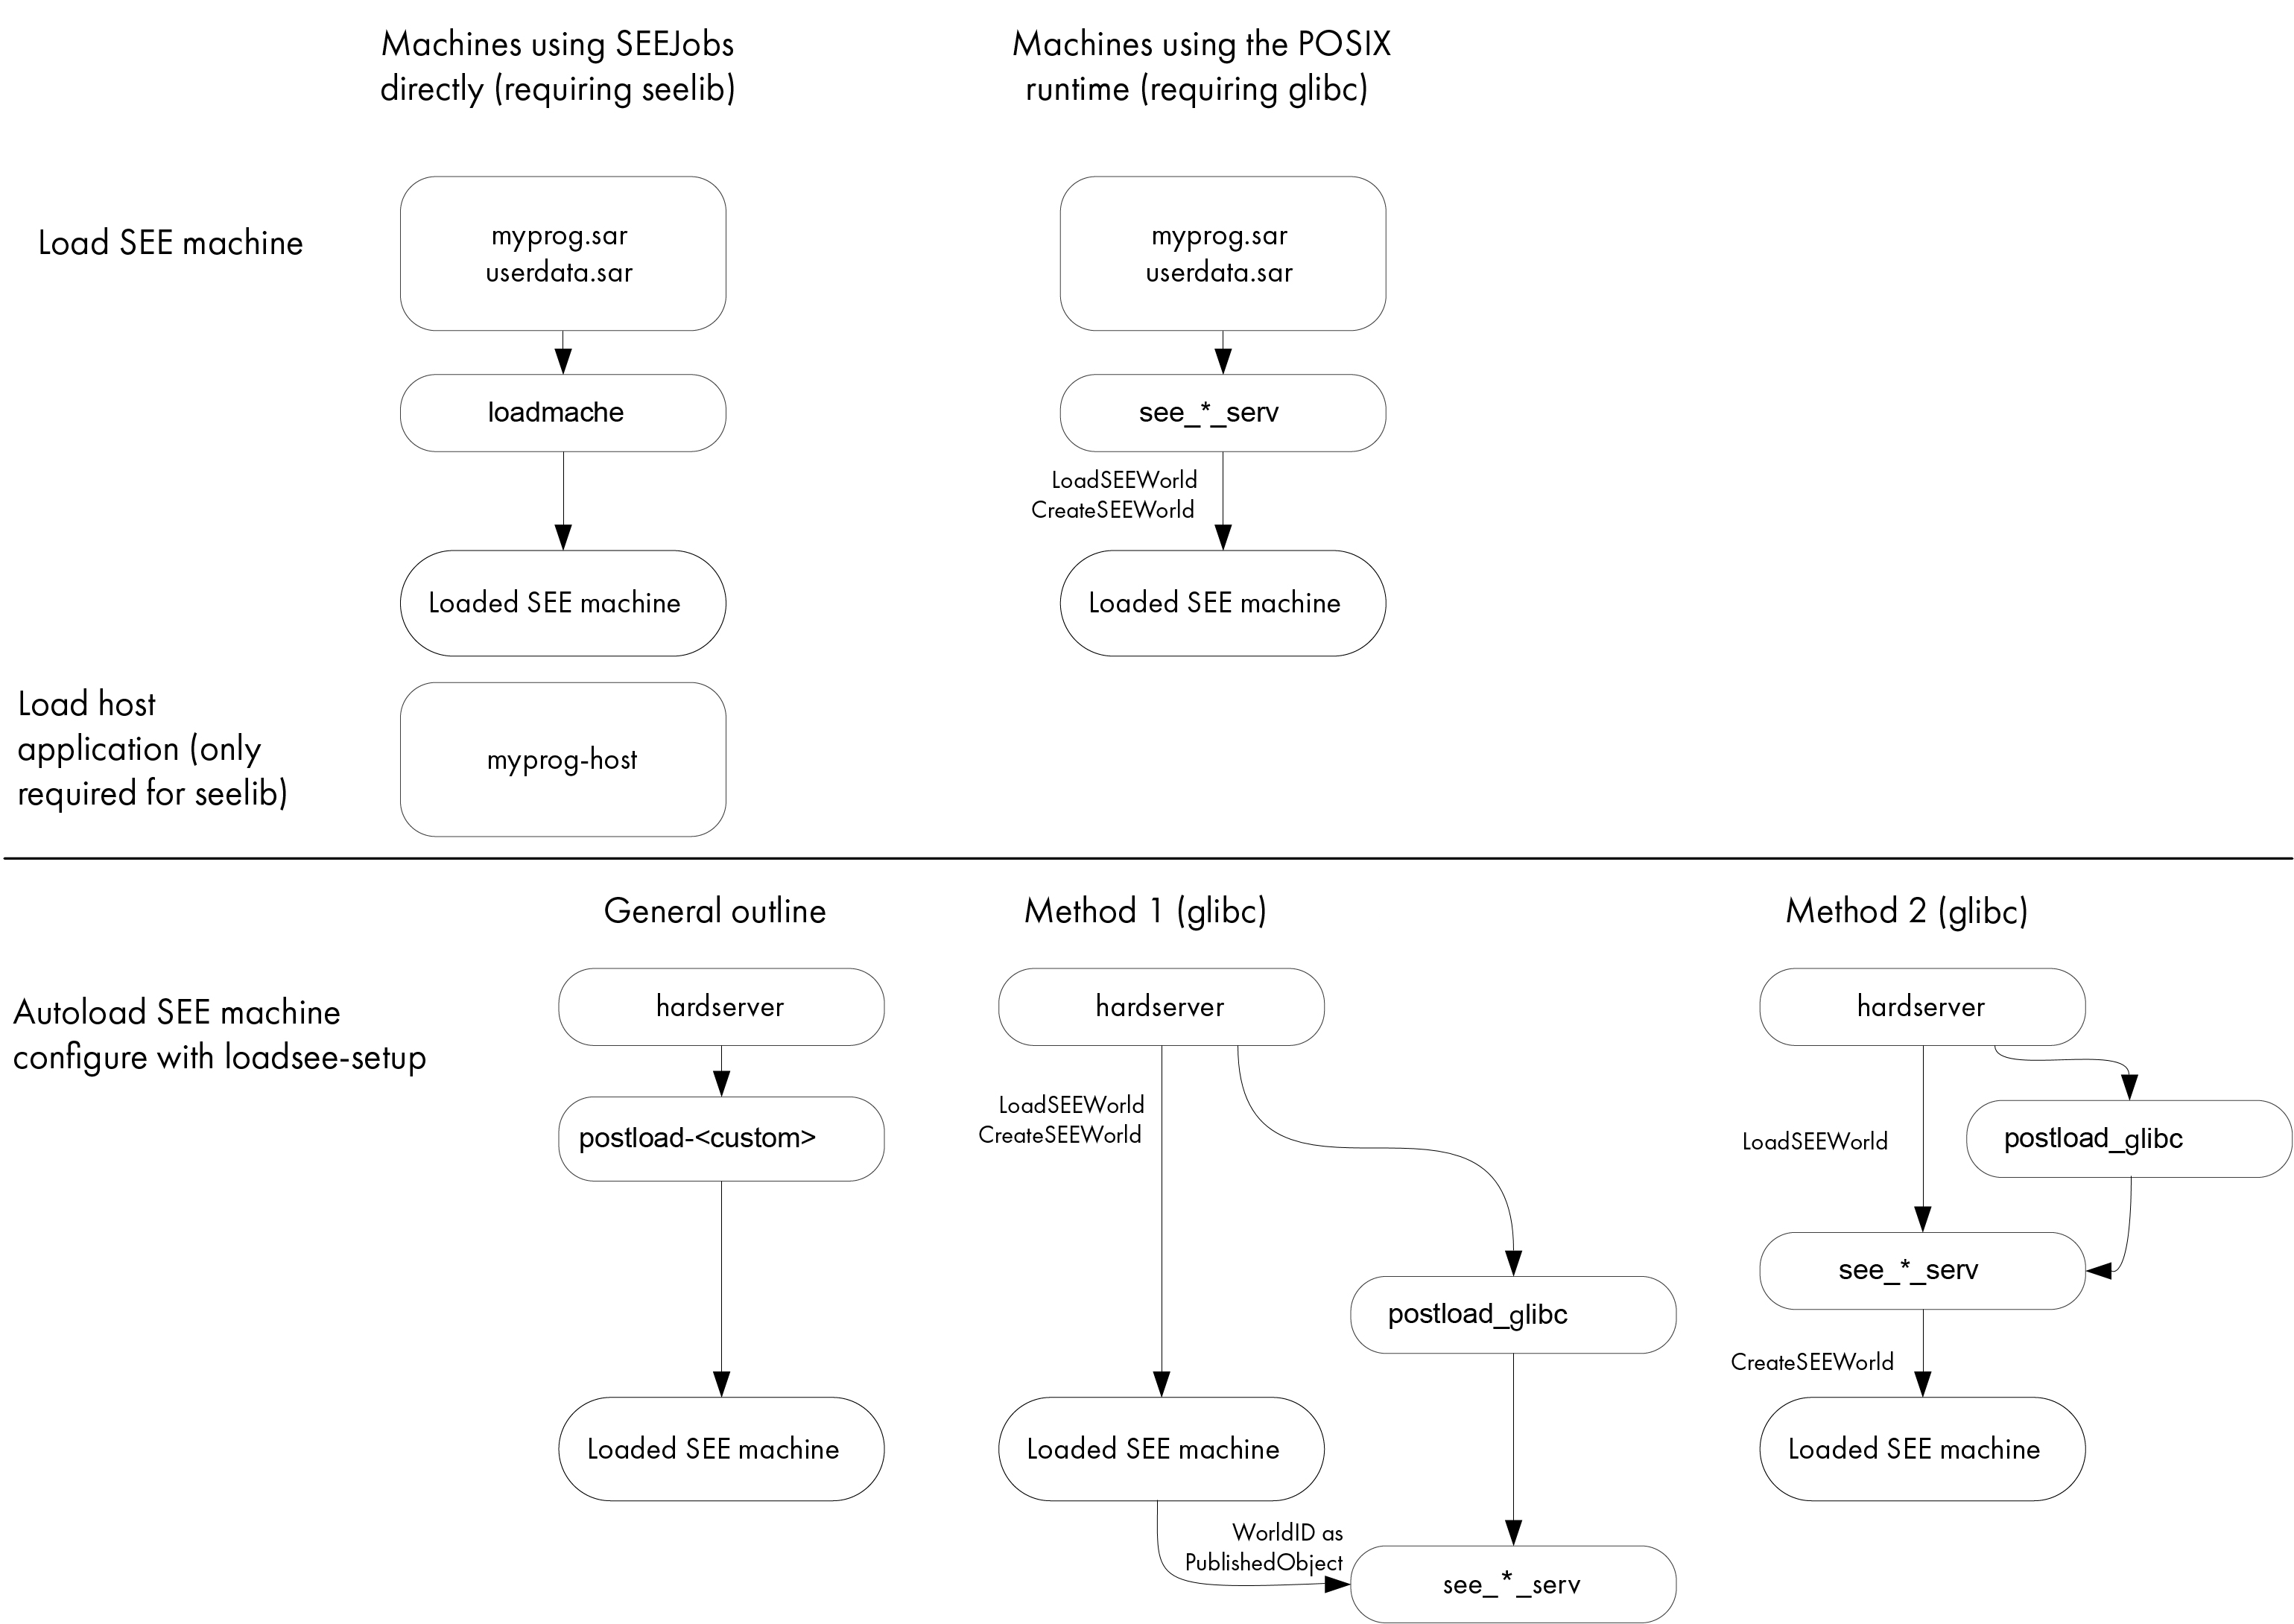
For more information, see Automatically loading a SEE machine.
Writing SEE machines - Solo PCIe
This chapter describes how to write an SEE machine for use on SEE-Ready HSMs.
An SEE machine is an executable binary file of a type appropriate for the HSM that communicates with the nShield core (which runs in kernel mode) using a defined set of software interrupts. These interrupts, and their wrapper functions, provide a run-time environment that includes memory and thread management as well as an interface for accepting and returning jobs and calling nCore API commands.
C source code is compiled using one of the GCC cross-compilers supplied with the CodeSafe Developer Kit. For details of required compiler options, see Example SEE machines and the Makefiles supplied with the examples.
The compiled code can then be signed, packed, and encrypted by using the Trusted Code Tool (tct2 utility) to produce a secure archive; see Utilities.
Designing the bsdlib architecture
We supply the FreeBSD C library bsdlib and system call underlay for use with CodeSafe SEE development.
Internally, bsdlib has three portions:
-
A set of C library functions taken from the 4.6.x FreeBSD distribution
-
A
pthreadsimplementation that allows SEE machines built with thebsdlibarchitecture to be both multithreading and multiplexing (select(2)andpoll(2)are available for multiplexing) -
A subset of the Unix-based system calls, both usable directly and used by the FreeBSD C library, implemented in terms of the SWI to the cryptographic HSM kernel. The provided subset of system calls includes a virtual file system and associated set of input and output devices with which you interact in the standard FreeBSD manner.
Also provided are some link-time plug-ins that extend the virtual file system to provide additional capabilities:
-
hoststdioe.o:stdin,stdout, andstderrfacility hooks;seestream_stdio(7see) -
hoststdoe.o:stdoutandstderrfacility hooks;seestream_stdio(7see) -
hostinetsocks.o: TCP socket facility hooks;seestream_inet(7see) -
coredevrandom.o:/dev/randomfacility hooks;fs_random(7see) -
procfs.o:/procfile system that provides features and flags;fs_proc(7see) -
getrtctime.o: uses the HSM’s secure RTC to callsettimeofdaywhen the machine starts up;time(7see)
The link-time plug-in vulnerability.o is provided for the purposes of debugging (see Vulnerability test harness).
Entrust recommends that you do not link vulnerability.o into a production SEE machine.
|
Host-side utilities for SEE machines using bsdlib
SEE machines that require the standard I/O streams or INET domain sockets must be serviced by an appropriate host-side utility. Without the host-side utility, SEE machine operations requiring any of these streams are blocked until the appropriate service becomes available.
We supply 4 different host-side utilities, all of which have the capability to:
-
Load the SAR file for the SEE machine
-
Load the mandatory
userdatafile -
Provide different combinations of socket and I/O streams
These utilities are described below:
-
see-sock-serv: Use this utility if your SEE machine requires only sockets, and if you want to make use of the CodeSafe Direct feature. (See Configuring the nShield Connect to use CodeSafe Direct for more information about CodeSafe Direct.) -
see-stdoe-serv: Use this utility if your SEE only requires standard output and error streams. -
see-stdioe-serv: Use this utility if your SEE machine requires only standard input, output, and error streams. -
see-stdioesock-serv: Use this utility if your SEE machine requires sockets in addition to standard input, output, and error streams.
Ensure that you select the appropriate utility for your SEE machine, because running a host-side utility with more provisions than the SEE machine was linked against causes the SEE machine to abort.
Generate the mandatory userdata file with the cpioc utility.
This utility takes a collection of files and packs them up into an archive file that the SEE machine can use.
To generate a userdata file, run a command of the form:
cpioc userdata.cpio <MyFile1> <MyFile2> <MyFile3> [...]In this command, <MyFile1>, <MyFile2>, and <MyFile3> represent the files being packed into the userdata.cpio file that is generated by the command.
You can specify as many files as appropriate.
You can also specify one or more directories; the command automatically packs their contents (including any subdirectories) into the generated userdata.cpio file.
Typically, you run the host-side utilities with a command of the form:
see-*-serv --machine <MySEEMachine>.sar --userdata-raw <MyUserdataFile>If the userdata file is signed (see Signing userdata for additional security), then run these host-side utilities with a command of the form:
see-*-serv --machine <MySEEMachine>.sar --userdata-sar <MyUserdataFile>.sar
Although you cannot load an encrypted SEE machine with the see-*-serv utilities, you can use them to start and service a previously loaded encrypted SEE machine.
|
For more detailed information and examples of how to apply these utilities, see Examples for bsdlib library and see-*-serv utilities.
Designing for the SEElib architecture
This section describes how to design SEE machines using the SEElib architecture.
This kind of architecture requires host-side software to create the SEE World and communicate with the HSM.
To start the SEE machine running with a particular SEE userdata, the host application calls the nCore API command CreateSEEWorld.
This command creates an SEE World using data previously loaded into the HSM with the LoadBuffer command from a buffer created with the CreateBuffer command.
See the nCore API Documentation (supplied as HTML) for information about the nCore API commands.
You can also use or adapt the supplied example Java class SEEWorld to initialize the SEE machine.
When the host application calls CreateSEEWorld, the HSM allocates memory for the SEE World and sets up its input and output job queues.
It then runs the SEE machine’s main() function.
The SEE machine’s main() function must:
-
Call
SEElib_init()before any other SEE library function to initialize the SEE library and to check that the HSM is running the expected version of the library -
If the machine accepts
userdata:-
call
SEElib_GetUserDataLento determine the length of the byte block that was passed withCreateSEEWorld -
call
SEElib_ReadUserDatato load the byte block -
determine whether the byte block is valid
-
initialize any required structures
-
-
Start at least one thread which receives and processes commands (this thread must call
SEElib_AwaitJob)The SEElib_StartProcessorThreadsfunction can be used for this purpose. -
Call
SEElib_InitCompleteand return a status.
The status passed to SEElib_InitComplete is returned to the calling application in the reply to CreateSEEWorld. The application can determine the status values, with one exception: if the machine fails before calling SEElib_InitComplete(), the CreateSEEWorld command returns a value of 1 (SEEInitStatus_MachineFailed) in this field.
You should therefore avoid choosing the value 1 to indicate successful initialization
When the application receives the reply to CreateSEEWorld with Status_OK and an acceptable initstatus, it can start to submit jobs with the nCore API command SEEJob.
You can also use or adapt the supplied example Java class SEEJob to submit jobs to the SEE machine.
The SEEJob command takes a byte block, which is passed to the SEElib_AwaitJob function without being interpreted in any way.
It is up to the host application to assemble this byte block and the SEE machine to interpret it.
After the job has been processed, assemble the reply into a byte block and call SEElib_ReturnJob to return it using the nShield core.
The nShield core assembles this byte block into a reply and returns it to the host application.
Provided that the job is returned before the command times out, the reply has the status OK.
The SEE machine must include any necessary status information within the byte block it returns.
The calling application must remember to check this status as well as the status of the SEEJob nCore API function and the transport call, for example NFastApp_Transact().
The SEE machine can call nCore API functions with SEElib_Transact or SEElib_MarshalSendCommand and SEElib_GetUnmarshalResponse.
It may submit these as part of its initialization, before it calls SEElib_InitComplete().
However, if it does not call SEElib_InitComplete() within 30 seconds of start-up, the CreateSEEWorld command returns SEEInitStatus_MachineFailed.
For this reason, you should not perform (for example) lengthy key generation operations during initialization.
SEElib_Transact has syntax equivalent to the NFastApp_Transact function in the C generic stub.
It takes a command structure and returns a reply structure.
SEElib_MarshalSendCommand takes a command structure and submits it.
SEElib_GetUnmarshalResponse reads a response from a buffer and returns a reply structure.
SEElib_StartTransactListener must be called successfully before you use SEElib_Transact to communicate with the nShield core.
|
SEE machines for new algorithms
In addition to being able to perform basic cryptographic operations, any SEE machine that implements an algorithm must also be able to:
-
Generate keys
-
Import keys
-
Store keys as key blobs.
The SEE machine can use the nCore API functions GenerateRandom and GeneratePrime to acquire random numbers and random prime numbers from the HSM’s hardware random number generator.
The SEE machine can perform its own multiprecision arithmetic.
Otherwise, it can use the nCore API BignumOp command to perform multiprecision arithmetic and the ModExp and ModExpCrt commands to perform modular exponentiation.
If you are using keys as session keys, there is no requirement for them ever to be placed in the nShield core. The only time that you need to transfer a key to the core is if you need to create a key blob for long-term storage. However, if you need to keep track of several keys, you may want to make use of the nShield core’s object store rather than having to create a similar structure in your own code.
For an example of how an SEE machine can implement a non-standard algorithm, see A3A8 example.
Key type
The SEE machine stores keys using the random key type.
This is a plain byte block with no structure.
If the key contains several values, for example, exponent and modulus, the SEE machine must implement its own routines for marshalling and unmarshalling the byte block into the correct structure.
SEE machines using standard algorithms do not use the random key type.
Instead, they use standard nCore key types.
|
ACL
The ACL needs to be constructed so that the SEE machine and only the SEE machine can access the key.
To transfer a key from the nShield core to the SEE machine, the key must have the ExportAsPlain flag set in its ACL.
The permission group with ExportAsPlain must be protected by a certifier so that this operation can only be performed by the SEE machine.
Although one obvious solution is to use the key that was used to sign the SEE machine, KInteg, as the certifier, using KInteg in this way means that whoever signed the SEE machine could potentially access any key for this algorithm.
A better solution is to add an extra signature to the SEE machine by using a second key, KAuth. The KInteg signature proves that the code has not changed since it was signed.
The KAuth signature is then used to control access to keys.
You can use the generatekey command-line utility to generates keys for use as KAuth and KInteg by specifying the seeinteg application as a key generation parameter.
The ACL must also have the correct MakeBlob permissions.
If you want to use the standard Security World tools for key management and recovery, the host application can use these tools to create the ACL.
| SEE machines using standard algorithms generally do not need to get the key as plain text in the SEE machine. |
Storage
For long-term storage, the key needs to be encapsulated in a key blob that is protected by the Security World or an OCS. To provide OCS replacement and recovery, you may also require additional key blobs protected by other card sets.
You could write a function where your SEE machine calls MakeBlob and returns the blob to the host.
Alternatively, you could write a method that returns a key ticket and have the host application create the key blobs.
If you are using a Security World, the host application can use nfkm library calls to create and store the key blobs.
Loading stored keys
In general, it is easier for the host application to manage tokens, because it has direct access to the user interface and can prompt the user to insert cards and enter passphrases.
When the token has been loaded, the host application can load the key and pass a key ticket to the SEE machine.
The SEE machine can then redeem the key ticket for a KeyID and use this to access the key.
If you have several keys that are protected by a token, it usually makes sense to pass a ticket for the KeyID of the logical token, rather than passing tickets for each key.
You should also pass in a ticket for the logical token if the host application that loads the token exits afterwards. When it exits, it destroys the logical token’s ID, which invalidates all loaded keys that were using it. Passing the logical token’s ID in to the SEE machine prevents its destruction when the application exits.
Run-time library
We supply a customized C run-time library (librtusr.a) and a corresponding set of header files (in the
include-see/module/rtlib
subdirectory) for programs operating in the SEE environment.
This library contains most commonly used ANSI C functions, with the addition of the following proprietary extensions:
-
Thread creation and control functions documented in
sys/threads.h -
Thread synchronization primitives (events, semaphores, spin-locks), also documented in
sys/threads.h
However, the librtusr.a library excludes:
-
Any file or directory access functions
-
User input functions (for example,
stdinandscanf()) -
Floating-point math library functions (in
math.h), although basic floating-point types and arithmetic are supported -
Time/date and locale-specific functions (
time.h,locale.h).Multiplexing is not available with the rtlib/SEElibruntime library.
Access to the raw (SWI) interface between the SEE machine and the kernel is by means of the SWIcall() function, documented in
sys/swis.h.
The comments in this file are provided mainly for information, because all useful SWIs have C wrapper functions presented in other header files.
See SEElib functions for reference information about bsdlib functions.
Signing userdata for additional security
Signing userdata files can help increase the security of CodeSafe SEE applications.
Both types of SEE machine architecture, using bsdlib and using SEElib, can take advantage of the security benefits offered by signing userdata files.
For example, if your SEE machine is intended to perform some cryptography functions using a given key, it would be advantageous to prevent that key from being accessed by any unauthorized SEE machines.
This can be achieved by signing the userdata file for your SEE machine.
The following diagram illustrates the process of signing an SEE machine’s userdata file.
The following sequence, in which an original SEE machine is represented by machine.sxf and an original userdata file is represented by userdata.bin, demonstrates the process of signing an SEE machine’s userdata file:
-
Create the key
Kseemach of typeseeintegto sign the SEE machine by running a command similar to:generatekey seeinteg plainname=seemach ... -
Create the key
Kuserdata of typeseeintegto sign theuserdataby running a command similar to:generatekey seeinteg plainname=userdata ... -
Run the
generatekeycommand-line utility to create a keyKcrypto (the key with which your SEE machine is to perform its cryptography functions), specifyingKuserdata for itsseeintegname:generatekey simple plainname=crypto --seeintegname=userdata ...This example assumes Kcrypto is being created as a Triple DES key. -
Run the
tct2command-line utility to sign theuserdatafile for your SEE machine with the keyKuserdata, specifyingKseemach as the SEE machine key:tct2 --sign --key=userdata --machine-key-ident=seemach --infile=userdata.bin --outfile=userdata.sarFor information about the tct2command-line utility, see tct2. -
Run the
tct2command-line utility to sign the SEE machine with the keyKseemach:tct2 --sign --key=seemach -- machine-type=PowerPCSXF--is-machine --infile=machine.sxf --outfile=machine.sar
The result of the process demonstrated in this sequence of steps is that no SEE machine can use the key Kcrypto unless at least one of the following conditions is met:
-
It has been signed by the correct
Kseemach and is used in conjunction with the correctuserdatafile -
You make use of the key recovery feature (see the User Guide).
Building your SEE machine and host-side application
The following steps provide an overview of the process you follow to use your application with SEE:
-
If you want to sign or encrypt your application, generate code-signing and confidentiality keys as applicable.
-
Compile and link the host application’s source files using the native compiler on the host. See the diagram in the following step.
-
Compile and link the SEE machine source using the GCC cross compiler. See the following diagram.
-
Run the
elftoolcommand-line utility to convert the compiled SEE machine to SXF format. See Utilities for additional information. -
If required, use the Trusted Code Tool (
tct2) to sign the SEE machine with the code-signing keys. See Utilities for additional information. -
Use the Trusted Code Tool (
tct2) to pack the HSM files and create a SAR file. See Utilities for additional information. You must pack the binary file even if signatures are not required. -
Use the Trusted Code Tool (
tct2) to pack (and, if required, sign with the code-signing keys) theuserdatafile and create a SAR file. You must pack theuserdatafile even if signatures are not required (unless you use one of thesee-*-servhost utilities with the--userdata-rawoption.
-
If required, use the Trusted Code Tool (
tct2) to encrypt theuserdatafile, using the confidentiality key. See Utilities for additional information. -
Place the
userdataSAR file and the host application in an appropriate location to be used at runtime. -
For SEE machines using the
SEElibarchitecture,userdatafile can either be either loaded automatically or can be loaded by running theloadmachecommand-line utility.For SEE machines that require support from a host-side
see-*-servutility, the host utility loads theuserdatafile automatically.The following diagram shows these different methods for loading an SEE machine.

For more information, see Automatically loading an SEE machine.