Checking and changing the mode on an nShield Solo module
This appendix tells you how to check and change the mode on an nShield Solo module. You must change the mode to perform certain maintenance and configuration tasks.
nShield Solo back panel and jumper switches
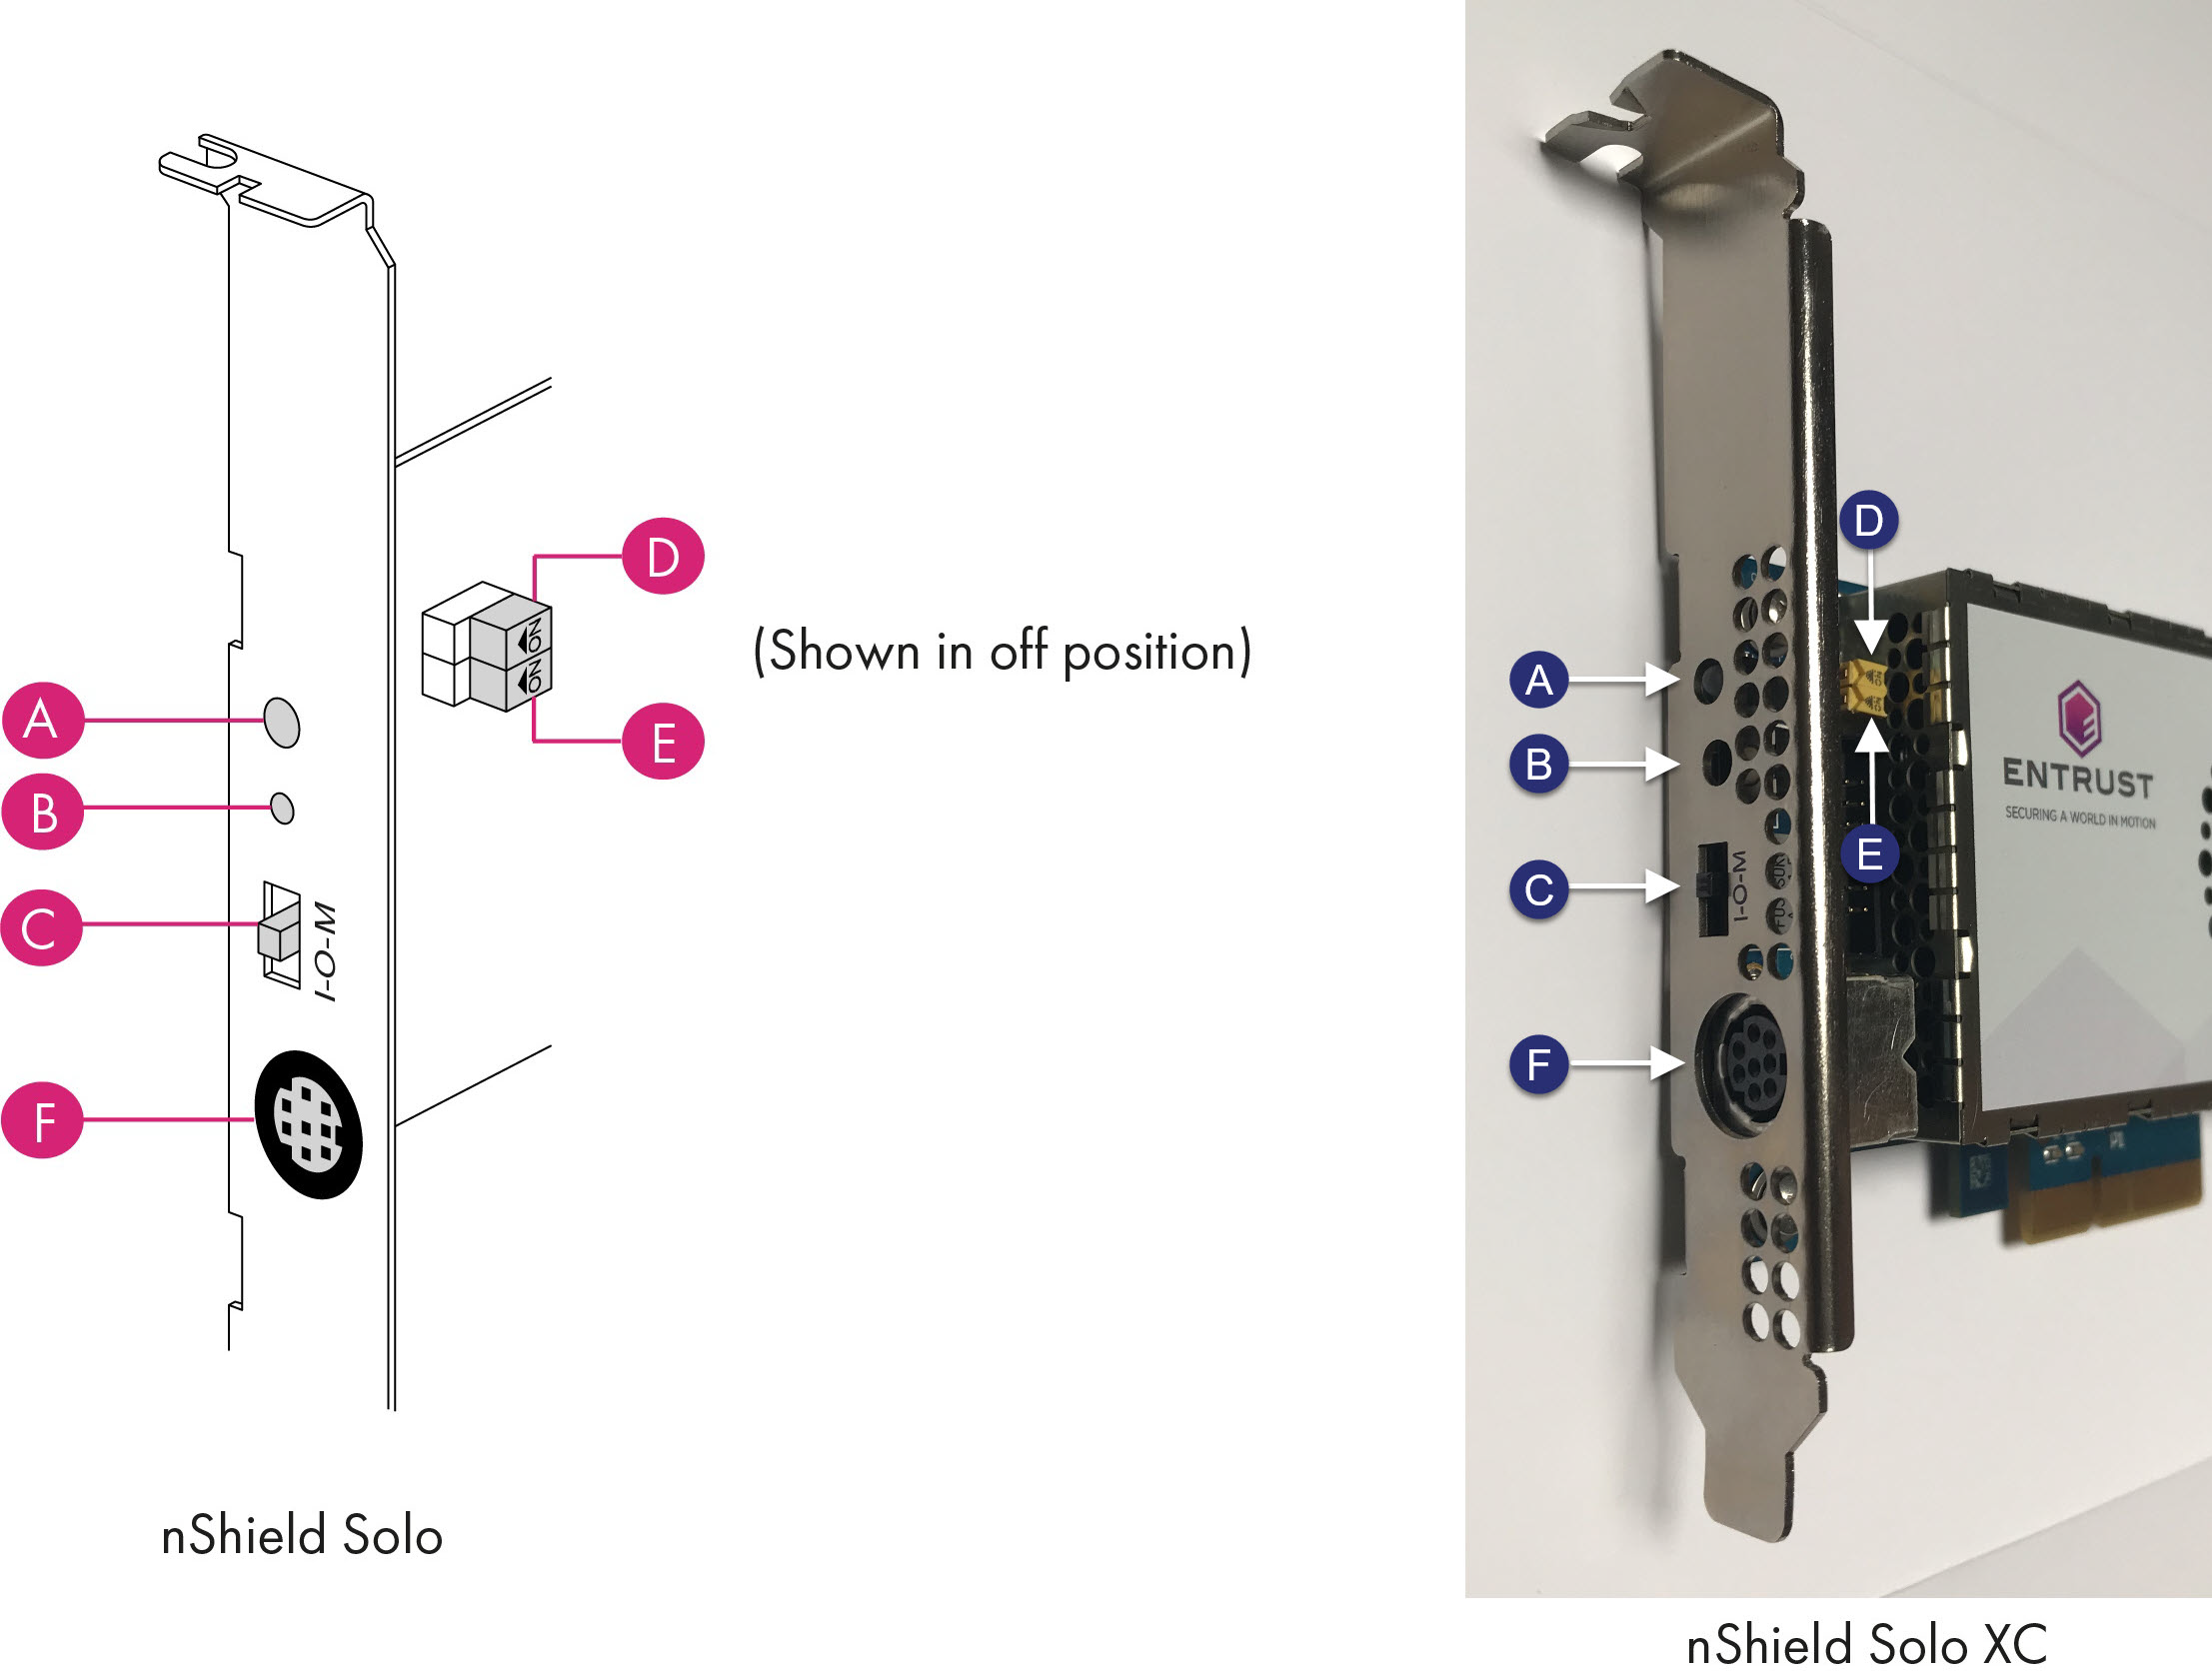
| Label | Description |
|---|---|
A |
Status LED |
B |
Recessed reset button |
C |
Physical mode switch |
D |
Physical mode override jumper switch, in the off position. When set to on, the mode switch (C) is deactivated. See Override switches for further information. |
E |
Remote Administration override jumper switch, in the off position. When set to on, remote mode switching is disabled. See Override switches for further information. |
F |
Smart card connector, 8 Pole Female Mini-DIN connector on nShield PCIe module. |
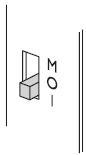
Physical mode switch
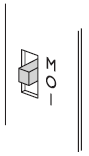
The physical mode switch on the back panel of an nShield Solo, as shown above and as 'C' in nShield Solo back panel and jumper switches enables you to select the mode on the module itself.
Available modes
The physical mode switch can be set to one of three positions:
-
Maintenance
-
Sets the module to start in pre-maintenance mode
-
Allows you to upgrade the firmware of the module
-
-
Operational
-
The default setting for day-to-day use
-
-
Initialization
-
Sets the module to start in pre-initialization mode
-
Allows you to use the module to create a Security World or add the module to an existing one
-
Once you have selected a mode, the module needs to be reset before the mode is actually changed. See Changing the mode for more about using the physical mode switch and resetting the module.
| If the Physical mode override jumper switch ('D' in nShield Solo back panel and jumper switches) is set to on, the mode is set to Operational (O) and you cannot change it using the physical mode switch. See Override switches for more about the Physical mode override jumper switch. You may, however, still be able to change the mode using the commanded mode switch. See Remote mode switch |
Remote mode switch
The Remote mode switch enables you to change the mode of an nShield Solo from a computer using the nopclearfail command, without accessing the back panel of the module.
Available commands
You can use the following commands to change the mode of a module:
| Command | Resulting mode |
|---|---|
|
Pre-maintenance |
|
Operational |
|
Pre-initialization |
Limitations
A privileged user can only change the mode of a nShield Solo using the remote mode switch according to the following:
-
The physical mode switch must be set to Operational (O) to be able to use the remote mode switch to change the mode.
-
If the module is physically set to either Maintenance (M) or Initialization (I), the remote mode switch has no effect, once the module has been reset following the
nopclearfailcommand.
-
-
If the physical mode override jumper switch ('D' in nShield Solo back panel and jumper switches) is set to on, the module behaves as if the physical mode switch is set to Operational (O) and the remote mode switch can be used to change the mode.
-
If the remote mode override jumper switch ('E' in nShield Solo back panel and jumper switches) is set to on, the remote mode switch cannot be used.
The following table summarizes the resulting module modes when using the remote mode switch, taking into account the physical mode switch and physical mode override jumper switch settings.
Command |
Physical jumper off (D) |
Physical jumper on (D) |
||
|---|---|---|---|---|
Physical mode switch position |
||||
M |
O |
I |
||
|
M |
M |
I |
M |
|
M |
O |
I |
O |
|
M |
I |
I |
I |
For you to be able to use the remote mode switch, the nShield Solo must be running 2.61.2 firmware or later. Otherwise the module responds with:
Module 1, command ClearUnitEx: HostDeviceDriverNotSupported
 -- device driver does not support software mode changes
See Changing the mode for more about using the remote mode switch. See Override switches for more about the remote mode override jumper switch.
Override switches
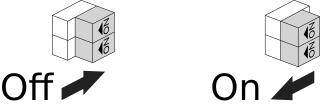
As shown in nShield Solo back panel and jumper switches
-
Switch 'D', the physical mode override jumper switch, deactivates the physical mode switch
-
Switch 'E', the command mode override jumper switch, deactivates the commanded mode switch
See the Installation Guide for more about accessing and setting a mode override jumper switch to off or on.
Changing the mode
Putting a module into pre-initialization mode using the physical mode switch
Do the following:
-
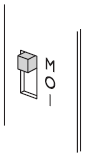
Switch the physical mode switch on the back panel of the module to the initialization (I) position, as shown below:
-
Reset the module by doing one of the following:
-
Press the
Recessed reset button('B' in nShield Solo back panel and jumper switches or: -
Run the
nopclearfail‑‑clear‑‑allcommand.
-
The module performs self-tests, during which the Status LED is lit continuously.
| If the Status LED remains on continuously for more than a minute, the module self tests have resulted in a terminal failure. Contact Support. |
When the self-tests are complete, the unit normally enters pre‑initialization mode. In this mode, the Status LED flashes a series of single short pulses.
See Status indications for more about Status LED codes.
You can use the enquiry command-line utility to check that the module is in the pre‑initialization mode.
After the module has been put into pre‑initialization mode, it is ready to be initialized.
It enters initialization mode when it receives an initialization command (for example, when you run the new-world command-line utility).
Putting a module into pre-initialization mode using the commanded mode switch
| See Limitations for more about the conditions that are required to use the commanded mode switch. Do the following: |
-
Run the
nopclearfail --initialization | -Icommand.When finished, the system responds with
OK.The system responds with OK, regardless of whether the module has been changed to the pre-initialization mode or not. To confirm that state of the module, do the following: -
Run the
enquirycommand.
Themodeline of theModulesection displays the current mode.
Putting a module into pre-maintenance mode using the physical mode switch
Only put a module into pre‑maintenance mode if you need to upgrade module firmware. Do the following:
-
Switch the physical mode switch on the module’s back panel to the maintenance (M) position, as shown below:
-
Reset the module by doing one of the following:
-
Press the
Recessed reset button('B' in nShield Solo back panel and jumper switches or: -
Run the
nopclearfail‑‑clear‑‑allcommand.
-
The module performs self-tests, during which the Status LED is lit continuously.
| If the Status LED remains on continuously for more than a minute, the module self tests have resulted in a terminal failure. Contact Support. |
When the self-tests are complete, the unit normally enters pre‑maintenance mode. In this mode, the Status LED flashes a series of long pulses.
See Status indications for more about Status LED codes.
You can use the enquiry command-line utility to check that the module is in the pre‑maintenance mode.
After the module has been put into pre‑maintenance mode, it is ready for maintenance.
It enters maintenance mode when it receives a Maintenance command (for example, when you run the loadrom command-line utility).
Putting a module into pre-maintenance mode using the commanded mode switch
| See Limitations for more about the conditions that are required to use the commanded mode switch. Do the following: |
-
Run the
nopclearfail --maintenance | -Mcommand.
When finished, the system responds withOK.The system responds with OK, regardless of whether the module has been changed to the pre-maintenance mode or not. To confirm that state of the module, do the following: -
Run the
enquirycommand.
Themodeline of theModulesection displays the current mode.
Putting a module into operational mode using the physical mode switch
Do the following:
-
Switch the physical mode switch on the module’s back panel to the operational (O) position, as shown below:
-
Reset the module by doing one of the following:
-
Press the
Recessed reset button('B' in nShield Solo back panel and jumper switches or: -
Run the
nopclearfail‑‑clear‑‑allcommand. The module performs self-tests, during which the Status LED is lit continuously.
-
| If the Status LED remains on continuously for more than a minute, the module self tests have resulted in a terminal failure. Contact Support. |
When the self-tests are complete, the unit normally enters operational mode and ready to accept commands.
In operational mode, the Status LED is mainly on, but blinks off briefly at regular intervals.
See Status indications for more about Status LED codes.
Putting a module into operational mode using the commanded mode switch
| See Limitations for more about the conditions that are required to use the commanded mode switch. Do the following: |
-
Run the
nopclearfail --operational | -Ocommand.When finished, the system responds with
OK.The system responds with OK, regardless of whether the module has been changed to the pre-maintenance mode or not. To confirm that state of the module, do the following: -
Run the
enquirycommand.The
modeline of theModulesection displays the current mode.
Status indications
The following table explains the codes displayed by the Status LED.
| LED | Mode | Reason |
|---|---|---|
Mainly on but regularly blinks off (The exact timing depends on the nShield module. The longer the LED stays on the less the load. At 100% load the LED is off for as long as it is on.) |
Operational |
The Mode switch is in the operational position or the Mode override jumper switch is on. See the nShield Solo Installation Guide for more about accessing the Mode override jumper switch and setting it to off. |
Emits repeated short flashes |
Pre-initialization |
The Mode switch is in the initialization position. |
Emits repeated long flashes |
Pre-maintenance |
The Mode switch is in the maintenance position. |
Flashes the Morse SOS pattern followed by a code |
Error |
The module has encountered an unrecoverable error. See Morse code error messages for more about these errors. |