C tutorial
Overview
This overview section provides a description of how to achieve two fundamental nCore API programming tasks: connecting to the hardserver and transacting a command. These two tasks are common to almost all cryptographic applications. The rest of this chapter works through a simple example of a basic cryptographic application.
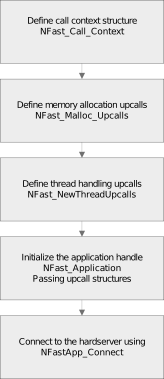
All applications that require nCore functionality first need to create a connection to a hardserver running on an nShield module. The following diagram illustrates the steps required to create a connection to a hardserver running on Entrust hardware:
When connected to the hardserver, an application can send an M_Command to a module.
The module processes the command and then returns the results along with any relevant error and status codes.
The following diagram illustrates the process of transacting a cryptographic operation with the module:

The M_Reply structure contains the results of the operation and an M_Status message that indicates the outcome of the operation.
If a problem was encountered, the M_Status value gives an indication of what went wrong.
The M_Reply contains the results of the command, for example, a key handle or the bytes of an encrypted file.
nCore API functionality used in this tutorial
This tutorial uses the following libraries from the nCore API.
You may find it useful to familiarize yourself with these libraries by reading the API documentation, which is located at <nfast_dir>/document/ncore/html/index.html.
-
nfkm.hThis library provides Security World functionality, for example, card-loading libraries, key-generation, and key-loading.
-
nfinttypes.hThis library is a utility library that provides standard integer types.
-
nffile.hThis library is a utility library that provides file manipulation functionality.
-
simplebignum.hThis library is a utility implementation of bignum functionality.
-
ncthread-upcalls.hThis library is a thread-handling library.
-
rqcard-applic.hThis library is a card-loading library.
-
rqcard-fips.hThis library is a card-loading library for use in a FIPS 140‑2 Level 3 (Federal Information Processing Standards) environment.
Variables used in this tutorial
The following table lists and describes the variables used in this tutorial. Throughout this tutorial you may wish to refer to this table. You may also find it useful to consult the API documentation of the listed types.
| Variable Name | Variable Type | Description |
|---|---|---|
|
|
Status code returned by operations |
|
|
Information about a Security World |
|
|
The application handle |
|
|
Used to initialize the application |
|
|
The connection to a hardserver |
|
|
Contains information about the module being used |
|
|
The name of the key |
|
|
Information about the key |
|
|
The key loaded into the module |
|
|
The card set loaded into the module |
|
|
The cryptographic key type, for example, KeyType_DSA |
|
|
The encryption mechanism used, for example, Mech_DSA |
|
|
The marshaled signature |
|
|
The initialization vector |
|
|
The command sent to module |
|
|
The reply returned by the module |
|
|
The ID of the channel used for streaming |
|
|
The card-loader handle |
|
|
The card-loader handle used in a FIPS 140‑2 Level 3 environment |
Before connecting to the hardserver
The nCore API provides mechanisms that allow you to control how threading, memory allocation, and numbers larger than the available C data types are handled, through an upcall mechanism. Specifying these upcalls is optional. Also optional is the call context structure, which can contain any contextual information that your application might require to keep track of. If you define your own upcalls and call context they must be supplied as arguments when initializing a handle to the hardserver.
Declaring a call context
Many nCore functions take a call context argument, cctx or ctx, which is passed on to upcalls.
The call context structure can be used for any purpose required by an application.
For example, the call context could identify an application thread.
The following code shows an example declaration of a call context structure:
struct NFast_Call_Context {
  int notused;
};
Declaring memory allocation upcalls
By default the nCore API manages memory by using the standard C library functions malloc, realloc, and free. To customize memory management, define a collection of memory allocation upcalls and pass this collection when initializing the application handle.
For example, a heavily threaded application may allocate memory per thread, and have separate application handles per thread, to avoid contention.
In this code example the memory allocation upcalls re-direct back to the default memory application functions.
The call context cctx and the transaction context tctx can contain any context information required by your application.
const NFast_MallocUpcalls mallocupcalls = {
  local_malloc,
  local_realloc,
  local_free
};
static void *local_malloc(size_t nbytes,
    struct NFast_Call_Context *cctx,
    struct NFast_Transaction_Context *tctx) {
  return malloc(nbytes);
}
static void *local_realloc(void *ptr,
    size_t nbytes,
    struct NFast_Call_Context *cctx,
    struct NFast_Transaction_Context *tctx) {
  return realloc(ptr, nbytes);
}
static void local_free(void *ptr,
    struct NFast_Call_Context *cctx,
    struct NFast_Transaction_Context *tctx) {
  free(ptr);
}
Declaring threading upcalls
ncthread_upcalls provides a mechanism to specify how threads are implemented on the target platform.
If an application needs to use a non-native thread model then the application can either:
-
fill in an
nf_thread_upcallsstructure with suitable upcalls and optionally write a translation functionxlate_cctx_to_ncthread() -
or fill in an
NFast_ThreadUpcallsstructure, and useNFAPP_IF_THREADin the code example below instead ofNFAPP_IF_NEWTHREAD.
const NFast_NewThreadUpcalls newthreadupcalls = {
  &ncthread_upcalls,
  xlate_cctx_to_ncthread
};
static void xlate_cctx_to_ncthread(NFast_AppHandle app,
   struct NFast_Call_Context *cc,
   struct nf_lock_cctx **lcc_r) {
  *lcc_r = 0;
}
Initializing the nFast application handle
The hardserver application handle is the main access point to nCore functionality. The following code specifies the application initialization arguments and initializes the application handle. The flags sent to the application initialization function in the following code example are:
-
NFAPP_IF_MALLOCindicates that an application is setting its own memory allocation upcalls -
NFAPP_IF_BIGNUMis necessary for anybignumoperations to work. The following code example usessimplebignumupcalls -
One of
NFAPP_IF_NEWTHREADorNFAST_IF_THREADis required in threaded applications. This code example does not perform any multi-threaded operations but the setting are included anyway for the purposes of the example.
memset(&app_init_args, 0, sizeof app_init_args);
app_init_args.flags = NFAPP_IF_MALLOC|NFAPP_IF_BIGNUM|NFAPP_IF_NEWTHREAD;
app_init_args.mallocupcalls = &mallocupcalls;
app_init_args.bignumupcalls = &sbn_upcalls;
app_init_args.newthreadupcalls = &newthreadupcalls;

rc = NFastApp_InitEx(&app, &app_init_args, cctx);
Connecting to the hardserver
Now that application handle is initialized, create a connection to the hardserver, as shown in the following code example.
The NFastApp_Connect() automatically determines whether to use pipes, local sockets, or TCP sockets, as appropriate.
rc = NFastApp_Connect(app, &conn, 0, cctx);
if(rc) {
  NFast_Perror("error calling NFastApp_Connect", rc);
  goto cleanup;
}
Getting Security World information
The following code reads in the Security World information that is associated with the application handle. An application handle will only ever be associated with a single Security World, which consists of one or more modules.
rc = NFKM_getinfo(app, &worldinfo, cctx);
if(rc) {
  NFast_Perror("error calling NFKM_getinfo", rc);
  goto cleanup;
}
Setting up the authorization mechanism
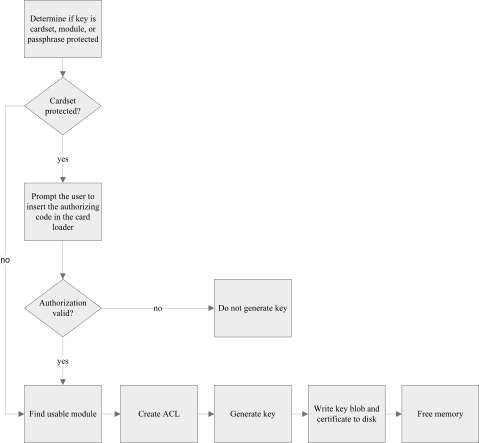
The nCore API supports three types of key protection:
-
module protection
-
pass phrase protection
-
card set protection.
The following three code examples demonstrate how to set up an application to use card set protection.
Initializing the card-loading libraries
The following code initializes the card-loading libraries, which are used later in the example. Card-loading libraries are bound to a single connection and to a single Security World.
rc = RQCard_init(&rqcard, app, conn, worldinfo, cctx);
if(rc) {
  NFast_Perror("error calling RQCard_init", rc);
  goto cleanup;
}
rqcard_initialized = 1;
Obtaining additional FIPS authorization
FIPS 140-2 Level 3 mode requires authorization for key-generation, which can be obtained from either an Operator Card or an Administrator Card. The following code initializes the FIPS 140-2 Level 3 code library, which seeks FIPS 140-2 Level 3 authorization when this is required:
rc = RQCard_fips_init(&rqcard, &rqcard_fips);
if(rc) {
  NFast_Perror("error calling RQCard_fips_init", rc);
  goto cleanup;
}
rqcard_fips_initialized = 1;
Selecting a user interface
The following code selects the default user interface for the platform on which the example is running. The user interface will be displayed to the user when authorization is required to perform an operation.
rc = RQCard_ui_default(&rqcard);
if(rc) {
  NFast_Perror("error calling RQCard_ui_default", rc);
  goto cleanup;
}
Generating a symmetric key
This section describes the key-generation process in detail. The process of generating a symmetric key differs slightly from the process of generating an asymmetric key, so each is described in a separate section. There is some repetition in the two sections.
This section does not explain how to use softcards to protect keys.
Softcards can be listed with NFKM_listsoftcards() and loaded with NFKM_loadsoftcard(). For more information about using softcards, see the information about nfkm.h in the nCore API documentation.
|
The following diagram illustrates the key-generation process:
The code in this section makes use of the following variables:
| Variable Name | Variable Type | Description |
|---|---|---|
|
|
Used to construct ACLs |
|
|
Used when making blobs |
|
|
Information about a key |
|
|
The module to use |
|
|
A certificate from a module |
|
|
FIPS authorization |
|
|
A loaded card set |
|
|
Information about a card set |
|
|
The ID of a module |
|
|
A hash of a card set |
|
|
A command return code |
|
|
A command structure |
|
|
A command reply |
Obtaining authorization and selecting a module
Keys are generated on a specific module and protected by some form of authorization. When a key is generated the type of authorization that is required to use the key is defined, as well as the purposes for which the key is allowed to be used, for example, only for encryption and decryption, or only for signing and verification.
Using card set protection
The following code prompts the user to provide a card to protect the key that will be generated.
The card set hash populates cardhash when the card-loader completes.
rc = RQCard_logic_ocs_anyone(rqcard, &cardhash,
                             "Insert a card set to protect the new key");
if(rc) {
  NFast_Perror("error calling RQCard_logic_ocs_anyone", rc);
  goto cleanup;
}
Selecting a Security World module
Now that authorization has been obtained, prompt the user to select a module in the Security World on which to generate the key.
Alternatively you could use the RQCard_whichmodule_specific() function to dictate which module will be used, or the NFKM_getusablemodule() function to use the first available module.
The module ID and a key ID for the desired card set on that module are assigned to the moduleid and ltid variables when the card-loader completes.
rc = RQCard_whichmodule_anyone(rqcard, &moduleid, <id);
if(rc) {
NFast_Perror("error calling RQCard_whichmodule_anyone", rc);
goto cleanup;
}
rc = rqcard->uf->eventloop(rqcard);
if(rc) {
NFast_Perror("error running card loader", rc);
goto cleanup;
}The moduleid, id, and ltid variables are now populated.
Next, populate the moduleinfo variable for the chosen module, and create a card set handle.
for(n = 0; n < worldinfo->n_modules; ++n)
  if(worldinfo->modules[n]->module == moduleid)
    break;
assert(n < worldinfo->n_modules);
moduleinfo = worldinfo->modules[n];

rc = NFKM_findcardset(app, &cardhash, &cardset, cctx);
if(rc) {
  NFast_Perror("error calling NFKM_findcardset", rc);
  goto cleanup;
}| Up to now in this example the application has performed actions common to generating either a symmetric key or an asymmetric key. The process from here on differs depending on which key type is generated. |
Preparing the key-generation command and ACL
Start by setting up some command parameters based on the information we have already gathered.
command.cmd = Cmd_GenerateKeyPair;
command.args.generatekey.params.type = keytype;
command.args.generatekey.flags = Cmd_GenerateKey_Args_flags_Certify;
command.args.generatekey.module = moduleinfo->module;
Keys are stored with an ACL, which defines which entities can perform operations with the key.
The next step is to populate the acl_params variable with the information needed to create the ACL that will be stored in the key blob along with the key we generate.
In this example the application sets the acl_params.f flags parameter to enable key recovery and specify the type of key protection to use.
There are three options:
-
card set protection
-
module protection
-
pass phrase protection.
This following code demonstrates how to indicate that a key should be protected by a card set. In this case, the card set is the one selected earlier by the user in Selecting a Security World module.
acl_params.f = NFKM_NKF_RecoveryEnabled|protection;
acl_params.cs = cardset;
The make ACL blob flags (acl_params.f) parameter must be same as the make blob flags parameter (blob_params.f), so is set accordingly.
blob_params.f = acl_params.f;The next step is to define in the ACL for which operations the key is allowed to be used. In this example, the application specifies that the key can be used to sign, verify, encrypt, or decrypt.
acl_params.op_base = (NFKM_DEFOPPERMS_SIGN
              |NFKM_DEFOPPERMS_VERIFY
              |NFKM_DEFOPPERMS_ENCRYPT
              |NFKM_DEFOPPERMS_DECRYPT);
The application is now ready to generate the ACL:
rc = NFKM_newkey_makeaclx(app, conn, worldinfo, &acl_params,
                              &command.args.generatekey.acl, cctx);
The following code sets up further generate key command parameters. The parameters that are required differ according to key type. For example, if an application is generating a Rijndael key, you need to specify the length of the key required, in bytes:
command.args.generatekey.params.params.random.lenbytes = 128/8;Generating a key in a FIPS140-2 Level 3 environment requires that an application obtains authorization (in this case, card set authorization) before attempting to generate a key. It is possible that the card loader has already obtained the necessary authorization from a prior card-loading operation. In this case, the following call will retrieve this authorization:
rc = RQCard_fips_get(rqcard_fips, moduleinfo->module, &fips140authhandle,
                     0);
If this call returns Status_RQCardMustContinue, an application must explicitly attempt to obtain the correct authorization as follows:
rc = RQCard_fips_logic(rqcard);
if(rc) {
  NFast_Perror("error calling RQCard_fips_logic", rc);
  goto cleanup;
}
rc = RQCard_whichmodule_specific(rqcard, moduleinfo->module, 0);
if(rc) {
  NFast_Perror("error calling RQCard_whichmodule_anyone", rc);
  goto cleanup;
}
rc = rqcard->uf->eventloop(rqcard);
if(rc) {


  NFast_Perror("error running card loader", rc);
  goto cleanup;
}
rc = RQCard_fips_get(rqcard_fips, moduleinfo->module, &fips140authhandle,
                      0);
Now that the application has obtained the necessary FIPS 140-2 Level 3 authorization (or cancelled the operation if the correct authorization could not be obtained), it can use the authorization to authorize the creation of the key.
rc = NFKM_newkey_makeauth(app, worldinfo, &command.flags, &command.certs,
                          fips140authhandle, cctx);
if(rc) {
  NFast_Perror("error calling NFKM_newkey_makeauth", rc);
  goto cleanup;
}
With or without FIPS authorization, the application has now obtained all the information necessary to transact a key-generation operation, so is now ready to send the key-generation command to the selected module. The reply is checked using the reply checking utility function mentioned at the beginning of the chapter.
rc = NFastApp_Transact(conn, cctx, &command, &reply, 0);
rc = check_reply(rc, &reply, "error generating new key");
if(rc)
  goto cleanup;
The application has now generated a new key, but as yet the key exists only in the module’s memory.
Next, construct an NFKM_Key key information structure (keyinfo) and then save it to disk.
keyinfo->v = 8;
keyinfo->appname = keyident.appname;
keyinfo->ident = keyident.ident;
time(&keyinfo->gentime);
The next step is to populate the parameters of the blob_params structure, which contains the information that is to be written to the key blob.
The following code also checks that a key-generation certificate was included in the reply.
The NFKM_MakeBlobsParams flags blob_params.f must be the same as the flags passed to NFKM_newkey_makeaclx() when the application created the private ACL.
mc = 0;
blob_params.kpriv = reply.reply.generatekey.key;
if(reply.reply.generatekey.flags & Cmd_GenerateKey_Reply_flags_cert_present)
  mc = reply.reply.generatekey.cert;
if(cardset) {

  blob_params.lt = ltid;
  blob_params.cs = cardset;
}
blob_params.fips = fips140authhandle;
The parameters required for the NFKM_newkey_makeblobsx() are now populated, and the application is ready to create the key blob.
As this is a symmetric key type the application need only save a private key blob.
rc = NFKM_newkey_makeblobsx(app, conn, worldinfo, &blob_params, keyinfo, cctx);
if(rc) {
  NFast_Perror("error calling NFKM_newkey_makeblobsx", rc);
  goto cleanup;
}
if(mc) {
  rc = NFKM_newkey_writecert(app, conn, moduleinfo, blob_params.kpriv, mc,
                            keyinfo, cctx);
  if(rc) {
    NFast_Perror("error calling NFKM_newkey_writecert", rc);
    goto cleanup;
 }
}
The keyinfo structure is now ready to be saved to disk.
rc = NFKM_recordkey(app, keyinfo, cctx);
if(rc) {
  NFast_Perror("error calling NFKM_recordkey", rc);
  goto cleanup;
}
rc = Status_OK;
Freeing memory
The final part of the key-generation process is the important step of unloading the key information in the module.
NFastApp_FreeACL(app, cctx, 0, &command.args.generatekey.acl);
NFKM_cmd_destroy(app, conn, 0, reply.reply.generatekey.key,
                 "generatekey.key", cctx);
if(ltid) NFKM_cmd_destroy(app, conn, 0, ltid, "ltid", cctx);
If you are running your application in FIPS 140-2 Level 3 mode, NFKM_newkey_makeauth() creates a certificate list, which also needs to be freed:
if(command.flags & Command_flags_certs_present)
   NFastApp_Free_CertificateList(app, cctx, 0, command.certs);

NFastApp_Free_Reply(app, cctx, 0, &reply);
keyinfo->appname = 0;
keyinfo->ident = 0;
NFKM_freekey(app, keyinfo, cctx);
NFKM_freecardset(app, cardset, cctx);
This concludes the explanation of symmetric key-generation. The next section describes the process of generating asymmetric keys.
Generating an asymmetric key
This section describes the asymmetric key-generation process in detail. The process of generating a symmetric key differs slightly from the process of generating an asymmetric key, so each is described in a separate section. There is some repetition in the two sections.
This section does not explain how to use softcards to protect keys.
Softcards can be listed with NFKM_listsoftcards() and loaded with NFKM_loadsoftcard(). See the nCore API documentation of nfkm.h for more information about using softcards.
|
The following diagram illustrates the key-generation process:

The following diagram illustrates how the programming environment architecture stores generated asymmetric keys. See nCore architecture for more information about the programming environment architecture.

The code in this section makes use of the following variables:
| Variable Name | Variable Type | Description |
|---|---|---|
|
|
Used to construct ACLs |
|
|
Used when making blobs |
|
|
Information about a key |
|
|
The module to use |
|
|
A certificate from a module |
|
|
FIPS authorization |
|
|
A loaded card set |
|
|
Information about a card set |
|
|
The ID of a module |
|
|
A hash of a card set |
|
|
A command return code |
|
|
A command structure |
|
|
A command reply |
Obtaining authorization and selecting a module
Keys are generated on a specific module and protected by some form of authorization. When a key is generated the type of authorization that is required to use the key is defined, as well as the purposes for which the key is allowed to be used, for example, only for encryption and decryption, or only for signing and verification.
Using card set protection
Proper authorization is required to generate a key.
This example handles card set authorization.
The following code prompts the user to provide a card to protect the key that is to be generated.
The card set hash populates cardhash when the card-loader completes.
rc = RQCard_logic_ocs_anyone(rqcard, &cardhash,
                             "Insert a cardset to protect the new key");
if(rc) {
  NFast_Perror("error calling RQCard_logic_ocs_anyone", rc);
  goto cleanup;
}
Selecting a Security World module
Now that authorization has been obtained, prompt the user to select a module in the Security World on which to generate the key.
Alternatively you could use the RQCard_whichmodule_specific() function to dictate which module to use or the NFKM_getusablemodule() function to use the first available module.
The module ID and a key ID for the desired card set on that module are assigned to the moduleid and ltid variables when the card-loader completes.
rc = RQCard_whichmodule_anyone(rqcard, &moduleid, <id);
if(rc) {
NFast_Perror("error calling RQCard_whichmodule_anyone", rc);
goto cleanup;
}
rc = rqcard->uf->eventloop(rqcard);
if(rc) {
NFast_Perror("error running card loader", rc);
goto cleanup;
}The moduleid, id and ltid are now populated.
The next step is to populate the moduleinfo variable for the chosen module, and create a card set handle.
for(n = 0; n < worldinfo->n_modules; ++n)
  if(worldinfo->modules[n]->module == moduleid)
    break;
assert(n < worldinfo->n_modules);
moduleinfo = worldinfo->modules[n];

rc = NFKM_findcardset(app, &cardhash, &cardset, cctx);
if(rc) {
  NFast_Perror("error calling NFKM_findcardset", rc);
  goto cleanup;
}| Up to now in this example the application has performed actions common to generating either a symmetric key or an asymmetric key. The process from here on differs depending on which key type is generated. |
Preparing the key-generation command and ACL
Start by setting up some command parameters based on the information we have already gathered.
command.cmd = Cmd_GenerateKeyPair;
command.args.generatekeypair.params.type = keytype;
command.args.generatekeypair.flags = Cmd_GenerateKeyPair_Args_flags_Certify;
command.args.generatekeypair.module = moduleinfo->module;
Keys are stored with an ACL which defines which entities can perform operations with the key.
The next step is to populate the acl_params variable with the information needed to create the ACL that is stored in the key blob along with the key we generate.
The application sets the acl_params.f flags parameter to enable key recovery, and specify the type of key protection to use.
There are three options:
-
card set protection
-
module protection
-
pass phrase protection.
This following code demonstrates how to indicate that a key should be protected by a card set. In this case the card set is the one selected earlier by the user in Selecting a Security World module.
acl_params.f = NFKM_NKF_RecoveryEnabled|protection;
acl_params.cs = cardset;
The make ACL blob flags (acl_params.f) must be same as the make blob flags (blob_params.f), so it is set accordingly.
blob_params.f = acl_params.f;
The next step is to define in the ACL which operations the key is allowed to be used for.
Firstly the application defines the allowed uses for the private key ACL.
The is_signing_only_keytype() function is not an nCore function:
if(is_signing_only_keytype(keytype))
  acl_params.op_base = NFKM_DEFOPPERMS_SIGN;
else if(is_encryption_only_keytype(keytype))
  acl_params.op_base = NFKM_DEFOPPERMS_DECRYPT;
else
  acl_params.op_base = (NFKM_DEFOPPERMS_SIGN
                 |NFKM_DEFOPPERMS_DECRYPT);
The application is now ready to generate the private key ACL:
rc = NFKM_newkey_makeaclx(app, conn, worldinfo, &acl_params,
                          &command.args.generatekeypair.aclpriv, cctx);
For asymmetric keys the application also defines a public key ACL.
acl_params.f = NFKM_NKF_PublicKey;
if(is_signing_only_keytype(keytype))
  acl_params.op_base = NFKM_DEFOPPERMS_VERIFY;
else if(is_encryption_only_keytype(keytype))
  acl_params.op_base = NFKM_DEFOPPERMS_ENCRYPT;
else
  acl_params.op_base = (NFKM_DEFOPPERMS_VERIFY
                 |NFKM_DEFOPPERMS_ENCRYPT);
The public key ACL is created in the same manner as the private key ACL:
rc = NFKM_newkey_makeaclx(app, conn, worldinfo, &acl_params,
                          &command.args.generatekeypair.aclpub, cctx);
The following code sets up further key generation command parameters. The parameters that are required differ according to key type. For example, an application might use the following code when generating a 1024 bit DSA key using strict key verification. For details of the parameters required for the types of key you want to generate, see the relevant nCore API documentation.
command.args.generatekeypair.params.params.dsaprivate.flags =
  KeyType_DSAPrivate_GenParams_flags_Strict;
command.args.generatekeypair.params.params.dsaprivate.lenbits = 1024;
Generating a key in a FIPS 140-2 Level 3 environment requires that an application obtains authorization (in this case, card set authorization) before attempting to generate a key. It is possible that the card loader has already obtained the necessary authorization from a prior card-loading operation. In this case, the following call retrieves this authorization:
rc = RQCard_fips_get(rqcard_fips, moduleinfo->module, &fips140authhandle,
                     0);
If this call returns Status_RQCardMustContinue, an application must explicitly attempt to obtain the correct authorization as follows:
rc = RQCard_fips_logic(rqcard);
if(rc) {
  NFast_Perror("error calling RQCard_fips_logic", rc);
  goto cleanup;
}
rc = RQCard_whichmodule_specific(rqcard, moduleinfo->module, 0);
if(rc) {
  NFast_Perror("error calling RQCard_whichmodule_anyone", rc);
  goto cleanup;
}
rc = rqcard->uf->eventloop(rqcard);
if(rc) {
  NFast_Perror("error running card loader", rc);
  goto cleanup;
}
rc = RQCard_fips_get(rqcard_fips, moduleinfo->module, &fips140authhandle,
                      0);
Now that the application has obtained the necessary FIPS 140-2 Level 3 authorization (or cancelled the operation if the correct authorization could not be obtained), it can use the authorization to authorize the creation of the key.
rc = NFKM_newkey_makeauth(app, worldinfo, &command.flags, &command.certs,
                          fips140authhandle, cctx);
if(rc) {
  NFast_Perror("error calling NFKM_newkey_makeauth", rc);
  goto cleanup;
}
With or without FIPS authorization, the application has now obtained all the information necessary to transact a key-generation operation, so is now ready to send the key-generation command to the selected module. The reply is checked using the reply checking utility function mentioned at the beginning of the chapter.
rc = NFastApp_Transact(conn, cctx, &command, &reply, 0);
rc = check_reply(rc, &reply, "error generating new key");
if(rc)
  goto cleanup;
The application has now generated a new key, but as yet the key exists only in the module’s memory.
Next, construct an NFKM_Key key information structure (keyinfo) and then save it to disk.
keyinfo->v = 8;
keyinfo->appname = keyident.appname;
keyinfo->ident = keyident.ident;
time(&keyinfo->gentime);
The next step is to populate the parameters of the blob_params structure, which contains the information that will be written to the key blob.
The following code also checks that a key-generation certificate was included in the reply.
The NFKM_MakeBlobsParams flags blob_params.f must be the same as the flags passed to NFKM_newkey_makeaclx() when the application created the private ACL.
mc = 0;
blob_params.kpriv = reply.reply.generatekeypair.keypriv;
blob_params.kpub = reply.reply.generatekeypair.keypub;
if(reply.reply.generatekeypair.flags & Cmd_GenerateKeyPair_Reply_flags_certpriv_present)
  mc = reply.reply.generatekeypair.certpriv;
if(cardset) {
  blob_params.lt = ltid;
  blob_params.cs = cardset;
}
blob_params.fips = fips140authhandle;
The parameters required for the NFKM_newkey_makeblobsx() are now populated and the application can now create the key blob.
rc = NFKM_newkey_makeblobsx(app, conn, worldinfo, &blob_params, keyinfo, cctx);
if(rc) {
  NFast_Perror("error calling NFKM_newkey_makeblobsx", rc);
  goto cleanup;
}
if(mc) {
  rc = NFKM_newkey_writecert(app, conn, moduleinfo, blob_params.kpriv, mc,
                            keyinfo, cctx);
  if(rc) {
    NFast_Perror("error calling NFKM_newkey_writecert", rc);
    goto cleanup;
 }
}
The keyinfo structure is now ready to be saved to disk.
rc = NFKM_recordkey(app, keyinfo, cctx);
if(rc) {
  NFast_Perror("error calling NFKM_recordkey", rc);
  goto cleanup;
}
rc = Status_OK;
Freeing memory
The final part of the key-generation process is the important step of freeing the memory used by the application, so that no key information remains in memory, which would make the key vulnerable to attackers.
NFastApp_FreeACL(app, cctx, 0, &command.args.generatekeypair.aclpriv);
NFastApp_FreeACL(app, cctx, 0, &command.args.generatekeypair.aclpub);
NFKM_cmd_destroy(app, conn, 0, reply.reply.generatekeypair.keypriv,
                 "generatekeypair.keypriv", cctx);
NFKM_cmd_destroy(app, conn, 0, reply.reply.generatekeypair.keypub,
                 "generatekeypair.keypub", cctx);
if(ltid) NFKM_cmd_destroy(app, conn, 0, ltid, "ltid", cctx);
If you are running your application in FIPS 140-2 Level 3 mode, NFKM_newkey_makeauth() will have created a certificate list, which also needs to be freed:
if(command.flags & Command_flags_certs_present)
   NFastApp_Free_CertificateList(app, cctx, 0, command.certs);

NFastApp_Free_Reply(app, cctx, 0, &reply);
keyinfo->appname = 0;
keyinfo->ident = 0;
NFKM_freekey(app, keyinfo, cctx);
NFKM_freecardset(app, cardset, cctx);
This concludes the explanation of asymmetric key-generation.
Using a key
Once a key has been generated on a module the encrypted key information, or key blob, is stored on the hard disk of the application that requested it. For your application to use a key, you first need to pass the information contained in the key blob to the hardserver, which will use a module to decrypt the key and return a key handle to your application.
The following diagram illustrates the process of loading a key:
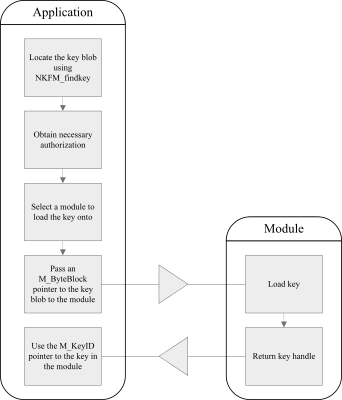
Finding a key
To load a key, first locate the key blob. A key is identified by the name of the application that created it and the key identifier. The following code tries to find an existing key blob of the requested type. If a key of this type cannot be found, the code generates a new key.
The following code uses a function called generate_key() to generate a key if a key cannot be found.
rc = NFKM_findkey(app, keyident, &keyinfo, cctx);
if(rc) {
  NFast_Perror("error calling NFKM_findkey", rc);
  goto cleanup;
}
if(!keyinfo) {
  rc = generate_key(app, conn, worldinfo, &rqcard, &rqcard_fips, opt_protect,
                    keyident, keytype, cctx);
  if(rc)
    goto cleanup;
  rc = NFKM_findkey(app, keyident, &keyinfo, cctx);
  if(rc) {
    NFast_Perror("error calling NFKM_findkey", rc);
    goto cleanup;
  }
  if(keyinfo == 0) {
    fprintf(stderr,
            "NFKM_findkey could not find key even after generating it.\n");
    rc = -1;
    goto cleanup;
  }
}
Loading a key
Before a key can be loaded into a module, an application must obtain the appropriate authorization. In this example the authorization required comes from a card in a card set, so the application must first initialize the card-loading libraries:
if(keyinfo->flags & Key_flags_ProtectionCardSet) {
  M_ModuleID moduleid;
  int n;
  rc = RQCard_logic_ocs_specific(&rqcard, &keyinfo->cardset,
                                 "Load cardset");
  if(rc) {
    NFast_Perror("error calling RQCard_logic_ocs_specific", rc);
    goto cleanup;
  }
}
A Security World often contains multiple modules, many of which may have the key that is needed to decrypt the key blob an application wants to load. For this example the user is prompted to choose a module that contains the necessary key, and then prompted to provide the card that authorizes the use of the key:
rc = RQCard_whichmodule_anyone(&rqcard, &moduleid, <id);
if(rc) {
NFast_Perror("error calling RQCard_whichmodule_anyone", rc);
goto cleanup;
}
rc = rqcard.uf->eventloop(&rqcard);
if(rc) {
NFast_Perror("error running card loader", rc);
goto cleanup;
}It is also possible for an application to ask the Security World to nominate a usable module by using the NFKM_getusablemodule() function:
rc = NFKM_getusablemodule(worldinfo, 0, &moduleinfo);
if(rc) {
  NFast_Perror("error calling NFKM_getusablemodule", rc);
  goto cleanup;
}
Now that the user has selected a module, an application can populate the moduleinfo variable, which is later used as a parameter to the NFKM_cmd_loadblob() function.
for(n = 0; n < worldinfo->n_modules; ++n)
  if(worldinfo->modules[n]->module == moduleid)
    break;
 assert(n < worldinfo->n_modules);
 moduleinfo = worldinfo->modules[n];
The application has now gathered all the information it needs to load the key onto a module using the NFKM_cmd_loadblob() function.
The next step is to prepare a pointer to the key that will be loaded into the module.
The following code loads the public key blob.
An application can load the private key blob in similar fashion using &keyinfo->privblob.
const M_ByteBlock *blobptr;
blobptr = &keyinfo->pubblob;
The following code attempts to load the key blob. NFKM_cmd_loadblob() fills in the command structure and handles the reply.
Assuming that the command executes successfully, you will now have a handle on the key loaded onto the selected module.
It is possible to construct an M_Command structure by using Cmd_LoadBlob() directly instead.
|
rc = NFKM_cmd_loadblob(app,
                       conn,
                       moduleinfo->module,
                       blobptr,
                       ltid,
                       &keyid,
                       "loading key blob",
                       cctx);
if(rc) {
  NFast_Perror("error calling NFKM_cmd_loadblob", rc);
  goto cleanup;
}
Encrypting a file
This section demonstrates how to encrypt the contents of a text file by using a secure channel. For the sake of simplicity, this example has no error handling.
First, generate an appropriate initialization vector:
iv.mech = Mech_RijndaelmCBCi128pPKCS5;
for (i=0; i<sizeof iv->generic128.iv.bytes; i++)
  iv.iv->generic128.iv.bytes[i]=(unsigned char)((i*19) ^ iv.mech);
Next, open a channel to use to encrypt the file. The mechanism that the channel uses to encrypt the file is specified when the channel is opened:
M_Command channel_open_command;
M_Reply channel_open_reply;
M_Status channel_open_rc;
channel_open_command.cmd = Cmd_ChannelOpen;
channel_open_command.args.channelopen.type = ChannelType_Any;
channel_open_command.args.channelopen.mode = ChannelMode_Encrypt;
channel_open_command.args.channelopen.mech = mech;
Some M_Command arguments are optional.
In this example, the application specifies both the key to be used to encrypt the file and the initialization vector and indicates which optional arguments have been specified by setting the appropriate flags:
channel_open_command.args.channelopen.flags |= Cmd_ChannelOpen_Args_flags_key_present;
channel_open_command.args.channelopen.key = &keyid;
channel_open_command.args.channelopen.flags |= Cmd_ChannelOpen_Args_flags_given_iv_present;
channel_open_command.args.channelopen.given_iv = iv;
To open the channel, transact the M_Command in the usual way and then set the channel ID pointer idch:
channel_open_rc = NFastApp_Transact(conn, cctx, &channel_open_command, &channel_open_reply, 0);
idch = channel_open_reply.reply.channelopen.idch;
The next step is to load the input file (the file to be encrypted) into a file stream (inputstream) and prepare the output file stream (outputstream) to which the encrypted file is going to be written.
inputstream = fopen("file_in.txt", "rb");
outputstream = fopen("file_out.txt", "wb");
Now that the application has opened the channel and prepared the input and output streams, start to prepare an M_Command to process the inputstream through the channel.
M_Command channel_process_stream_command;
M_Reply channel_process_stream_reply;
M_Status channel_process_stream_rc;
int eof = 0;
unsigned char buffer[6144];
size_t bytes_read;
Next, read the bytes of the inputstream into a char buffer, updating the channel on each read.
do {
  bytes_read = fread(buffer, 1, sizeof buffer, inputstream);
  if(ferror(inputstream)) {
    fprintf(stderr, "error reading from %s: %s\n",
            input_path, strerror(errno));
    rc = -1;
    goto cleanup;
  }

  if(feof(inputstream))
    eof = 1;

  command.cmd = Cmd_ChannelUpdate;
  if(eof)
    command.args.channelupdate.flags |= Cmd_ChannelUpdate_Args_flags_final;
  command.args.channelupdate.idch = idch;
  command.args.channelupdate.input.ptr = buffer;
  command.args.channelupdate.input.len = (M_Word)bytes_read;

  rc = NFastApp_Transact(conn, cctx, &command, &reply, 0);
  rc = check_reply(rc, 0, "Cmd_ChannelUpdate");
  if(rc)
    goto cleanup;

  if(reply.reply.channelupdate.output.len) {
    if(outputstream) {
      fwrite(reply.reply.channelupdate.output.ptr,
             1, reply.reply.channelupdate.output.len,
             outputstream);
      /* Check for a write error */
      if(ferror(outputstream)) {
        fprintf(stderr, "error writing to %s: %s\n",
                output_path, strerror(errno));
        rc = -1;
        NFastApp_Free_Reply(app, cctx, 0, &reply);
        goto cleanup;
      }
    }
    if(outputdstr) {
      if(nf_dstr_putm(outputdstr, reply.reply.channelupdate.output.ptr,
                      reply.reply.channelupdate.output.len)) {
        fprintf(stderr, "error writing to dstr: %s\n", strerror(errno));
        rc = -1;
        goto cleanup;
      }
    }
  }

 NFastApp_Free_Reply(app, cctx, 0, &reply);
 memset(&reply, 0, sizeof reply);
} while(!eof);
If the file was successfully encrypted, save the file to disk:
if(channel_process_stream_reply.reply.channelupdate.output.len) {
  if(outputstream) {
    fwrite(channel_process_stream_reply.reply.channelupdate.output.ptr,
           1, channel_process_stream_reply.reply.channelupdate.output.len,
           outputstream);
    writefile(ciphertext_path,
              reply->reply.encrypt.cipher.data.generic128.cipher.ptr,
              reply->reply.encrypt.cipher.data.generic128.cipher.len);
  }
}
The final step is to free memory and close the outputstream.
NFastApp_Free_Reply(app, cctx, 0, &reply);
memset(&reply, 0, sizeof reply);
fclose(outputstream);
Cleaning up resources
Memory leaks and objects left in memory constitute a security risk. The following code removes all sensitive information from memory and cleanly shuts down the connection to the hardserver.
free(sigbytes.ptr);
if(keyid) NFKM_cmd_destroy(app, conn, 0, keyid, "keyid", cctx);
if(idch) NFKM_cmd_destroy(app, conn, 0, idch, "idch", cctx);
NFastApp_Free_Reply(app, cctx, 0, &reply);
if(rqcard_fips_initialized) RQCard_fips_free(&rqcard, &rqcard_fips);
if(rqcard_initialized) RQCard_destroy(&rqcard);
NFKM_freekey(app, keyinfo, cctx);
NFKM_freeinfo(app, &worldinfo, cctx);
if(conn) NFastApp_Disconnect(conn, cctx);
NFastApp_Finish(app, cctx);
if(inputstream) fclose(inputstream);
if(outputstream) fclose(outputstream);