Physical Security
This chapter provides guidance on the physical security controls available on the different nShield platforms and the procedural controls required to maintain those physical security controls across the product’s lifecycle.
The industry terms "tamper resistance", "tamper evidence", "tamper detection", and "tamper response", as defined in the glossary, will be used when discussing the physical security controls available.
nShield Edge physical security controls
The nShield Edge uses Tamper Resistance and Tamper Evident physical security controls to protect sensitive security parameters within the unit:
The mini HSM within the unit is covered in an epoxy encapsulant to resist tamper attempts. This is a tamper resistant control.
| This would also be a tamper evident control as well if it could be inspected. However, the internal mini HSM is additionally protected by the security seal control on the enclosure boundary and therefore can’t be inspected. |
Once assembled the nShield Edge can’t be disassembled without breaking the security seal. This is a tamper evident control.
Once assembled the nShield Edge is difficult to disassemble without disfiguring the fascia. This is a tamper evident control.
See Tamper inspection for procedural control guidance required to maintain tamper evident security controls.
nShield Solo+ physical security controls
The nShield Solo+ uses Tamper Resistance and Tamper Evident physical security controls to protect sensitive security parameters within the unit:
The nShield Solo+ card is covered in an epoxy encapsulant to resist and provide evidence of tamper attempts.
See Tamper inspection for procedural control guidance required to maintain and manage tamper evident security controls.
nShield Solo XC physical security controls
The nShield Solo XC uses Tamper Resistance, Tamper Evident, Tamper Detection and Response physical security controls to protect sensitive security parameters within the unit:
The nShield Solo XC card is covered in an epoxy encapsulant to resist and provide evidence of tamper attempts. A cosmetic metal lid covers the encapsulant and can be removed for inspection purposes. See Tamper inspection for procedural control guidance required to maintain and manage tamper evident security controls.
The nShield Solo XC features tamper detection and response mechanisms that indicates the following tamper events:
-
Abnormal temperature
-
Abnormal voltage
-
Low battery voltage
-
Sensor failure.
When one of the above tamper events is detected (i.e. a possible attempt to compromise the system has been detected), the HSM will perform the following actions:
-
All non-protected secrets in the HSM will be erased
-
The HSM will enter its Error state
-
The particular tamper event is identified by flashing a morse (SOS) code error on the LED indicator.
After a tamper event, the HSM and its environment should be examined for signs of potential tamper/intrusion, and the tamper event recorded (in accordance with the Customer’s Security Incident and Response Policy). If the source of the tamper event can be discovered and can be considered harmless, provided the Customer’s Security Incident and Response Policy allows, the HSM can be restarted to bring it back into operation. If the tamper event has not been neutralized, the HSM will just reassert the tamper event.
If the source of the tamper cannot be discovered, then the HSM should be considered to be in a compromised state and will have to either be destroyed or returned to Entrust for secure destruction. See Decommission and Disposal for further information.
A list of nShield Solo XC of hard tamper events and their respective morse code error messages is listed in the Appendices of the User Guide.
| In the case of the battery removal/failure tamper event, the tamper event can only be actioned upon the next application of mains power (with the battery removed). Once this tamper event is complete (and all non-protected secrets are erased) the HSM should blink the morse code pattern on the LED for low battery voltage <2.5V to indicate that there are no secrets within the HSM to the customer. However, in the unlikely scenario that the HSM is non-functional to the point where the Security Processor will not wake up after mains power is applied, the non-protected secrets will never be erased. Therefore, the customer must monitor for the correct morse code sequence to indicate that all non-protected secrets have been erased. If the LED does not blink the prescribed pattern then the nShield Solo XC must be physically, securely destroyed. |
For guidance on how to respond to a tamper, see Security Incident and Response.
nShield Connect physical security controls
This section provides an overview of the physical security measures that have been implemented to protect your nShield Connect. You are also shown how to:
-
Check the physical security of your nShield Connect
-
Disable and re-enable tamper detection functionality on your nShield Connect.
The tamper detection and response functionality on the nShield Connect provides additional physical security, over and above that provided by the tamper evident holographic security seal, and alerts you to tampering in an operational environment. There is a removable lid on top of the nShield Connect, protected by the security seal and tamper detection switches. To prevent the insertion of objects into the nShield Connect, tamper resistant baffles are placed behind vents.
To optimize their effectiveness, use the physical security measures implemented on the nShield Connect in association with your security policies and procedures.
| The FIPS 140-2 Level 3 cryptographic boundary is at the nShield Solo. |
| For more information about FIPS 140-2, see http://csrc.nist.gov/publications/fips/fips140-2/fips1402.pdf. |
Tamper event
The nShield Connect offers several layers of tamper protection. The outer boundary (case) of the nShield Connect has tamper detection and response capabilities. When tampered, the unit ceases to provide cryptographic functionality, alerts the operator of the event, and ultimately forces the operator to reset the unit to factory defaults. For guidance on how to respond to a tamper, see Security Incident and Response.
Movements/vibrations, or replacing the fan tray module or a PSU, does not activate the tamper detection functionality.
nShield Connect lid is closed
If the nShield Connect is powered, a tamper event has occurred, and the lid is closed, the following message is displayed on screen:
** TAMPER DETECTED **
Consult User Guide.
Check physical seals.
Reset to factory state
or disable tamper
detection first?
RESET       DISABLE
When you see this message, examine your unit for physical signs of tampering, see Physical security checks.
If you discover signs of tampering do not attempt to put the unit back into operation. The date and time of the tamper event are recorded in the log (see Logging, debugging, and diagnostics section of the nShield Connect User Guide).
| The tamper-responsiveness circuitry has a RTC that runs independently from the main nShield Connect clock. The times associated with events in the tamper log may have slight offsets to times recorded in other log files. |
If there are signs of tampering, and the tamper event occurred
-
During transit from Entrust, contact Entrust nShield Support
-
After installation, refer to your security policies and procedures.
If there are no signs of tampering, you can either:
-
Reset the nShield Connect to a factory state. Use the Security World data stored on the RFS and the ACS to recover the keys and cryptographic data.
Or:
-
Disable the tamper detection functionality and then reset the nShield Connect to a factory state.
| Do not disable tamper detection unless asked to do so by Support. |
After reseting the unit to a factory state, you require a quorum of the ACS to restore the key data and reconnect the nShield Connect to the network. If you chose to disable the tamper protection circuitry when you reset the nShield Connect to a factory state, a cautionary warning is displayed prior to the request for card authorization. For information about re-enabling disabled tamper detection functionality, see Disabling tamper detection and response functionality.
nShield Connect lid is open
If the nShield Connect is powered, a tamper event has occurred, and the lid is open, the following message is displayed on screen:
** TAMPER DETECTED **

Unit lid is open
Replace lid or disable
tamper detection
DISABLE
An open lid indicates that the physical security of the unit is compromised. You may want to examine your unit for other physical signs of tampering - see Physical security checks. Do not attempt to put the unit back into operation.
The date and time of the tamper event are recorded in the log files (see Logging, debugging, and diagnostics of the nShield Connect User Guide). If the tamper event occurred
-
During transit from Entrust, contact Entrust nShield Support
-
After installation, refer to your security policies and procedures.
If you choose to replace the lid of the nShield Connect, the onscreen message changes to the tamper alert message that is given when the lid is closed. Closing the lid provides you with the option to reset the unit to a factory state without disabling tamper detection functionality. If the lid remains open, all button presses other than those made using the right-hand navigation button are ignored. Pressing the right-hand navigation button disables tamper responsiveness and resets the nShield Connect to a factory state.
Physical security checks
An alternative presentation of the physical security checks described here can be found in the Physical Security Checklist. For more information about tamper events, and what actions to take if you discover signs of tampering, see Tamper event.
To determine if the security of the nShield Connect is compromised:
-
Check that the physical security seal is authentic and intact. Look for the holographic foil bearing the holographic tamper label. Look for cuts, tears and voiding of the seal. The seal is located on the top of the nShield Connect chassis.
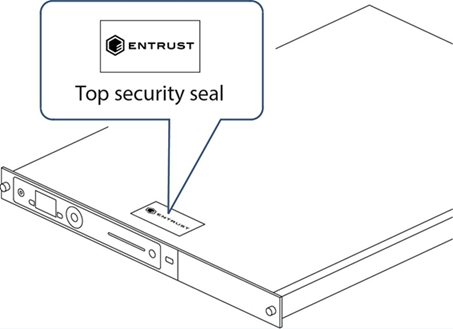
For information about the appearance of intact and damaged security seals, see the Physical Security Checklist.
-
Check that the metal lid remains flush with the nShield Connect chassis.
Metal lid in the correct position:

Metal lid in an incorrect position (pulled back):

-
Check all surfaces — the top, bottom and sides of the nShield Connect — for signs of physical damage.
-
Check that there are no signs of physical damage to the vents, including attempts to insert objects into the vents.
Front vent (to the right of the front panel controls):

Rear vent (to the right of the power supplies):

Disabling tamper detection and response functionality
Tamper detection and response functionality can be disabled if the customer’s security policy does not require it. The tamper detection and response functionality provides a critical part of the defence in depth physical security strategy of the nShield Connect. We do not recommend disabling tamper detection functionality.
To disable tamper responsiveness on your nShield Connect:
-
From the main menu select System > System configuration > Tamper config.
You are shown the following dialog:
Tamper responsiveness is currently enabled. This matches nCipher's recommendation. Do you want to disable tamper responsiveness? -
Press the right-hand navigation button to disable tamper responsiveness.
-
You are asked to confirm the change. Press the right-hand navigation button again.
Tamper responsiveness is disabled and the unit is reset to a factory state. To restore the key data and reconnect the nShield Connect to the network you must present a quorum of the ACS.
nShield card readers
The card reader and its cable should be inspected for signs of tamper.
See Tamper inspection for procedural control guidance required to maintain and manage tamper evident security controls.
Tamper inspection
Inspections as described in Supply and Transportation. This may include removing the HSM from cabinets to ensure that all surfaces are intact. Further guidance on inspection frequency can be found in Physical inspection. Guidance on how to respond to a tamper can be found in Security Incident and Response.