nShield CLI Commands
GUI initialization
Upon the startup of the nShield Monitor Virtual Appliance, the CLI will wait for the GUI to finish initializing (at the first boot and every reboot). This operation can take up to 60 seconds. If GUI initialization is not completed by then, the user is logged out and asked to log back in later.
Setting a password
If you are using the One Time Password (OTP), you will be asked to change it after logging in and before accessing any of the CLI operations.
You are prompted with the following password requirements:
-
Length should be between eight and sixteen characters
-
Should contain at least two capital letters
-
Should contain at least two lower case letter,
-
Should contain at least two digits
-
Should contain at least two special characters
-
Enter the old password.
-
Enter the new password.
The new password is checked for the requirements above and compared with the old password. If it fails to comply with the requirements or if the new password is the same as the old one, the user is prompted with the associated error and/or the requirements and is directed back to step 2. -
Enter the password confirmation.
The only check that is performed is whether the two passwords match.
If it fails, it will prompt the error and start from step 2 above.
If it is successful, you will proceed to the CLI commands of the wizard.
Master key status
After the setup wizard has run and the mandated passwords have been entered, a status message for the master key may be prompted. This occurs if the master key needs to be reloaded, or generated and loaded.
CLI setup wizard
Log in
-
Connect to the IP address.
-
Login as administrator.
The CLI Setup Wizard initializes at the first boot. It will only initialize if the entire wizard setup has not yet run, or if the following steps of the wizard failed: Set User Email, or Create Administrators.
The wizard prompts you to perform the following operations:
-
Set the user's email
-
Create two administrators
-
Configure the network
-
Configure the date and time
-
Set two passwords for system key
Once the user logs in, the CLI verifies if the Virtual Machine (VM) has an IP address. If it does, it will prompt the user with the IP address and the URL to launch the wizard from a web browser.
| If the Virtual Machine (VM) does not have an IP address, the CLI will prompt the user to set the static network configuration before running the Wizard. Until the IP address is set, the user will not be able to run the Wizard. |
EULA
The EULA is displayed one page at a time.
-
Navigate the EULA:
-
Scroll up and down the page using up and down arrows
-
Select Enter to scroll down the page
-
Enter q to quit EULA at any time
-
Scroll to the bottom of the page, which will automatically close the EULA.
-
Select y to agree to the terms of the EULA.
Select n if your need to exit and logout (after 5 seconds). The system prompts to set the default user email.
Set User's Email
The requirements for an email address are:
-
Alphanumeric characters and < - or _ or .>@<alphanumeric characters and < - or .>
-
The two parts before and after the "@" cannot start or end with a non-alphanumeric character.
-
The email cannot contain successive dots, dashes or underscores.
-
Enter your email address.
-
Re-enter your email address to confirm.
The system prompts to create your Administrators.
Create Administrators
-
Enter the User Name for Administrator One.
-
Enter the first administrator's email address; verify that the email address is valid.
-
Enter the first administrator's email address confirmation; verify that the email addresses match.
-
Repeat steps 1 through 3 above to create second administrator.
Once the administrators are created, the system prompts for network configuration.
Configure network
The wizard will show the current network configuration.
-
Select the network configuration.
-
If DHCP, enter:
-
hostname (optional)
-
mail host (optional)
-
Interface (optional)
Interface can be skipped by pressing enter (system defaults to eth0). -
-
If Static, enter:
-
hostname (mandatory)
-
IP (mandatory)
-
netmask (mandatory)
-
gateway (mandatory)
-
domain (optional)
-
primary DNS (optional)
-
secondary DNS (optional)
-
mail host (optional)
-
Interface (optional)
Interface can be skipped by pressing enter (system defaults to eth0). -
-
To Keep the current configuration, enter: mail host(optional)
The system continues with Master Key Generation and prompts you to create Passphrase One.
Generate system key
-
Enter Passphrase One and then re-enter to confirm.
The system prompts for Passphrase Two.
-
Enter Passphrase Two and then re-enter to confirm.
The system prompts to configure date and time.
Configure date and time
-
Choose between NTP and NTP Disable (manual configuration).
-
Enter 1 or 2 based on your preference:
-
Enter: 1 for dynamic configuration (NTP enabled)
Follow the prompts to complete the configuration.
-
-
Enter servers (this is only optional if a server is already configured, otherwise this is mandatory).
-
Check for server regular expression.
-
Select timezone (optional).
-
| Each parameter is checked. If a failure occurs, you are prompted to re-enter the parameter. |
-
Enter 2 for manual configuration (NTP disabled)
-
Follow the prompts to complete the configuration:
-
Enter date (optional)
-
Enter time (optional)
-
Select timezone (optional)
-
| Each parameter is checked. If a failure occurs, you are prompted to re-enter the parameter. |
The system now prompts for initialization.
Initialize
-
Select y to start performing all operations.
Select n if you need to log out.
The initialization process is performed in the following order:
-
Generate and load master key.
-
Set user's email (if this fails, it will log out after five seconds).
-
Create administrators (if this fails, it will log out after five seconds).
-
Set mailhost.
-
Configure network.
-
Set NTP (on/off). Configure date, time and timezone and/or NTP servers.
If the date-time configuration is successful, a reboot is triggered.
|
You can log back in and restart the wizard if:
|
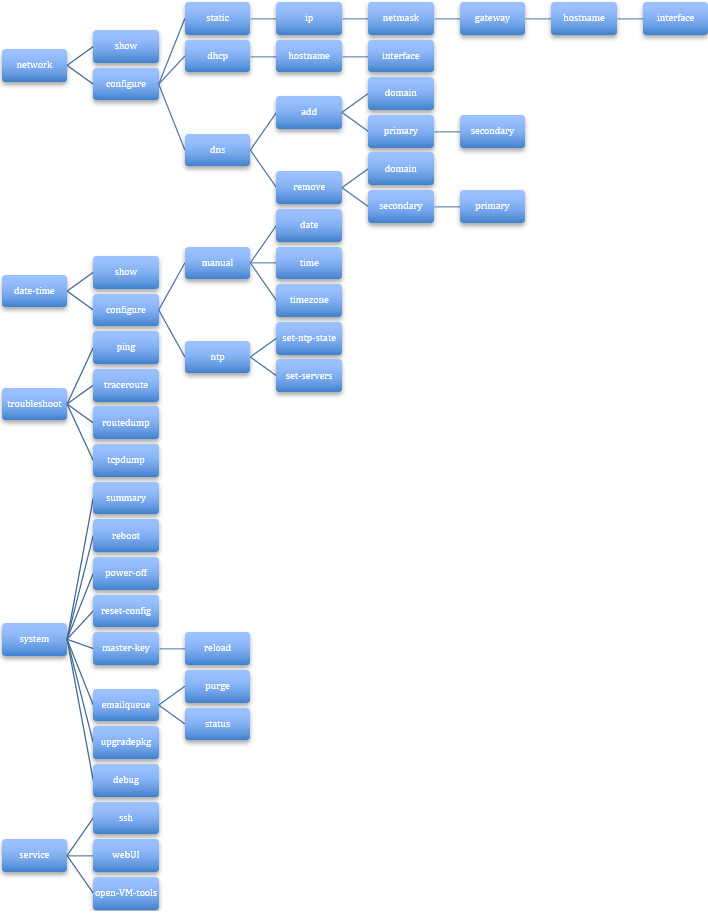
Network commands
Action |
Show current network configuration |
Input |
|
Output |
Mode (dhcp or static) |
Action |
Configure dynamic network |
Input |
|
Output |
Hostname is optional. Interface is optional |
Action |
Configure static network |
Input |
|
Details |
All parameters are mandatory. Interface is optional |
Action |
Add/overwrite DNS parameters |
Input |
|
Details |
Commands to set domain name and primary DNS/secondary DNS can be performed separately or together in one command. |
Action |
Remove DNS parameters |
Input |
|
Details |
Commands to remove domain name and primary DNS/secondary DNS can be performed separately or together in one command. |
Date-time commands
Date-time configuration triggers system reboot if configuration has succeeded.
Action |
Show date and time configuration |
Input |
|
Output |
NTP enabled : <yes/no> |
Action |
Switch NTP on or off |
Input |
|
Details |
set-ntp-state is mandatory.
Set it to « on » to enable NTP and set it to « off » to disable NTP. |
Action |
Set NTP servers |
Input |
|
Details |
This command removes all previous servers (if any) sets the new list of
servers. |
Action |
Configure date and time manually |
Input |
|
Details |
NTP has to be disabled to perform this operation. |
System commands
Action |
Power off the system |
Input |
|
Details |
This operation can take up to 60 seconds |
Action |
Reboot the system |
Input |
|
Details |
This operation can take up to 60 seconds |
Action |
Reset the system to factory settings |
Input |
|
Details |
This operation can take up to 60 seconds |
Action |
Show the summary of system information |
Input |
|
Details |
SSH state indicates only the user’s configuration for SSH through the CLI (« service ssh enable/disable » command.) |
Output |
Serial Number |
Action |
Reload Master Key |
Input |
|
Details |
Reload master key when master key is generated but not loaded. |
Action |
Show current state of debug |
Input |
|
Details |
Show current state of debug |
Action |
Enable logging of debug message |
Input |
|
Details |
Enable debug logging |
Action |
Disable logging of debug message |
Input |
|
Details |
Disable debug logging |
Email queue commands
Action |
Disable logging of debug message |
Input |
|
Details |
Disable debug logging |
Action |
Show the outstanding emails queued up in the system |
Input |
|
Output |
EMAIL QUEUE SUMMARY |
Action |
Purge system email queue |
Input |
|
Output |
EMAIL QUEUE PURGE STATUS |
Troubleshooting commands
Action |
Ping host name or IP address |
Input |
|
Action |
Traceroute host name or IP address |
Input |
|
Details |
This operation may take up to 450 seconds (7.5 min) |
Action |
Show routing tables |
Input |
|
Action |
Dump traffic on the network to a file |
Input |
|
Details |
The file is overwritten every time tcpdump is turned on |
Action |
Export debug logs through SCP |
Input |
|
Optional |
|
Details |
This command is used to export debug logs using SCP.
The users should have valid access to SCP server with |
Service commands
Action |
Enable/Disable SSH |
Input |
|
Details |
By default, it is disabled as well as after each reboot |
Action |
Enable/Disable webUI |
Input |
|
Action |
Enable/Disable OVT |
Input |
|
| CLI access is restricted to Administrator accounts only. Manager accounts cannot access the CLI. A proper error message will be displayed. |