Test integration
Create a key set in Entrust KeyControl
This key set will be used to create a cloud key in Entrust KeyControl.
-
Sign in to the Entrust KeyControl Vault URL bookmark in [create-keycontrol-vault].
-
Select the CLOUDKEYS icon on the toolbar.
-
Select the Key Sets tab.
-
Select Actions > Create Key Set.
The Choose the type of keys… dialog appears.
-
Choose GCP Key.
The Create Key Set dialog appears.
-
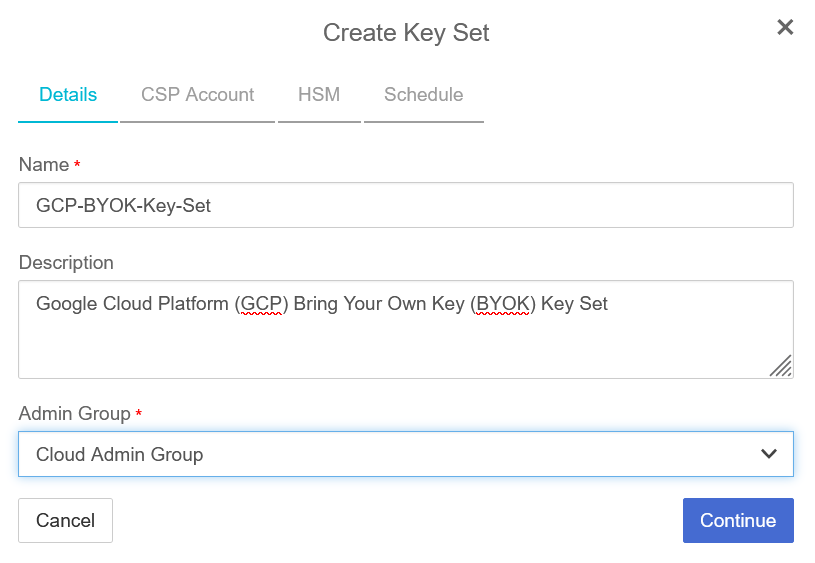
In the Details tab, enter a Name and Description.
-
From the Admin Group menu, select Cloud Admin Group.
For example:
-
Select Continue.
-
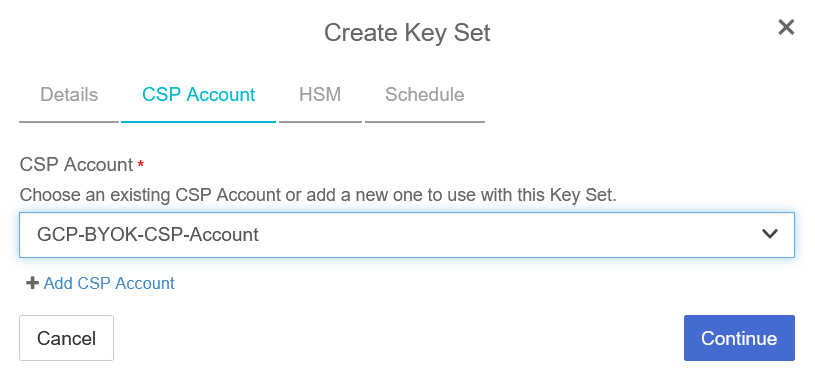
In the CSP Account tab, select the CSP account created in [create-keycontrol-csp-account].
For example:
-
Select Continue.
-
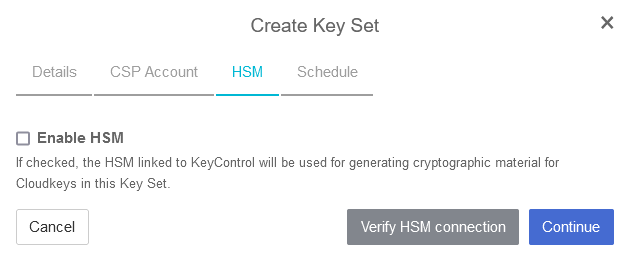
In the HSM tab, select Enable HSM if using one. The HSM must be configured prior to this step.
For example:
-
Select Continue.
-
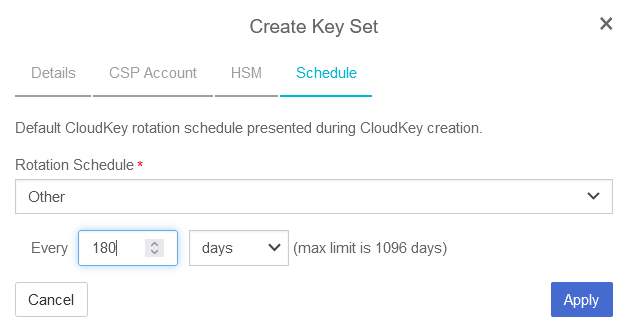
In the Schedule tab, select a Rotation Schedule.
For example:
-
Select Apply.
The key set is added.
For example:

-
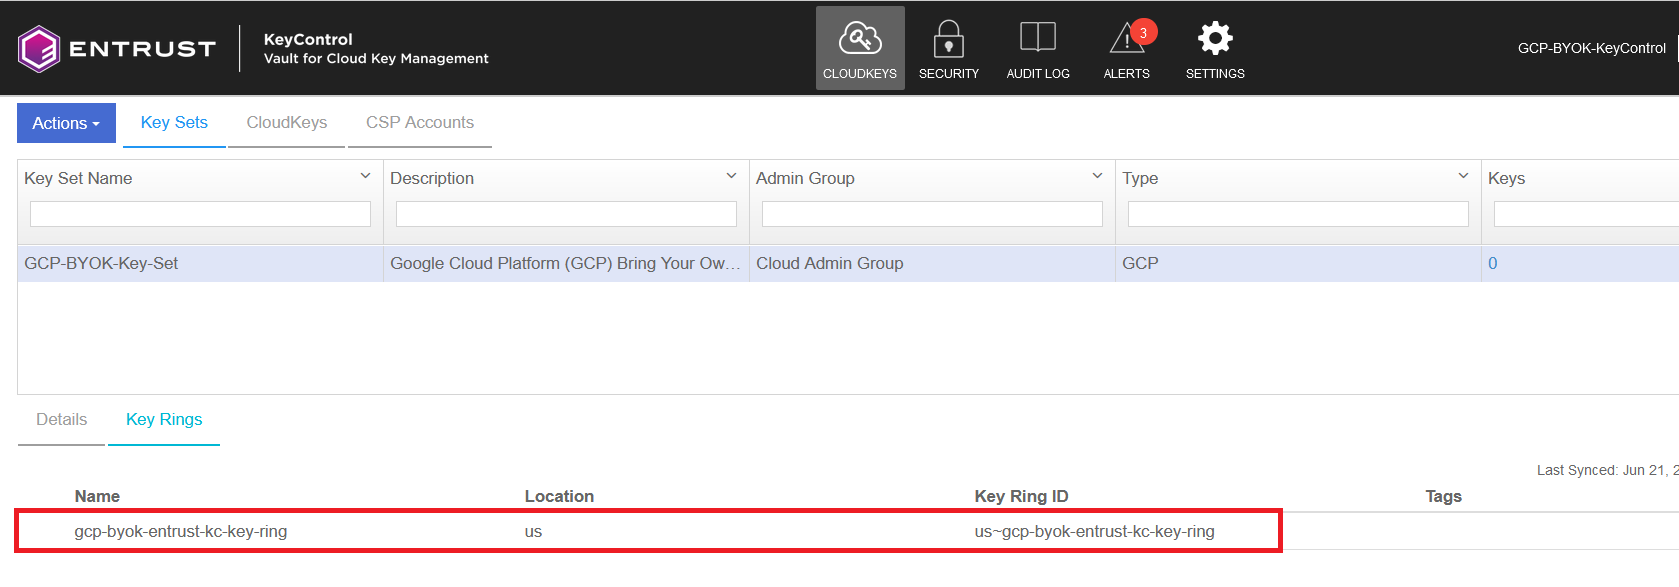
Verify the GCP key ring created in [create-gcp-keyring] is listed in the Key Rings tab. Select Sync Now on the right of the display to update the Key Ring list.
For example:
For additional information, see Creating a Key Set.
Create a cloud key in Entrust KeyControl
The following steps create a cloud key in Entrust KeyControl and verify it is available in GCP key ring:
-
Sign in to the Entrust KeyControl Vault URL bookmark from [create-keycontrol-vault].
-
Select the CLOUDKEYS icon on the toolbar.
-
Select the CloudKeys tab.
-
In the Key Set menu, select the Key Set created in Create a key set in Entrust KeyControl.
-
In the Key Ring menu, select the key ring created in [create-gcp-keyring].
For example:

-
Select Actions > Create CloudKey.
The Create CloudKey dialog appears.
-
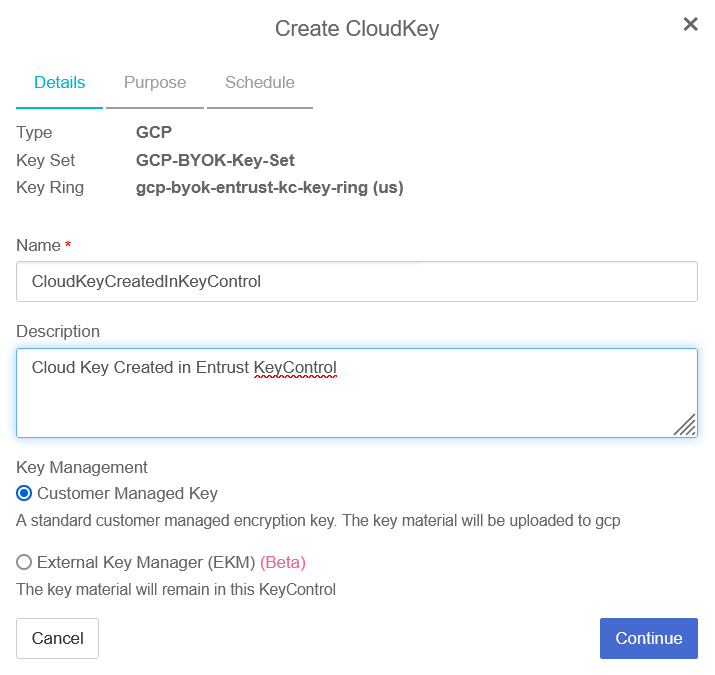
In the Details tab, enter a Name and Description.
-
Select Customer Managed Key from the list of Key Management options.
For example:
-
Select Continue.
-
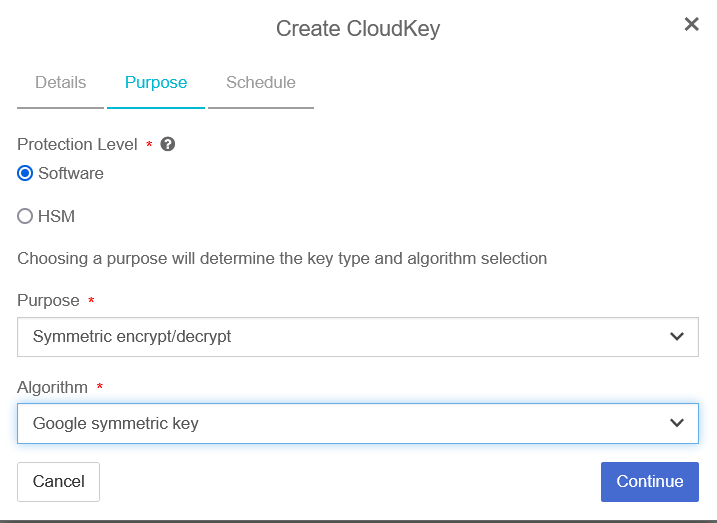
If you are using the hardware protection method, in the Purpose tab, select HSM from the Protection Level options.
-
From the Purpose and Algorithm pull down menus, select the appropriate options for your application.
For example:
-
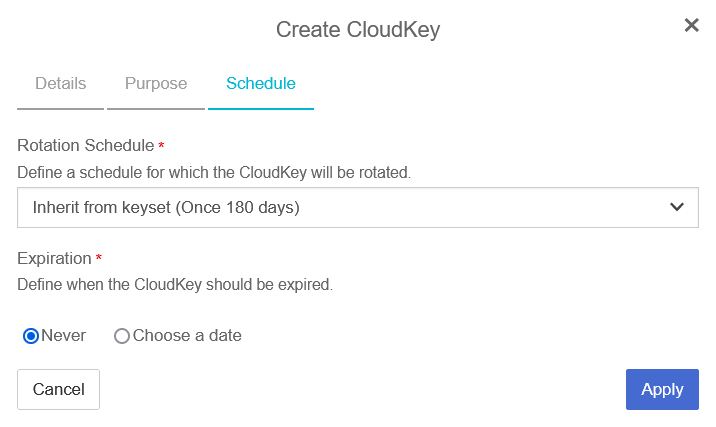
In the Schedule tab, select the Rotation Schedule and Expiration.
For example:
-
Select Apply.
The cloud key is created.

-
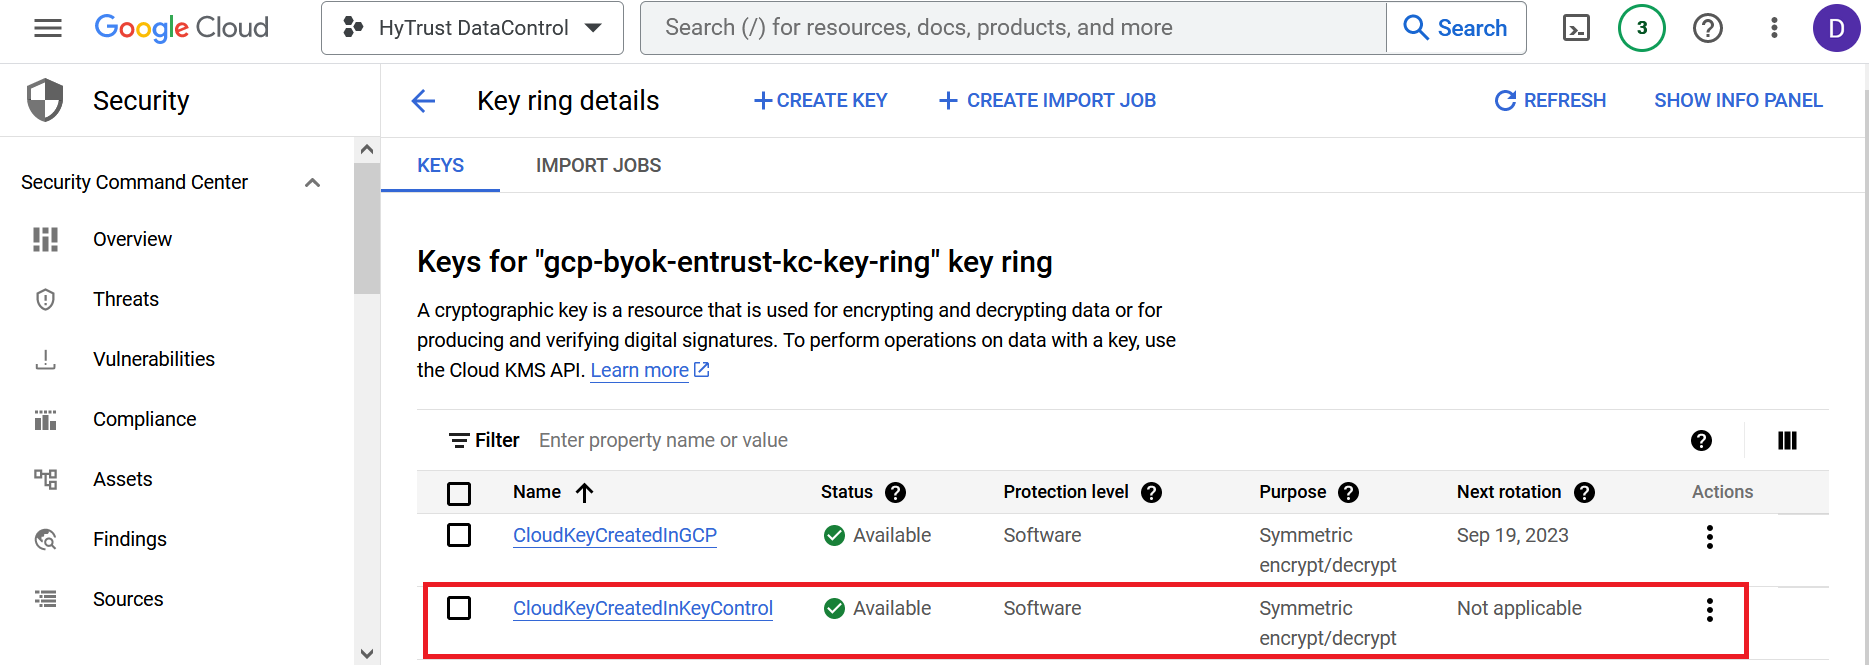
Verify the cloud key created in Entrust KeyControl is Available in the GCP key ring.
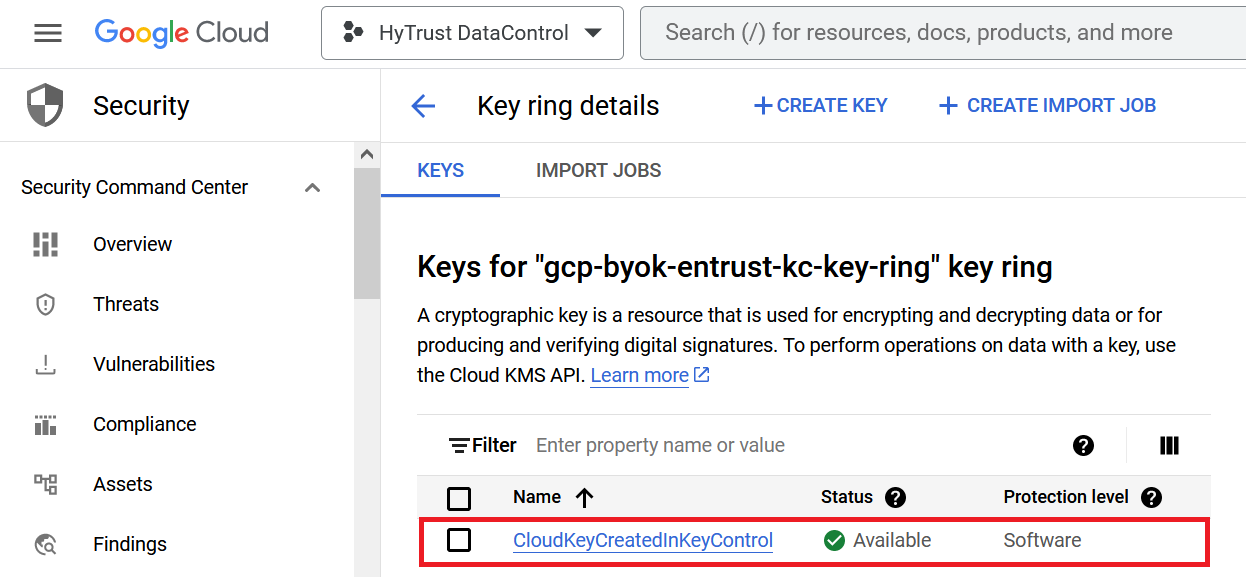
For additional information, see Creating a CloudKey.
Import a GCP cloud key into Entrust KeyControl
The following steps document how to import an existing cloud key from GCP to Entrust KeyControl.
| It is recommended that all cloud keys be created in Entrust KeyControl, and never directly in GCP. |
-
Open a browser and sign in to the GCP portal https://console.cloud.google.com.
-
In the navigation menu select Security > Key Management.
-
In the KEY RINGS tap in the left-hand pane, select the key ring created in [create-gcp-keyring].
-
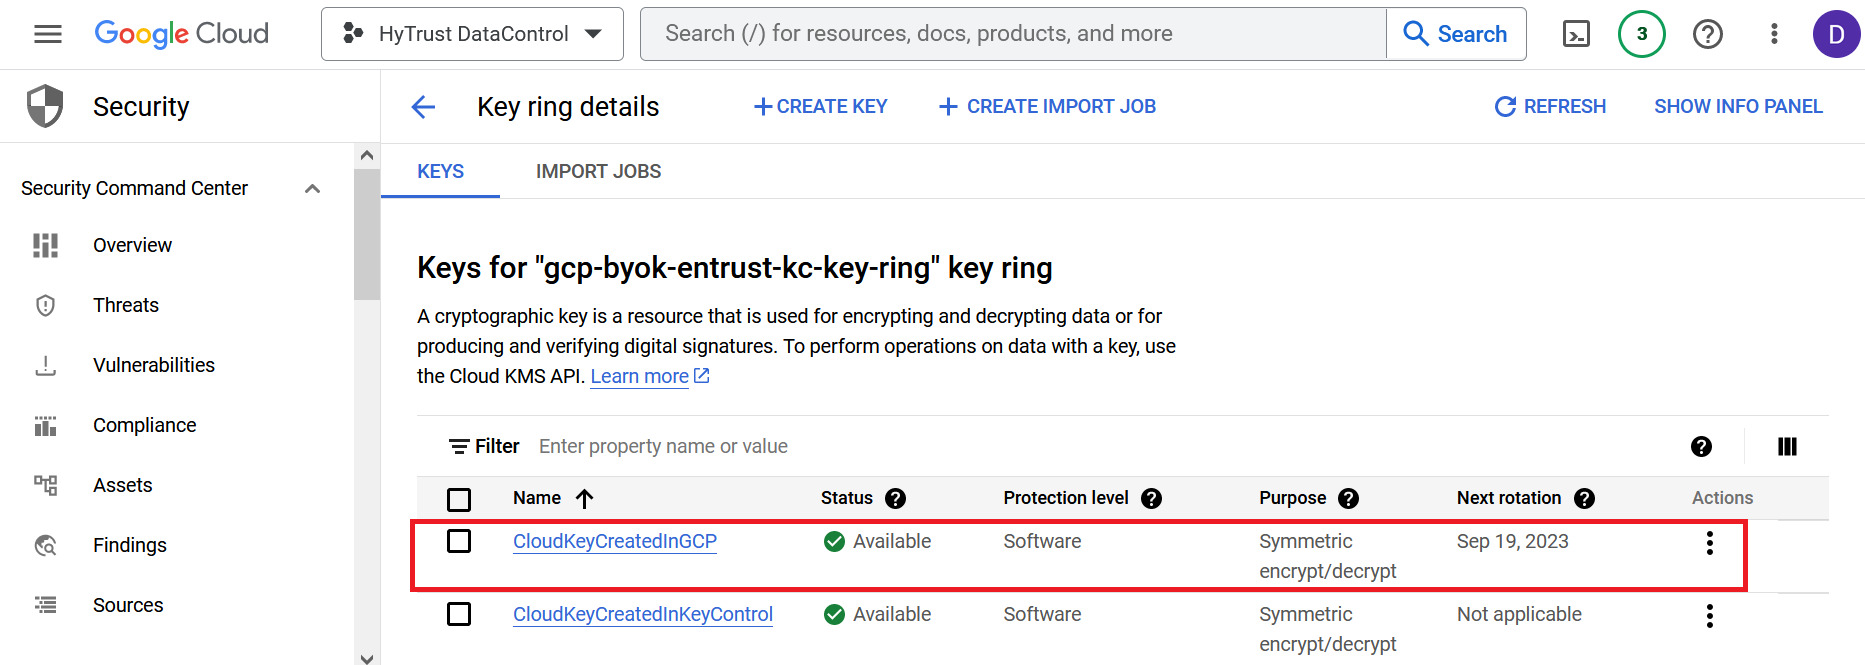
The existing cloud key in GCP to be imported into Entrust KeyControl is enclosed in the red box.
For example:
-
Sign in to the Entrust KeyControl Vault URL bookmark from [create-keycontrol-vault].
-
Select the CLOUDKEYS icon on the toolbar.
-
Select the Key Sets tab.
-
Select the key set created in Create a key set in Entrust KeyControl.
-
Select Actions > Import CloudKey.
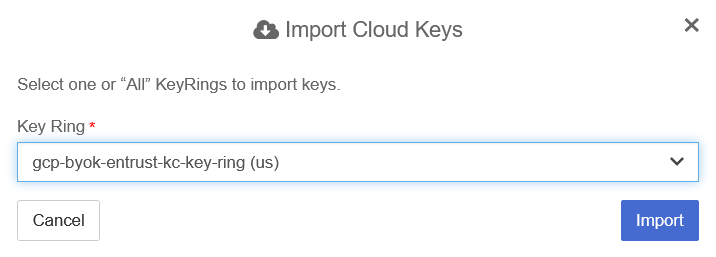
The Import Cloud Keys dialog appears.
-
From the Key Ring pull-down menu, select the GCP key ring created in [create-gcp-keyring].
For example:
-
Select Import.
The key is imported.
For example:

-
Verify that the GCP cloud key is AVAILABLE in Entrust KeyControl.

Rotate a cloud key in Entrust KeyControl
To rotate a cloud key in Entrust KeyControl:
-
Sign in to the Entrust KeyControl Vault URL bookmark from [create-keycontrol-vault].
-
Select the CLOUDKEYS icon on the toolbar.
-
Select the CloudKeys tab.
-
From the Key Set menu, select the Key Set created in Create a key set in Entrust KeyControl.
-
From the Key Ring menu, select the key ring created in [create-gcp-keyring].
-
Select the key to rotate.
For example:

-
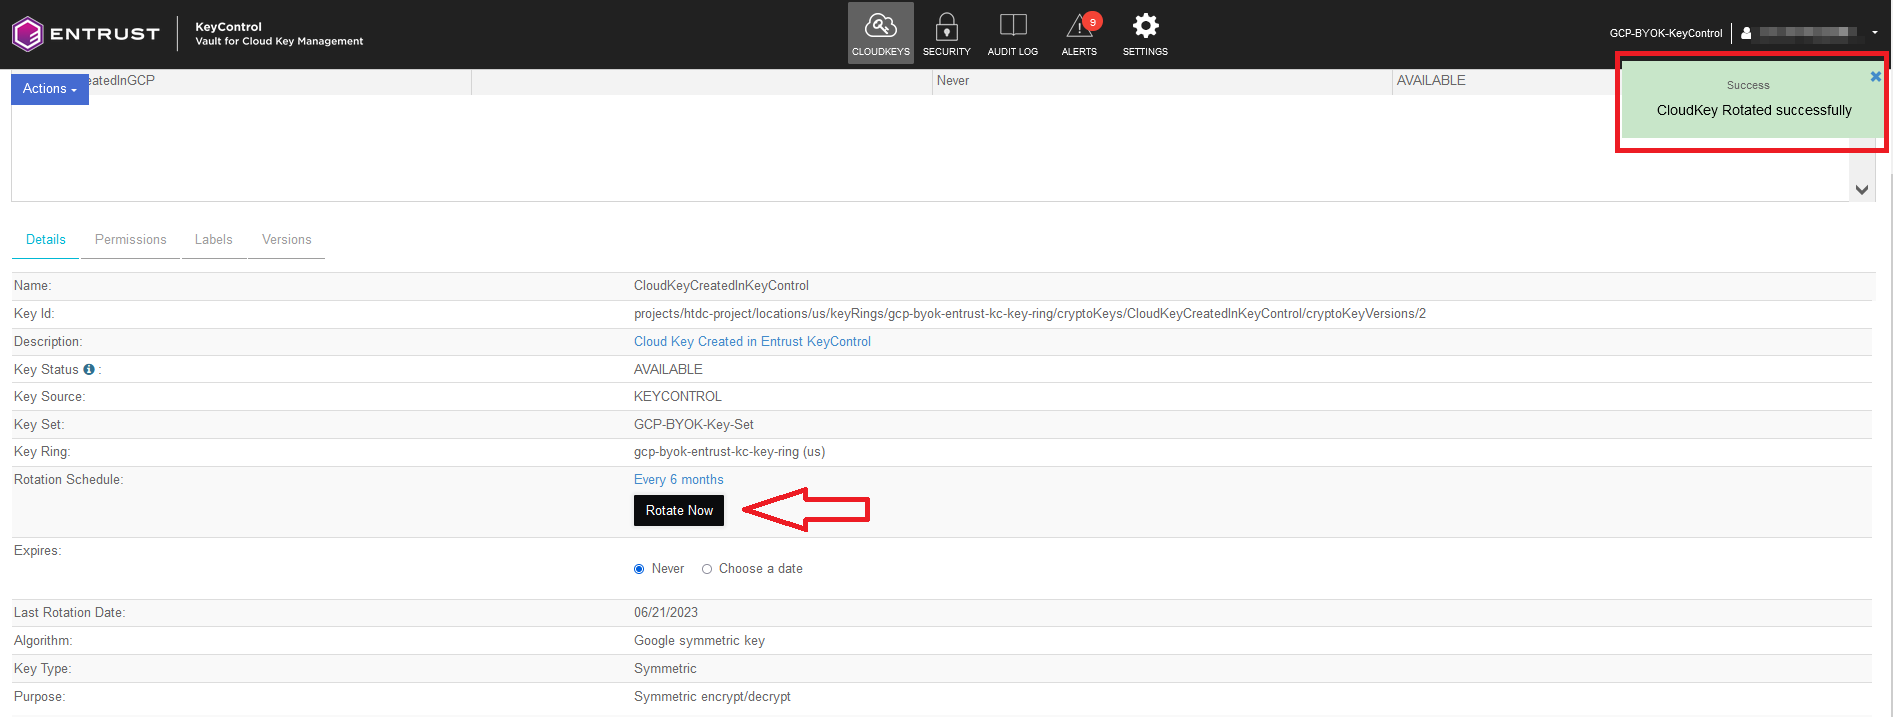
Select Rotate Now. You might need to scroll down the page to view this button.
For example:
-
In GCP, navigate to Security > Key Management.
-
In the KEY RINGS tab in the left-hand pane, select the key ring created in [create-gcp-keyring].
-
Select the key you just rotated in Entrust KeyControl.
-
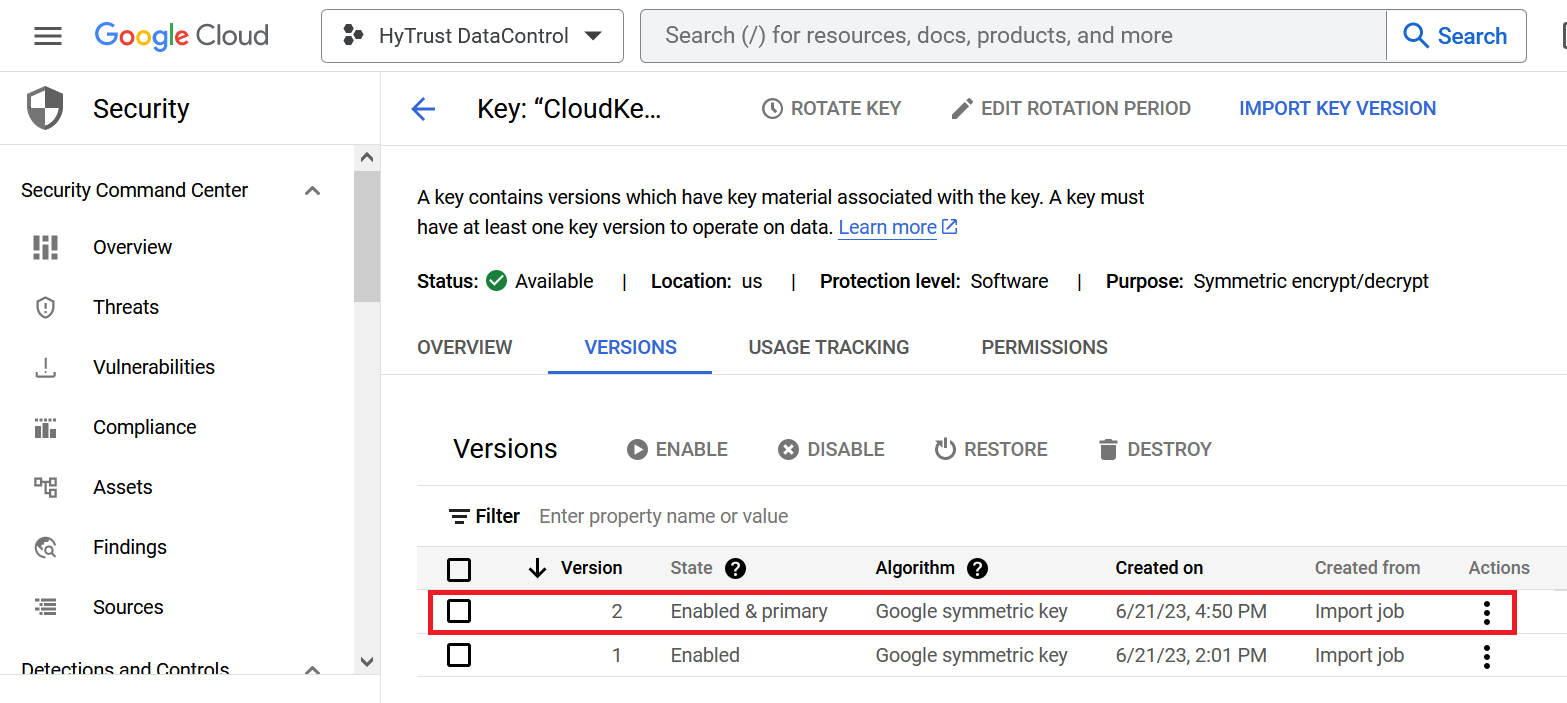
Verify that the key has been rotated in GCP in synchronization with Entrust KeyControl.
For example:
Remove a cloud key in Entrust KeyControl
A removed cloud key in Entrust KeyControl will no longer be available for use in GCP. However, Entrust KeyControl will keep a copy of the removed cloud key, which can be reloaded back to GCP for use.
-
Sign in to the Entrust KeyControl Vault URL bookmark from [create-keycontrol-vault].
-
Select the CLOUDKEYS icon on the toolbar.
-
Select the CloudKeys tab.
-
In the Key Set menu, select the Key Set created in Create a key set in Entrust KeyControl.
-
In the Key Ring menu, select the key ring created in [create-gcp-keyring].
-
Select the key to the removed.
-
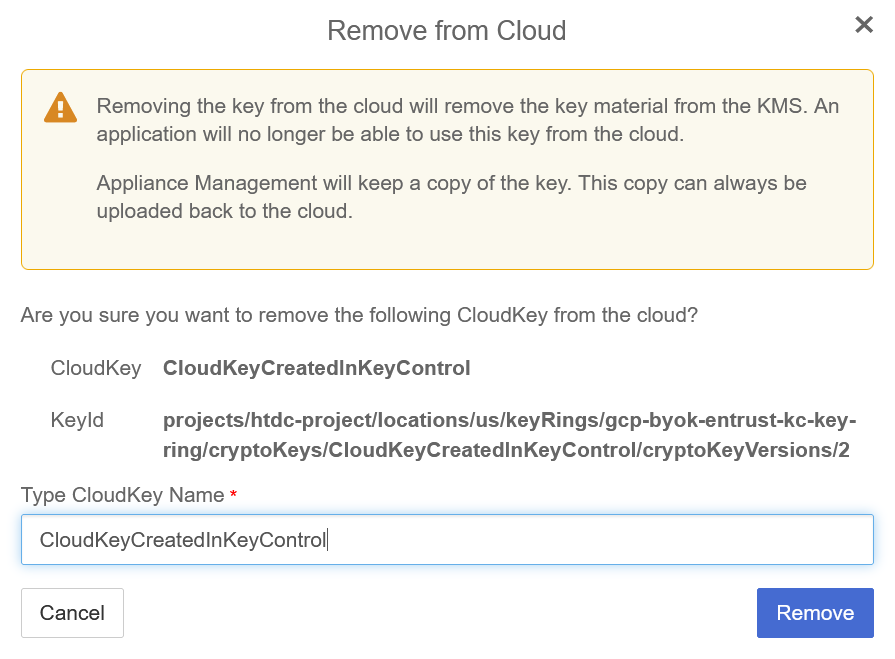
Select Actions > Remove from Cloud.
The Remove from Cloud dialog appears.
-
Type the name of the cloud key in Type CloudKey Name.
For example:
-
Select Remove.
-
Verify the status change in Entrust KeyControl.
For example:

-
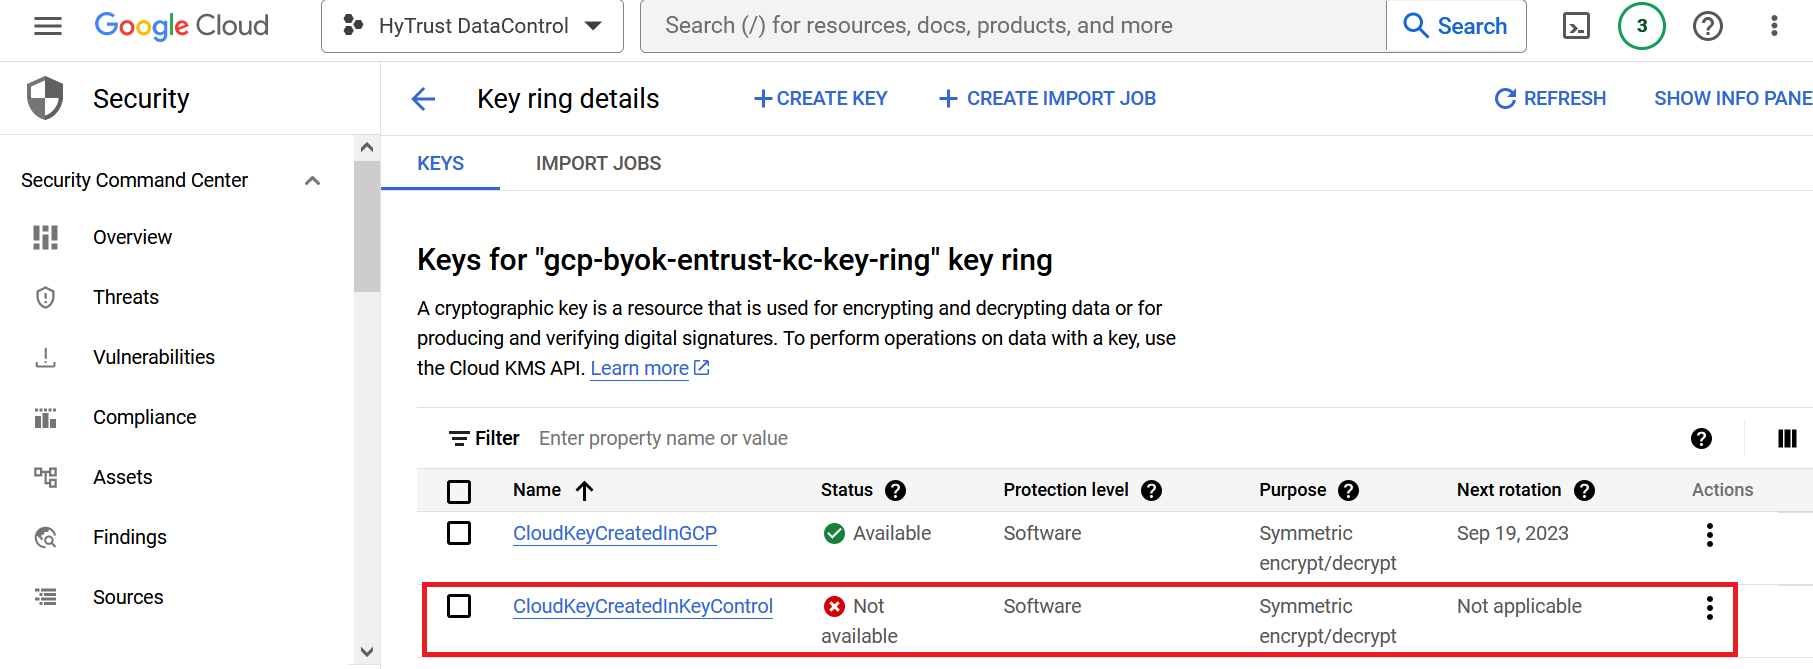
Verify the key is now Not available in GCP.
For example:
For additional information, see Removing a CloudKey from the Cloud.
Upload a removed Entrust KeyControl key back to GCP
Follow these steps to upload back to GCP the Entrust KeyControl key removed in Remove a cloud key in Entrust KeyControl.
-
Sign in to the Entrust KeyControl Vault URL bookmark from [create-keycontrol-vault].
-
Select the CLOUDKEYS icon on the toolbar.
-
Select the CloudKeys tab.
-
From the Key Set menu, select the Key Set created in Create a key set in Entrust KeyControl.
-
From the Key Ring menu, select the key ring created in [create-gcp-keyring].
-
Select the key to be uploaded.
-
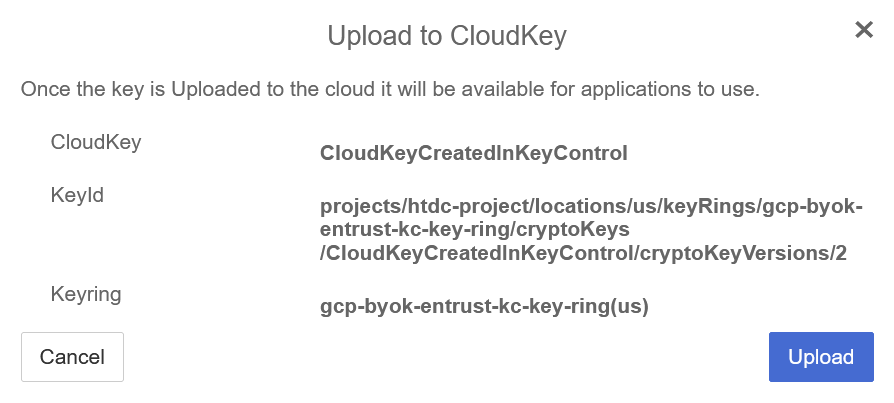
Select Actions > Upload to Cloud.
The Upload to CloudKey dialog appears.
For example:
-
Select Upload.
-
Verify the status change in Entrust KeyControl.
For example:

-
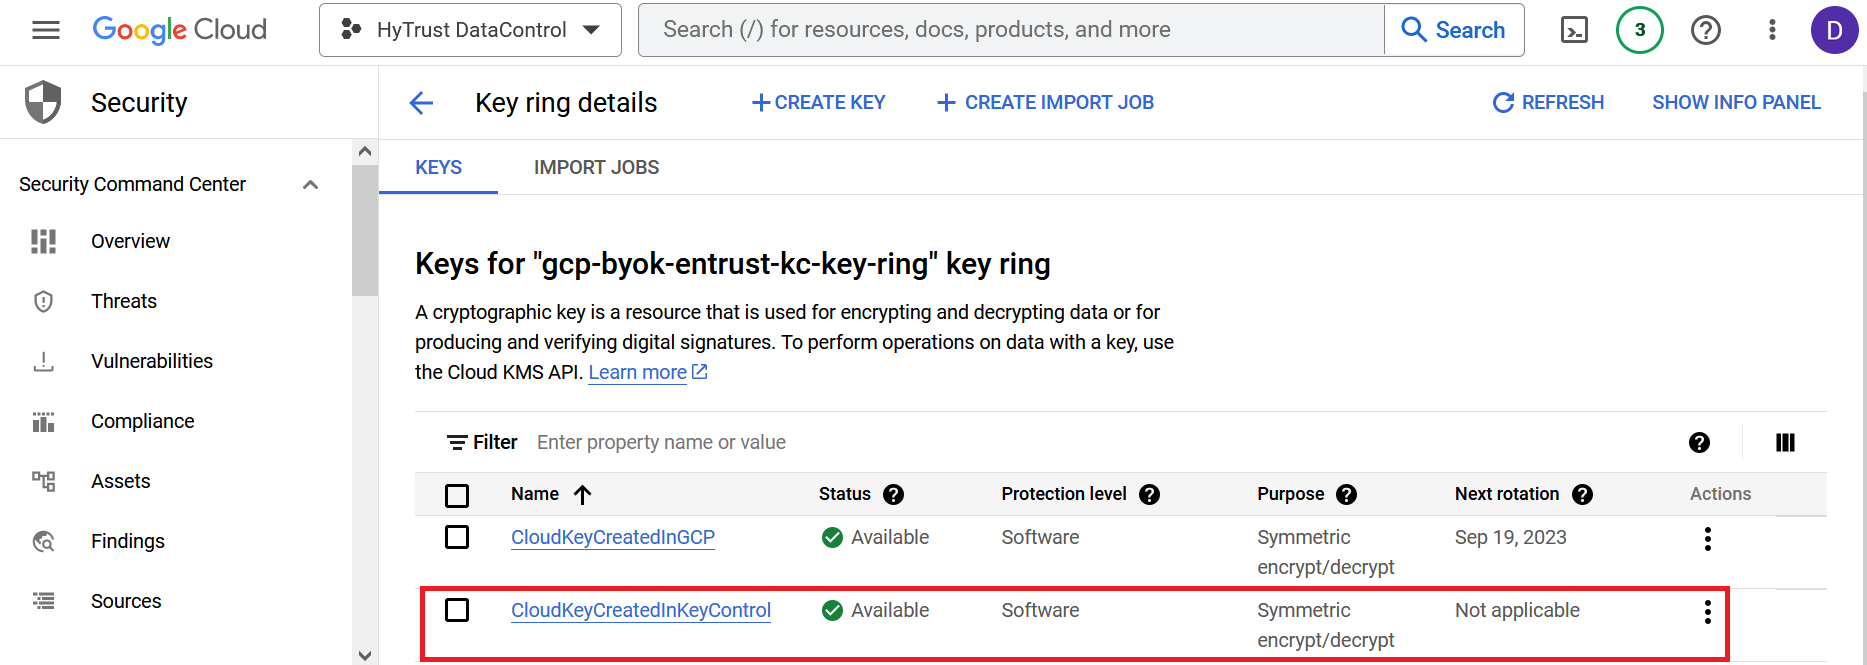
Verify the key is now Available in GCP.
For example:
Delete a cloud key in Entrust KeyControl
The deletion of a cloud key does not take effect immediately. However, after a user-defined interval, the key will be permanently removed.
-
Sign in to the Entrust KeyControl Vault URL bookmark from [create-keycontrol-vault].
-
Select the CLOUDKEYS icon on the toolbar.
-
Select the CloudKeys tab.
-
From the Key Set menu, select the Key Set created in Create a key set in Entrust KeyControl.
-
From the Key Ring menu, select the key ring created in [create-gcp-keyring].
-
Select the key to delete.
-
Select Actions > Delete CloudKey.
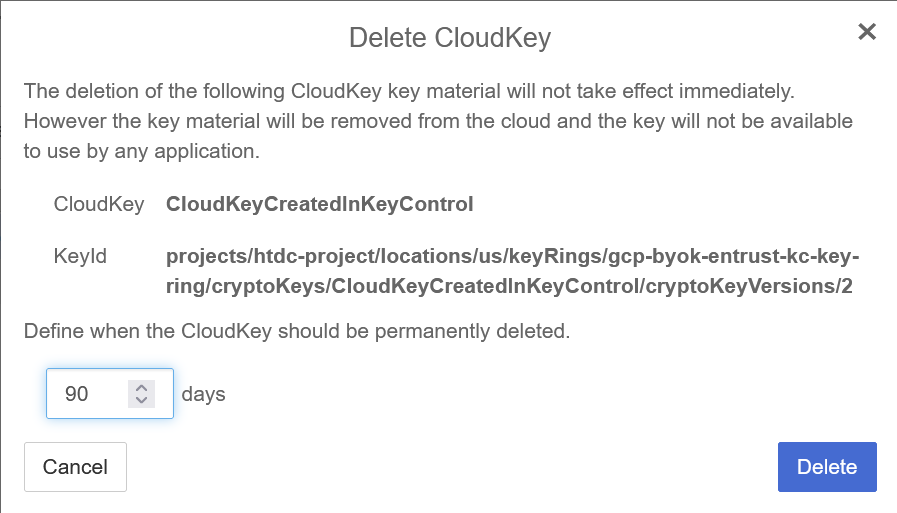
The Delete CloudKey dialog appears.
-
Select a time in Define when the CloudKey should be permanently deleted.
For example:
-
Select Delete.
-
Verify the status change in Entrust KeyControl.
For example:

-
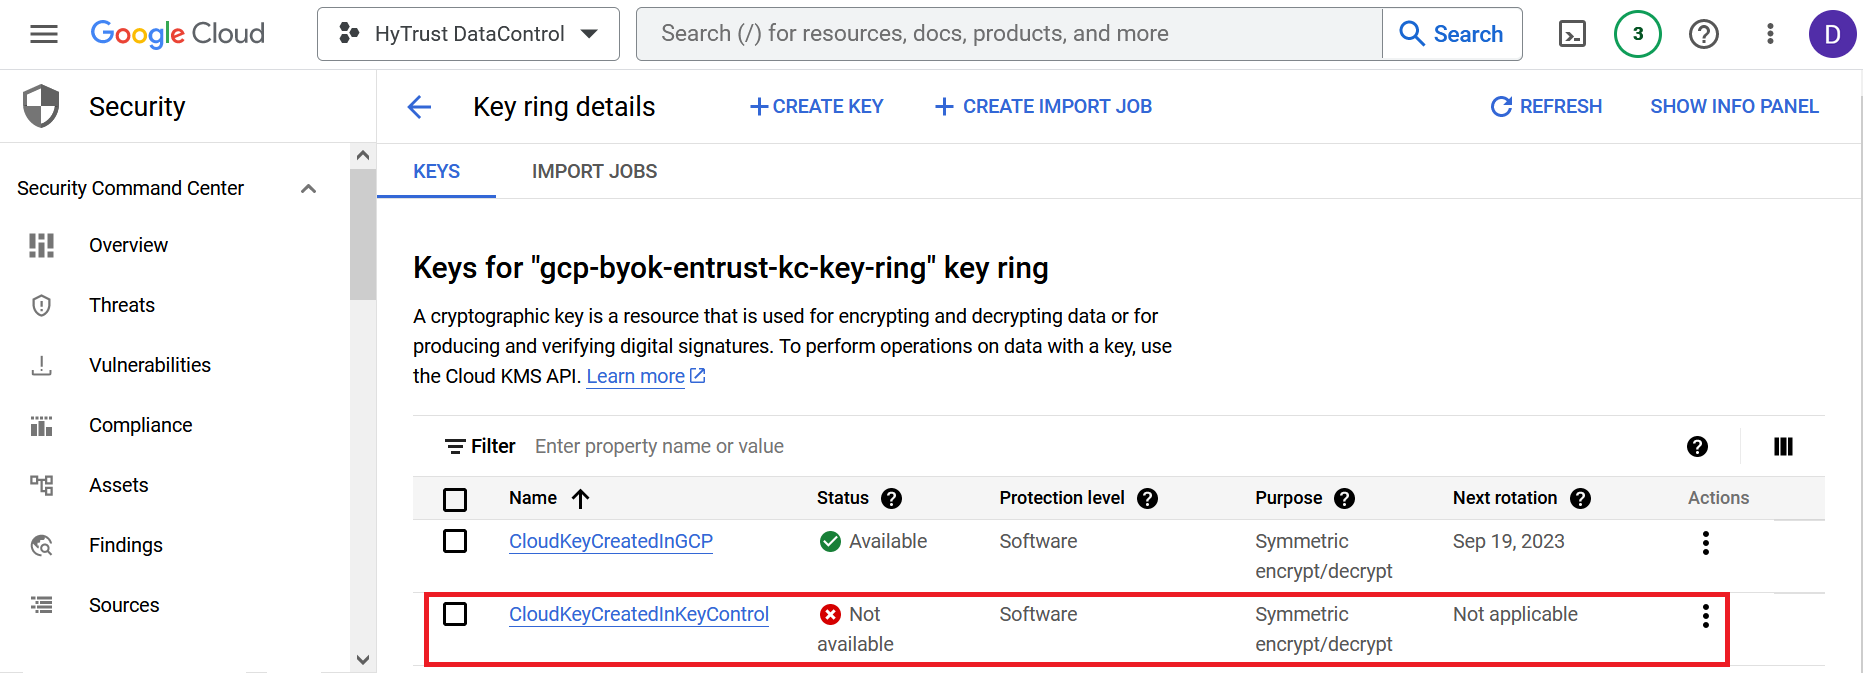
Verify the key is now Not available in GCP.
For example:
| A permanently removed key continues to appear in both GCP and Entrust KeyControl. Its status is set to *Destroyed" by GCP. Neither the key nor its name can ever be used again. |
For additional information, see Deleting a CloudKey.
Cancel a cloud key deletion in Entrust KeyControl
The deletion of a key can be canceled while the time in the Define when the CloudKey should be permanently deleted setting has not expired. Follow these steps to upload back to GCP the Entrust KeyControl key deleted in Delete a cloud key in Entrust KeyControl.
-
Sign in to the Entrust KeyControl Vault URL bookmark from [create-keycontrol-vault].
-
Select the CLOUDKEYS icon on the toolbar.
-
Select the CloudKeys tab.
-
In the Key Set menu, select the Key Set created in Create a key set in Entrust KeyControl.
-
In the Key Ring menu, select the key ring created in [create-gcp-keyring].
-
Select the key deletion to be canceled.
-
Select Actions > Cancel Deletion.
The Cancel Deletion dialog box appears.
For example:

-
Select Yes, Cancel Deletion.
-
Verify the status change in Entrust KeyControl.
For example:

-
Select Actions > Enable CloudKey.
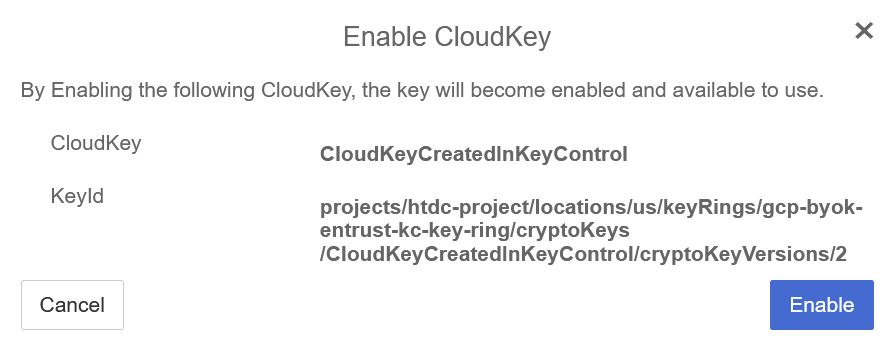
The Enable CloudKey dialog box appears.
For example:
-
Select Enable.
-
Verify the status change in Entrust KeyControl.
For example:

-
Verify the key is now Available in GCP.
For example:
For additional information, see Canceling a CloudKey Deletion.