Post-Quantum Cryptography Testing
This section outlines the nShield product configuration requirements and the specific testing procedures needed to integrate post-quantum key generation and certificate signing with Microsoft Authenticode.
Product configurations
Entrust has successfully tested nShield HSM integration with Microsoft Authenticode in Microsoft Windows Server 2025 in the following configurations, with OCS, softcard, and module protection:
| Product | Version |
|---|---|
Base OS |
Windows Server 2025, OS-build 26100.32995 |
Microsoft .NET Framework |
4.8 |
Windows SDK |
10.0.26100 |
Supported nShield features
Entrust has successfully tested nShield HSM integration with the following features:
| Feature | Support |
|---|---|
Operator Card Set (OCS) |
Yes |
Softcard Protection |
Yes |
Module Protection |
Yes |
nSaaS |
Yes |
Supported nShield hardware and software versions
| Product | Security World Software | Firmware | Image |
|---|---|---|---|
Connect XC |
13.9.5 |
13.8.3 |
13.9.5 |
nShield 5C |
13.9.5 |
13.8.4 |
13.9.5 |
Overview
The testing procedures documented here are similar to the procedures used in non-PQC environments, with key differences in a few areas. This section of the guide assumes that the environment is set up according to the directions outlined earlier in this document within Install the Microsoft tools. The following steps highlight the variations required for post-quantum testing; all other aspects follow the standard process.
| Ensure you are installing a Security World software version that supports post-quantum cryptography, as described in Supported nShield hardware and software versions. For detailed instructions, see the Installation Guide and the User Guide for the HSM available from the installation disc. |
Generate the Authenticode master key
This key will be protected by the HSM.
-
Launch PowerShell as Administrator, and run the following script:
> .\Generate_ML-DSA_Authenticode_MasterKey.ps1You can run this script with the following options:
-
-ParameterSet: Changes the type of the ML-DSA key (ML-DSA 44, 65, 87) -
-KeyName: Changes the name of the key
For example, to generate an ML-DSA 87 key with the default name, you would run the script as follows:
> .\Generate_ML-DSA_Authenticode_MasterKey.ps1 -ParameterSet 87Display the Generate_ML-DSA_Authenticode_MasterKey.ps1 script
param( [ValidateSet("44", "65", "87")] [string]$ParameterSet = "87", [string]$KeyName = "" ) if ([string]::IsNullOrWhiteSpace($KeyName)) { $KeyName = "Authenticode_MLDSA${ParameterSet}_MasterKey" } $cngProviderName = "nCipher Security World Key Storage Provider" $cngAlgorithmName = "ML-DSA" $cngProvider = New-Object System.Security.Cryptography.CngProvider($cngProviderName) $cngKeyParams = New-Object System.Security.Cryptography.CngKeyCreationParameters $cngKeyParams.Provider = $cngProvider $cngKeyParams.KeyCreationOptions = [System.Security.Cryptography.CngKeyCreationOptions]::OverwriteExistingKey $paramSetBytes = [System.Text.Encoding]::Unicode.GetBytes("$ParameterSet`0") $parameterSetProperty = New-Object System.Security.Cryptography.CngProperty( "ParameterSetName", $paramSetBytes, [System.Security.Cryptography.CngPropertyOptions]::None ) $cngKeyParams.Parameters.Add($parameterSetProperty) $cngAlgorithm = New-Object System.Security.Cryptography.CngAlgorithm($cngAlgorithmName) $cngKey = [System.Security.Cryptography.CngKey]::Create( $cngAlgorithm, $KeyName, $cngKeyParams ) Write-Host "Key successfully created." Write-Host "Provider: $cngProviderName" Write-Host "Algorithm: $cngAlgorithmName" Write-Host "Parameter Set: $ParameterSet" Write-Host "Key Name: $KeyName" $cngKey -
-
Enter the credentials associated with the protection method you selected when you installed the CNG provider.
An ML-DSA key pair called
Authenticode_MLDSA_MasterKeyis generated (the name may vary depending on the key size or on the name you specified). The key is encrypted in the HSM, and then pushed to the requesting On-Premise Client server, where it is stored as an Application Key Token in the%NFAST_KMDATA%\localfolder (C:\ProgramData\nCipher\Key Management Data\local). -
Verify the new key with
nfkminfo -k:> nfkminfo -k Key list - 1 keys AppName caping Ident s-1-5-21-1456163111-1567960500-3523019067-500--b15c34b0ee3ef43bb6405bd4946f86190b60a7a5 -
Display the key information by running
nfkminfo -kagain, this time with theAppNameandIdentfrom the output in the previous step:nfkminfo -k <AppName> <Ident>The protection method is displayed according to the type of protection you are using:
For OCS Cardset
For Softcard Passphrase
For Module protection Module
You can check the actual key name in the
nameline.For example:
> nfkminfo -k caping  s-1-5-21-1456163111-1567960500-3523019067-500--b15c34b0ee3ef43bb6405bd4946f86190b60a7a5
Key AppName caping Ident s-1-5-21-1456163111-1567960500-3523019067-500--b15c34b0ee3ef43bb6405bd4946f86190b60a7a5
BlobKA length         5316
BlobPubKA length      2820
BlobRecoveryKA length 5704
name                  "Authenticode_MLDSA87_MasterKey"
hash                  1984db66564a85596531ef4fe1e1178cf2525d4f
recovery              Enabled
protection            Module
other flags           PublicKey !SEEAppKey !NVMemBlob +0x0
gentime               2026-07-27 16:16:48
SEE integrity key     NONE

BlobKA
format                5 Module
other flags           0x0
hkm                   417f6e05283d8abad40ee3ee49db304c70027535
hkt                   none
hkr                   none

BlobRecoveryKA
format                9 UserKey
other flags           0x0
hkm                   none
hkt                   none
hkr                   ff6ec9c6c1a13a37d30c3a29ae56a51cbfd107ca

BlobPubKA
format                5 Module
other flags           0x0
hkm                   c2be99fe1c77f1b75d48e2fd2df8dffc0c969bcb
hkt                   none
hkr                   none

Extra entry #1
typecode              0x10000 65536
length                132
Not a blob
Generate the Authenticode signing certificate
A self-signed code signing certificate will be generated for the purpose of this Integration Guide.
-
Launch PowerShell as Administrator, and run the following script:
> .\Generate_ML-DSA_Authenticode_SelfCert.ps1Ensure you provide the same
-ParameterSetvalue you used when generating the key in the previous step, for example:> .\Generate_ML-DSA_Authenticode_SelfCert.ps1 -ParameterSet 87Display the Generate_ML-DSA_Authenticode_SelfCert.ps1 script
param( [ValidateSet("44","65","87")] [string]$ParameterSet = "87" ) $cngProviderName = "nCipher Security World Key Storage Provider" $subjectName = "Authenticode ML-DSA-$ParameterSet Code Signing Certificate" $friendlyName = "Authenticode_MLDSA${ParameterSet}_SelfCert" $locationName = "Cert:\CurrentUser\My" $containerName = "Authenticode_MLDSA${ParameterSet}_MasterKey" New-SelfSignedCertificate ` -Subject $subjectName ` -FriendlyName $friendlyName ` -Type CodeSigningCert ` -CertStoreLocation $locationName ` -Provider $cngProviderName ` -ExistingKey ` -Container $containerName -
Enter the credentials associated with your selected protection method.
When the script completes, the PowerShell command line displays the following information:
PSParentPath: Microsoft.PowerShell.Security\Certificate::CurrentUser\My Thumbprint Subject ---------- ------- 5B27B1E51D12161A5EC994DF65ECB262E93BEAEA CN=Authenticode ML-DSA-87 Code Signing Certificate -
To view the self-signed certificate, run the following command in a PowerShell window:
> Get-ChildItem Cert:\CurrentUser\My | Format-Table Subject,FriendlyName,Thumbprint,HasPrivateKey

Subject                                            FriendlyName                  Thumbprint
-------                                            ------------                  ----------
CN=Authenticode ML-DSA-87 Code Signing Certificate Authenticode_MLDSA87_SelfCert 5B27B1E51D12161A5EC994DF65ECB262E93...
You can also view it with the Windows Certificate Manager.
Sign and timestamp the code with Microsoft SDK
The signtool utility is used for signing.
The Entrust online Time Stamp Server (TSS) is used to timestamp.
signtool can access the code-signing certificate the following ways:
-
Directly, from the certificate store with the thumbprint. This is the preferred method.
-
By name, for example,
Authenticode Code Signing Certificate. -
By pointing to a
.cerfile that was created by exporting the certificate.
If you plan to access the certificate by pointing to a .cer file, perform the following steps first:
-
Export the certificate to your preferred location in the file system.
> Export-Certificate -FilePath "Place_Output_Certificate_Path_Here" -Cert (Get-ChildItem Cert:\CurrentUser\My | Where-Object { $_.FriendlyName -eq "Place_Friendly_Name_Here" } | Select-Object -First 1)For example:
> Export-Certificate -FilePath "C:\Users\Administrator\Documents\Authenticode_MLDSA87_SelfCert.cer" -Cert (Get-ChildItem Cert:\CurrentUser\My | Where-Object { $_.FriendlyName -eq "Authenticode_MLDSA87_SelfCert" } | Select-Object -First 1) Directory: C:\Users\Administrator\Documents Mode LastWriteTime Length Name ---- ------------- ------ ---- -a---- 7/27/2026 12:38 PM 7527 Authenticode_MLDSA87_SelfCert.cer -
View the exported certificate by navigating to it in File Explorer, right-clicking it, and selecting Properties.
An executable called MyTestApplication.exe was created for the purpose of this guide.
Sign and timestamp it by running one of the signing scripts provided.
There is a script for each protection method.
To sign and timestamp the test executable, run the appropriate script based on your protection method.
You might need to modify the $fileName line in the script before you run it to update the filepath for the executable.
-
OCS card protection:
> .\Sign_with_MS_SDK_PQC_OCS.ps1 -ParameterSet 87When prompted, select the HSM and enter the passphrase.
Display the Sign_with_MS_SDK_PQC_OCS.ps1 script
param( [ValidateSet("44","65","87")] [string]$ParameterSet = "87" ) $friendlyName = "Authenticode_MLDSA${ParameterSet}_SelfCert" $certHash = (Get-ChildItem Cert:\CurrentUser\My | Where-Object { $_.FriendlyName -eq $friendlyName } | Select-Object -First 1 -ExpandProperty Thumbprint) if (-not $certHash) { throw "Certificate '$friendlyName' not found." } $timestampServer = "http://timestamp.entrust.net/TSS/RFC3161sha2TS" $fileName = "C:\Users\Administrator\Documents\MyTestApplication.exe" signtool sign ` /debug ` /fd SHA256 ` /sha1 $certHash ` /td SHA256 ` /tr $timestampServer ` $fileName -
Softcard protection:
> .\Sign_with_MS_SDK_PQC_Softcard.ps1 -ParameterSet 87When prompted, enter the passphrase.
Display the Sign_with_MS_SDK_PQC_Softcard.ps1 script
param( [ValidateSet("44","65","87")] [string]$ParameterSet = "87" ) $cngProviderName = "nCipher Security World Key Storage Provider" $containerName = "Authenticode_MLDSA${ParameterSet}_MasterKey" $certificatePath = "C:\Users\Administrator\Documents\Authenticode_MLDSA${ParameterSet}_SelfCert.cer" $password = "1234" $timestampServer = "http://timestamp.entrust.net/TSS/RFC3161sha2TS" $fileName = "C:\Users\Administrator\Documents\MyTestApplication.exe" signtool sign ` /debug ` /fd SHA256 ` /csp $cngProviderName ` /kc $containerName ` /f $certificatePath ` /p $password ` /td SHA256 ` /tr $timestampServer ` $fileName -
Module protection:
> .\Sign_with_MS_SDK_PQC_Module.ps1 -ParameterSet 87Display the Sign_with_MS_SDK_PQC_Module.ps1 script
param(
    [ValidateSet("44","65","87")]
    [string]$ParameterSet = "87"
)

$friendlyName = "Authenticode_MLDSA${ParameterSet}_SelfCert"

$certHash = (
    Get-ChildItem Cert:\CurrentUser\My |
    Where-Object { $_.FriendlyName -eq $friendlyName } |
    Select-Object -First 1 -ExpandProperty Thumbprint
)

$timestampServer = "http://timestamp.entrust.net/TSS/RFC3161sha2TS"
$fileName = "C:\Users\Administrator\Documents\MyTestApplication.exe"

signtool sign `
    /debug `
    /fd SHA256 `
    /sha1 $certHash `
    /td SHA256 `
    /tr $timestampServer `
    $fileName
For all protection types, the PowerShell command line displays script output information similar to the following:
The following certificates were considered:
    Issued to: Authenticode ML-DSA-87 Code Signing Certificate
    Issued by: Authenticode ML-DSA-87 Code Signing Certificate
    Expires:   Wed Jul 14 10:36:15 2027
    SHA1 hash: 7D5F95A9CF17893EE17425AB9CCBD3486745E7BC

After EKU filter, 1 certs were left.
After expiry filter, 1 certs were left.
After Subject Name filter, 1 certs were left.
After Private Key filter, 1 certs were left.
The following certificate was selected:
    Issued to: Authenticode ML-DSA-87 Code Signing Certificate
    Issued by: Authenticode ML-DSA-87 Code Signing Certificate
    Expires:   Wed Jul 14 10:36:15 2027
    SHA1 hash: 7D5F95A9CF17893EE17425AB9CCBD3486745E7BC

Done Adding Additional Store
Successfully signed: C:\Users\Administrator\MyTestApplication.exe

Number of files successfully Signed: 1
Number of warnings: 0
Number of errors: 0
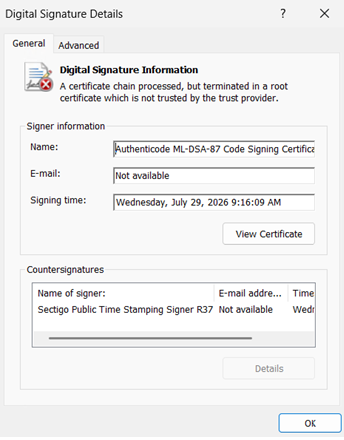
To view the update timestamp and signing parameters:
-
Select the Properties of the test executable that was signed.
-
On the Digital Signatures tab, select Details.