Procedures
To install and configure Microsoft Authenticode with an HSM:
-
Install the Microsoft Windows SDK.
-
Install the nShield Security World software and create a Security World.
-
Install and register the CNG provider.
The installation procedures outlined here assume, for example purposes, that you are installing an offline root Certificate System. It is also assumed that a new root key is generated during installation, rather than a software key being imported from an existing installation.
Install the Microsoft tools
-
Install the Microsoft Windows SDK, which contains the Authenticode programs such as
signtoolandsn(Strong Name Tool). See the appropriate Microsoft SDK installation documentation. -
Add the path to the above programs to the Windows Environment Variable, since it might be long.
-
Second line: path to the nShield utilities.
-
Third line: path to the
signtoolutility. -
Fourth line: path to the
snutility. -
Fifth line: path to the
csc.execompiler.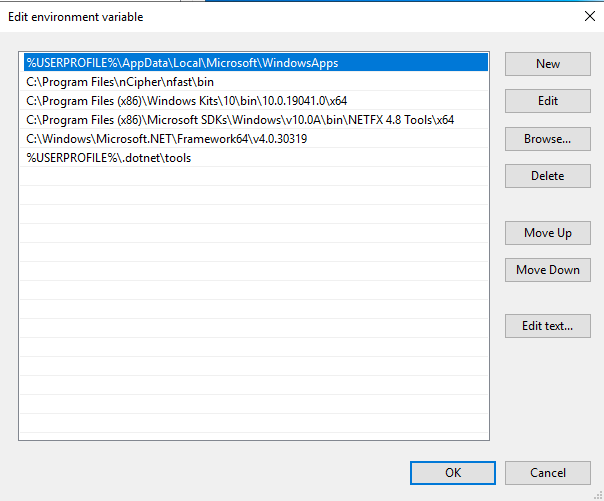
-
-
Install the PowerShell PKI module:
PS C:\Users\Administrator> Get-Command -Module PKI

CommandType     Name                                               Version    Source
-----------     ----                                               -------    ------
Cmdlet          Add-CertificateEnrollmentPolicyServer              1.0.0.0    PKI
Cmdlet          Export-Certificate                                 1.0.0.0    PKI
Cmdlet          Export-PfxCertificate                              1.0.0.0    PKI
Cmdlet          Get-Certificate                                    1.0.0.0    PKI
Cmdlet          Get-CertificateAutoEnrollmentPolicy                1.0.0.0    PKI
Cmdlet          Get-CertificateEnrollmentPolicyServer              1.0.0.0    PKI
Cmdlet          Get-CertificateNotificationTask                    1.0.0.0    PKI
Cmdlet          Get-PfxData                                        1.0.0.0    PKI
Cmdlet          Import-Certificate                                 1.0.0.0    PKI
Cmdlet          Import-PfxCertificate                              1.0.0.0    PKI
Cmdlet          New-CertificateNotificationTask                    1.0.0.0    PKI
Cmdlet          New-SelfSignedCertificate                          1.0.0.0    PKI
Cmdlet          Remove-CertificateEnrollmentPolicyServer           1.0.0.0    PKI
Cmdlet          Remove-CertificateNotificationTask                 1.0.0.0    PKI
Cmdlet          Set-CertificateAutoEnrollmentPolicy                1.0.0.0    PKI
Cmdlet          Switch-Certificate                                 1.0.0.0    PKI
Cmdlet          Test-Certificate                                   1.0.0.0    PKI
Install the Security World software and create a Security World
-
Install the Security World software by double-clicking on the
SecWorld_Windows-xx.xx.xx.isofile. For detailed instructions, see the Installation Guide and the User Guide for the HSM available from the installation disc. -
Add the Security World utilities path
C:\Program Files\nCipher\nfast\binto the Windows system path. -
Open the firewall port 9004 for the HSM connections.
-
Install the nShield Connect HSM locally, remotely, or remotely via the serial console. See the following nShield Support articles, and the Installation Guide for the HSM:
Access to the Entrust nShield Support Portal is available to customers under maintenance. To request an account, contact nshield.support@entrust.com. -
Open a command window and run the following to confirm that the HSM is
operational:>enquiry Server: enquiry reply flags none enquiry reply level Six serial number 530E-02E0-D947 7724-8509-81E3 09AF-0BE9-53AA 9E10-03E0-D947 mode operational ... Module #1: enquiry reply flags none enquiry reply level Six serial number 530E-02E0-D947 mode operational ... -
Create your Security World if one does not already exist, or copy an existing one. Follow your organization’s security policy for this.
-
Confirm that the Security World is
usable:>nfkminfoAuthen generation 2 state 0x37270008 Initialised Usable ... ... Module #1 generation 2 state 0x2 Usable ...
Install and register the CNG provider
-
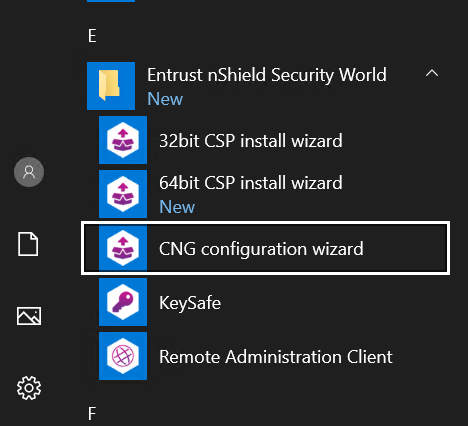
Select the Start button to access all applications. Look for the recently installed nShield utilities.
-
Double-click the CNG configuration wizard and run it as Administrator.
-
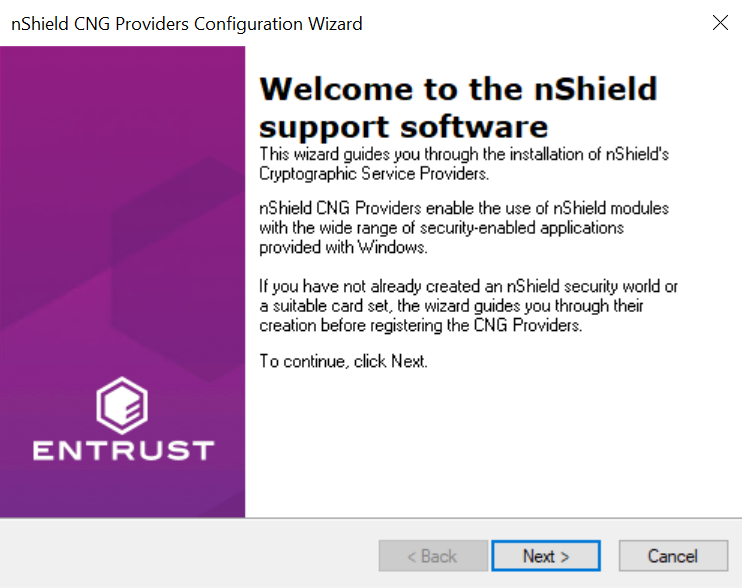
Select Next on the CNG Install welcome screen.
-
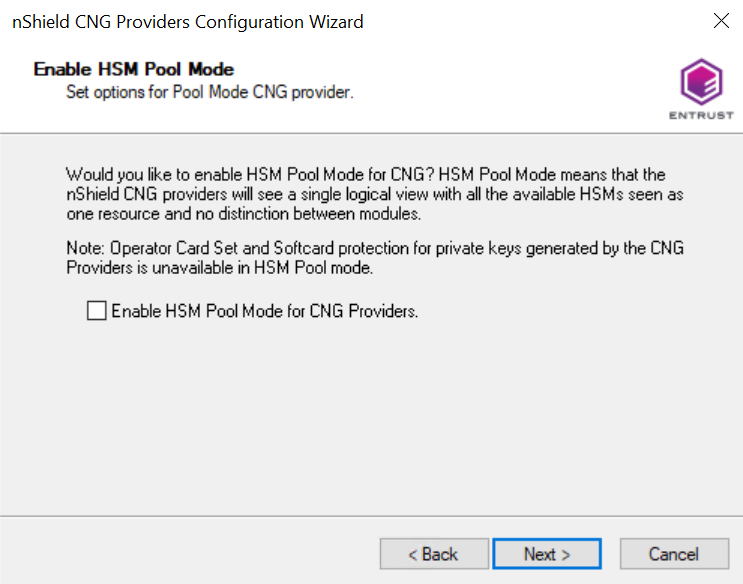
Select Next on the Enable HSM Pool Mode screen. Leave the Enable HSM Pool Mode for CNG Providers check box un-checked.
-
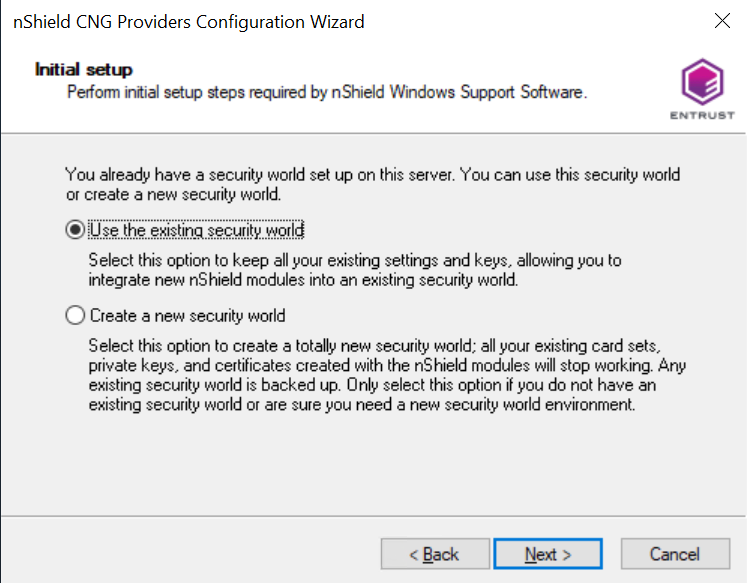
At the Security World screen, select:
-
Use the existing security world if you already have a Security World that you intend to use for this integration. The corresponding
worldandmodule_xxxx-xxxx-xxxxfiles most be present in the%NFAST_KMDATA%\localfolder. Be prepared to present the quorum of Administrator cards. -
Create a new Security World if you do not currently have a Security World or would like to create a new Security World.
For the purposes of this Integration Guide, an existing Security World is used. For instructions on how to create and configure a new Security World, see the Installation Guide and User Guide for your HSM. Select Next.
-
-
The Set Module States pop-up shows the available HSM(s). Select the desired HSM. The state of the selected HMS should be
operational. Select Next.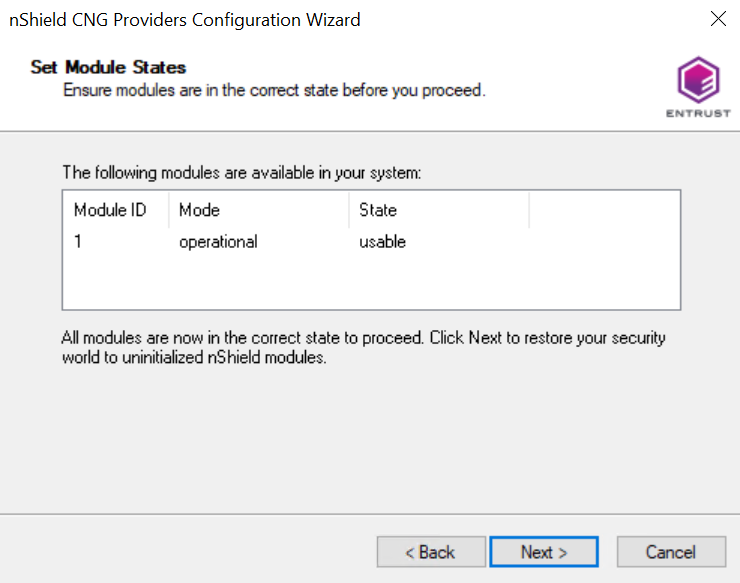
-
Select the protection method.
-
Module protection:
-
In Key Protection Setup, select Softcard protection, then select Next.
-
-
Operator Card Set protection:
-
In Key Protection Setup, select Operator Card Set, then select Next.
-
Enter the OCS name, K of N values, select Persistent and Usable remotely, then select Next.
-
Insert a blank Operator Card in the HSM.
-
In Insert Next Card, enter a name to for the OCS card, enter the passphrase for the OCS card, then select Next.
-
-
Softcard protection:
-
In Key Protection Setup, select Softcard protection , then select Next.
-
In Token for Key Protection, select Create a new Softcard named, enter the name of the Softcard and the passphrase for the Softcard, then select Next.
-
-
-
In Software installation, select Next.
The nShield CNG providers are installed and the key Storage Provider is registered.
-
Select Finish.
-
Open a command window as administrator and type the following to confirm that the KSP has been successfully registered. Look for nCipher Security World Key Storage Provider.
>cnglist.exe --list-providers Microsoft Key Protection Provider Microsoft Passport Key Storage Provider Microsoft Platform Crypto Provider Microsoft Primitive Provider Microsoft Smart Card Key Storage Provider Microsoft Software Key Storage Provider Microsoft SSL Protocol Provider Windows Client Key Protection Provider nCipher Primitive Provider nCipher Security World Key Storage Provider -
Check the registry in
CNGRegistry:HKEY_LOCAL_MACHINE\SYSTEM\ControlSet001\Control\Cryptography\Providers\nCipherSecurityWorldKeyStorageProvider
Generate the Authenticode master key
This key will be protected by the HSM.
-
Launch PowerShell as Administrator, and run
Generate_Authenticode_MasterKey.ps1:> .\Generate_Authenticode_MasterKey.ps1Script:
$cngProviderName = "nCipher Security World Key Storage Provider" $cngAlgorithmName = "RSA" $cngKeySize = 2048 $cngKeyName = "Authenticode_MasterKey" $cngProvider = New-Object System.Security.Cryptography.CngProvider($cngProviderName) $cngKeyParams = New-Object System.Security.Cryptography.CngKeyCreationParameters $cngKeyParams.provider = $cngProvider $cngKeyParams.KeyCreationOptions = [System.Security.Cryptography.CngKeyCreationOptions]::OverwriteExistingKey $keySizeProperty = New-Object System.Security.Cryptography.CngProperty("Length",[System.BitConverter]::GetBytes($cngKeySize), [System.Security.Cryptography.CngPropertyOptions]::None); $cngKeyParams.Parameters.Add($keySizeProperty) $cngAlgorithm = New-Object System.Security.Cryptography.CngAlgorithm($cngAlgorithmName) $cngKey = [System.Security.Cryptography.CngKey]::Create($cngAlgorithm, $cngKeyName, $cngKeyParams) -
Enter the credentials associated with the protection method:
-
OCS Card Protection:
The Create new key window appears.
-
Select Next.
The Select a method to protect new key window appears.
-
Select Operator Card Set protection.
-
Insert the OCS card in the HSM and select Next.
The Select token to protect key with window appears.
Notice that the OCS name appears in the Current Operator Card Sets box.
-
Select Next.
The Choose modules you wish to load the key onto window appears.
-
Add the HSM and select Finish.
A credentials window appears.
-
Enter the OCS passphrase and select Next.
The Card reading complete window appears.
-
Select Finish.
-
-
Softcard protection:
A softcard credentials window appears.
-
Enter the Softcard passphrase.
-
Select Finish.
-
-
Module protection:
No window appears for module protection.
A 2048-bit RSA key pair, called
Authenticode_MasterKey, is generated. The key is encrypted in the HSM, and then pushed to the requesting On-Premise Client server, where it is stored as an Application Key Token in the%NFAST_KMDATA%\localfolder (:\ProgramData\nCipher\Key Management Data\local). -
-
Verify the new key:
> nfkminfo -k Key list - 1 keys AppName caping Ident s-1-5-21-3303772969-3979158951-288552622-500--006507ceb938e7b01e42954ffd4e2238483710eb -
Display the information about the key by copy-pasting the key name. The protection method is displayed according to the type of protection you are using:
For OCS Cardset
For Softcard Passphrase
For module protection Module
> nfkminfo -k caping s-1-5-21-3303772969-3979158951-288552622-500--006507ceb938e7b01e42954ffd4e2238483710eb
Key AppName caping Ident s-1-5-21-3303772969-3979158951-288552622-500--006507ceb938e7b01e42954ffd4e2238483710eb
 BlobKA length         1128
 BlobPubKA length      484
 BlobRecoveryKA length 1496
 name                  "Authenticode_MasterKey"
 hash                  3e7a6ad6f44bbbd4b01b798d1846427f6f7cf7a7
 recovery              Enabled
 protection            CardSet
 other flags           PublicKey !SEEAppKey !NVMemBlob +0x0
 cardset               1e7c555a529da8dd3a1d41604e83ce2b2b9032f8
 gentime               2021-04-19 20:18:15
 SEE integrity key     NONE

BlobKA
 format                6 Token
 other flags           0x0
 hkm                   2a2e6b22ad6a72673473511d91304efd2f76e197
 hkt                   1e7c555a529da8dd3a1d41604e83ce2b2b9032f8
 hkr                   none

BlobRecoveryKA
 format                9 UserKey
 other flags           0x0
 hkm                   none
 hkt                   none
 hkr                   fc4cbd1a6e88c08dd35912d0aecabf47ff1e0c2a

BlobPubKA
 format                5 Module
 other flags           0x0
 hkm                   c2be99fe1c77f1b75d48e2fd2df8dffc0c969bcb
 hkt                   none
 hkr                   none

Extra entry #1
 typecode              0x10000 65536
 length                96
Not a blob
Generate the Authenticode signing certificate
A self-signed code signing certificate will be generated for the purpose of this Integration Guide.
-
Launch PowerShell as Administrator, and run
Generate_Authenticode_SelfCert.ps1:> .\Generate_Authenticode_SelfCert.ps1Script:
$cngProviderName = "nCipher Security World Key Storage Provider" $subjectName = "Authenticode Code Signing Certificate" $friendlyName = "Authenticode_SelfCert" # locationName = "Cert:\LocalMachine\My" $locationName = "Cert:\CurrentUser\My" $containerName = "Authenticode_MasterKey" New-SelfSignedCertificate -Subject $subjectName -FriendlyName $friendlyName -Type CodeSigningCert -CertStoreLocation $locationName -Provider $cngProviderName -ExistingKey -Container $containerName -
Enter the credentials associated with the protection method:
-
OCS card protection:
The Load key window appears.
-
Select Next.
The Choose modules you wish to load the key onto window appears.
-
Add the HSM and select Finish.
A credentials window appears.
-
Enter the OCS passphrase and select Next.
The Card reading complete window appears.
-
Select Finish.
-
-
Softcard protection:
A softcard credentials window appears.
-
Enter the Softcard passphrase.
-
Select Finish.
-
-
Module protection:
No pop-up window appears for module protection.
-
-
When the script completes, the PowerShell command line displays the following information:
> PowerShell -ExecutionPolicy Bypass -File Generate_Authenticode_SelfCert.ps1 PSParentPath: Microsoft.PowerShell.Security\Certificate::CurrentUser\My Thumbprint Subject ---------- ------- 1974F986D9B8BF32F47FC2AF33D6271DD905C44F CN=Authenticode Code Signing Certificate -
The self-signed certificate can be viewed at any time in a PowerShell window:
> Get-ChildItem -Path Cert:\CurrentUser\My -CodeSigningCert -Recurse


   PSParentPath: Microsoft.PowerShell.Security\Certificate::CurrentUser\My

Thumbprint                                Subject
----------                                -------
1974F986D9B8BF32F47FC2AF33D6271DD905C44F  CN=Authenticode Code Signing Certificate
The certificate can also be viewed with the Windows Certificate Manager.
Sign and time-stamp the code with Microsoft SDK
The signtool utility is used for signing.
The Entrust on-line Time Stamp Server (TSS) is used to time stamp.
signtool can access the code-signing certificate the following ways:
-
Directly from the certificate store with the thumbprint. This is the preferred method.
-
By name, for example
Authenticode Code Signing Certificate. -
By pointing to a
.cerfile that was created by exporting the certificate.
If you plan to access the certificate by pointing to a .cer file:
-
Export the certificate to your preferred location in the file system.
-
Launch PowerShell as Administrator, and run
Export_Certificate.ps1:> .\Export_Certificate.ps1Script:
$certificate = Get-ChildItem -Path Cert:\CurrentUser\My\ | Where-Object {$_.Subject -eq "CN=Authenticode Code Signing Certificate"} Export-Certificate -FilePath "C:\Users\Administrator\Documents\Authenticode Code Signing Certificate.cer" -Cert $certificate -
View the exported certificate by right-click on it and selecting Properties.
-
An executable called
MyTestApplication.exewas created for the purpose of this guide. Sign and time stamp it by running one of the signing scripts provided. There is a script for each protection method. Modify the script as needed.
For all protection methods:
-
Run the required script:
-
OCS card protection:
-
Run the following script:
> .\Sign_with_MS_SDK_OCS.ps1Script:
# CNG Provider #$cngProviderName = "nCipher Security World Key Storage Provider" # Certificate Key #$containerName = "Authenticode_MasterKey" # Certificate Name #$certName = "Authenticode Code Signing Certificate" #$certificatePath = "C:\Users\Administrator\Documents\Authenticode Code Signing Certificate.cer" $certHash = "1974f986d9b8bf32f47fc2af33d6271dd905c44f" # OCS Password #$password = "xxxxxxxxxxx" # Entrust Certificate Services Time Stamp Server $timestampServer = "http://timestamp.entrust.net/TSS/RFC3161sha2TS" # File to be Signed $fileName = "C:\Users\Administrator\Documents\MyTestApplication.exe" #signtool sign /debug /fd SHA256 /n $certName /td SHA256 /tr $timestampServer $fileName #signtool sign /debug /fd SHA256 /csp $cngProviderName /kc $containerName /f $certificatePath /p $password /td SHA256 /tr $timestampServer $fileName signtool sign /debug /fd SHA256 /sha1 $certHash /td SHA256 /tr $timestampServer $fileName -
Select the HSM and enter the passphrase when prompted.
-
-
Softcard protection:
-
Run the following script:
> .\Sign_with_MS_SDK_Softcard.ps1Script:
# CNG Provider $cngProviderName = "nCipher Security World Key Storage Provider" # Certificate Key $containerName = "Authenticode_MasterKey" # Certificate Name $certName = "Authenticode Code Signing Certificate" $certificatePath = "C:\Users\Administrator\Documents\Authenticode Code Signing Certificate.cer" # Softcard Password $password = "1234" # Entrust Certificate Services Time Stamp Server $timestampServer = "http://timestamp.entrust.net/TSS/RFC3161sha2TS" # File to be Signed $fileName = "C:\Users\Administrator\Documents\MyTestApplication.exe" signtool sign /debug /fd SHA256 /csp $cngProviderName /kc $containerName /f $certificatePath /p $password /td SHA256 /tr $timestampServer $fileName -
Enter the passphrase when prompted.
-
-
Module protection:
-
Run the following script:
> .\Sign_with_MS_SDK_Module.ps1Script:
# CNG Provider
$cngProviderName = "nCipher Security World Key Storage Provider"


# Certificate Key
$containerName = "Authenticode_MasterKey"


# Certificate Name
$certName = "Authenticode Code Signing Certificate"
$certificatePath = "C:\Users\Administrator\Documents\Authenticode Code Signing Certificate.cer"
#$certHash = "1974f986d9b8bf32f47fc2af33d6271dd905c44f"


# Password
#$password = "123"
#$password = "xxxxxxxxxxx"


# Entrust Certificate Services Time Stamp Server
$timestampServer = "http://timestamp.entrust.net/TSS/RFC3161sha2TS"


# File to be Signed
$fileName = "C:\Users\Administrator\Documents\MyTestApplication.exe"


signtool sign /debug /fd SHA256 /n $certName /td SHA256 /tr $timestampServer $fileName
-
For all protection types, the PowerShell command line displays script output information similar to the following:
The following certificates were considered: Issued to: Authenticode Code Signing Certificate Issued by: Authenticode Code Signing Certificate Expires: Tue Apr 19 17:48:34 2022 SHA1 hash: 1974F986D9B8BF32F47FC2AF33D6271DD905C44F After EKU filter, 1 certs were left. After expiry filter, 1 certs were left. After Hash filter, 1 certs were left. After Private Key filter, 1 certs were left. The following certificate was selected: Issued to: Authenticode Code Signing Certificate Issued by: Authenticode Code Signing Certificate Expires: Tue Apr 19 17:48:34 2022 SHA1 hash: 1974F986D9B8BF32F47FC2AF33D6271DD905C44F Done Adding Additional Store Successfully signed: C:\Users\Administrator\Documents\MyTestApplication.exe Number of files successfully Signed: 1 Number of warnings: 0 Number of errors: 0 -
-
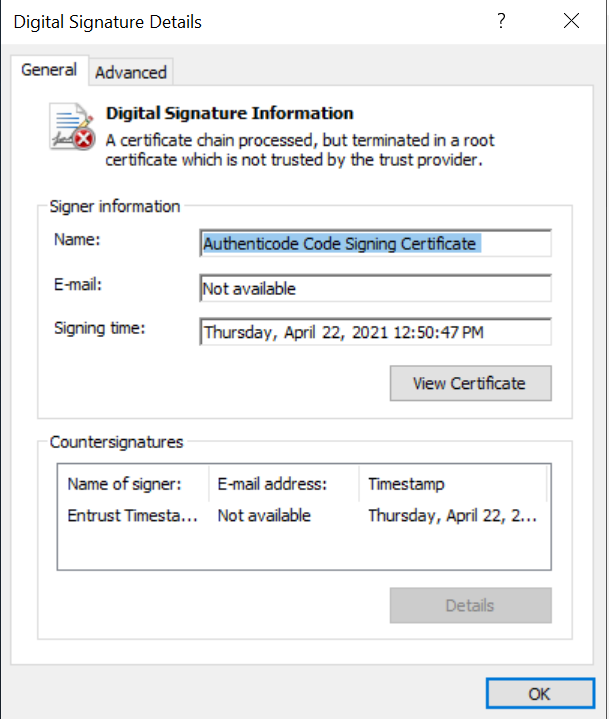
Select the Properties of the test executable that was signed. Select the Digital Signatures tab, and Details. Notice the time stamp and other signing parameters just created.
nShield and Microsoft Strong Name integration
Strong names prevent spoofing of your code by a third party.
Strong name signing is provided with the Microsoft SDK to give .NET Framework assemblies unique identities. To get a valid strong name, an assembly is strong-name signed during the build process. This is done by using the private key that corresponds to the public key in the strong name.
The strong name signature can then be verified using the public key.
Make sure you use the 32-bit version of the sn utility.
The 64-bit version is not supported.
|
-
Install and register the CAPI provider, which is required for strong name signing with nShield products. Run both the 32bit CSP install wizard and the 64bit CSP install wizard and follow the steps. The following shows an example of the 64bit installer.
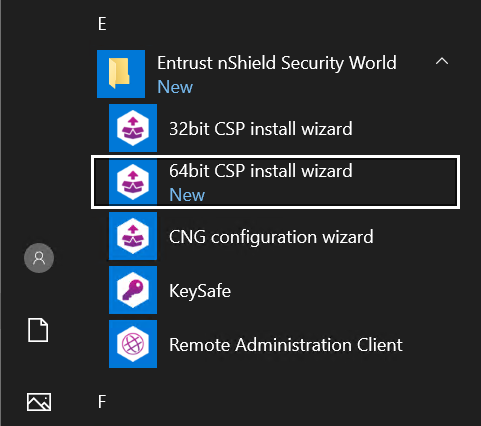
Do not place the HSM in Pre-initializationmode as descried in Install and register the CNG provider. Name the OCSMSAuthenticodeCAPI. -
Open a command window as Administrator.
-
Set the cryptography service provider.
Notice that the output nCipher Enhanced Cryptographic Provider differs from the nCipher Security World Key Storage Provider of the CNG.
>sn -c "nCipher Enhanced Cryptographic Provider" Microsoft (R) .NET Framework Strong Name Utility Version 4.0.30319.0 Copyright (c) Microsoft Corporation. All rights reserved. Default CSP set to 'nCipher Enhanced Cryptographic Provider' -
Create the container:
>keytst -c StrongNamed_Container CSP being used: nCipher Enhanced Cryptographic Provider Container 'StrongNamed_Container' created -
Create the key in the container:
-
Run the following command:
>keytst -cs StrongNamed_Container
CSP being used: nCipher Enhanced Cryptographic Provider
Generating 2048-bit key(s) for the 'StrongNamed_Container' container.

New signature key generated OK.
The key protection wizard starts. For example, for the 64-bit CSP install:
-
Select Next.
The Choose an Operator Card Set window appears.
-
Select the OCS and select Next.
The Choose Modules window appears.
-
Select the HSM and select Next.
The Load a Token window appears.
-
Enter the passphrase and select Next.
A completion window appears.
-
Select Finish.
-
-
List the container and the key that you created:
>csputils -U ALL File ID Container name Container owner DLL name S X ========= =================== =================== ========= = = 49942fc5f StrongNamed_Cont... WIN-G0JD49QMHEV\... ncsp * 1 container and 1 key found. -
Show the public half of the key created above. If using an OCS, select the cardset and the HSM. Enter the passphrase as done above.
>keytst -p StrongNamed_Container CSP being used: nCipher Enhanced Cryptographic Provider Container 'StrongNamed_Container': Key exchange key not present. Public half of Signature key is: 06 02 00 00 00 24 00 00 52 53 41 31 00 08 00 00 01 00 01 00 17 F1 63 62 50 41 94 16 90 3F 25 CD 2B 6F FF C5 91 29 74 BA AE 67 EF C4 3D E9 E5 26 10 EE E4 D9 71 1C 0D 7F 2D 71 89 D1 E6 A9 77 A3 AE EB 79 0A 5F D6 E4 3B 41 5A 17 C3 30 B3 8F DF A0 01 E2 93 8E 6F 6B 5B E2 E5 01 A7 19 25 48 EF 4C 65 29 8D 5E E1 0D 55 E8 93 43 9D 9A 41 EC 93 BD A1 83 11 CF C8 E3 A0 4E AC 78 DC 70 A2 46 56 3F 56 FA 65 C4 4C C1 95 57 CD 40 FE 3A 3F 7B 00 BD BA D5 AB EB 1B A4 06 7A 80 A5 41 27 24 B0 18 45 58 7E B5 7A 5C 80 5D 8C 7D 06 78 2B 3A 7F 36 96 42 D9 29 65 EE 1D 7D 1F E2 15 B6 8C C5 32 66 CB DC C5 54 27 4E D5 76 41 E6 3C FF 00 C0 E6 91 64 FD 4D 2E E8 FD 3D 7A D0 88 CF 0F 14 FA AE 38 70 6D 57 99 31 74 0E B1 29 16 A5 D0 8F FE 1B 08 09 51 AE 7F 76 FC 1F D0 84 7A 4E 76 0C DC E0 D3 2E C9 2F 8F 5E D6 62 7C 38 75 2D AA 47 EF 56 0F 6F 56 78 A7 -
Extract the public half of the key to a file:
sn -pc StrongNamed_Container C:\Users\Administrator\Documents\StrongNamed_Container.snk Microsoft (R) .NET Framework Strong Name Utility Version 4.0.30319.33440 Copyright (c) Microsoft Corporation. All rights reserved. Public key written to StrongNamed_Container.snk -
The executable
MyTestProgram.cswas created for the purpose of this guide.Compile
MyTestProgram.cswith the public key part ofStrongNamed_Container:csc /delaysign+ /keyfile:"C:\Users\Administrator\Documents\StrongNamed_Container.snk" /out:C:\Users\Administrator\Documents\MyTestProgram.exe C:\Users\Administrator\Documents\MyTestProgram.cs Microsoft (R) Visual C# Compiler version 4.8.3761.0 for C# 5 Copyright (C) Microsoft Corporation. All rights reserved. -
Re-sign the signed
MyTestProgram.exeexecutable withStrongNamed_Container:>sn -Rc C:\Users\Administrator\Documents\MyTestProgram.exe StrongNamed_Container Microsoft (R) .NET Framework Strong Name Utility Version 4.0.30319.0 Copyright (c) Microsoft Corporation. All rights reserved. Assembly 'C:\Users\Administrator\Documents\MyTestProgram.exe' successfully re-signed -
Verify the self-consistency of the strong name signature:
>sn -v C:\Users\Administrator\Documents\MyTestProgram.exe Microsoft (R) .NET Framework Strong Name Utility Version 4.0.30319.0 Copyright (c) Microsoft Corporation. All rights reserved. Assembly 'C:\Users\Administrator\Documents\MyTestProgram.exe' is valid -
Disassemble
MyTestProgram.exe:>ildasm C:\Users\Administrator\Documents\MyTestProgram.exe