Test integration
Check if Cloud Key is Working as expected
To check if the Cloud Key created earlier is functioning as designed we will do the following:
-
Create a Cloud Storage Bucket
-
Test if items in the cloud storage bucket are protected by the Cloud Key
Create a Cloud Storage Bucket
This bucket will be used to test the Cloud Key when attempting to view an object stored in the bucket. All objects will be encrypted by the cloud key, and only visible when the cloud key is active. If the cloud key has been disabled, the object in the bucket will not be accessible.
-
Copy the Cloud Key name created earlier.
-
Open a browser and sign in to the GCP portal: https://console.cloud.google.com.
-
In the navigation menu select Cloud Storage > Buckets.
-
Select Create.
-
Enter the Name of the bucket.
-
Select Continue.
-
On the Choose Where to Store Your Data, for Location Type, select Region.
-
Select us-east1
-
Select Continue.
-
On the Choose a storage class for your data, select Set as a default class and select Standard.
-
Select Continue.
-
On the Choose how to control your objects, deselect Enforce public access prevention on this bucket.
-
Select Continue.
-
On the Choose how to protect your data, Expand the Data Encryption section and select Cloud KMS Key.
-
For Key Type, select Cloud KMS.
-
For Select a customer-managed key, enter the cloud key name you created.
-
-
Select Create.
Possible issues while creating the bucket
If the service agent account for the Cloud Storage service does not have the appropriate roles, the creation of the bucket may fail with the following error:
You do not have sufficient permissions for Google Cloud to display whether the correct IAM policy for the specified encryption key exists.
Check that your Cloud Platform project’s service account, service-271839031145@gs-project-accounts.iam.gserviceaccount.com, has the cloudkms.cryptoKeyEncrypterDecrypter role for the specified key.
Without this role, you may not be able to encrypt or decrypt objects using the key which will prevent you from uploading or downloading objects.
|
Talk to your GCP administrator and ask for the role to be added to the service account.
The service account above is a default "Service Agent" of the Cloud Storage service and this Agent doesn’t have access to role cloudkms.cryptoKeyEncrypterDecrypter.
If you select Settings under Cloud Storage, you will be able to see the service account being used.
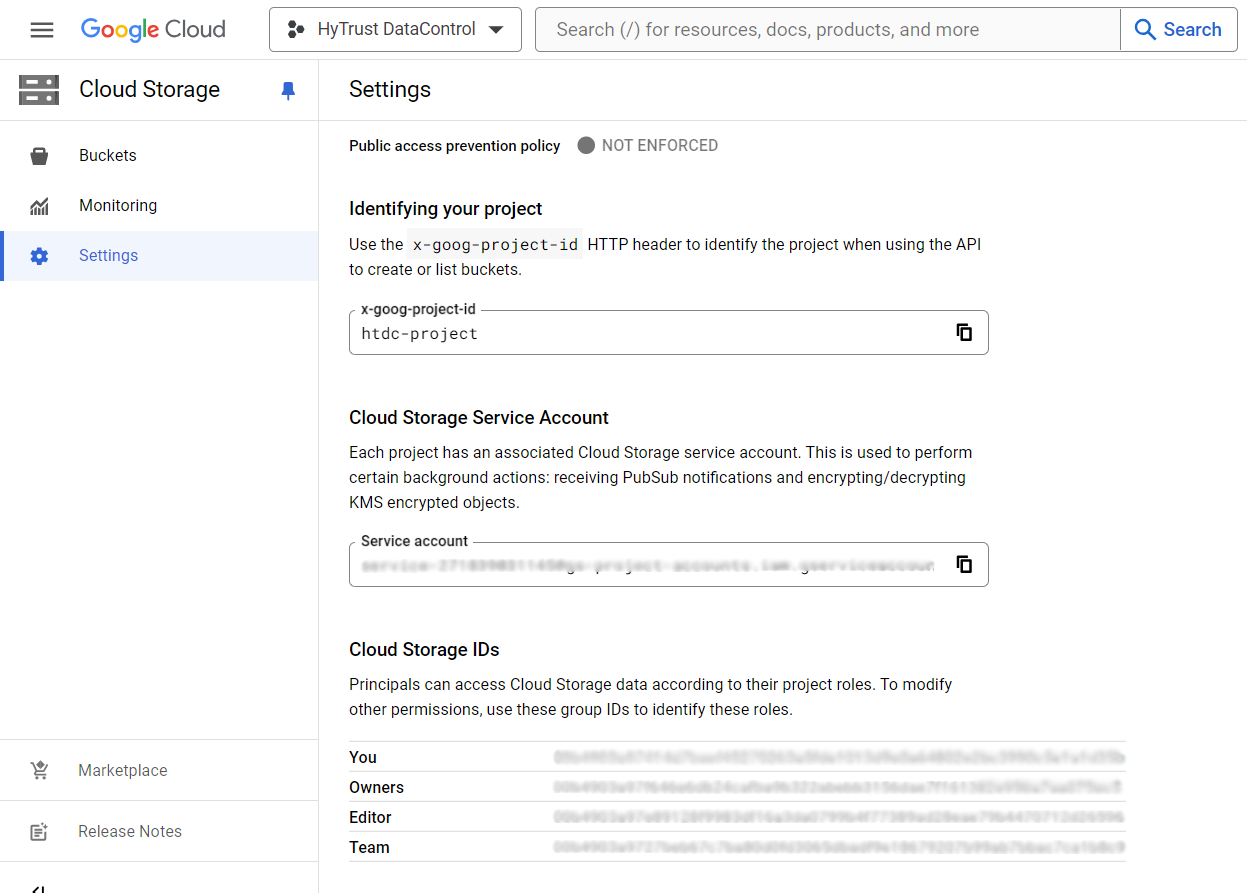
Once the role has been granted, you can see it.
-
In the navigation menu select IAM & Admin.
-
Make sure Include Google-provided role grants is selected.
-
Select the View by Roles tab.
-
Look for the Cloud KMS CryptoKey Encrypter/Decrypter (x) Role and you should be able to see the account listed under that role.

-
Now go back and attempt to create the bucket again.
You may see the message again, but this time GCP will create the bucket which will allow you to do the testing.
Test access to an object in the bucket
-
Upload a file to the bucket. We suggest you upload an image.
-
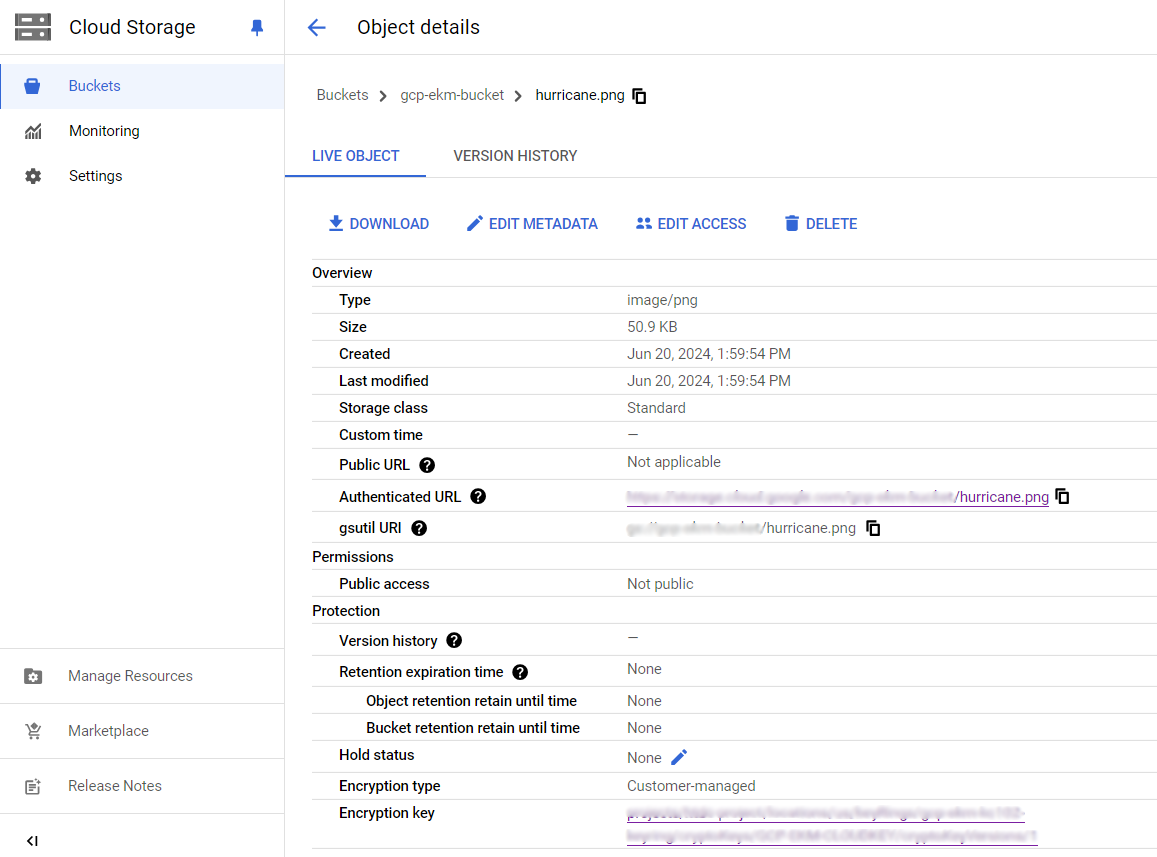
Once the file has been uploaded, select on it to see its details. For example:
-
Copy the Authenticated URL in the Object Details view and use it in another tab in the browser. You should be able to see the contents of the file. In this case an image:

-
Now go back to the KeyControl Vault and disable the cloudkey.
-
Log into the KeyControl Cloud Key Management Vault webGUI using an account with Cloud Admin privileges.
-
In the top menu bar, select CloudKeys.
-
Select the CloudKeys tab and select the Key Set.
-
Select the CloudKey used in the Bucket in GCP. In the Actions menu, select Disable CloudKey.

-
Now if you try to access the image file uploaded in the bucket earlier, you should see the following message:
The Cloud Storage service agent does not have permission to access the KMS key in Cloud EKM. Grant the appropriate permissions in your external key manager. -
Go back to the KeyControl Vault and enable the cloudkey.
-
Select the CloudKey used in the Bucket in GCP. In the Actions menu, select Enable CloudKey.
-
The image file now is visible again.
Rotate a cloud key in KeyControl
To rotate a cloud key in KeyControl:
-
Sign in to the KeyControl Vault URL bookmark from install-configure-keycontrol.adoc#create-keycontrol-vault.
-
Select the CLOUDKEYS icon on the toolbar.
-
Select the CloudKeys tab.
-
From the Key Set menu, select the Key Set created in configure-kc-as-gcp-csp.adoc#create-keyset.
-
From the Key Ring menu, select the key ring created in configure-gcp.adoc#create-gcp-keyring.
-
Select the key to rotate.
-
Select Rotate Now in the Details tab of the key.
-
Once rotated, select the Versions tab of the key, to see that a new version of the key has been created.
-
In GCP, navigate to Security > Key Management.
-
In the KEY RINGS tab, select the key ring created in configure-gcp.adoc#create-gcp-keyring.
-
Select the key you just rotated in KeyControl.
-
Verify that the key has been rotated in GCP in synchronization with KeyControl.
Delete a cloud key in KeyControl
A deleted cloud key in KeyControl will no longer be available for use in GCP. However, KeyControl will keep a copy of the deleted cloud key, which can be reloaded back to GCP for use.
-
Sign in to the KeyControl Vault URL bookmark from install-configure-keycontrol.adoc#create-keycontrol-vault.
-
Select the CLOUDKEYS icon on the toolbar.
-
Select the CloudKeys tab.
-
In the Key Set menu, select the Key Set created in configure-kc-as-gcp-csp.adoc#create-keyset.
-
In the Key Ring menu, select the key ring created in configure-gcp.adoc#create-gcp-keyring.
-
Select the key to the deleted.
-
Select Actions > Delete CloudKey.
The Delete Cloudkey dialog appears.
-
Enter the number of days when the cloud key should be permanently deleted.
-
Select Delete.
-
Verify the Key status changed in KeyControl to PENDING DELETE.
-
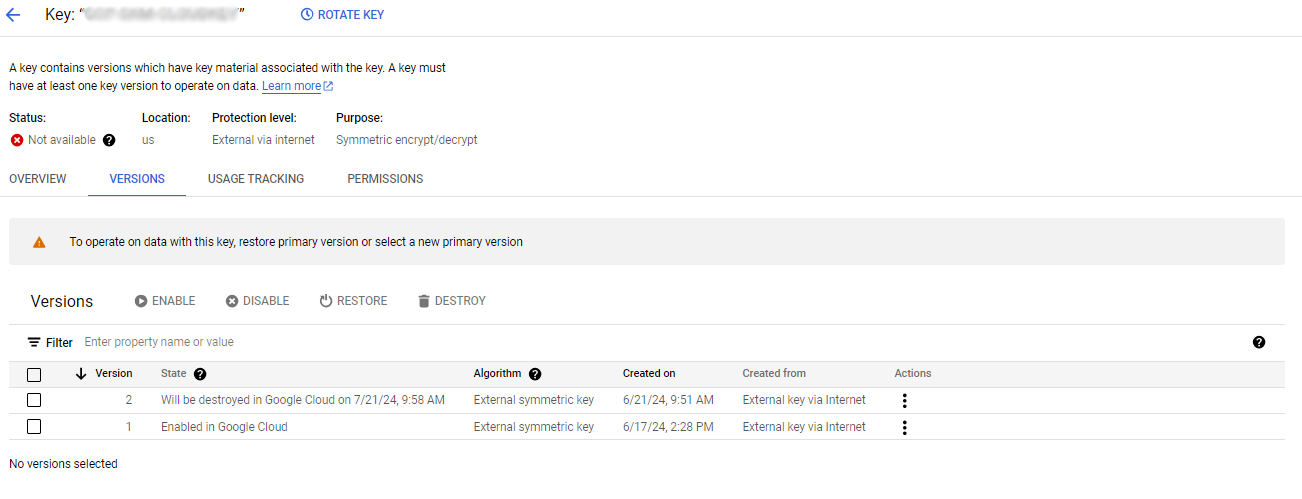
Verify the key is now scheduled to be deleted from GCP.
For example:
Cancel deletion of a deleted KeyControl key
Follow these steps to cancel the deletion and enable back to GCP the KeyControl key deleted in Delete a cloud key in KeyControl.
-
Sign in to the KeyControl Vault URL bookmark from install-configure-keycontrol.adoc#create-keycontrol-vault.
-
Select the CLOUDKEYS icon on the toolbar.
-
Select the CloudKeys tab.
-
From the Key Set menu, select the Key Set created in configure-kc-as-gcp-csp.adoc#create-keyset.
-
From the Key Ring menu, select the key ring created in configure-gcp.adoc#create-gcp-keyring.
-
Select the key pending to be deleted.
-
Select Actions > Cancel Deletion.
The Cancel Deletion dialog appears.
-
Select Yes, Cancel Deletion.
-
Verify the status change in KeyControl to DISABLED.
-
Now enable the key so it is Available in GCP.
-
Select Actions > Enable Key.
-
Verify the status change in KeyControl to AVAILABLE.
Sign/Verify an input file with a GCP CloudKey
This test case uses gcloud to sign a file with a GCP cloudkey and OpenSSL to verify the signing.
To install gcloud, we use an Ubuntu server to the installation.
-
Install needed packages.
% sudo apt-get install apt-transport-https ca-certificates gnupg -
Add
gcloudcli distribution.echo "deb [signed-by=/usr/share/keyrings/cloud.google.gpg] https://packages.cloud.google.com/apt cloud-sdk main" | sudo tee -a /etc/apt/sources.list.d/google-cloud-sdk.list -
Acquire the Public Key.
$ curl https://packages.cloud.google.com/apt/doc/apt-key.gpg | sudo apt-key --keyring /usr/share/keyrings/cloud.google.gpg add - -
Install
gcloud.$ sudo apt-get update && sudo apt-get install google-cloud-cli
Create a Cloudkey with purpose of 'Asymmetric Sign'
This procedure is for creating an cloudkey that can be used for signing.
-
Log into the KeyControl Cloud Key Management Vault webGUI using an account with Cloud Admin privileges.
-
In the top menu bar, select CloudKeys.
-
Select the CloudKeys tab and select the Key Set and Key Ring.
If you do not finish the selections on the CloudKeys page, you will need to add them on the Details tab of the Create CloudKey dialog box.
-
Select Actions > Create CloudKey.
-
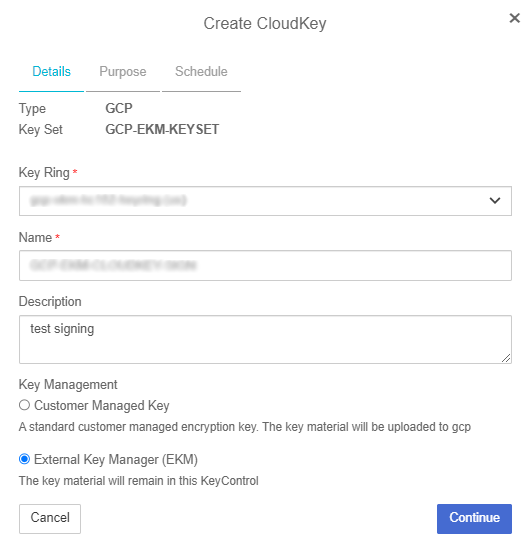
On the Details tab of the Create CloudKey dialog box, enter the following:
-
Name: Enter the name for the CloudKey.
-
Description: Enter the optional description for the CloudKey
-
Key Management: Select External Key Management (EKM).
-
-
Select Continue.
-
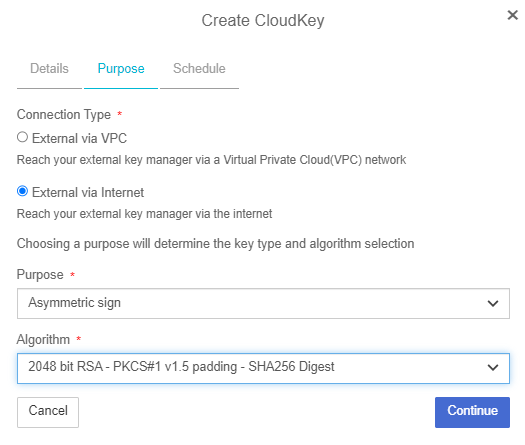
On the Purpose tab, complete the following:
-
Connection Type: Select how the external key manager will be reached.
-
Purpose: Select Asymmetric Sign
-
Algorithm: Select the algorithm 2048 bit RSA - PKCS#1 v1.5 padding - SHA256 Digest
-
-
Select Continue.
-
On the Schedule tab, determine the rotation schedule for the CloudKey.
-
Select when the CloudKey should expire. This can be Never, or you can select a specific date.
-
Select Apply.
Use gcloud to sign/verify a file using the cloud key
-
Initialize the
gcloudcli.$ gcloud initYou need to do this on the console of the machine that has
gcloudinstalled. This procedure will attempt to open a browser window for you to sign in to GCP so it can authenticategcloud. Do not ssh and attempt to do this as it will fail to open the browser window if you don’t have access to the UI. -
Set the project
$ gcloud config set project htdc-project -
Create a Key for the service account used in the guide.
-
Open a browser and sign in to the GCP portal: https://console.cloud.google.com.
-
Select IAM & Admin on Google Cloud Menu.
-
Select Service Accounts in the left-hand pane.
-
Select the service account created in configure-gcp.adoc#create-service-account from the list.
-
Select the KEYS tab.
-
Select ADD KEY and then select Create new key.
-
Select JSON from the available Key type options.
-
Select CREATE.
A pop-up message appears indicating that the key created was downloaded to your computer.
-
Transfer the json file that was downloaded to the machine you installed
gcloud.
-
-
Authorize the Service account
$ gcloud auth activate-service-account [Account] --key-file=Key_FILEDo this in the machine
gcloudwas installed.$ gcloud auth activate-service-account gcp-ekm-entrust-kc@htdc-project.iam.gserviceaccount.com --key-file=htdc-project-29f147e89a52.json -
Give Permission to the service account to manipulate the key.
-
In GCP, navigate to Security > Key Management.
-
In the KEY RINGS tab, select the key ring created earlier.
-
Select the key that will be used for the signing.
-
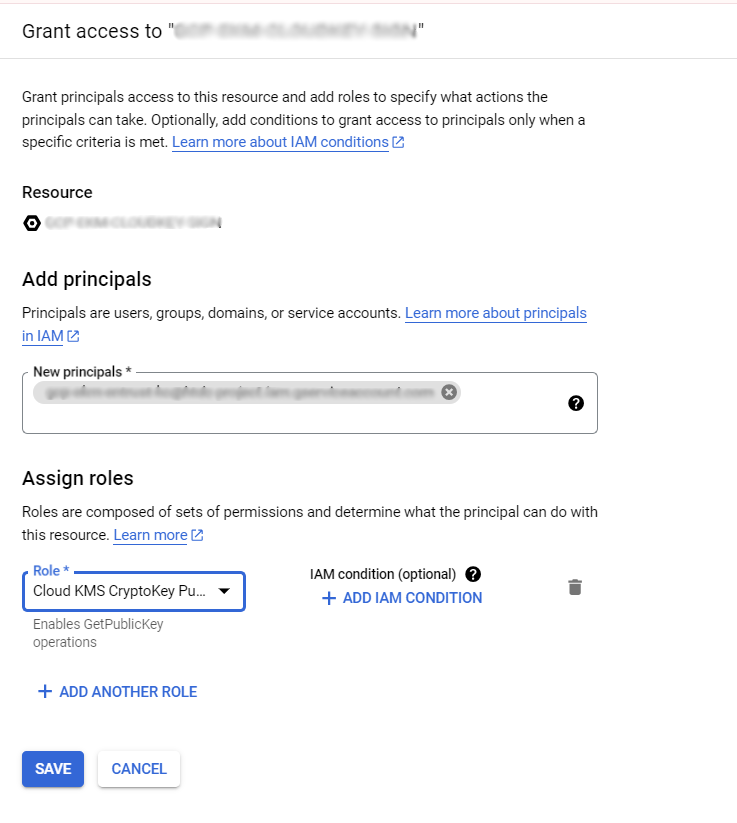
Select Grant Access
-
In the Grant Access Pane:
-
For the Principal, enter the service account.
-
For the Role, select Cloud KMS Crypto Operator
-
Select Save.
-
-
-
Download the public key for the cloudkey created earlier.
Back in the terminal, use
gcloudto download the public key for the key being used for signing.% gcloud kms keys versions get-public-key 1 --location $location --keyring $keyring --key $key --output-file $public_keyFor example:
$ gcloud kms keys versions get-public-key 1 --key GCP-EKM-CLOUDKEY-SIGN --location us --keyring gcp-ekm-kc102-keyring --output-file public.key -
Create a temp file with some text in it.
% vi sign.txtEnter some text in it, for example:
I want to sign this. -
Sign the file with
gcloudcli:$ gcloud kms asymmetric-sign --location $location --keyring $keyring --key $key --version 1 --input-file inputfile.txt --signature-file $sign_fileFor example:
$ gcloud kms asymmetric-sign --location us --keyring gcp-ekm-kc102-keyring --key GCP-EKM-CLOUDKEY-SIGN --version 1 --input-file sign.txt --signature-file sign.signed -
Now verify the signed file with download public key using OpenSSL.
$ openssl dgst -sha256 -verify $public_key -signature $sign_file inputfile.txFor example:
$ openssl dgst -sha256 -verify public.key -signature sign.signed sign.txr
Verified OK
If verification is exited with ok , then operation is complete successfully.