Integrate the Entrust Timestamping Authority with the nShield HSM
Create a certificate request
-
Run the following commands in the EDM to load the HSM configuration.
[sysadmin@timestamping-auth-edm ~]$ sudo /usr/local/bin/tsactl import-nshield -f /opt/nfast/kmdata [sudo] password for sysadmin: If there is a kmdata in TSA, it will be overwritten. Created keys will be lost. Continue? [y/N]: y Setting done ╢▌▌▌▌▌▌▌▌▌▌╟ 100 % Secret(s) established. A redeploy of the tsa solution is required for changes to take effect Importing nShield... Done -
Present the OCS if using OCS protection. The OCS must be presented in slot 0 which means: insert the OCS in the HSM front panel reader, or map the TVD to slot 0 as described in Map dynamic slots to slot #0
[sysadmin@timestamping-auth-edm ~]$ /opt/nfast/bin/nfkminfo World generation 2 state 0x3737000c Initialised Usable ... Module #1 Slot #0 IC 217 generation 1 phystype SmartCard slotlistflags 0x2 SupportsAuthentication state 0x5 Operator flags 0x10000 shareno 2 shares LTU(PIN) LTFIPS error OK Cardset name "testOCS" k-out-of-n 1/5 flags NotPersistent PINRecoveryForbidden(disabled) !RemoteEnabled timeout none card names "" "" "" "" "" hkltu edb3d45a28e5a6b22b033684ce589d9e198272c2 gentime 2023-07-20 18:50:48 -
Create the key pair and the certificate signing request (CSR) of the certificate for signing TSA responses.
[sysadmin@timestamping-auth-edm ~]$ sudo /usr/local/bin/tsactl create-key -k RSA2048 -s "CN=TSA" -o /tmp/tsa-cert-request.txt -t testOCS -v nshield
tsa-cert-request.txt file already exists. Do you want to overwrite it? [y/N]: y
Obtaining necessary components for TSA...     Done
Enter HSM PIN:
Starting PKCS #11 Manager...                  Done
2025-05-14 20:47:58 [0007]: pkcs11: 00000000 >>   C_GetFunctionList

...

2025-05-14 20:47:58 [0007] tc0b6ffd10d7f0000: pkcs11: 00000000 <    rv 0x00000000
Setting  done ╢▌▌▌▌▌▌▌▌▌▌╟ 100 %
Secret(s) established. A redeploy of the tsa solution is required for changes to take effect
CSR written in path: tsa-cert-request.txt
Sign the certificate request
-
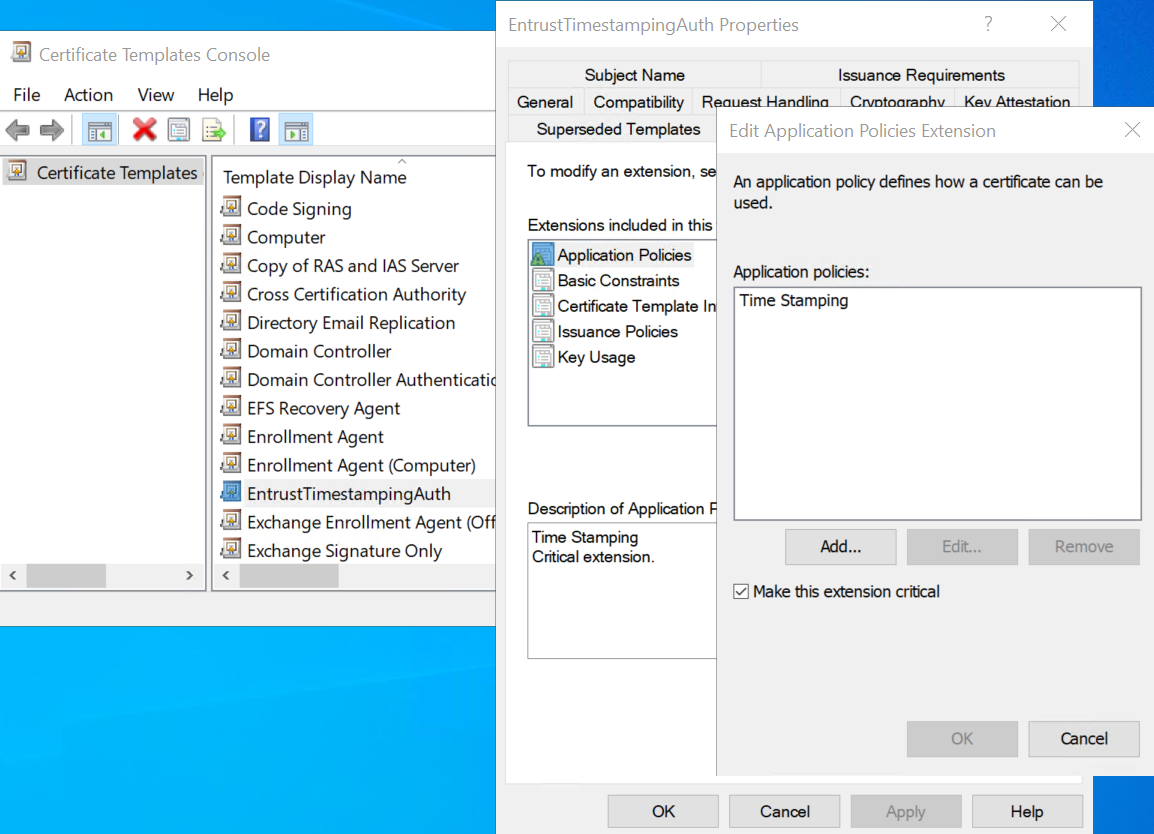
Create a timestamping certificate template in your CA to sign the
/tmp/tsa-cert-request.txtCSR created in Create a certificate request. A certificate template named EntrustTimestapingAuth was created by copying the Web Server certificate. The Server Authentication application policy was removed from the Extensions. The Time Stamping application policy was added to the Extensions. This extension was made critical.The PKI used in this testing consisted of a root CA and a subordinate CA. The certificate template create above and signing below were done at the subordinate CA.
-
Sign the
/tmp/tsa-cert-request.txtCSR. The signed certificate file,tsa-signed-cert.cerin this example, must contain a certificate in PEM format and Base64 encoding.C:\Users\Administrator.INTEROP\Downloads>certreq -submit -attrib "CertificateTemplate:EntrustTimestampingAuth" tsa-cert-request.txt Active Directory Enrollment Policy {96E14557-DDD4-48BD-BE1A-AA453F20D859} ldap: RequestId: 17 RequestId: "17" Certificate retrieved(Issued) Issued -
Print the certificate in text form. Notice the extended key usage.
C:\Users\xxxxxxxx\Downloads>openssl x509 -text -noout -verify -in tsa-signed-cert.crt Certificate: Data: Version: 3 (0x2) Serial Number: 39:00:00:00:13:82:ce:22:2f:09:f3:52:7f:00:00:00:00:00:13 Signature Algorithm: sha256WithRSAEncryption Issuer: DC = local, DC = interop, CN = interop-INTEROP-SUB-CA-CA Validity Not Before: May 23 15:48:40 2025 GMT Not After : May 23 15:48:40 2027 GMT Subject: CN = TSA Subject Public Key Info: Public Key Algorithm: rsaEncryption Public-Key: (2048 bit) Modulus: 00:d2:f1:6a:ec:9a:f0:f2:66:b9:f0:dd:21:f7:0a: ... 46:23:e8:74:c7:8d:c5:e9:cb:87:77:d5:a2:16:25: f6:e1 Exponent: 65537 (0x10001) X509v3 extensions: X509v3 Subject Key Identifier: E1:36:EF:65:3A:81:F8:AB:12:CF:B6:57:D6:50:DD:FA:21:80:F6:A5 X509v3 Authority Key Identifier: DE:07:BB:92:75:2C:43:F4:BC:2F:9F:D5:3D:2C:00:79:C7:6A:27:B9 X509v3 CRL Distribution Points: Full Name: URI:ldap:///CN=interop-INTEROP-SUB-CA-CA,CN=interop-sub-ca,CN=CDP,CN=Public%20Key%20Services,CN=Services,CN=Configuration,DC=interop,DC=local?certificateRevocationList?base?objectClass=cRLDistributionPoint Authority Information Access: CA Issuers - URI:ldap:///CN=interop-INTEROP-SUB-CA-CA,CN=AIA,CN=Public%20Key%20Services,CN=Services,CN=Configuration,DC=interop,DC=local?cACertificate?base?objectClass=certificationAuthority X509v3 Key Usage: Digital Signature, Key Encipherment 1.3.6.1.4.1.311.21.7: 0/.'+.....7.....x...X...(.......V.e...C...W..d... X509v3 Extended Key Usage: critical Time Stamping 1.3.6.1.4.1.311.21.10: critical 0.0 ..+....... Signature Algorithm: sha256WithRSAEncryption Signature Value: 8d:20:50:30:64:4b:4a:29:ae:63:cd:3f:4a:3e:75:87:d1:12: ... c4:db:29:cf -
Save the certificate file
tsa-signed-cert.cer.
Export your root CA certificate
Your certificate chain will be needed to verify the time stamp in Test the integration.
-
Export the certificates of your CAs in the chain. The exported certificates were copied to a server, first introduced now, which will be used later to request the time stamp.
C:\Users\Administrator\Downloads>dir interop-root-ca.cer interop-sub-ca.cer Volume in drive C has no label. Volume Serial Number is 86CD-3DFE Directory of C:\Users\Administrator\Downloads 05/27/2025 02:41 PM 793 interop-root-ca.cer Directory of C:\Users\Administrator\Downloads 05/27/2025 02:27 PM 1,360 interop-sub-ca.cer 2 File(s) 2,153 bytes 0 Dir(s) 51,288,801,280 bytes free -
Convert these certificates to
pemformat.C:\Users\Administrator\Downloads>certutil.exe -encode interop-sub-ca.cer interop-sub-ca.pem Input Length = 1360 Output Length = 1930 CertUtil: -encode command completed successfully. -
Create the certificate chain.
C:\Users\Administrator\Downloads>type interop-root-ca.pem interop-sub-ca.pem > chain.pem

interop-root-ca.pem

interop-sub-ca.pem