Procedures
Preparatory requirements
Before installing the software, Entrust recommends that you familiarize yourself with:
-
The Oracle database TDE documentation and setup process.
-
The Entrust KeyControl Vault documentation.
-
Entrust recommends that you create a policy for managing SQL scripts that allow use of credentials for the Oracle database. These SQL scripts should only be available to authorized users.
This guide assumes that Oracle database software, and (at least) one Oracle database, is already installed on your system. With Oracle database software already installed, ensure that any required patches have been added.
To integrate an Oracle database with Entrust KeyControl Database Vault, the following steps are required:
-
Environment configuration.
-
Install the Entrust KeyControl Database Vault software.
-
Configure Oracle database software to use the Entrust KeyControl Database Vault.
Details of your installation and configuration will depend on:
-
Whether you want to migrate encryption keys from an existing Oracle software keystore to Entrust KeyControl, or start directly with Entrust KeyControl.
The default host server user is oracle unless stated otherwise.
For more information on how to configure your Entrust environment, see the KeyControl Vault Installation Guide.
For more information on how to configure your Oracle environment, see the Oracle documentation.
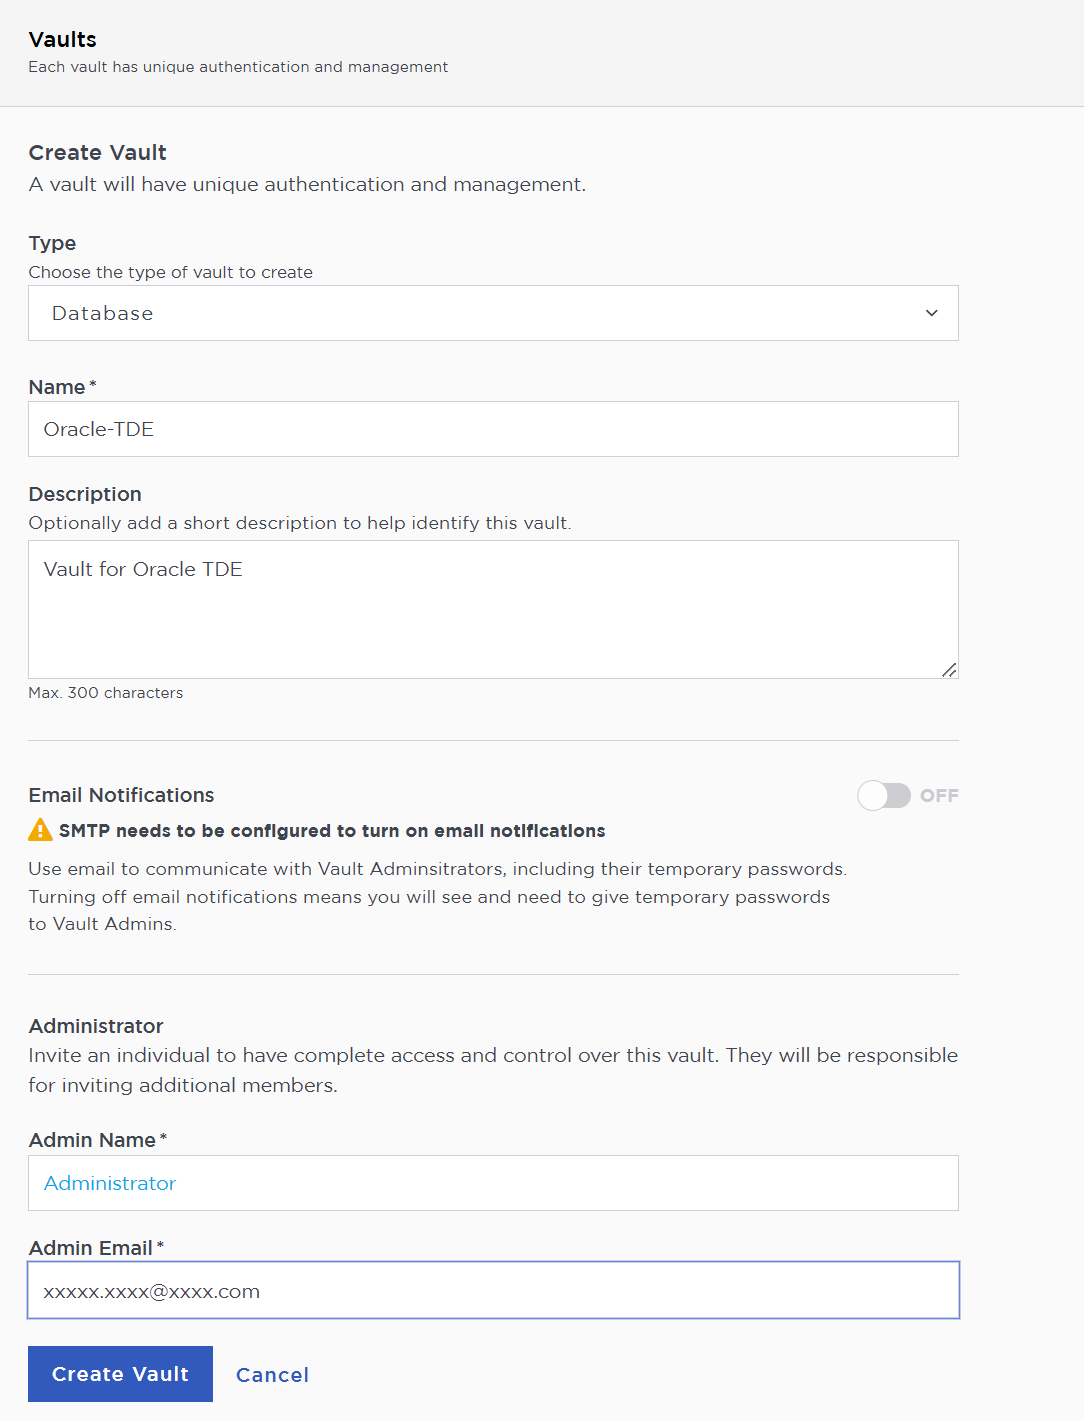
Create a Database Vault in the KeyControl Vault Server
The KeyControl Vault appliance supports different type of vaults that can be used by all type of applications. This section describes how to create a Database Vault in the KeyControl Vault Server. See Creating a Vault for more details.
-
Log in to the KeyControl Vault Server web user interface:
-
Use your browser to access the IP address of the server.
-
Sign in using the secroot credentials.
-
-
If not in the Vault Management interface, in the top menu bar, on the right side, select Switch to: Manage Vaults.

This action will take you to the KeyControl Vault Management interface.
-
In the KeyControl Vault Management interface, select Create Vault.

-
In the Create Vault page, create a Database Vault:
-
For Type, select Database.
-
For Name, enter the name of the vault
-
For Description, enter the description of the vault.
-
For Admin Name, enter the name of the administrator of the vault.
-
For Admin Email, enter a valid email for the administrator.
-
-
Select Create Vault.
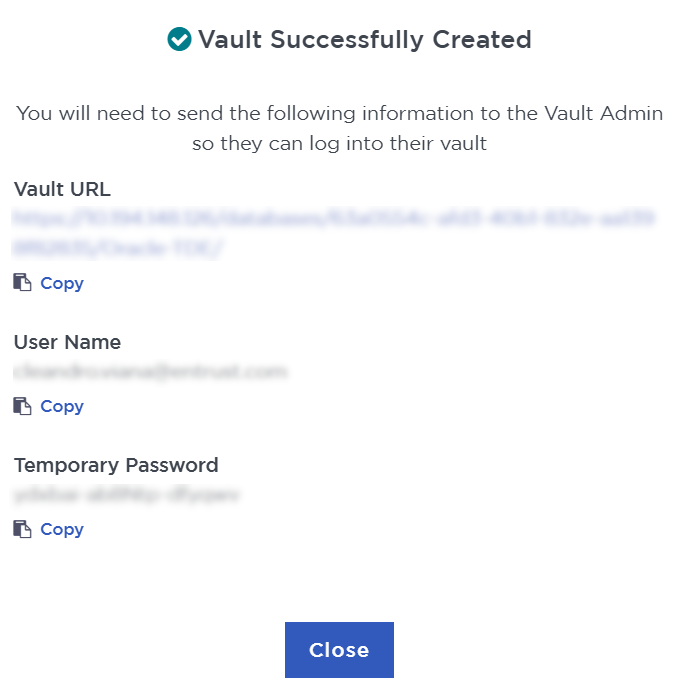
A temporary password will be emailed to the administrator’s email address. This is the password that will be used to sign in for the first time to the Database vault’s space in KeyControl. In a closed-gap environment where email is not available, the password for the user is displayed when you first create the vault. That can be copied and sent to the user. -
Select Close when the vault creation completes.
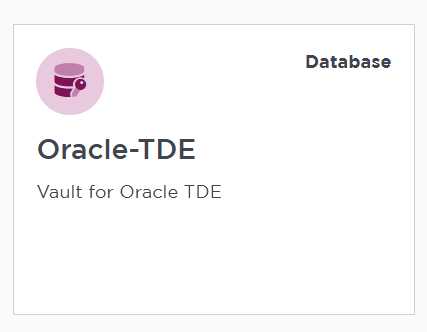
The newly-created vault is displayed in the Vault dashboard. For example:
Sign in to the Database Vault URL
-
Sign in to the URL provided above with the temporary password that was copied.
-
Change the initial password when prompted.
-
Sign in again to verify.
Downloade the Policy Agent
The nShield DataControl Policy Agent serves as a software module that facilitates encryption of virtual disks and individual files on Windows and Linux operating systems, enabling secure sharing of encrypted data among VMs. When a user attempts to access an encrypted disk, the Policy Agent ensures authorization by verifying the request with KeyControl Vault. Furthermore, the configuration of the Policy Agent includes the setup of the Oracle server to load the EKM provider library, reinforcing the encryption capabilities within the server environment.
-
Log in to the newly created vault:
-
Select the WORKLOADS tab.
-
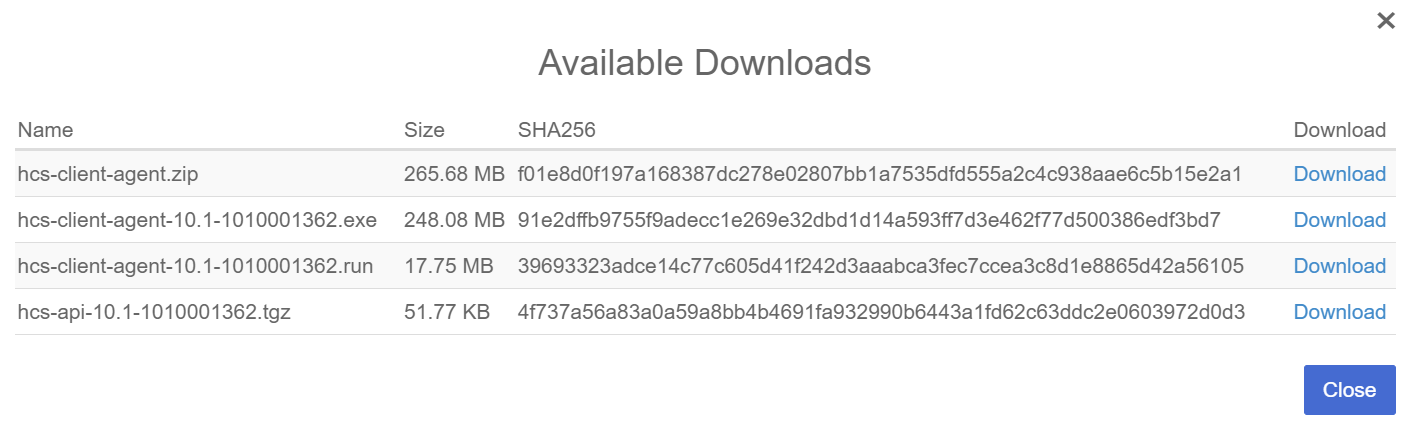
Select Actions > Download Policy Agent
A list of available downloads appears. For example:
-
-
Download the
hcs-client-agent-10.4.1-1041000262.runfile.Once downloaded, transfer the file to the Oracle Server.
-
Return to the Oracle server as
rootuser and installpkcs11-toolfor testing:% yum install opensc -
Check if Python is already installed:
% python --version -
If Python is already installed, it will display the version number. If not, you can install it using the package manager for your Linux distribution:
% dnf install python3 -
After installing Python, check that it is in your system path:
% python --version -
Navigate to the directory where you downloaded the
hcs-client-agent-10.4.1-1041000262.runfile. -
Make the file executable:
% chmod +x hcs-client-agent-10.4.1-1041000262.run -
Run the installer:
% ./hcs-client-agent-10.4.1-1041000262.runVerifying archive integrity... All good. Uncompressing hcs-client-agent-10.4.1-1041000262.run 100% x86_64 No Entrust Agent found on this system Entrust Agent will be installed in /opt/hcs Specify location for installing Entrust Agent (/opt/hcs): Created symlink /etc/systemd/system/multi-user.target.wants/hcld.service → /usr/lib/systemd/system/hcld.service. Platform is rhel You can now install online encryption driver, the process is described in the Admin Guide Please see the following section of Admin Guide for details --- Administration Guide > Data Encryption > Linux Encryption Overview Installation successful -
Verify the installation:
% hcl statusSummary -------------------------------------------------------------------------------- KeyControl: None Status: Not registered AES_NI: enabled HTCRYPT: Not Installed Registered Devices -------------------------------------------------------------------------------- Disk Name Cipher Status Clear -------------------------------------------------------------------------------- Available Devices -------------------------------------------------------------------------------- Disk Name Device Node Size (in MB) -------------------------------------------------------------------------------- Other Devices -------------------------------------------------------------------------------- Disk Name Device Node Status -------------------------------------------------------------------------------- sda2 /dev/sda2 Mounted (/boot) sda1 /dev/sda1 Mounted (/boot/efi) sda3 /dev/sda3 LVM (rhel) rhel-swap /dev/dm-1 Mounted (swap) rhel-home /dev/dm-2 Mounted (/home) rhel-root /dev/dm-0 Mounted (/)For more information, see Entrust DataControl Policy Agent.
Create a VMSet in KeyControl Vault
A VMSet in KeyControl Vault is a logical grouping of virtual machines (VMs) that allows for centralized management and control of encryption policies.
-
Login to the KeyControl Database Vault for Oracle TDE.
-
Select the WORKLOADS tab.
-
Select Actions > Create New Cloud VM Set.
-
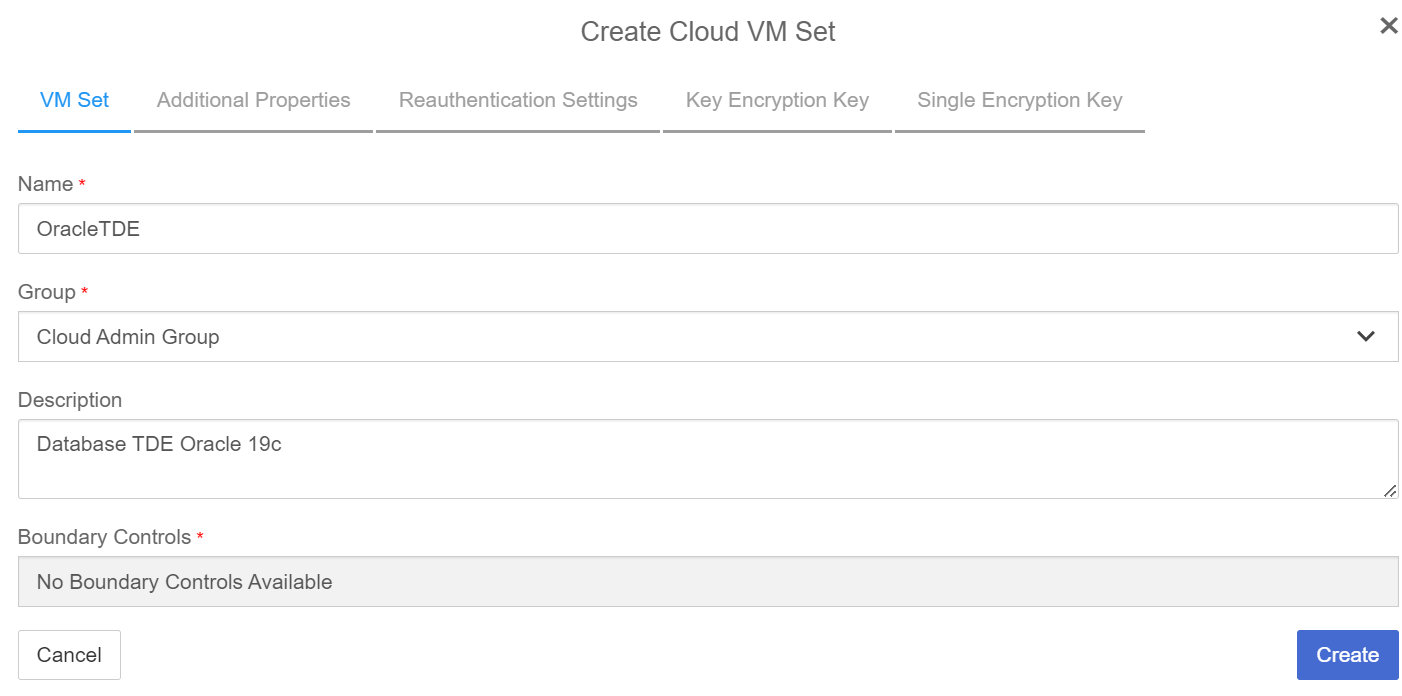
In the Create Cloud VM Set page:
-
Enter a Name for the cloud VM set
-
For Group, select Cloud Admin Group
-
Enter a Description
-
Select No Boundary Controls Available
For example:
-
-
Select Create.
-
When a success message appears, click Close.
-
The newly-created VM Set is added to the list.

Register the Oracle Server VM to the VM set
-
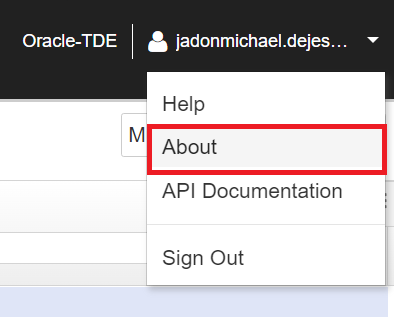
In the vault page, click on your user in the top corner and select About.
-
Copy the Vault ID.

-
Register KeyControl in the Oracle Server:
% hcl register -a -v <VAULT-ID> <KEYCONTROL-VAULT-IP>Enter the number corresponding to the VM created earlier, then enter
yto confirm the VM and continue. For example:Please provide the Vault login details username: xxxxxx.xxxxxx@entrust.com password: Available Cloud VM Sets -------------------------------------------------------------------------------- 1 : OracleTDE -------------------------------------------------------------------------------- Please select a Cloud VM Set by number to which this VM should be added: 1 The selected Cloud VM Set is -- OracleTDE Do you want to continue (y/n)?y Registered as otde-23ai-kc1041 with KeyControl node(s) xx.xxx.xxx.xxx Completing authentication for otde-23ai-kc1041 on KeyControl node(s) xx.xxx.xxx.xxx Authentication complete, machine ready to use Getting KeyControl Mapping information KeyControl Mappings are not available -
Verify the registration:
% hcl statusSummary -------------------------------------------------------------------------------- KeyControl: xx.xxx.xxx.xxx:443 KeyControl list: xx.xxx.xxx.xxx:443 Vault ID: 63a0554c-afd3-40b1-832e-aa1398f82835 Status: Connected Last heartbeat: Wed Jan 15 12:01:42 2025 (successful) AES_NI: enabled Certificate Expiration: Jan 15 17:00:10 2026 GMT HTCRYPT: Not Installed Registered Devices -------------------------------------------------------------------------------- Disk Name Cipher Status Clear -------------------------------------------------------------------------------- Available Devices -------------------------------------------------------------------------------- Disk Name Device Node Size (in MB) -------------------------------------------------------------------------------- Other Devices -------------------------------------------------------------------------------- Disk Name Device Node Status -------------------------------------------------------------------------------- sda2 /dev/sda2 Mounted (/boot) sda1 /dev/sda1 Mounted (/boot/efi) sda3 /dev/sda3 LVM (rhel) rhel-swap /dev/dm-1 Mounted (swap) rhel-home /dev/dm-2 Mounted (/home) rhel-root /dev/dm-0 Mounted (/) -
Enable TDE:
% hcl tde enableEnabling tde will change permissions of some Files. Do you want to proceed? (y/n) y If you are enabling TDE for an Oracle database, follow the steps mentioned below from the Administritor Guide. "Administration Guide > KeyControl Vault for Databases > KeyControl with Oracle TDE > Configuring the Oracle Server Database" -
Check the TDE status.
% hcl tde statusTDE is enabled on this VM
Create a key set
A KeySet in KeyControl Vault serves as a container for managing encryption keys used in various cryptographic operations.
-
Login to the KeyControl Database Vault.
-
Select the CLOUD KEYS and then select the Key Sets tab.
-
Select Actions > Create Key Set.

The Create Key Set dialog appears.
-
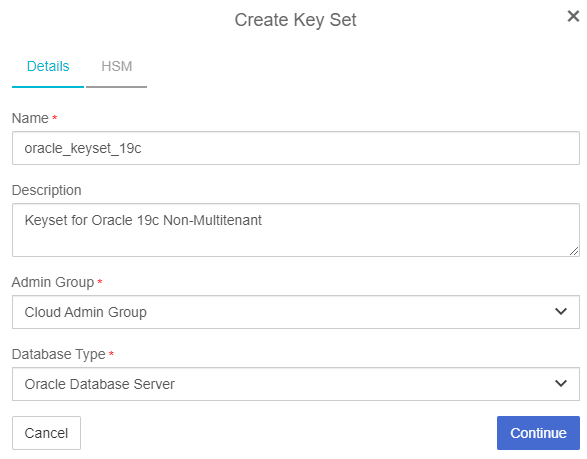
In the Details tab, create the Key Set:
-
Enter a Name.
-
For Admin Group, select Cloud Admin Group.
-
For Database Type, select Oracle Database Server.
-
-
Select Continue.
-
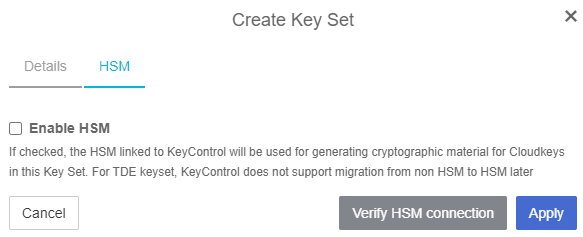
In the HSM tab, there is no HSM available, so just select Apply. The KeySet can also be created with HSM enabled, providing administrators with the ability to safeguard the TDE master keys using an HSM. However, prior to creating the KeySet, the HSM must be properly configured within KeyControl.
For more information on HSM configuration with KeyControl, see Hardware Security Modules with KeyControl Vault.
-
Select Apply.
Click Close when a success message appears.
-
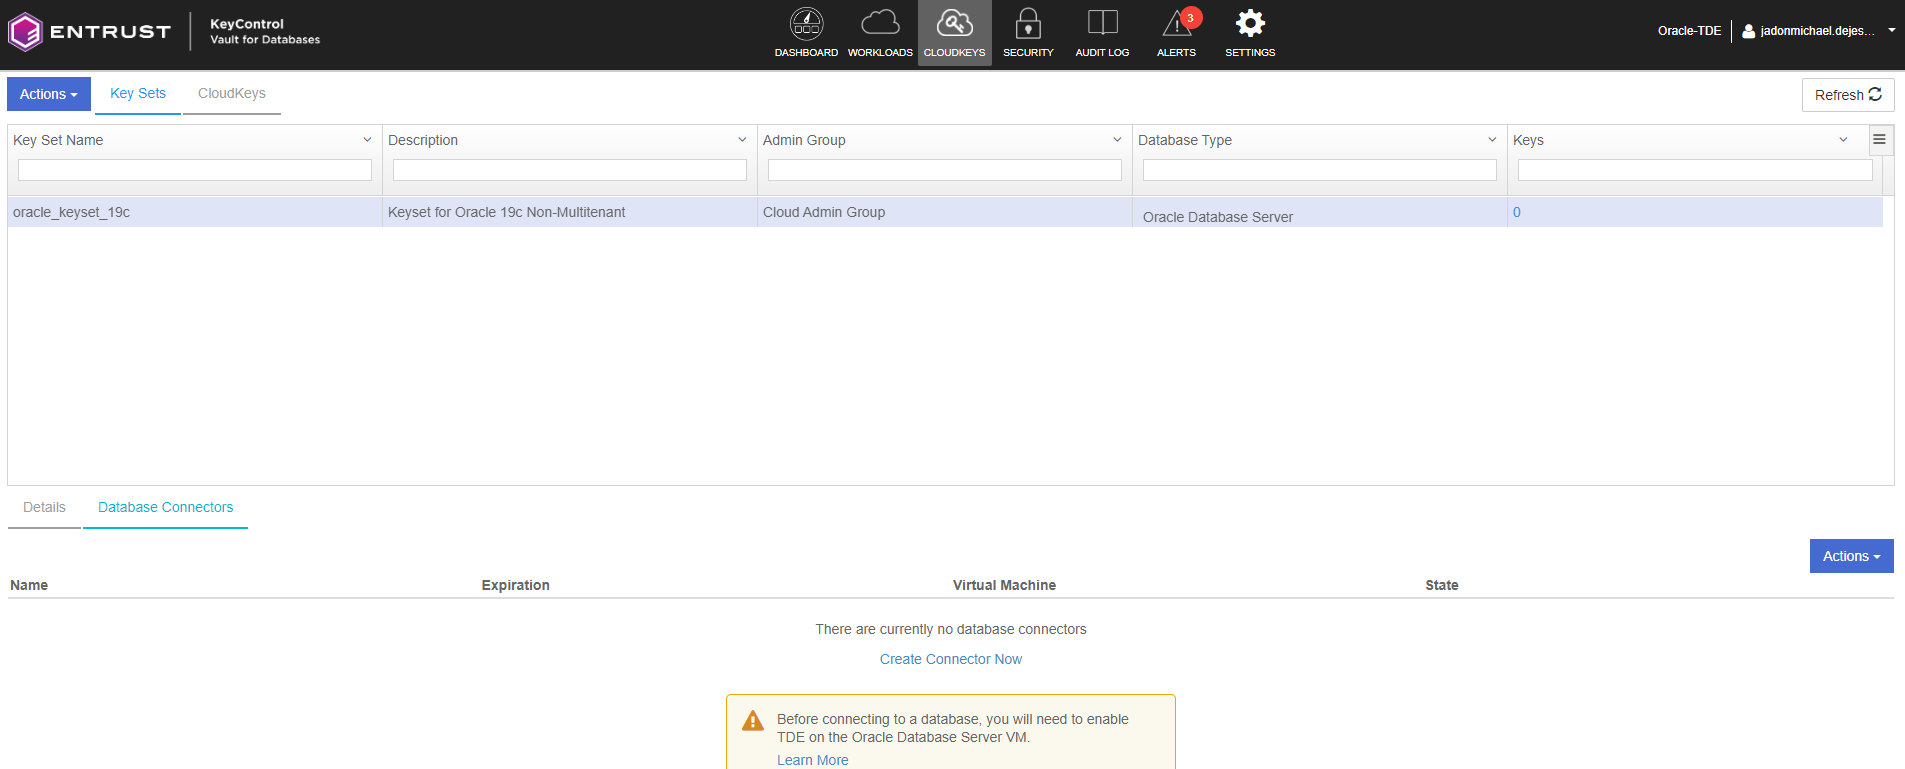
Verify that your KeySet is listed.
Create the Database Connector
The Database Connector creates a connection between the KeySet and the registered VM, enabling secure communication. Access credentials are associated with the connector, providing authentication for data access. The connector also allows for controlled access, empowering the controller to manage privileges effectively.
-
Select the newly created KeySet.
-
Select the Database tab.
-
Select Create Connector Now
-
Create Database Connector:
-
Select the VM Name
-
Enter a Connector Name
-
Select an Expiration
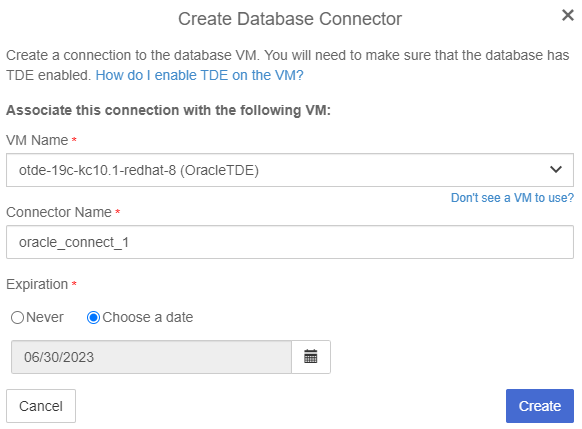
-
-
Select Create
-
Select the newly created database connector > Actions > Generate Access Token

-
Select Generate Token and it will display the newly generated token.
-
Copy the access token (Identity and Secret).
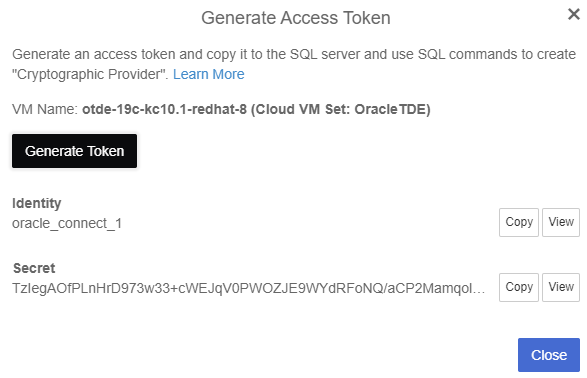
-
Select Close.
-
In your Oracle Server, create a config file
/opt/oracle/entrust/orcl.confusing the copied Access Token (Identity and Secret) that will be used by the database administrators.First create the
/opt/oracle/entrustdirectory.% mkdir -p /opt/oracle/entrustThe
orcl.conffile must be in a JSON format. For example:{ "identity": "oracletde-connector", "secret": "aBC......XyZ=" } -
Set the following ownership and permissions on the
/opt/oracle/entrustdirectory:-
Owner: oracle
-
Group: oinstall
-
Permissions: 775
% chown oracle:oinstall /opt/oracle/entrust
% chmod 775 /opt/oracle/entrust
The access credentials will be securely stored on the Oracle server, enabling the creation and utilization of the master key. By leveraging these credentials, you gain the ability to enable robust encryption on the database, making use of the master key for enhanced security.
For more information on creating a KeyControl Vault Key Set for TDE, see KeyControl Vault Key Set for TDE.
-
Link the P11 library
You must now configure the Oracle PKCS #11 Library folder to use the KeyControl PKCS#11 API.
-
Create a directory path for the nShield API library as the
oracleuser. Make ownership and permissions on the directory as:-
Owner: oracle
-
Group: oinstall
-
Permissions: 775
Make sure that
ORACLE_BASEpoints to/opt/oracle.# # ORACLE_BASE is typically /opt/oracle # % sudo chown -R oracle:oinstall $ORACLE_BASE % sudo chmod -R 775 $ORACLE_BASE % mkdir -p $ORACLE_BASE/extapi/64/hsm/entrust % chown oracle:oinstall $ORACLE_BASE/extapi/64/hsm/entrust % chmod 775 $ORACLE_BASE/extapi/64/hsm/entrust
-
-
Link the PKCS#11 Library into the directory as the
oracleuser:% ln -s /opt/hcs/lib/libpkcs11.so $ORACLE_BASE/extapi/64/hsm/entrust/libpkcs11.so
Test the integration
When testing the integration, make sure you use the instructions that are appropriate to your installation. These tests are suitable for a multitenant database and software keystore.
For this integration, it is necessary to update the PKCS#11 library for Oracle 23ai Multitenant Database. Failure to do so may lead to the following issues:
-
Failing at migrating the software wallet to KeyControl.
-
Failing at opening KeyControl keystore for all containers.
For example:
ERROR at line 1:
ORA-28407: Hardware Security Module failed with PKCS#11 error
CKR_SESSION_HANDLE_INVALID(179)

ERROR at line 1:
ORA-03113: end-of-file on communication channel
Process ID: 148627
Session ID: 379 Serial number: 61809
Open and close a keystore or KeyControl
Oracle has a control system that gates access to a software keystore or KeyControl:
-
If a keystore or wallet is open, then you can access its contents.
-
If a keystore or wallet is closed, then you cannot access its contents.
You can open or close a software keystore or wallet with the following SQL statements.
Multitenant considerations
This section assumes the respective container and PDB databases are open:
To open/close a keystore for the container database only
SQL> ADMINISTER KEY MANAGEMENT SET KEYSTORE OPEN IDENTIFIED BY "<credential>";
SQL> ADMINISTER KEY MANAGEMENT SET KEYSTORE CLOSE IDENTIFIED BY "<credential>";
To open/close a keystore for the container and all PDBs it holds
SQL> ADMINISTER KEY MANAGEMENT SET KEYSTORE OPEN IDENTIFIED BY "<credential>" CONTAINER=ALL;
SQL> ADMINISTER KEY MANAGEMENT SET KEYSTORE CLOSE IDENTIFIED BY "<credential>" CONTAINER=ALL;
If you want to close all keystores, use the following SQL:
SQL> ADMINISTER KEY MANAGEMENT SET KEYSTORE CLOSE CONTAINER=ALL;Migrate from software keystore to KeyControl (multitenant)
The following procedure applies when the target database is multitenant, and you are already using a software wallet with TDE encryption.
Repeat the following procedure for each software keystore from which you want to migrate. Each container database can use its own Entrust key protection method (credential) if required. However, once a Entrust key protection method has been activated for a particular database instance, then you must continue to use that same credential for any further keys you want to protect for that instance.
Use the WALLET_ROOT and TDE_CONFIGURATION parameters.
In the following steps, use the orcl.conf file to utilize the access credentials for the KeyControl Database Vault.
In the Oracle Server log in to the SQL database as sysdba.
CONNECT sysdba@FREEROOTBack up your software keystore before attempting key migration to KeyControl
SQL> ADMINISTER KEY MANAGEMENT BACKUP KEYSTORE USING '<PreMigrationBackupString>' IDENTIFIED BY "<keystorepassphrase>";Prepare for key migration by running an SQL script
SQL> ALTER SESSION SET CONTAINER = CDB$ROOT;

Session altered.

SQL> ALTER PLUGGABLE DATABASE ALL CLOSE;

Pluggable database altered.

SQL> ALTER SYSTEM SET TDE_CONFIGURATION='KEYSTORE_CONFIGURATION=HSM|FILE' CONTAINER = ALL;

System altered.

SQL> ALTER PLUGGABLE DATABASE ALL OPEN;

Pluggable database altered.

SQL> SHOW PARAMETER TDE_CONFIGURATION;

NAME                                 TYPE        VALUE
------------------------------------ ----------- ------------------------------
tde_configuration                    string      KEYSTORE_CONFIGURATION=HSM|FILE
Create an auto login
SQL> ALTER SESSION SET CONTAINER = CDB$ROOT;

Session altered.

-- Open all the PDBs.
SQL> ALTER PLUGGABLE DATABASE ALL OPEN;

Pluggable database altered.

-- Create Auto Login
SQL> ADMINISTER KEY MANAGEMENT CREATE AUTO_LOGIN KEYSTORE FROM KEYSTORE '/opt/oracle/admin/FREE/keystore-folder/tde' IDENTIFIED BY KeystorePassword1;

keystore altered.
Migrate from the keystore to KeyControl
SQL> ALTER SESSION SET CONTAINER = CDB$ROOT;

Session altered.

SQL> ADMINISTER KEY MANAGEMENT SET ENCRYPTION KEY IDENTIFIED BY "file:/opt/oracle/entrust/orcl.conf" MIGRATE USING <keystore-passphrase> WITH BACKUP;

keystore altered.
Disable the auto login
Here we only have to move keystore wallet file out of the way.
sudo -u oracle mv /opt/oracle/admin/FREE/keystore-folder/tde/cwallet.sso /opt/oracle/admin/FREE/keystore-folder/tde/cwallet.sso.backupBounce the database
SQL> shutdown immediate;

Database closed.
Database dismounted.
ORACLE instance shut down.

SQL> startup;

ORACLE instance started.

Total System Global Area 1603787624 bytes
Fixed Size                  5421928 bytes
Variable Size             419430400 bytes
Database Buffers         1174405120 bytes
Redo Buffers                4530176 bytes
Database mounted.
Database opened.
Close all keystores
SQL> ALTER SESSION SET CONTAINER = CDB$ROOT;

Session altered.

-- Open all the PDBs.
SQL> ALTER PLUGGABLE DATABASE ALL OPEN READ WRITE;

Pluggable database altered.

-- Close all keystores
SQL> ADMINISTER KEY MANAGEMENT SET KEYSTORE CLOSE CONTAINER=ALL;

--Show the Keystores are closed
SQL> ALTER SESSION SET CONTAINER = FREEPDB1;
SQL> select CON_ID,WRL_TYPE,STATUS from V$ENCRYPTION_WALLET;

    CON_ID WRL_TYPE             STATUS
---------- -------------------- ------------------------------
         3 FILE                 CLOSED
         3 HSM                  CLOSED


SQL> ALTER SESSION SET CONTAINER = CDB$ROOT;
SQL> select CON_ID,WRL_TYPE,STATUS from V$ENCRYPTION_WALLET;

    CON_ID WRL_TYPE             STATUS
---------- -------------------- ------------------------------
         1 FILE                 CLOSED
         1 HSM                  CLOSED
         2 FILE                 CLOSED
         2 HSM                  CLOSED
         3 FILE                 CLOSED
         3 HSM                  CLOSED
Open the HSM protection wallet on all databases
SQL> ALTER SESSION SET CONTAINER = CDB$ROOT;

-- Open DB
SQL> ALTER DATABASE OPEN;

-- Open all the PDBs.
SQL> ALTER PLUGGABLE DATABASE ALL OPEN READ WRITE;

-- Open keystore
SQL> ADMINISTER KEY MANAGEMENT SET KEYSTORE OPEN IDENTIFIED BY "file:/opt/oracle/entrust/orcl.conf" CONTAINER=ALL;

-- Show HSM Keystore as Open
SQL> ALTER SESSION SET CONTAINER = FREEPDB1;
SQL> select CON_ID,WRL_TYPE,STATUS from V$ENCRYPTION_WALLET;

    CON_ID WRL_TYPE             STATUS
---------- -------------------- ------------------------------
         3 FILE                 CLOSED
         3 HSM                  OPEN

SQL> ALTER SESSION SET CONTAINER = CDB$ROOT;
SQL> select CON_ID,WRL_TYPE,STATUS from V$ENCRYPTION_WALLET;

    CON_ID WRL_TYPE             STATUS
---------- -------------------- ------------------------------
         1 FILE                 CLOSED
         1 HSM                  OPEN
         2 FILE                 CLOSED
         2 HSM                  OPEN
         3 FILE                 CLOSED
         3 HSM                  OPEN
Create master keys directly in KeyControl for a multitenant database
The following procedure applies when the target database is multitenant, and there is no preexisting software keystore.
Repeat the following procedure for each database in which you want to create keys. Each database instance can use its own Entrust key protection method (credential) if required. However, once an Entrust key protection method has been activated for a particular database instance, then you must continue to use that same credential for any further keys you want to protect for that instance.
You must create the container database master key first. After the container database master key has been created, you have a choice of how you create master keys for all PDBs:
-
in one operation
-
for each PDB individually
| The PDB(s) must use the same protection credential as the container database (CDB). |
In the Oracle Server log in to the SQL database as sysdba.
CONNECT sysdba@FREEROOTSet the WALLET_ROOT and TDE_CONFIGURATION parameters
To set and use the WALLET_ROOT and TDE_CONFIGURATION parameters:
-
Set up the
WALLET_ROOTparameter.You must set up the
WALLET_ROOTparameter even if you do not use a keystore. The database needs to be bounced after setting up theWALLET_ROOTparameter.SQL> ALTER SYSTEM SET WALLET_ROOT = "/opt/oracle/entrust" scope=SPFILE; SQL> shutdown immediate; SQL> startup SQL> SHOW PARAMETER WALLET_ROOT; NAME TYPE VALUE ------------------------------------ ----------- ------------------------------ wallet_root string /opt/oracle/entrust -
Set up the
TDE_CONFIGURATIONparameter.The database needs to be bounced after setting up the
TDE_CONFIGURATIONparameter.SQL> ALTER SESSION SET CONTAINER = CDB$ROOT; Session altered. SQL> ALTER PLUGGABLE DATABASE ALL CLOSE; Pluggable database altered. SQL> ALTER SYSTEM SET TDE_CONFIGURATION = "KEYSTORE_CONFIGURATION=HSM" SCOPE=BOTH SID='*'; System altered. SQL> ALTER PLUGGABLE DATABASE ALL OPEN; Pluggable database altered. SQL> SHOW PARAMETER TDE_CONFIGURATION; NAME TYPE VALUE ------------------------------------ ----------- ------------------------------ tde_configuration string KEYSTORE_CONFIGURATION=HSM SQL> shutdown immediate; SQL> startup
Configure Oracle to generate the master encryption key
SQL> GRANT ADMINISTER KEY MANAGEMENT TO SYSTEM;

Grant succeeded.

SQL> GRANT RESOURCE TO syskm;

Grant succeeded.

SQL> GRANT UNLIMITED TABLESPACE TO syskm;

Grant succeeded.

SQL> commit;

Commit complete.
Open the HSM keystore
You will see that when you open the HSM Keystore, the status will say OPEN_NO_MASTER_KEY.
SQL> ALTER SESSION SET CONTAINER = CDB$ROOT;

-- Open DB
SQL> ALTER DATABASE OPEN;

-- Open all the PDBs.
SQL> ALTER PLUGGABLE DATABASE ALL OPEN READ WRITE;

-- Open keystore
SQL> ADMINISTER KEY MANAGEMENT SET KEYSTORE OPEN IDENTIFIED BY "file:/opt/oracle/entrust/orcl.conf" CONTAINER=ALL;

-- Show HSM Keystore as open
SQL> ALTER SESSION SET CONTAINER = FREEPDB1;

Session altered.

SQL> select CON_ID,WRL_TYPE,STATUS from V$ENCRYPTION_WALLET;

    CON_ID WRL_TYPE             STATUS
---------- -------------------- ------------------------------
         3 HSM                  OPEN_NO_MASTER_KEY

SQL> ALTER SESSION SET CONTAINER = CDB$ROOT;

Session altered.

SQL> select CON_ID,WRL_TYPE,STATUS from V$ENCRYPTION_WALLET;

    CON_ID WRL_TYPE             STATUS
---------- -------------------- ------------------------------
         1 HSM                  OPEN_NO_MASTER_KEY
         2 HSM                  OPEN_NO_MASTER_KEY
         3 HSM                  OPEN_NO_MASTER_KEY
Create a TDE master encryption key
The TDE Master Encryption Key is stored inside the Entrust KeyControl. Oracle Database uses the TDE master encryption key to encrypt or decrypt TDE table keys and tablespace keys.
CONNECT sysdba@FREEROOT
SQL> ALTER SESSION SET CONTAINER = CDB$ROOT;

-- Open all the PDBs.
SQL> ALTER PLUGGABLE DATABASE ALL OPEN;

SQL> ADMINISTER KEY MANAGEMENT SET KEY IDENTIFIED BY "file:/opt/oracle/entrust/orcl.conf" WITH BACKUP CONTAINER = ALL;

keystore altered.

SQL> select CON_ID,WRL_TYPE,STATUS from V$ENCRYPTION_WALLET;

    CON_ID WRL_TYPE             STATUS
---------- -------------------- ------------------------------
         1 HSM                  OPEN
         2 HSM                  OPEN
         3 HSM                  OPEN
The master key is created.
Encrypt your database using tablespace encryption, column encryption, or both.

Rekeying or key rotation
After you have established your KeyControl Database Vault as the primary protector for your master encryption keys, for security reasons you may want to periodically replace the keys, or re-key. For your particular system, you can do this by following the instructions below.
The following subsections show how to perform a re-key in Oracle multitenant environments. After re-key, the new encryption keys should be immediately available and usable by the client that initiated the re-key.
In the Oracle Server log in to the SQL database as sysdba.
CONNECT sysdba@FREEROOT
Rekey for a multitenant database
-
Doing it for CDB and all the PDBs in one operation.
SQL> ALTER SESSION SET CONTAINER = CDB$ROOT; Session altered. -- Open all the PDBs. SQL> ALTER PLUGGABLE DATABASE ALL OPEN; Pluggable database altered. -- ReKey SQL> ADMINISTER KEY MANAGEMENT SET KEY IDENTIFIED BY "file:/opt/oracle/entrust/orcl.conf" WITH BACKUP CONTAINER = ALL; keystore altered. -
Doing for the CDB only.
SQL> ADMINISTER KEY MANAGEMENT SET KEY IDENTIFIED BY "file:/opt/oracle/entrust/orcl.conf" WITH BACKUP;
Disable or enable the Database Connector
Disable the Database Connector
-
Log in to the KeyControl Database Vault.
-
Select CLOUDKEYS in the top bar.
-
Select the Key Sets tab.
-
Select the desired Key Set and proceed to Database Connectors.
-
Choose the appropriate Database connector and access its settings.
-
Under Actions, locate the option to Disable Connector.

-
Select Disable.
-
Confirm that the state is DISABLED.

-
Return to the Oracle Server in the SQL logged in as
sysdba. -
When you run the commands to verify the tables, you will notice that it shows the wallet is not open:
ERROR at line 1: ORA-28365: wallet is not open -
Confirm the wallet is closed with the following command:
SQL> ALTER SESSION SET CONTAINER = FREEPDB1;
SQL> select CON_ID,WRL_TYPE,STATUS from V$ENCRYPTION_WALLET;

    CON_ID WRL_TYPE             STATUS
---------- -------------------- ------------------------------
         3 HSM                  CLOSED

SQL> ALTER SESSION SET CONTAINER = CDB$ROOT;
SQL> select CON_ID,WRL_TYPE,STATUS from V$ENCRYPTION_WALLET;

    CON_ID WRL_TYPE             STATUS
---------- -------------------- ------------------------------
         1 HSM                  CLOSED
         2 HSM                  CLOSED
         3 HSM                  CLOSED
Enable the Database Connector
-
Log in to the KeyControl Database Vault.
-
Select CLOUDKEYS in the top bar.
-
Select the Key Sets tab.
-
Select the desired Key Set and proceed to Database Connectors.
-
Choose the appropriate Database connector and access its settings.
-
Under Actions, locate the option to Enable Connector.

-
Open the keystore:
Return to the Oracle Server in the SQL logged in as
sysdba.SQL> ALTER SESSION SET CONTAINER = CDB$ROOT; -- Open DB SQL> ALTER DATABASE OPEN; -- Open all the PDBs. SQL> ALTER PLUGGABLE DATABASE ALL OPEN READ WRITE; -- Open keystore SQL> ADMINISTER KEY MANAGEMENT SET KEYSTORE OPEN IDENTIFIED BY "file:/opt/oracle/entrust/orcl.conf" CONTAINER=ALL; -- Show HSM Keystore as open SQL> ALTER SESSION SET CONTAINER = FREEPDB1; Session altered. SQL> select CON_ID,WRL_TYPE,STATUS from V$ENCRYPTION_WALLET; CON_ID WRL_TYPE STATUS ---------- -------------------- ------------------------------ 3 HSM OPEN SQL> ALTER SESSION SET CONTAINER = CDB$ROOT; Session altered. SQL> select CON_ID,WRL_TYPE,STATUS from V$ENCRYPTION_WALLET; CON_ID WRL_TYPE STATUS ---------- -------------------- ------------------------------ 1 HSM OPEN 2 HSM OPEN 3 HSM OPEN