Test integration
Create a key set in Entrust KeyControl
This key set will be used to create a cloud key in Entrust KeyControl.
-
Sign in to the Entrust KeyControl Vault URL bookmark from [create-keycontrol-vault].
-
Select the CLOUDKEYS icon on the toolbar.
-
Select the Key Sets tab.
-
Select Actions > Create Key Set.
The Choose the type of keys… dialog appears.
-
Choose Azure Key.
The Create Key Set dialog appears.
-
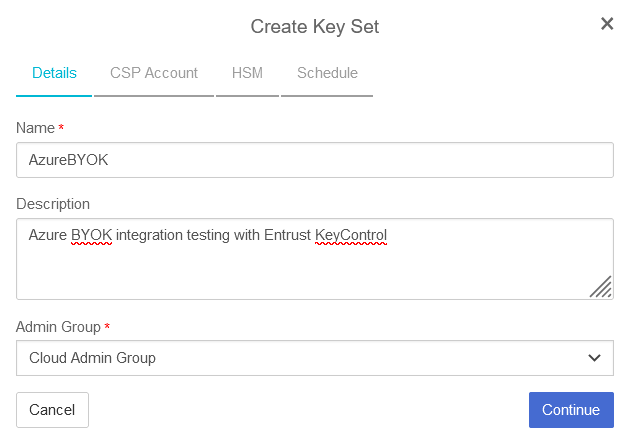
In the Details tab enter a Name and Description.
-
In the Admin Group menu select Cloud Admin Group.
For example:
-
Select Continue.
-
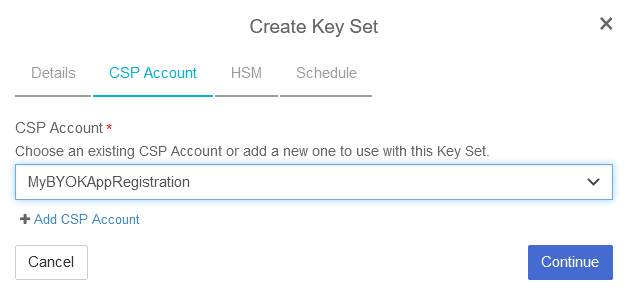
In the CSP Account tab, select the CSP account created in [create-keycontrol-csp-account].
For example:
-
Select Continue.
-
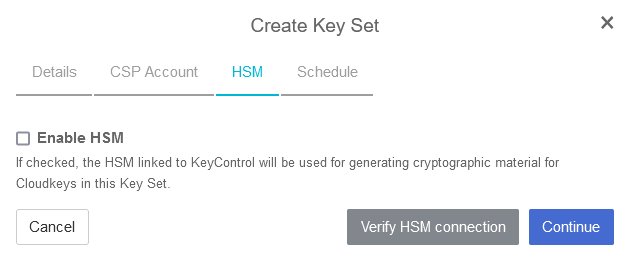
In the HSM tab, select Enable HSM if using one. In that case ensure the HSM is configured prior to this step.
For example:
-
Select Continue.
-
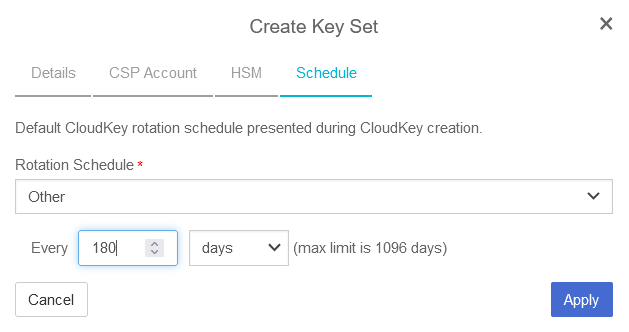
In the Schedule tab, select a Rotation Schedule matching the selection made during [create-azure-client-secret]. For example:
-
Select Apply.
The key set is added. For example:

-
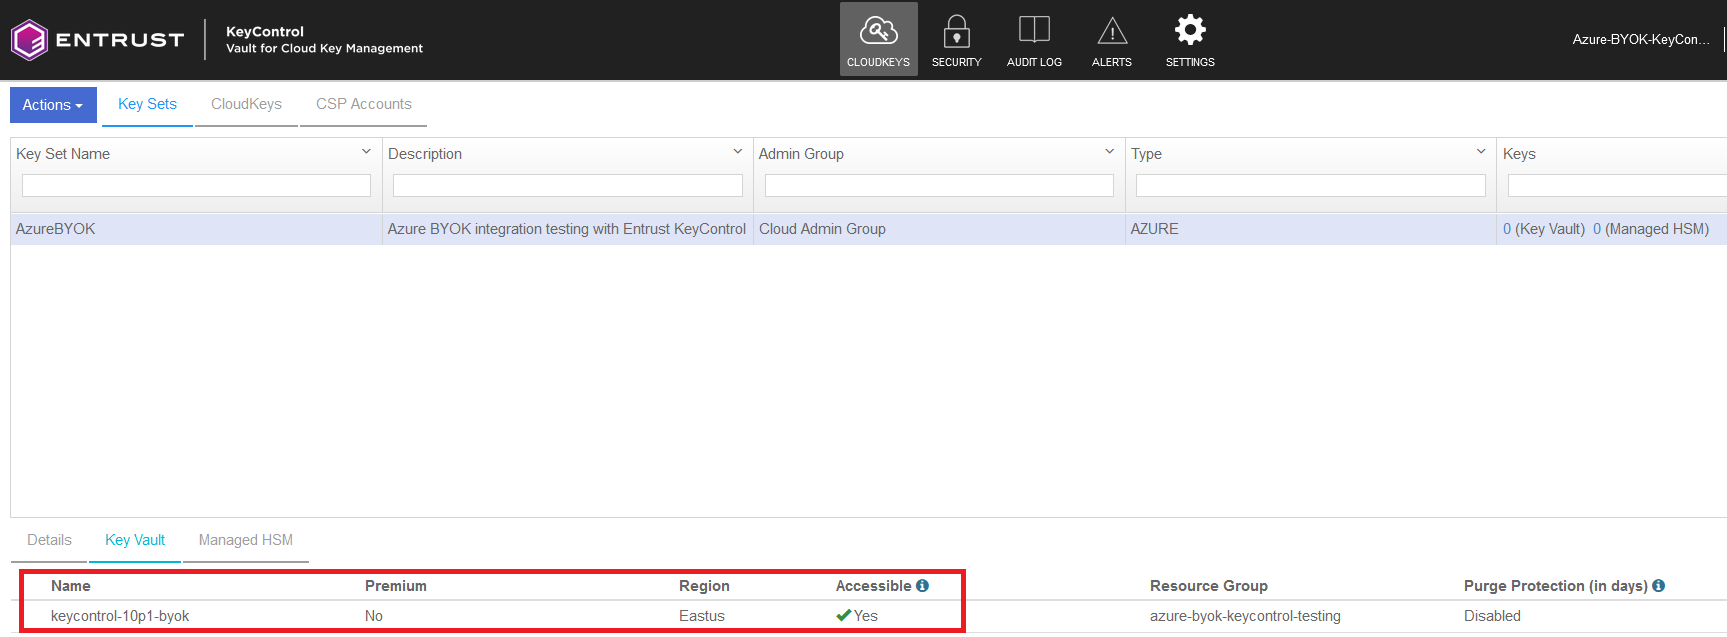
Verify the Azure key vault created in [create-azure-keyvault] is listed in the Key Vault tab with setting Accessible set to Yes.
For example:
For additional information, see Creating a Key Set.
Create a cloud key in Entrust KeyControl
The following steps create a cloud key in Entrust KeyControl and verify it is available in Azure key vault.
-
Sign in to the Entrust KeyControl Vault URL bookmark from [create-keycontrol-vault].
-
Select the CLOUDKEYS icon on the toolbar.
-
Select the CloudKeys tab.
-
In the Key Set menu, select the Key Set created in Create a key set in Entrust KeyControl.
-
In the Type menu, select Key Vault.
For example:

-
Select Actions > Create CloudKey.
The Create CloudKey dialog appears.
-
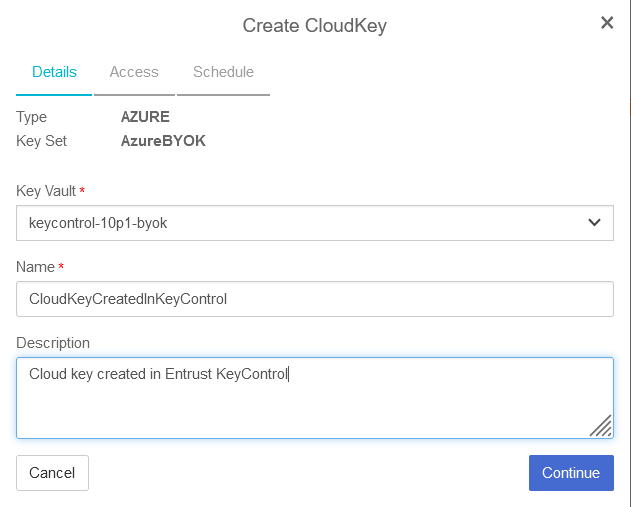
In the Key Vault menu, select the Azure key vault created in [create-azure-keyvault].
-
In the Details tab, enter the Name and Description. For example:
-
Select Continue.
-
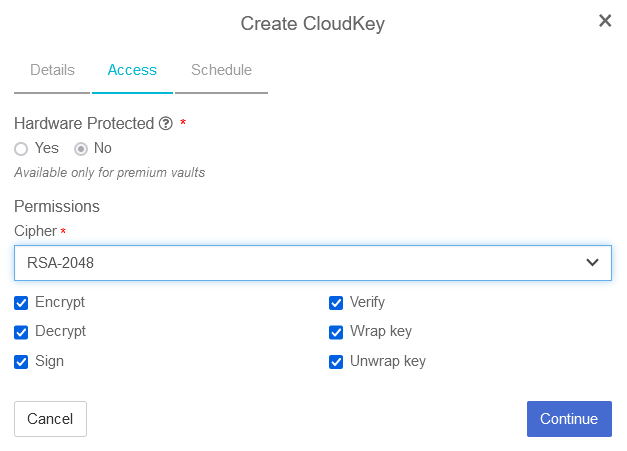
In the Access tab, select the required Cipher.
For example:
-
Select Continue.
-
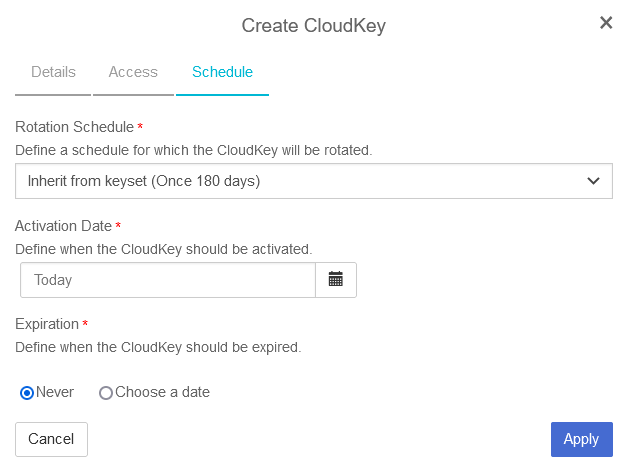
In the Schedule tab, select the Rotation Schedule, Activation Date, and Expiration.
For example:
-
Select Apply.
The cloud key is created.

-
Verify the cloud key created in Entrust KeyControl is available in Azure key vault.

For additional information, see Creating a CloudKey.
Create a cloud key in Azure key vault
The following steps create a cloud key in Azure key vault and import it into Entrust KeyControl.
To create a cloud key in Azure Key Vault:
-
Navigate to Home > Key vaults > <Key_vault_name> > Keys > Generate/Import.
The Create a key dialog appears.
-
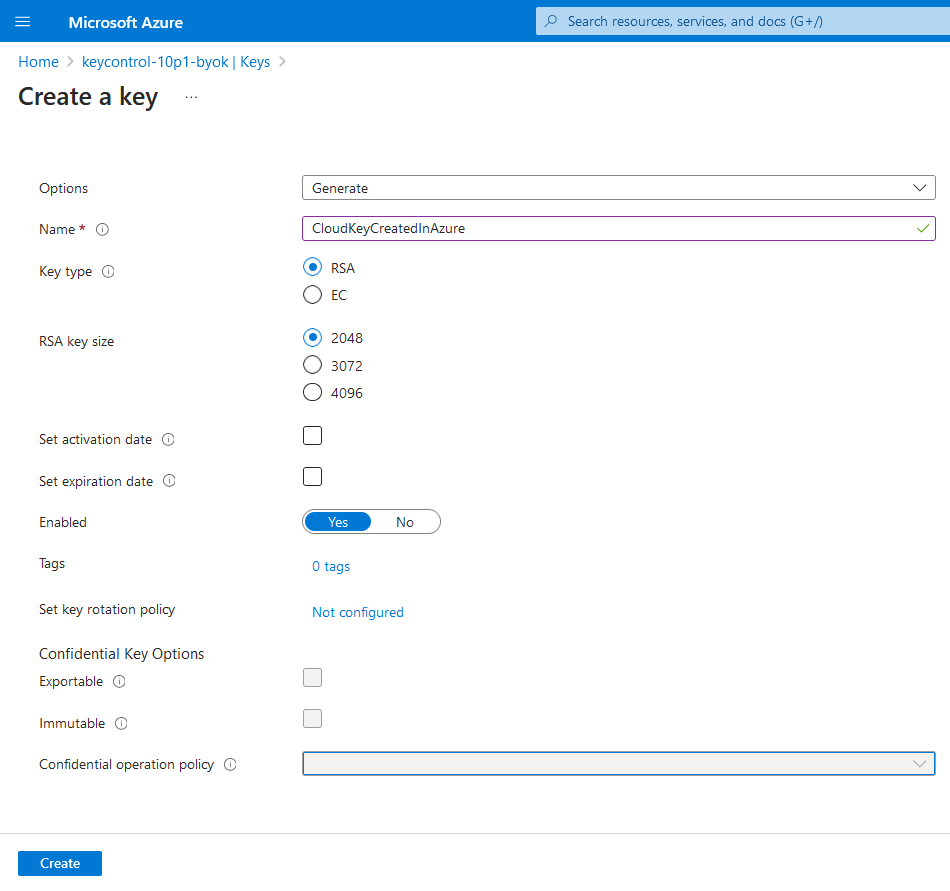
Enter the Name and the required key properties.
For example:
-
Select Create.
The cloud key is created.
-
Verify the newly created key.
For example:

To import the cloud key created in Azure into Entrust KeyControl:
-
Sign in to the Entrust KeyControl Vault URL bookmark from [create-keycontrol-vault].
-
Select the CLOUDKEYS icon on the toolbar.
-
Select the Key Sets tab.
-
Select the key set created in Create a key set in Entrust KeyControl.
-
Select Actions > Import CloudKey.
The Import Cloud Keys dialog appears.
-
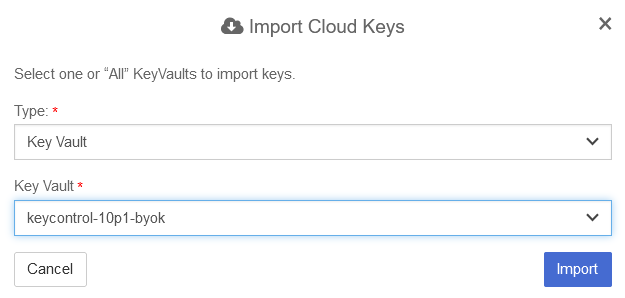
In the Type menu, select Key Vault.
-
In the Key Vault menu, select the Azure key vault created in [create-azure-keyvault].
For example:
-
Select Import.
-
Verify the cloud key created in Azure key vault is available in Entrust KeyControl.

Rotate a cloud key in Entrust KeyControl
To rotate a cloud key in Entrust KeyControl:
-
Sign in to the Entrust KeyControl Vault URL bookmark from [create-keycontrol-vault].
-
Select the CLOUDKEYS icon on the toolbar.
-
Select the CloudKeys tab.
-
Select the key to rotate. Then, scroll down until you see the Rotate Now control.
-
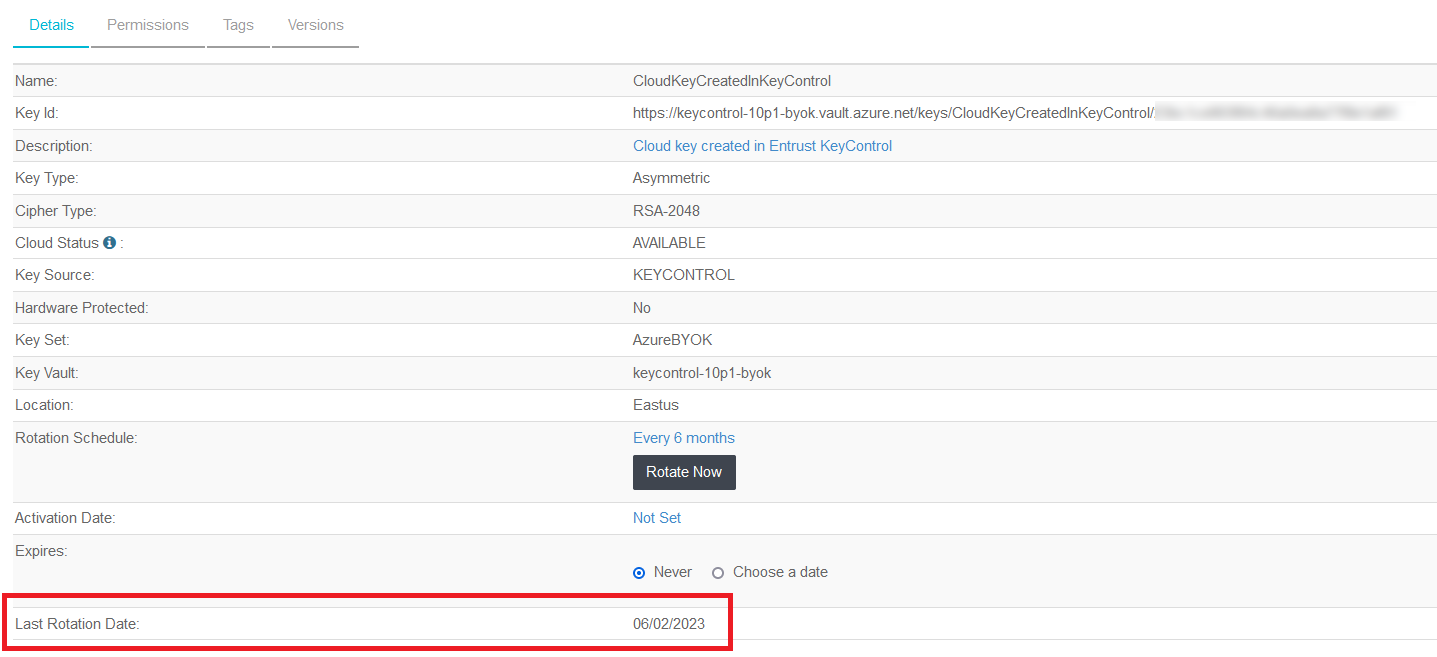
Select Rotate Now.
The key has been rotated.
For example:

-
In Azure, navigate to Home > Key vaults > <Key_vault_name> > Keys.
-
Select the key you want to rotate.
-
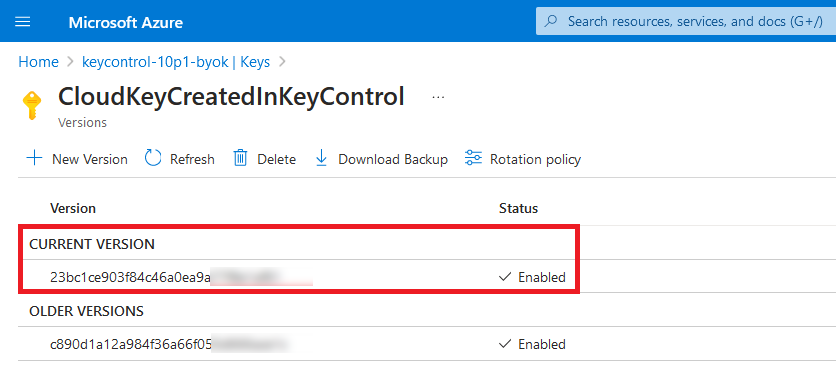
Verify that the key has been rotated.
For example:
Remove a cloud key in Entrust KeyControl
A removed cloud key in Entrust KeyControl will no longer be available for use in Azure. However, Entrust KeyControl will keep a copy of the removed cloud key, which could be reloaded to Azure for use.
-
Sign in to the Entrust KeyControl Vault URL bookmark from [create-keycontrol-vault].
-
Select the CLOUDKEYS icon on the toolbar.
-
Select the CloudKeys tab.
-
Select the key to the removed.
-
Select Actions > Remove from Cloud.
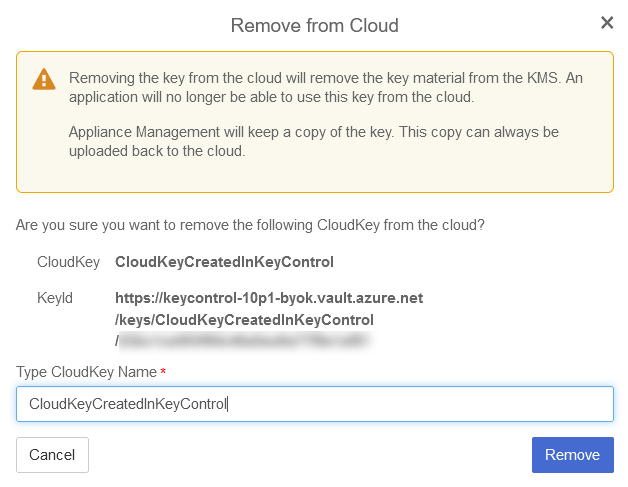
The Remove from Cloud dialog appears.
-
Type the name of the cloud key in Type CloudKey Name.
For example:
-
Select Remove.
-
Verify the status change in Entrust KeyControl.
For example:

-
Verify the key is gone from Azure.
For example:

For additional information, see Removing a CloudKey from the Cloud.
Upload a removed cloud key to Azure in Entrust KeyControl
To upload a removed cloud key to Azure in Entrust KeyControl:
-
Sign in to the Entrust KeyControl Vault URL bookmark from [create-keycontrol-vault].
-
Select the CLOUDKEYS icon on the toolbar.
-
Select the CloudKeys tab.
-
Select the key to be uploaded.
-
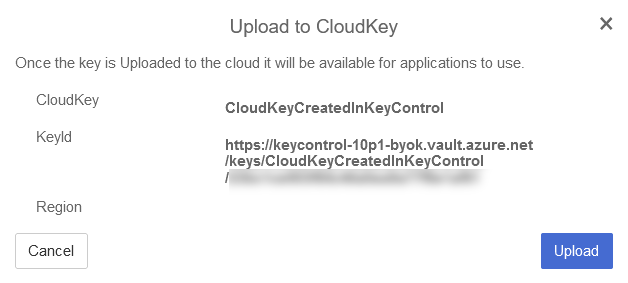
Select Actions > Upload to Cloud.
The Remove from Cloud dialog appears. For example:
-
Select Upload.
-
Verify the status change in Entrust KeyControl. For example:

-
Verify the key is now available in Azure. For example:

Delete a cloud key in Entrust KeyControl
The deletion of a cloud key does not take effect immediately. However, after a user defined interval, the key will be permanently removed.
-
Sign in to the Entrust KeyControl Vault URL bookmark from [create-keycontrol-vault].
-
Select the CLOUDKEYS icon on the toolbar.
-
Select the CloudKeys tab.
-
Select the key to deleted.
-
Select Actions > Delete CloudKey.
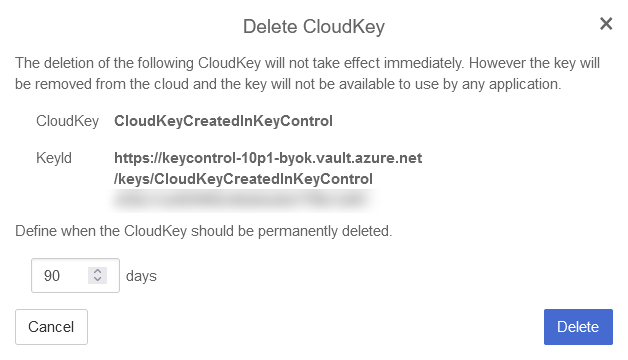
The Delete CloudKey dialog appears.
-
Select a time in Define when the CloudKey should be permanently deleted.
For example:
-
Select Delete.
-
Verify the status change in Entrust KeyControl.
For example:

-
Verify the key is gone from Azure. For example:

For additional information, see Deleting a CloudKey.
Cancel a cloud key deletion in Entrust KeyControl
The deletion of a key can be canceled while the time in the Define when the CloudKey should be permanently deleted setting has not expired.
-
Sign in to the Entrust KeyControl Vault URL bookmark from [create-keycontrol-vault].
-
Select the CLOUDKEYS icon on the toolbar.
-
Select the CloudKeys tab.
-
Select the key deletion to be canceled.
-
Select Actions > Cancel Deletion.
The Cancel Deletion dialog appears.
For example:

-
Select Yes, Cancel Deletion.
-
Verify the status change in Entrust KeyControl.
For example:

-
Verify the key is now available in Azure. For example:

For additional information, see Canceling a CloudKey Deletion.