nShield 5c 10G Procedures
This section describes procedures for managing certificates used by the nShield 5C 10G KeySafe 5 agent, setting up tenancies, and adding clients to the nShield 5c 10G HSM’s tenancy. These procedures should be performed during initial deployment, certificate renewal, certificate rotation, or recovery scenarios.
nShield 5c 10G KeySafe 5 Agent Certificate Management
Generate a CSR for the HSM KeySafe 5 Agent
Use this procedure to generate a Certificate Signing Request (CSR) for the nShield 5c 10G KeySafe 5 agent. The CSR is generated on the nShield 5c 10G HSM using the serial CLI.
-
Run the CSR generation command. The output includes a certificate request block beginning with “BEGIN CERTIFICATE REQUEST” and ending with “END CERTIFICATE REQUEST”.
(cli)ks5agent mbcsrExample CSR file structure:
-----BEGIN CERTIFICATE REQUEST----- MIIBvTCCAR8CAQAwITE .... zSfZvnckFvtRohFOwJv+MEE= -----END CERTIFICATE REQUEST----- -
Copy the entire certificate request, including the BEGIN and END lines, and save it to a file with a
.csrextension, for example nShield5c10G.csr. -
You may optionally verify and display the contents of the CSR to confirm correctness.
On Linux systems, assuming OpenSSL is installed, use OpenSSL to inspect the CSR.
openssl req -in nShield5c10G.csr -noout -textOn Windows systems, use OpenSSL to verify the CSR self-signature and display the certificate request details. Successful verification confirms the subject, public key information, extensions, and signature algorithm.
openssl req -text -noout -verify -in nShield5c10G.csr
Signing the CSR
Peer-to-peer certificate infrastructure signing
In a peer-to-peer certificate infrastructure, the nShield 5c 10G CSR is signed by the Certificate Authority embedded in the KeySafe 5 application.
-
Log in to the KeySafe 5 server and copy the nShield5c10G.csr file to a directory on the KeySafe 5 server.
-
Execute the CSR signing command using the KeySafe 5 server administration utility. The command outputs Base64-encoded TLS and CA certificates. Examples are provided below for both Linux and Windows environments.
Linux KeySafe 5 systems:
sudo /opt/nfast/bin/keysafe5-server-admin sign nShield5c10G.csrExample output: user@keysafe5:~/Downloads/new$ sudo /opt/nfast/bin/keysafe5-server-admin sign nShield5c10G.csr Base64 encoded tls.crt: LS0tLS1CRUdJTiBDRVJUSUZJQ0FURS0tLS0tCk1JSUNKekNDQVlxZ0F3SUJBZ0lCQ0RBS0....VPaVBmcEcvMmszQllsVW9hOUNvb2RTMUgKLS0tLS1FTkQgQ0VSVElGSUNBVEUtLS0tLQo= Base64 encoded ca.crt: LS0tLS1CRUdJTiBDRVJUSUZJQ0FURS0tLS0tCk1JSUNSRENDQWFXZ0F3SUJBZ0lCS2pBS0....TRVhXQmFlT0pPCmF4VHhPUWFXUC9vPQotLS0tLUVORCBDRVJUSUZJQ0FURS0tLS0tCg== Successfully signed CSR nShield5c10G.csr for 30 days Saved certificates tls.crt and ca.crt in the current directoryWindows KeySafe 5 Systems:
"C:\Program Files\nCipher\nfast\bin\keysafe5-server-admin.exe" sign nShield5c10G.csrAn Example output: C:\Users\Administrator.INTEROP\Documents\certificates-ks5ca-signed>"C:\Program Files\nCipher\nfast\bin\keysafe5-server-admin.exe" sign nShield5c10G.csr Base64 encoded tls.crt: LS0tLS1CRUdJTiBDRVJUSUZJQ0FURS0tLS0tCk1JSUNLRENDQVlxZ0F3SUJBZ0lCQXpBS0....YYXpqMVozM0hXODZzWlp2cXJMMGxtdz09Ci0tLS0tRU5EIENFUlRJRklDQVRFLS0tLS0K Base64 encoded ca.crt: LS0tLS1CRUdJTiBDRVJUSUZJQ0FURS0tLS0tCk1JSUNSRENDQWFXZ0F3SUJBZ0lCS2pBS0....UUWhZTUVvaHQrCnlrVnA0WmhKbDZzPQotLS0tLUVORCBDRVJUSUZJQ0FURS0tLS0tCg== Successfully signed CSR nShield5c10G.csr for 30 days Saved certificates tls.crt and ca.crt in the current directory-
The output confirms successful signing, displays the Base64-encoded certificate strings, and indicates that the certificate files have been saved in the current directory.
Copy the Base64 encoded strings for the tls.crt and ca.crt for later use.
-
Install the Signed Certificates on the nShield 5c 10G
-
Install the TLS certificate on the nShield 5c 10G by providing the Base64-encoded TLS certificate string through the CLI with the following command. The CLI will confirm that the certificate data has been saved successfully.
(cli)ks5agent mbtls tls.crt <Base64-encoded-TLS-string>An example: (cli)ks5agent mbtls tls.crt LS0tLS1CRUdJTiBDRVJUSUZJQ0FURS0tLS0tC... Saved Base64 encoded data to tls.crt. -
Install the CA certificate on the nShield 5c 10G by providing the Base64-encoded CA certificate string through the CLI with the following command. The CLI confirms that the certificate data has been saved successfully.
(cli)ks5agent mbtls ca.crt <Base64-encoded-CA-string>An example: (cli)ks5agent mbtls ca.crt LS0tLS1CRUdJTiBDRVJUSUZJQ0FURS0tLS0tCk1JS... Saved Base64 encoded data to ca.crt. -
Restart the nShield 5c 10G KeySafe 5 agent to apply the newly installed certificates. A successful restart confirms that the updated configuration has been loaded.
(cli)ks5agent restart -
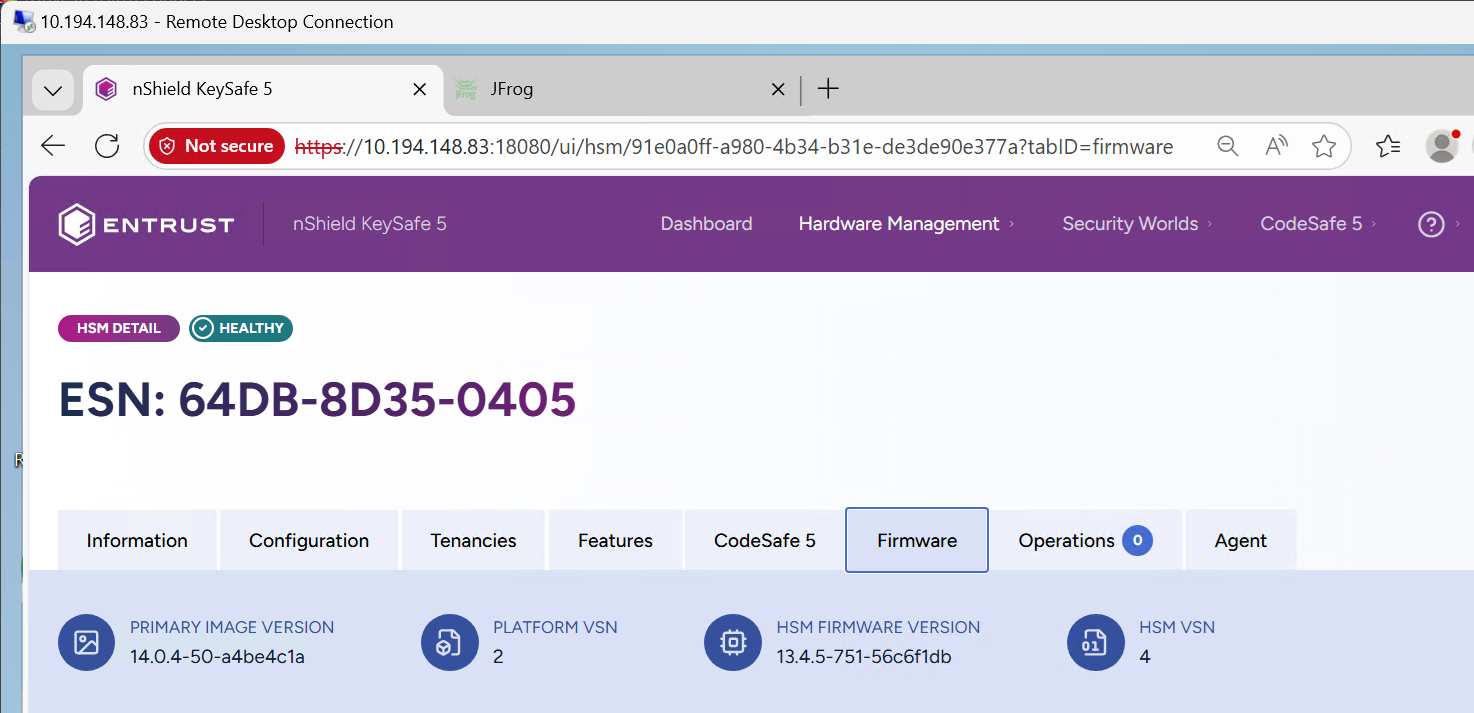
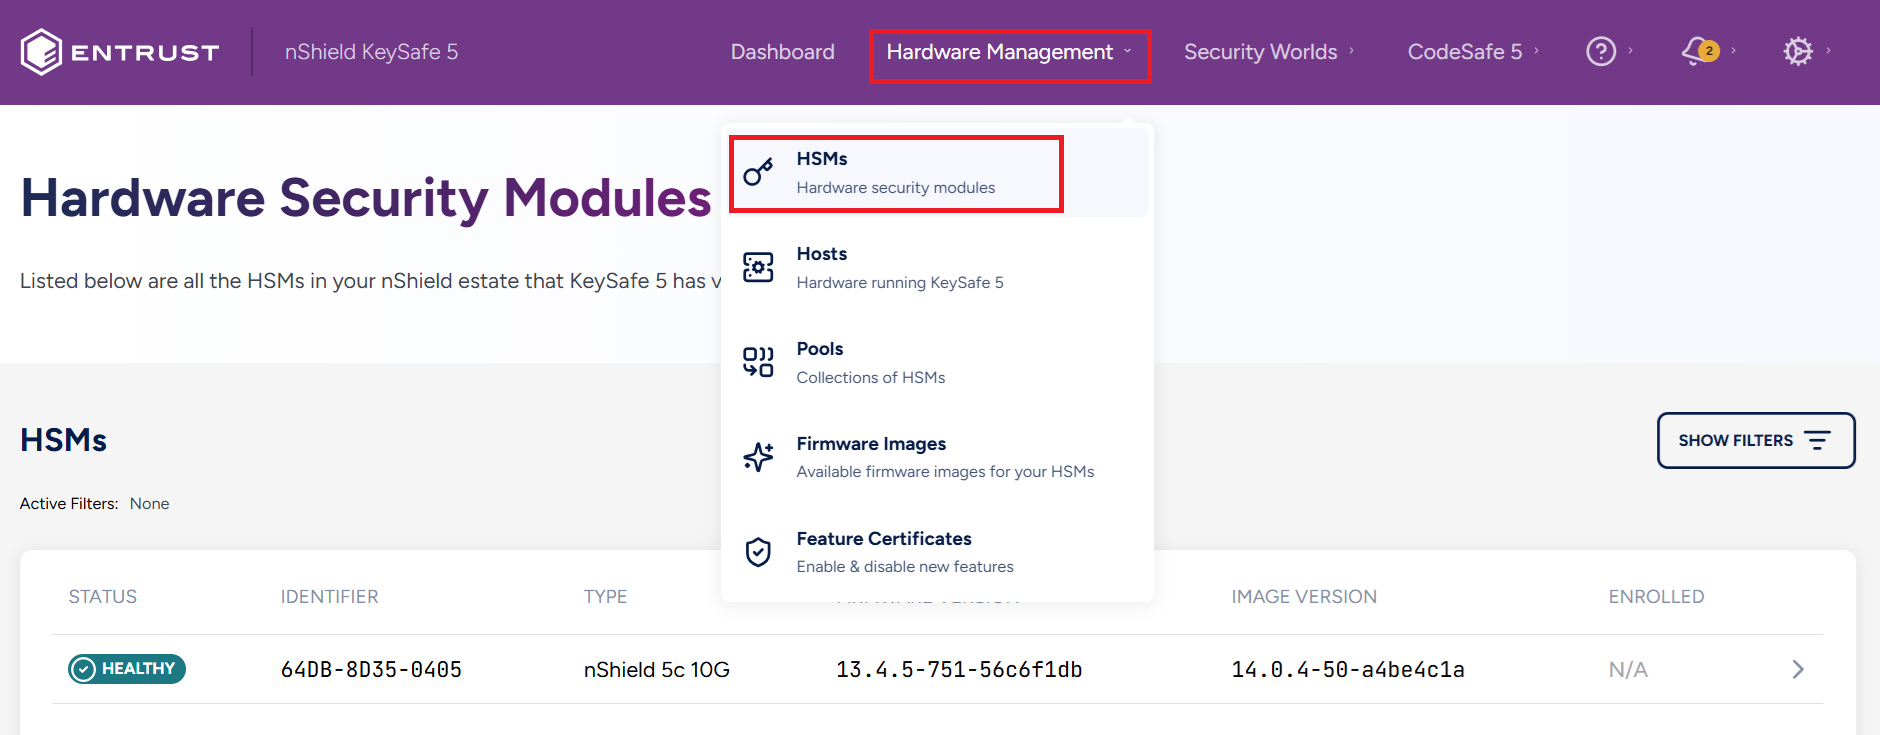
Next, verify the HSM’s state. From the KeySafe 5 User Dashboard, click Hardware Management, then HSMs. Confirm that the HSM status is shown as HEALTHY. Please refer to the Troubleshooting section later in this guide if the HSM does not appear in the GUI.
Creating a Tenancy and Adding Clients
Setting up a Tenancy
To enable access to the HSM from KeySafe 5, a tenancy must be set up on the HSM.
-
From the KeySafe 5 Dashboard, navigate to Hardware Management > HSMs. Select your HSM to proceed.
-
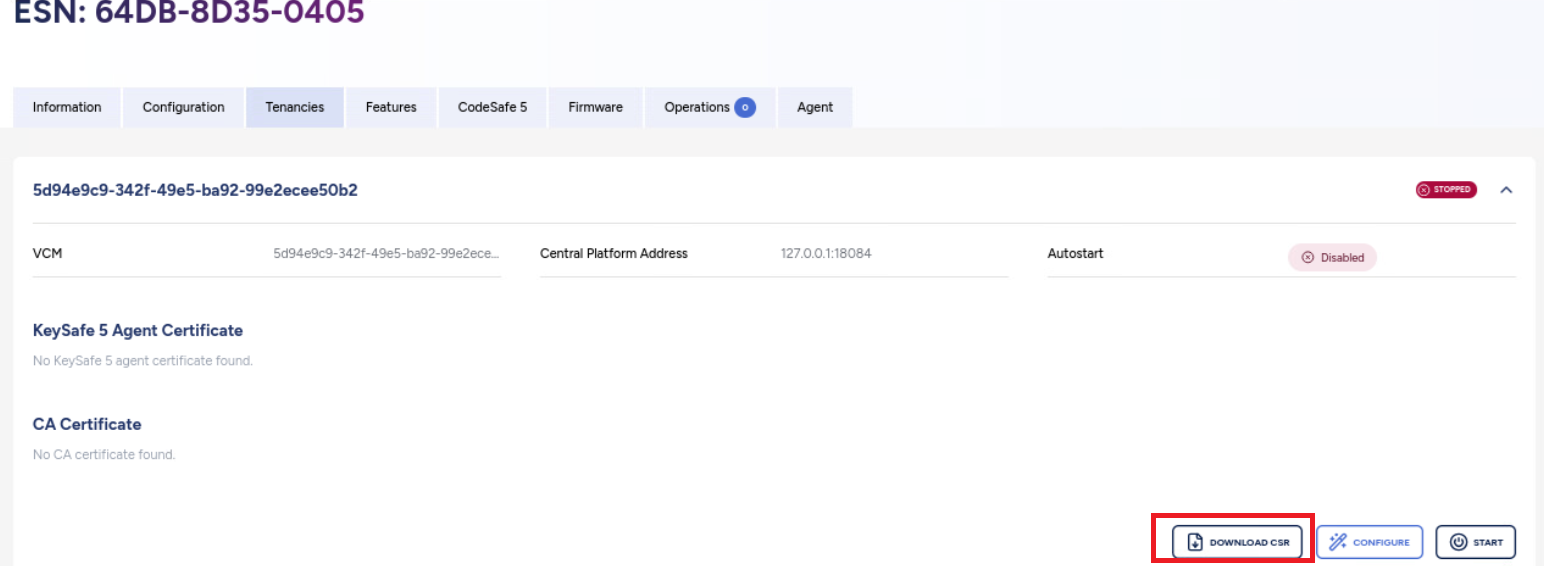
Select the HSM’s Tenancies Tab, and then click the Download CSR button at the lower right corner of the screen.
-
Transfer the downloaded
certificate.csrto the KeySafe 5 Server, and perform the signing operation on it.In the example output, the signed certificate was given a custom validity period of 2 years. See the section titled Additional Information later in this guide for more details. Linux KeySafe 5 Systems :
sudo /opt/nfast/bin/keysafe5-server-admin sign certificate.csr 730Example output: user@keysafe5:~/Downloads/tenancy$ sudo /opt/nfast/bin/keysafe5-server-admin sign certificate.csr 730 Base64 encoded tls.crt: LS0tLS1CRUdJTiBDRVJUSUZJQ0FURS0tLS0tCk1JSUNkRENDQWRhZ0F3SUJBZ0lCQ1RBS0....FGck5UWFBzaU10Y08KeTRYY0hGMzBwSUU9Ci0tLS0tRU5EIENFUlRJRklDQVRFLS0tLS0K Base64 encoded ca.crt: LS0tLS1CRUdJTiBDRVJUSUZJQ0FURS0tLS0tCk1JSUNSRENDQWFXZ0F3SUJBZ0lCS2pBS0....dTRVhXQmFlT0pPCmF4VHhPUWFXUC9vPQotLS0tLUVORCBDRVJUSUZJQ0FURS0tLS0tCg== Successfully signed CSR certificate.csr for 730 days Saved certificates tls.crt and ca.crt in the current directoryWindows KeySafe 5 Systems:
"C:\Program Files\nCipher\nfast\bin\keysafe5-server-admin.exe" sign certificate.csr 730An Example output: C:\Users\Administrator.INTEROP\Downloads>"C:\Program Files\nCipher\nfast\bin\keysafe5-server-admin.exe" sign certificate.csr 730 Base64 encoded tls.crt: LS0tLS1CRUdJTiBDRVJUSUZJQ0FURS0tLS0tCk1JSUNkRENDQWRhZ0F3SUJBZ0lCQmpBS0....tZYnpOQUxzaGJuemcKcmYzSW5GdDNQUjQ9Ci0tLS0tRU5EIENFUlRJRklDQVRFLS0tLS0K Base64 encoded ca.crt: LS0tLS1CRUdJTiBDRVJUSUZJQ0FURS0tLS0tCk1JSUNSRENDQWFXZ0F3SUJBZ0lCS2pBS0....NUUWhZTUVvaHQrCnlrVnA0WmhKbDZzPQotLS0tLUVORCBDRVJUSUZJQ0FURS0tLS0tCg== Successfully signed CSR certificate.csr for 730 days Saved certificates tls.crt and ca.crt in the current directory -
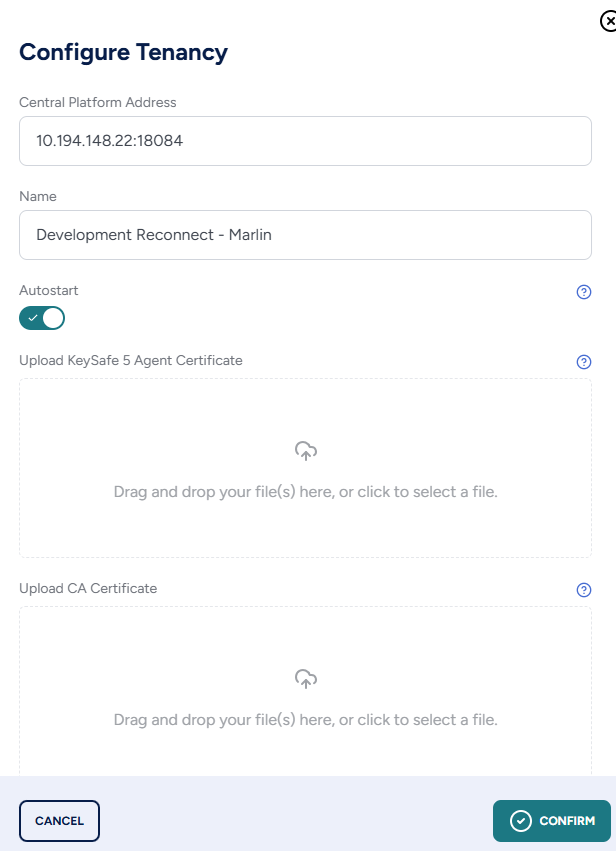
In the KeySafe 5 Web GUI, select your HSM. Click the Tenancies tab, then click Configure in the lower-right corner. Input the following information in the Configure Tenancy Window:
-
Input the Central Platform IP address which is your KeySafe 5 server IP address.
-
Input a Name for the Tenancy.
-
Select Autostart.
-
Upload the signed tls.crt and ca.crt generated by the signing operation in the previous step.
-
-
Select Confirm on the Configure Tenancy Window, then close.
-
Select Start at the lower right corner of the HSM’s Tenancy Tab. Select Confirm to start the Tenancy.
-
Verify that the created Tenancy appears in the HSM’s Tenancy Tab.
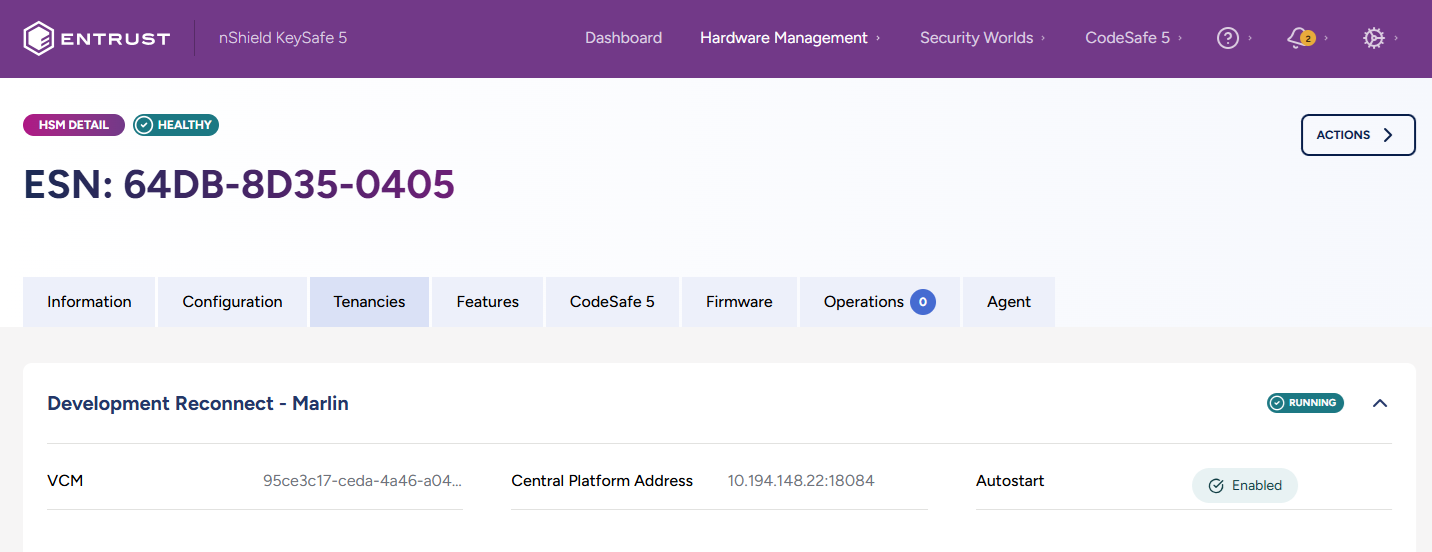
-
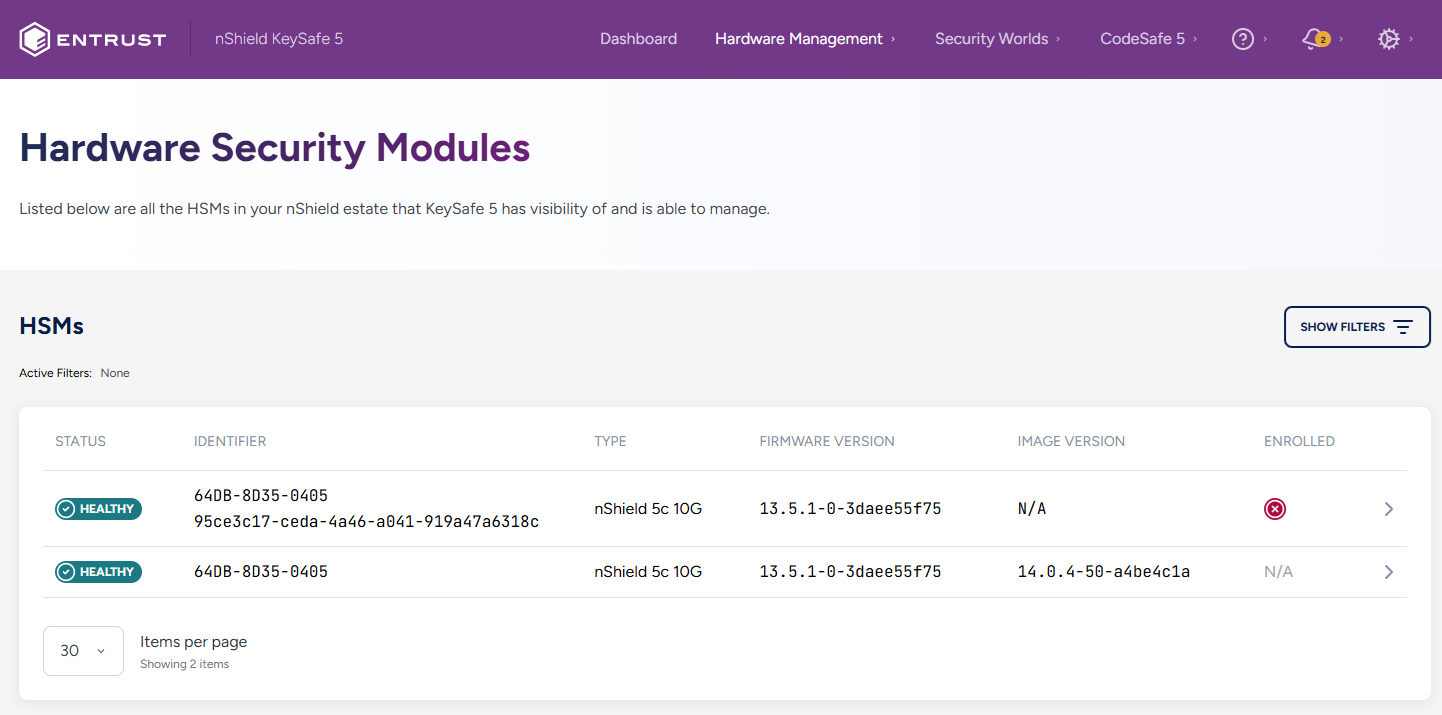
At Hardware Management > HSMs, you should see two HSMs with the same ESN. The HSM entry with the VCM visible as an Identifier is the Tenant HSM while the other entry is the platform HSM. Verify that the tenant HSM is available and Healthy.
Client Configuration
Adding Clients to the Tenancy
For a client to access and use the HSM for security purposes, the client must be added to the HSM’s tenancy.
-
On the Client that will be added to the HSM tenancy, install the latest version of the Security World software as described in the Installation Guide for the HSM. Ensure the Security World software is installed and operational before proceeding.
-
On the Client, run the following command and save the kneti hash.
% sudo /opt/nfast/bin/enquiryFor example: [root@ocp4-redhat-9 ~]# /opt/nfast/bin/enquiry Server: enquiry reply flags none enquiry reply level Six serial number mode operational version 13.6.14 ... remote port (IPv4) 9004 kneti hash 6126e791823fa40726253b9dd... rec. LongJobs queue 0 ... -
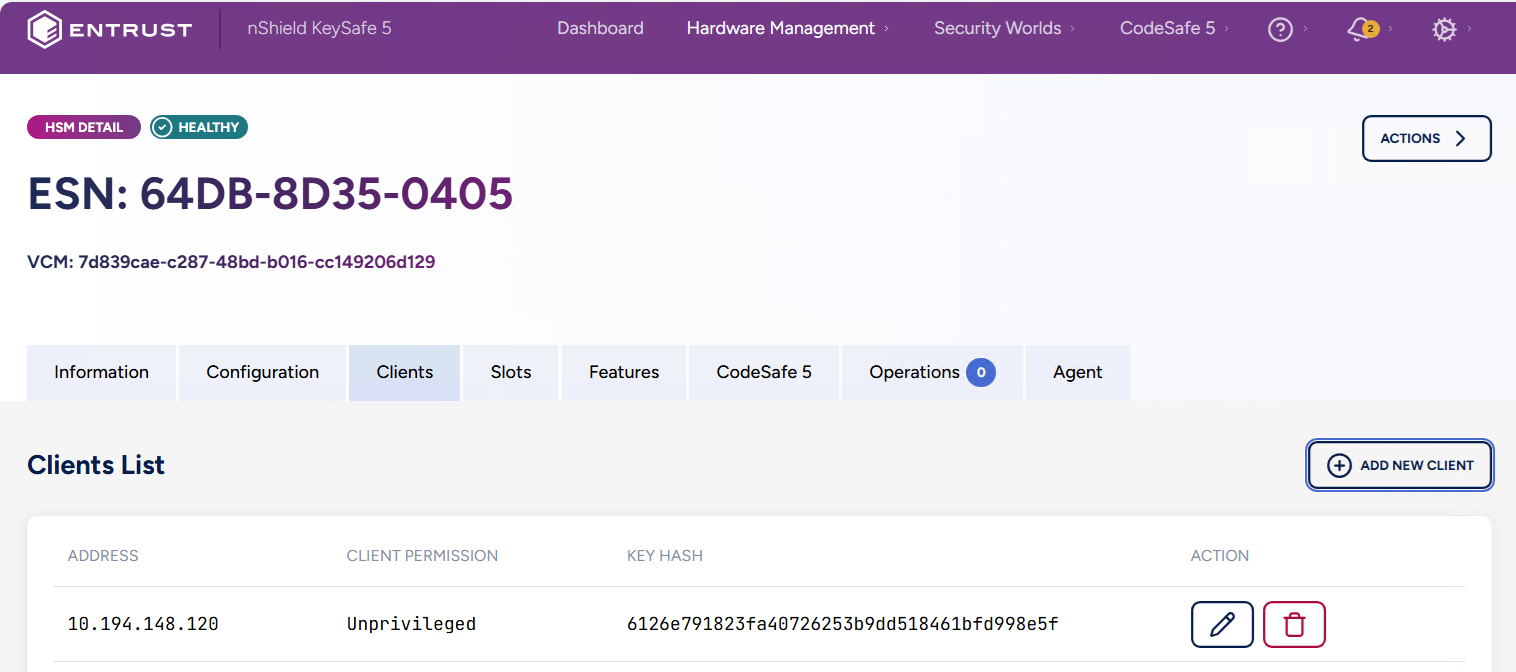
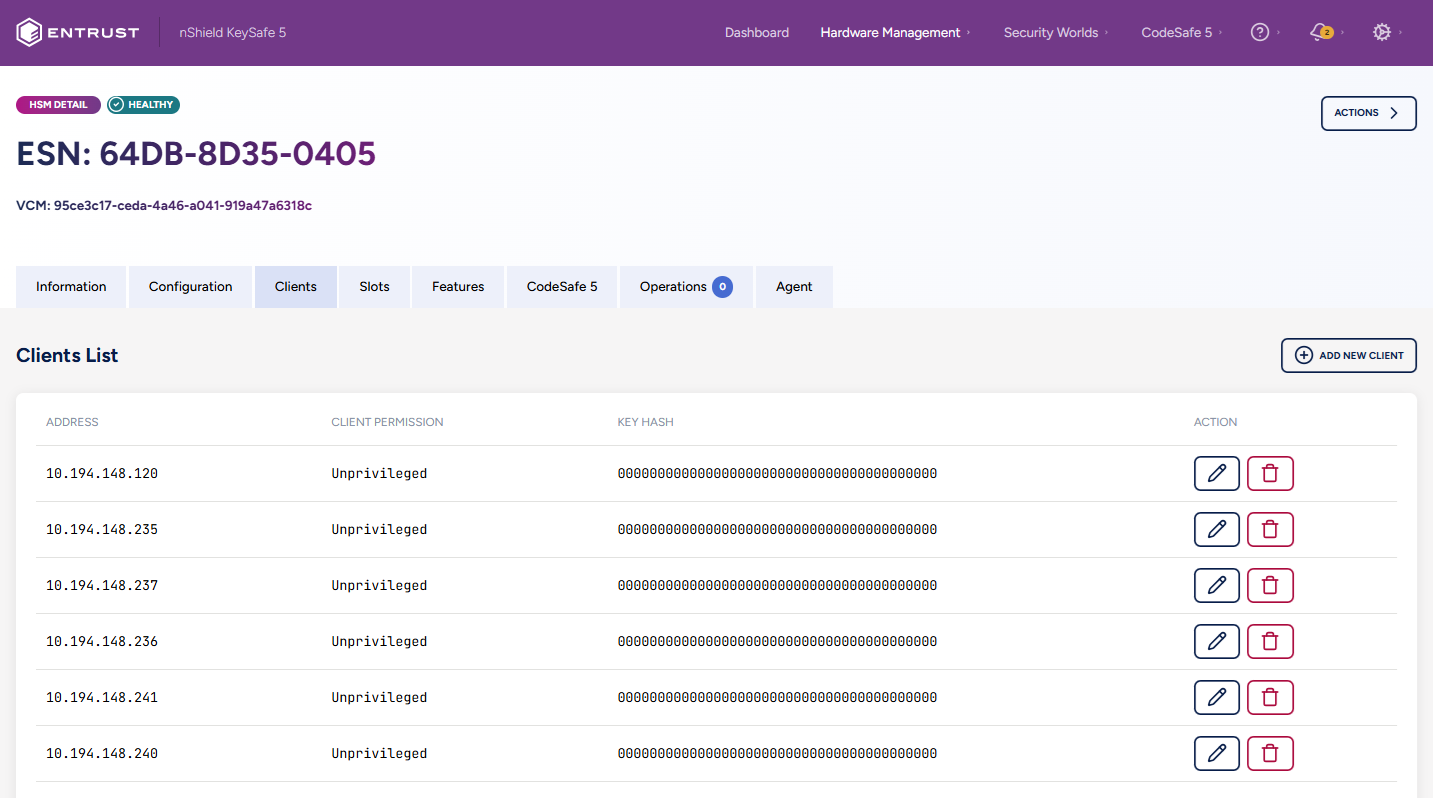
In the KeySafe 5 Web GUI, navigate to Hardware Management > HSMs. Select the Tenant HSM, then select the Clients tab.
-
Select Add New Client, which will bring up the Client Configuration window. Input the following information.
-
Select the intended Client Permission type. By default, this is set to Unprivileged.
-
In the Client Authentication area, consider the following options when making your selection:
Address Box KNETI Hash Box Instruction/Purpose Checked
Unchecked
Enter the client’s IP address. Any client with that IP address will be allowed to use the HSM irrespectively of its KNETI hash.
Unchecked
Checked
Enter the client’s KNETI hash. Any client with that KNETI hash will be allowed to use the HSM regardless of its IP address.
Checked
Checked
Enter both the client’s IP address and KNETI hash. These need to match to allow the client to use the HSM.
-
An example selection:
-
-
Select Save and then Close. It may take a few seconds before the Client appears in the Web GUI.
-
-
Once the Client appears in the Client List, the HSM is ready to be used by the Client.
Example of multiple clients added with KNETI hash unchecked:
Enrolling the HSM in the Client’s Security World
-
On the Client machine, run the following Security World utility command to determine the Electronic Serial Number (ESN) and KNETI hash of the HSM to enroll. Input the HSM’s IP address in the field designated by
<HSM-IP-address>.% sudo /opt/nfast/bin/anonkneti <HSM-IP-address> -
Enroll the HSM with the Security World utility command
nethsmenroll. Two methods are available.-
Using the HSM IP address. You will be prompted to validate the ESN and HASH in order to do the enrollment.
% sudo /opt/nfast/bin/nethsmenroll <HSM-IP-address> -
Using the ESN and KNETI Hash, specifying privileged or keeping the default unprivileged connection type.
Privileged connection :
% sudo /opt/nfast/bin/nethsmenroll --privileged <HSM-IP-address> <HSM-ESN> <HSM-kneti-hash>Unprivileged connection:
sudo /opt/nfast/bin/nethsmenroll <HSM-IP-address> <HSM-ESN> <HSM-kneti-hash>
-
-
Check that the HSM has been enrolled. The HSM should be listed in the module section of the output (e.g. Module #1). The mode should be operational, and the hardware status should be OK.
% sudo /opt/nfast/bin/enquiryAn Example output: [root@ocp4-redhat-9 ~]# enquiry Server: enquiry reply flags none enquiry reply level Six serial number ... mode operational version 13.6.14 ... Module #1: enquiry reply flags UnprivOnly enquiry reply level Six serial number ... mode operational version 13.4.5 ... module type nShield 5c 10G ... hardware status OK -
The HSM is now able to be used by the Client machine for security purposes.
Additional Procedures
This section describes optional or infrequently performed procedures that may be required in specific operational scenarios. These actions are not part of standard setup or day‑to‑day operation but are provided for advanced configuration, maintenance, or troubleshooting purposes.
Modifying Signed Certificate Validity Periods
By default, signed certificates are valid for 30 days. To extend the validity period, you can either change the CA validity period on the KeySafe 5 server for all signings, or specify a custom validity period for an individual CSR signing operation.
Commands shown below are to be run on the KeySafe 5 server.
-
Changing the CA validity on the KeySafe 5 server for all signings, for example, to 730 days (2 years):
/opt/nfast/bin/keysafe5-server-admin init -y --ca 730 --server 730 -
Changing the validity period for a single CSR signing to a custom period:
sudo /opt/nfast/bin/keysafe5-server-admin sign nShield5c10G.csr 730
Upgrading the nShield 5c 10G HSM’s Firmware through KeySafe 5
Upload the Firmware to KeySafe 5
-
Download the firmware package for your HSM, and extract the compressed file with the extension
.npkg -
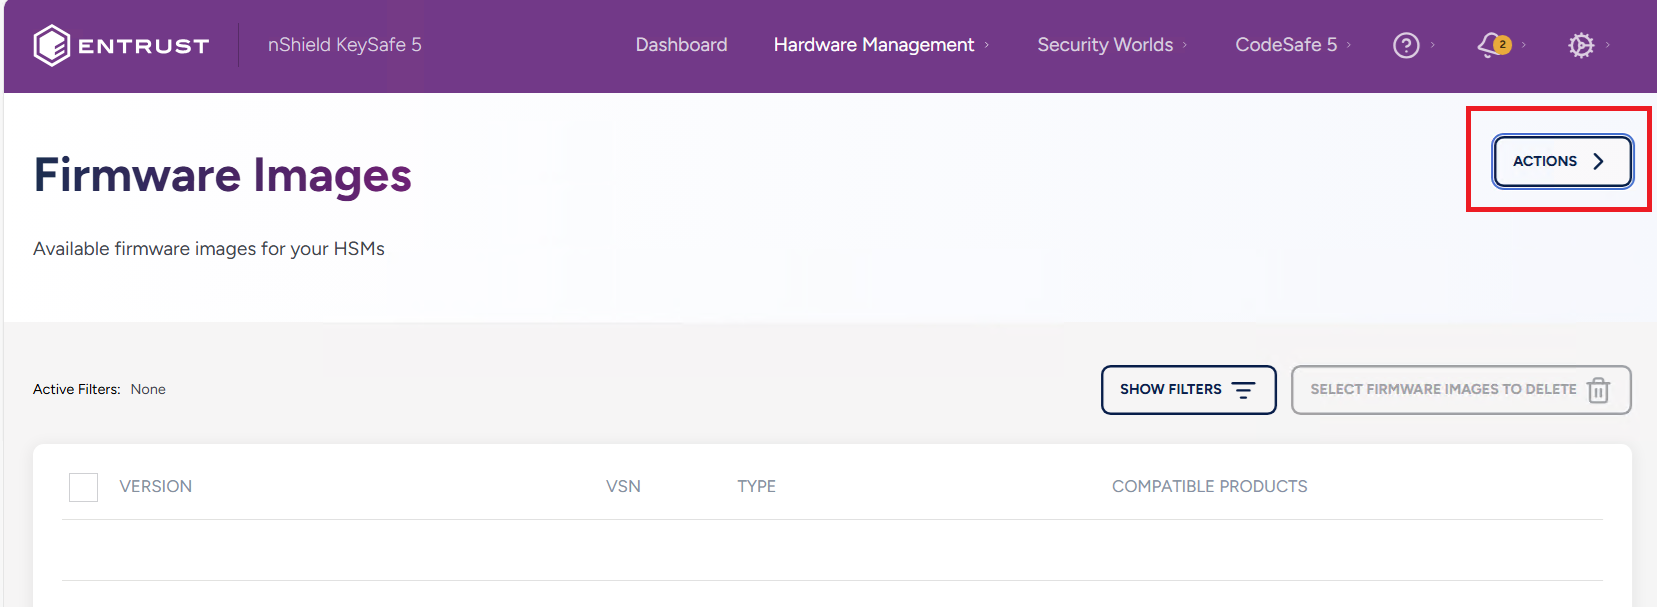
In the KeySafe 5 Web GUI, navigate to Hardware Management > Firmware Images.
-
Select the Actions button at the upper right corner.
-
In the Upload HSM Firmware Image window, drag and drop or upload the firmware upgrade file.
-
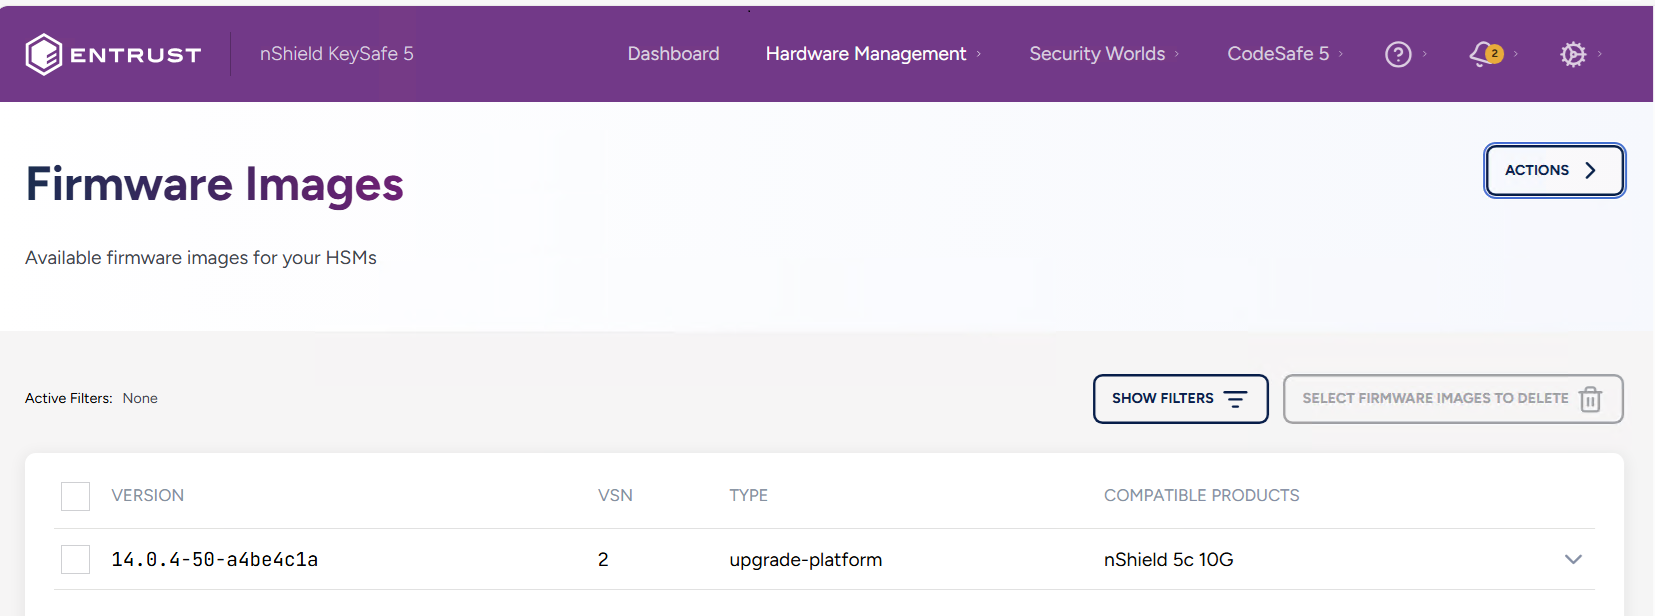
Select Upload Image. A confirmation window will appear with the firmware’s details. Click close once you are done verifying.
-
The Firmware Images window should now have an entry with your uploaded firmware.
Performing the Firmware upgrade
-
Once the firmware package is available in the KeySafe 5 GUI, navigate within the GUI to Hardware Management > HSMs.
-
Select the Platform HSM you wish to upgrade.
The Platform HSM will not have a VCM visible as its identifier, while the Tenant HSM does. Ensure the Platform HSM is the one selected. -
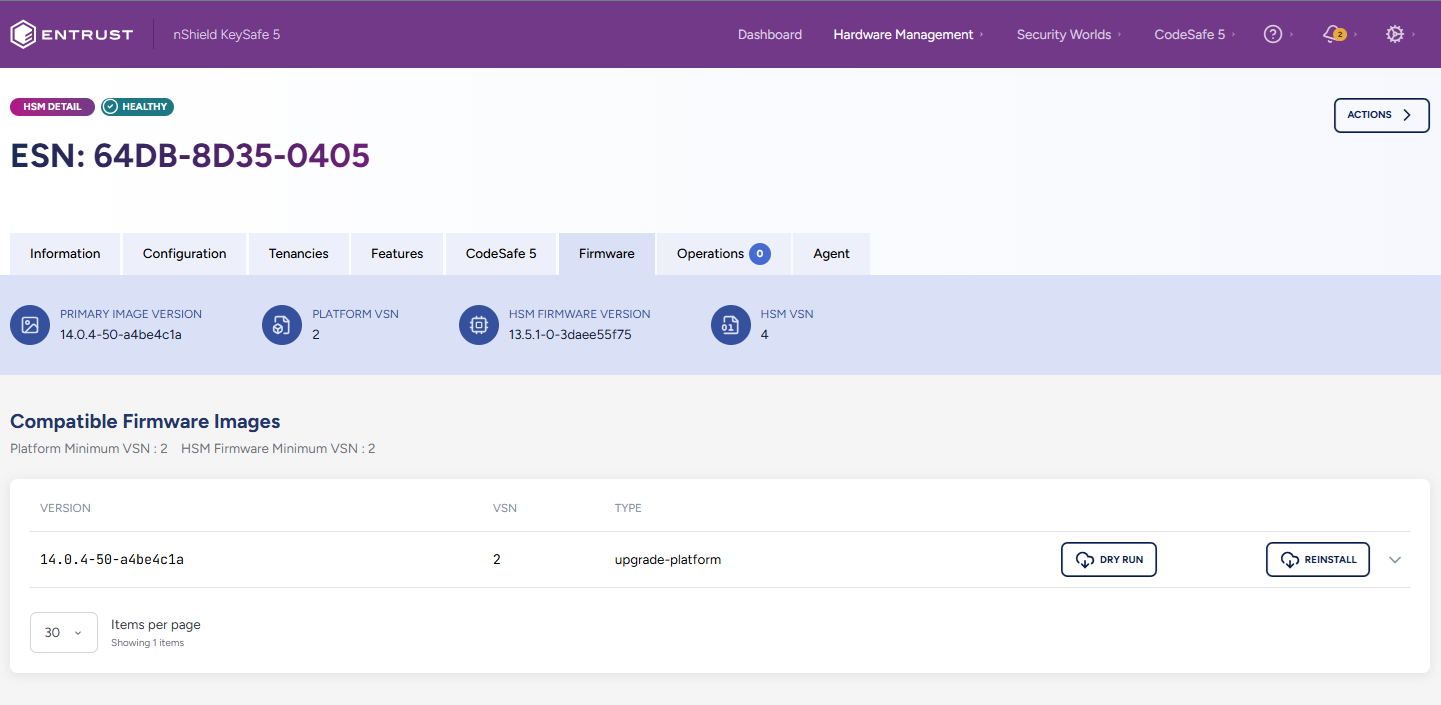
Select the HSM’s Firmware tab. Here you can verify the HSM’s current firmware version, and any compatible firmware versions you can upgrade to.
-
Select the version of firmware you wish to upgrade the HSM to. Verify the firmware package’s details.

-
Select the Reinstall button to install the selected firmware version package. A menu will open so you may verify firmware compatibility with your HSM.
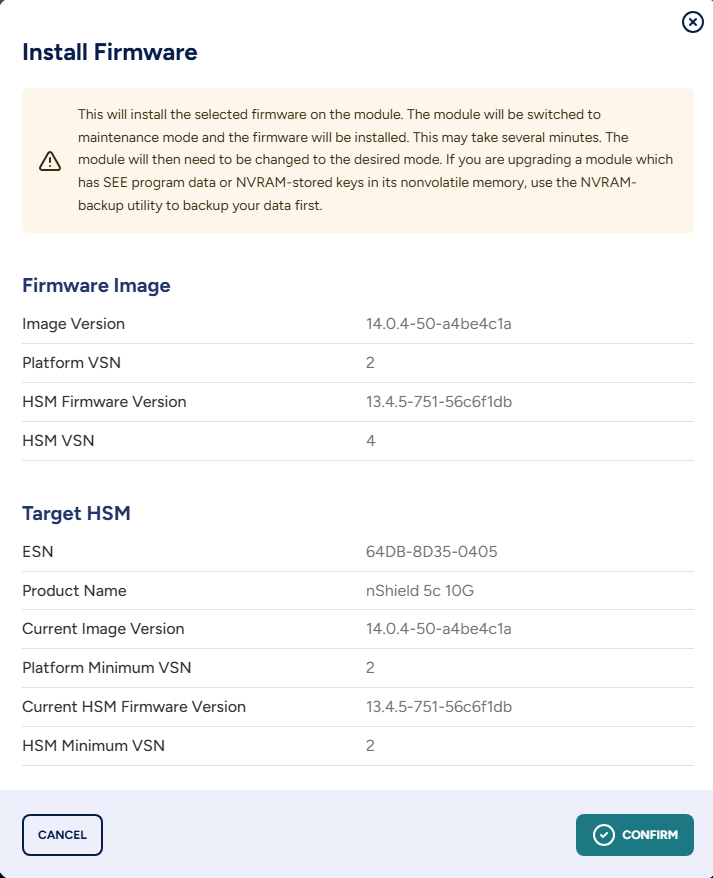
-
Select Confirm to proceed.
-
An Install Firmware dialog window will appear, allowing you to optionally view the progress of the installation.
Although an Upgrade Successful message appears during the install, it may take up to 10 minutes for the upgrade to successfully complete. 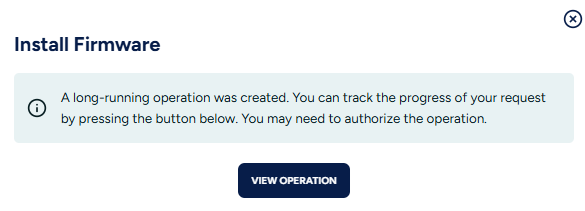
-
To verify that the firmware package installed successfully, navigate to Hardware Management > HSMs in the KeySafe 5 Web GUI and select the Platform HSM where you installed it.
-
When you select the firmware tab of the HSM, you will be able to see the new firmware version under the HSM Firmware Version field.