Procedures
Before deploying the nShield nCOP image onto OpenShift to be integrated with IBM Blockchain Platform, complete the following integration procedures:
-
Install and configure the nShield Connect XC, see the Installation Guide for your HSM.
-
Configure the HSM(s) to have the IP address of your container host machine as a client, as well as the IP addresses of the nodes that make up your OpenShift cluster.
-
Create a new Security World or load an existing one on the HSM. The Security World and module files will need to be copied to a specific directory on the NFS server that will be accessed by the IBM Blockchain Platform nodes. This will use either OpenShift or a Kubernetes persistent volume. Instructions for this are included later in this guide.
-
Docker or Podman installed to build the image.
-
Install nCOP on the image-building machine. See the nShield Container Option Pack User Guide.
For more information on configuring and managing nShield HSMs, Security Worlds, and Remote File Systems, see the User Guide for your HSM(s).
This guide uses a Red Hat OpenShift cluster for deployment of the IBM Blockchain Platform, so many commands in this guide are oc commands.
These oc commands can be directly replaced with kubectl commands if you are deploying onto a Kubernetes cluster.
|
OpenShift container platform
For this integration a Red Hat OpenShift cluster running OpenShift 4.8.43 is used. For example:
% oc version

Client Version: 4.8.43
Server Version: 4.8.43
Kubernetes Version: v1.21.11+6b3cbdd
The cluster is composed of three master nodes and three worker nodes:
% oc get nodes

NAME                         STATUS   ROLES    AGE   VERSION
ocp4843-w9lph-master-0       Ready    master   79m   v1.21.11+6b3cbdd
ocp4843-w9lph-master-1       Ready    master   79m   v1.21.11+6b3cbdd
ocp4843-w9lph-master-2       Ready    master   79m   v1.21.11+6b3cbdd
ocp4843-w9lph-worker-925wf   Ready    worker   58m   v1.21.11+6b3cbdd
ocp4843-w9lph-worker-dzpmk   Ready    worker   58m   v1.21.11+6b3cbdd
ocp4843-w9lph-worker-gl8gr   Ready    worker   58m   v1.21.11+6b3cbdd
For more information on how to install and setup Red Hat OpenShift, see Installing and configuring OpenShift Container Platform clusters in the Red Hat online documentation.
Deploy IBM Blockchain
Perform the IBM Blockchain 2.5.3 deployment guide process in the IBM online documentation to deploy and install IBM Blockchain on your Red Hat OpenShift Cluster.
| Some sample YAML files are provided in this guide to help with the integration. You may need to make changes to these to support your specific integration. |
Create the NFS storage class for the cluster
If you have already created a storage class for your cluster, you can skip this section. All that will be needed in later sections of this guide is the storage class name (<storage-class-name>) and the NFS share directory (<nfs-directory>).
To serve as persistent storage for the IBM Blockchain Platform deployment onto OpenShift, a separate CentOS 7 virtual machine was created with 2 vCPUs, 8 GB Memory, and 400 GB storage (to meet storage requirements for the IBM Blockchain console and nodes). This VM hosts an NFS server that is connected to the cluster.
-
For steps on deploying your own NFS server, see https://dev.to/prajwalmithun/setup-nfs-server-client-in-linux-and-unix-27id.
-
For steps on connecting it to OpenShift, see https://levelup.gitconnected.com/how-to-use-nfs-in-kubernetes-cluster-storage-class-ed1179a83817.
-
Also see How do I create a storage class for NFS dynamic storage provisioning in an OpenShift environment? the IBM online documentation.
The following YAML files may be useful to setup NFS with OpenShift:
-
nfs-rbac.yaml -
nfs-deployment.yamlThe important fields on this file are:
 - name: NFS_SERVER
   value: xx.xxx.xxx.xxx
 - name: NFS_PATH
   value: /your/nfs/path
Make sure they match the NFS_SERVER and NFS_PATH you are using.
-
storage-class.yamlThe important fields on this file are:
pathPattern: "ibmblockchain"This field will be used by IBM Blockchain. During the deployment process a folder named
ibmblockchainwill be created in the NFS_PATH where IBM Blockchain will store its files.
See Sample YAML files for YAML files you can adapt to your system.
If you need to connect your NFS server to OpenShift and make it the default storage class for your cluster, run the following commands:
% oc apply -f nfs-rbac.yaml -n ibm-blockchain-proj
serviceaccount/nfs-client-provisioner created
clusterrole.rbac.authorization.k8s.io/nfs-client-provisioner-runner unchanged
clusterrolebinding.rbac.authorization.k8s.io/run-nfs-client-provisioner unchanged
role.rbac.authorization.k8s.io/leader-locking-nfs-client-provisioner created
rolebinding.rbac.authorization.k8s.io/leader-locking-nfs-client-provisioner created

% oc adm policy add-scc-to-user hostmount-anyuid system:serviceaccount:ibm-blockchain-proj:nfs-client-provisioner
clusterrole.rbac.authorization.k8s.io/system:openshift:scc:hostmount-anyuid added: "nfs-client-provisioner"

% oc apply -f nfs-deployment.yaml -n ibm-blockchain-proj
deployment.apps/nfs-client-provisioner created

% oc apply -f storage-class.yaml -n ibm-blockchain-proj
storageclass.storage.k8s.io/nfs-storage created
This setup needs to be performed after you create your ibm-blockchain-proj and before the deployment of the bp-operator during the deployment of IBM Blockchain.
Throughout the rest of this guide, for clarity, the storage class nfs-storage, is referred to as <storage-class-name>.
|
% oc get serviceaccount
NAME                     SECRETS   AGE
nfs-client-provisioner   2         3m

% oc get storageclasses -n ibm-blockchain-proj
NAME             PROVISIONER                                   RECLAIMPOLICY   VOLUMEBINDINGMODE   ALLOWVOLUMEEXPANSION   AGE
nfs-storage      k8s-sigs.io/nfs-subdir-external-provisioner   Delete          Immediate           false                  0s

% oc get deployment
NAME                     READY   UP-TO-DATE   AVAILABLE   AGE
nfs-client-provisioner   1/1     1            1           2m28s
Generate the HSM config files and copying files to the persistent volume
This section describes how to generate the HSM config file after installing nCOP, and copy the required files to the persistent volume that will be accessed by the IBM Blockchain Platform nodes.
-
Change to the directory where nCOP is installed.
-
Run the following command to create the
configfile in/opt/nfast/kmdata/local.% ./make-nshield-hwsp-config --output /opt/nfast/kmdata/local/config <HSM-IP> -
Verify your
configfile looks like the following.syntax-version=1 [nethsm_imports] local_module=1 remote_esn=<HSM-ESN> remote_ip=<HSM-IP> remote_port=9004 keyhash=... privileged=0 -
Copy
configto<nfs-directory>. -
Additionally, copy the
worldandmodulefiles to<nfs-directory>. Both files are found at/opt/nfast/kmdata/localwhere your Security World is installed, and the module file is namedmodule_<HSM-ESN>. -
Finally, create the
cknfastrcfile in<nfs-directory>. The next section will describe how to populate this file to change the mode of key protection.% touch <nfs-directory>/cknfastrc -
Ensure all the files in the
<nfs-directory>have proper users/groups and permissions.% ls -l <nfs-directory> -rw-r--r--. 1 nfast nfast 33 Jun 14 14:04 cknfastrc -rw-r--r--. 1 nfast nfast 179 Jun 14 14:00 config -rwxr-xr-x. 1 nfast nfast 3488 Jun 14 14:02 module_BD10-03E0-D947 -rwxr-xr-x. 1 nfast nfast 39968 Jun 14 14:02 world
The pkcs11.log is described in Generate keys using different key protection methods.
Generate keys using different key protection methods
This section describes how to populate the <nfs-directory>/cknfastrc file based on what method of key protection you choose.
-
If you want to generate keys with module protection, add the following line to the 'cknfastrc' file:
CKNFAST_FAKE_ACCELERATOR_LOGIN=1 -
To protect keys with softcard protection, add the following lines to
cknfastrc:CKNFAST_LOADSHARING=1 CKNFAST_FAKE_ACCELERATOR_LOGIN=1To generate a softcard, run the following command on a valid Security World installation:
% /opt/nfast/bin/ppmk --new <softcard-name>This generates a softcard file in
/opt/nfast/kmdata/localwhich must be copied to<nfs-directory>to be accessed by both containers that are eventually created. -
If you want to add PKCS11 debugging, add the following two lines to the
cknfastrcfile:CKNFAST_DEBUG=10 CKNFAST_DEBUGFILE=/opt/nfast/kmdata/local/pkcs11.logThen create the
pkcs11.logfile./opt/nfast/kmdata/localwill be mounted to<nfs-directory>. This is why thetouchcommand path and the debug file path differ.% touch <nfs-directory>/pkcs11.log
Build the custom HSM image
Successful completion of this section requires the following files on your image-building machine:
-
make-nshield-ibmibp. -
Security World ISO. This guide uses version
SecWorld_Lin64-12.80.4.iso.
The customer receives the make-nshield-ibmibp script with their purchase of nCOP.
|
-
Ensure the
make-nshield-ibmibpscript has executable permissions:% chmod +x make-nshield-ibmibp -
Mount the appropriate security world ISO file to
/mnt:% mount -t iso9660 -o loop SecWorld_Lin64-12.80.4.iso /mnt mount: /dev/loop0 is write-protected, mounting read-only -
Run the script:
% ./make-nshield-ibmibp --from registry.access.redhat.com/ubi8/ubi:latest --tag rh8nshieldibm /mnt Detecting nShield software version Version is 12.80.4 Unpacking hwsp... ... Building image... Sending build context to Docker daemon 702.4MB ... Successfully built 9764c359f3cc Successfully tagged rh8nshieldibm:latest -
Verify the image was built successfully:
% docker images REPOSITORY TAG IMAGE ID CREATED SIZE rh8nshieldibm latest 9764c359f3cc 2 minutes ago 929MB -
Umount the ISO:
% umount /mnt
Getting the rh8nshieldibm image into the OpenShift container image registry
This section details the steps needed to get the rh8nshieldibm image into the OpenShift image registry.
Docker or Podman can be used.
OpenShift supports pulling a container image for deployment from an external docker registry.
In this guide, the external registry is <external-docker-registry-IP-address>.
To deploy the rh8nshieldibm image for use with OpenShift:
-
Retag the image:
% docker tag rh8nshieldibm <external-docker-registry-IP-address>/<image-name> -
Log in to the external registry and enter the password when prompted:
% docker login -u <registry-username> <external-docker-registry-IP-address> -
Push the docker image to the external registry:
% docker push <external-docker-registry-IP-address>/<image-name> -
List the nodes to view the compute/worker nodes:
% oc get nodes NAME STATUS ROLES AGE VERSION ocp4843-w9lph-master-0 Ready master 4d20h v1.21.11+6b3cbdd ocp4843-w9lph-master-1 Ready master 4d20h v1.21.11+6b3cbdd ocp4843-w9lph-master-2 Ready master 4d20h v1.21.11+6b3cbdd ocp4843-w9lph-worker-925wf Ready worker 4d20h v1.21.11+6b3cbdd ocp4843-w9lph-worker-dzpmk Ready worker 4d20h v1.21.11+6b3cbdd ocp4843-w9lph-worker-gl8gr Ready worker 4d20h v1.21.11+6b3cbdd -
Create a shell for one of the compute nodes listed:
% oc debug nodes/ocp4843-w9lph-master-0 Starting pod/ocp4843-w9lph-master-0-debug ... To use host binaries, run `chroot /host` Pod IP: 10.194.148.228 If you don't see a command prompt, try pressing enter. sh-4.4# -
Create access to tools such as
ocand Podman on the node:% chroot /host -
Log into the container platform from the node:
% oc login -u kubeadmin -p <cluster-password> <console-url> -
Ensure you are using the same project on your cluster that the pods running the IBM Blockchain operator and console:
% oc project <ibp-project-name> Now using project <ibp-project-name> on server <console-url> -
Log in to the container image registry:
% podman login -u kubeadmin -p $(oc whoami -t) image-registry.openshift-image-registry.svc:5000 -
Log in to the remote registry and enter the password when prompted:
% podman login -u <registry-username> <external-docker-registry-IP-address> -
Pull the image from the remote registry:
% podman image pull <external-docker-registry-IP-address>/<image-name> -
List the downloaded image:
% podman images <external-docker-registry-IP-address>/<image-name> latest 6af59fac9600 21 hours ago 734 MB -
Retag the image:
% podman tag <external-docker-registry-IP-address>/<image-name> image-registry.openshift-image-registry.svc:5000/openshift/rh8nshieldibm -
Push the image to the container platform registry:
% podman push image-registry.openshift-image-registry.svc:5000/openshift/rh8nshieldibm Getting image source signatures Copying blob ... ... done ... Writing manifest to image destination Storing signatures -
Remove the debug pod:
% exit
exit
% exit
exit

Removing debug pod ...
Create the rh8nshieldibm image pull secret
This section details the steps needed to create an image pull secret for the rh8nshieldibm image.
This pull secret is needed so that the IBM Blockchain Platform nodes can pull the image from the OpenShift container image registry.
The pull secret uses a token as part of the credentials to pull images.
-
Ensure you have a valid token:
% oc whoami -t a-Jj-mALh... -
Create the secret:
% oc create secret docker-registry hsm-docker-secret --docker-server=image-registry.openshift-image-registry.svc:5000 --docker-username=kubeadmin --docker-password=$(oc whoami -t) --docker-email=<email> -n <ibp-project-name>In this example:
-
Replace <email> with any email address.
-
Replace <ibp-project-name> with the namespace where your IBM Blockchain Platform operator and console are deployed.
-
Note how the Docker password is simply the token.
-
Create the persistent volume, persistent volume claim, and configmap for the HSM
This section describes how to deploy the persistent volume and persistent volume claims on your cluster so that the IBM Blockchain Platform nodes can access their data on the NFS server. It also covers how to deploy the HSM ConfigMap, which is pulled by the platform to store the HSM configuration.
| See Sample YAML files for YAML files you can adapt to your system. |
-
Edit the
hsm-pv.yamlfile.Note the prefix being used in the name of the PV as this will will be used later in the integration. In this file, use the same nfs path and storage class as when IBM Blockchain was deployed.
metadata: name: ibmblockchain-pv nfs: path: /your/nfs/path server: xx.xxx.xxx.xxx storageClassName: nfs-storage -
Edit the
hsm-pvc.yamlfile.Note the prefix being used in the name of the PVC as this will will be used later in the integration. It should match the same prefix on the PV.
metadata: name: ibmblockchain-pvc -
Edit the
hsm-cm.yamlfile.Note that the ConfigMap uses the image built earlier. This is required in the internal OpenShift registry.
      image: >-
        image-registry.openshift-image-registry.svc:5000/openshift/rh8nshieldibm
If using softcard protection, change the
hsm-cm.yamlfile and add the following environment variable to the envs section:envs: - name: CKNFAST_LOADSHARING value: 1 -
Create the PV, PVC, and ConfigMap on the cluster:
% oc apply -f hsm-pv.yaml persistentvolume/test1ca-pv created % oc apply -f hsm-pvc.yaml persistentvolumeclaim/test1ca-pvc created % oc apply -f hsm-cm.yaml configmap/ibp-hsm-config created -
Verify everything was deployed successfully:
% oc get cm
NAME            DATA   AGE
ibp-hsm-config  1      40s

% oc get pv
NAME              CAPACITY   ACCESS RECLAIM P. STATUS   CLAIM                                   STORAGECLASS   REASON   AGE
ibmblockchain-pv  100Gi      RWX    Retain     Bound    ibm-blockchain-proj/ibmblockchain-pvc   nfs-storage             20s

% oc get pvc
NAME                STATUS   VOLUME             CAPACITY   ACCESS MODES   STORAGECLASS   AGE
ibmblockchain-pvc   Bound    ibmblockchain-pv   100Gi      RWX            nfs-storage    65s
The prefixes of the PV and PVC are important.
In the above example, the prefix is ibmblockchain.
This must exactly match the name of the certificate authority node you will later create from the IBM Blockchain Platform console.
|
Deploy the IBM Blockchain certificate authority node
This section describes how to deploy a certificate authority (CA) node from the IBM Blockchain console and configure it with an Entrust HSM.
To deploy the CA node from the IBM Blockchain console:
-
Browse to your IBM Blockchain console and log in using your credentials.
-
After logging in, from the Nodes page, scroll down and select Add Certificate Authority +.
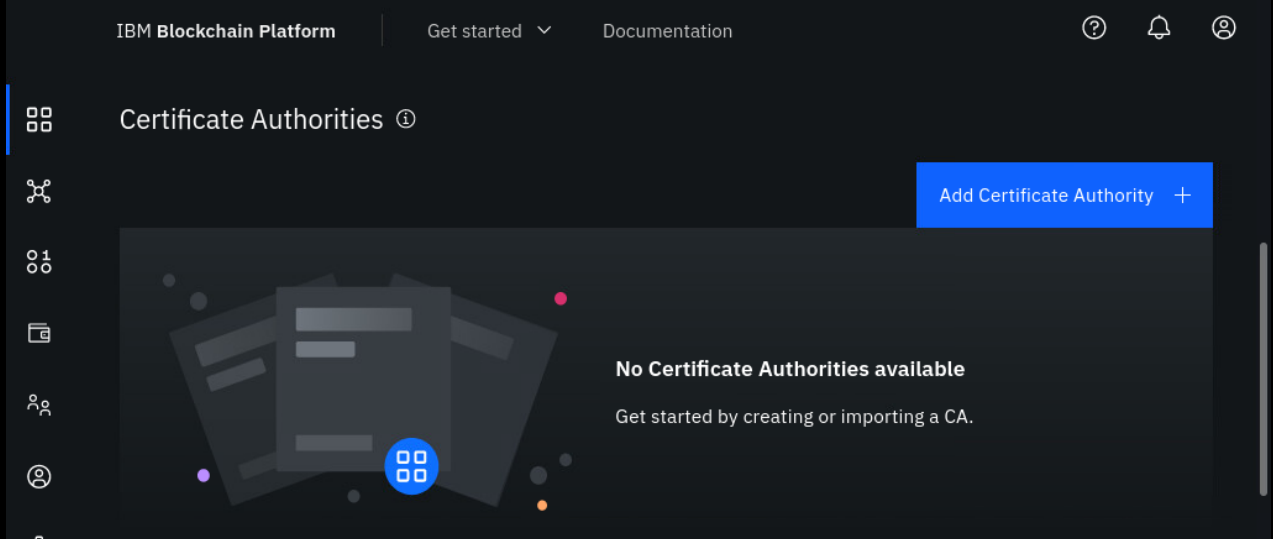
-
Select Create a Certificate Authority and select Next.
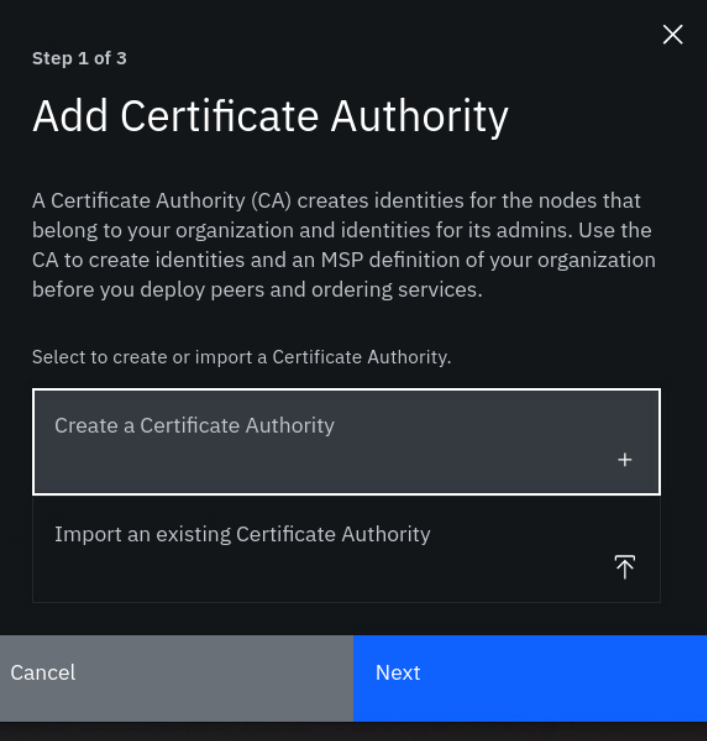
-
Enter a CA display name. This must match the prefix of the name of the Persistent Volume and Persistent Volume Claim, which can be found in either
hsm-pv.yamlorhsm-pvc.yaml. In this example:-
The name of the PVC is
ibmblockchain-pvc. -
The CA display name is
ibmblockchain.
-
-
Enter a CA administrator enroll ID. Ideally, this should match the email used to sign into the console.
-
Enter a CA administrator enroll secret. Remember your enroll ID and secret as these will be needed later to associate an admin identity with the root CA.
-
Under Advanced deployment options, select the checkboxes for Hardware Security Module (HSM) and Resource allocation.
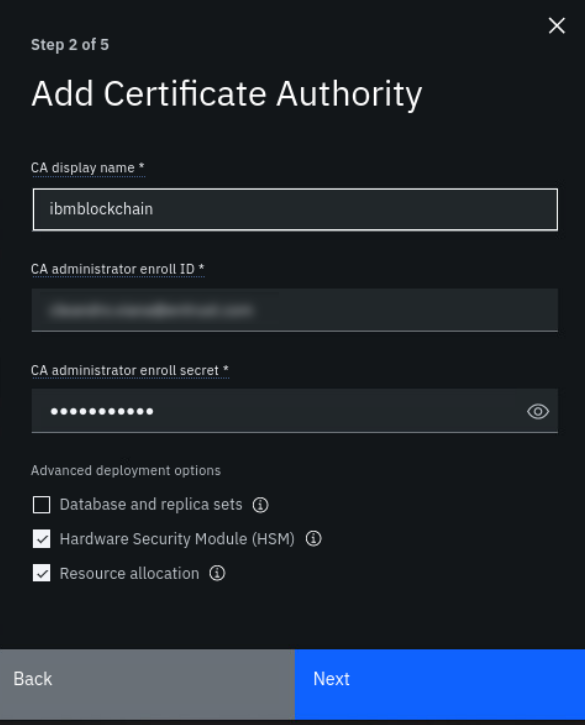
-
Select Next.
-
The next configuration page should pertain to the HSM. If the HSM ConfigMap (
hsm-cm.yaml) was deployed and the custom HSM image was created and imported into the OpenShift container image registry correctly, you should see a toggle for Use HSM client image. Make sure this toggle is present and toggled on. -
For HSM label, enter
accelerator. -
For HSM PIN, anything can be entered (remember this number). For example, a valid PIN is
1234.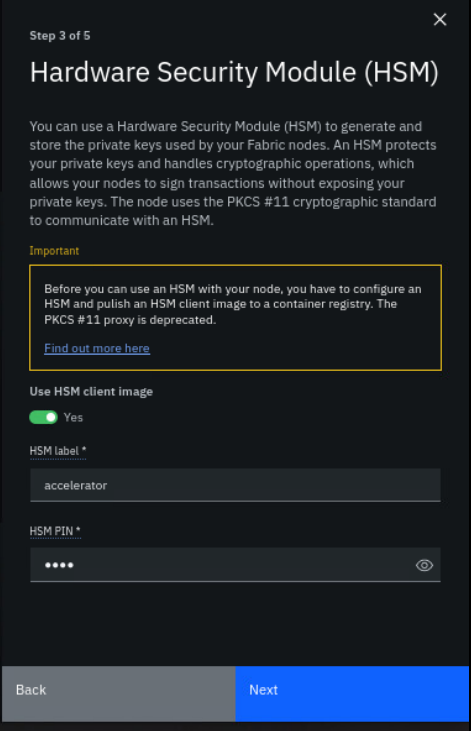
-
Select Next when finished.
-
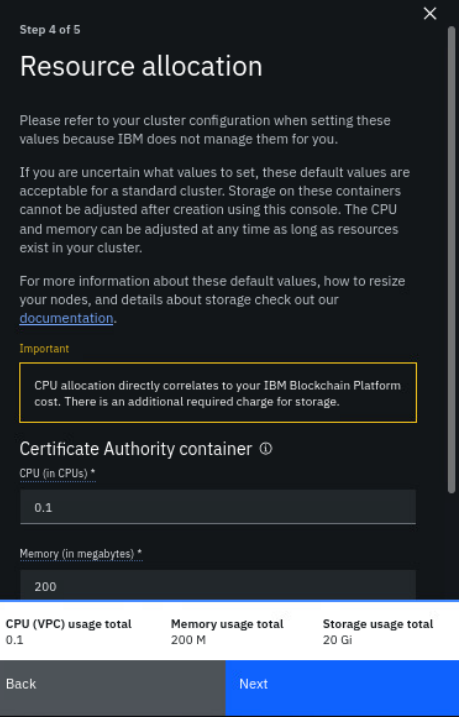
The next configuration page should pertain to resource allocation.
The default resource allocation is 0.1 CPU, 200 MB memory, and 20 GB storage. Change these numbers if needed, but make sure enough disk storage exists on the NFS server if you decide to increase the storage capacity.
-
Select Next when finished.
-
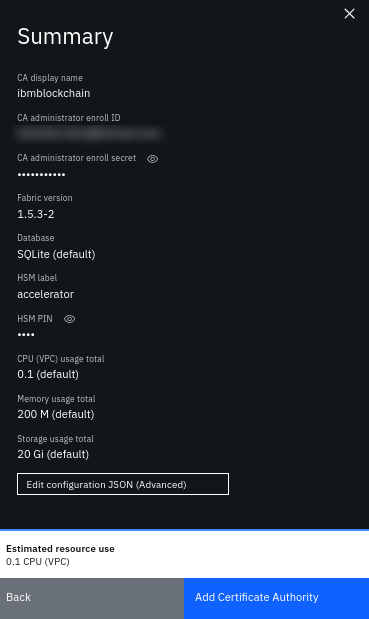
Review the CA configuration.
-
When finished, select Add Certificate Authority.
You should see a success message that the CA was added and the CA should show on the console dashboard under Certificate Authorities. For example:

There may be issues with the HSM and troubleshooting may be required at this stage, see Troubleshooting the CA node deployment. If there are no issues, continue from Check if deployment is successful.
Troubleshooting the CA node deployment
Here are some examples of things you can do to troubleshoot the CA node deployment:
-
Look at the logs for the
certgencontainer:% oc logs <ca-pod-name> certgen -
Look at the logs for the
hsm-daemoncontainer:% oc logs <ca-pod-name> hsm-daemon
Check if deployment is successful
To check if a deployment is successful:
-
Wait for the CA to become operational. This may take a few minutes. When the CA is operational, a green box will show inside the CA square on the console dashboard. For example:

-
Verify that the CA files are present on the NFS server at
<nfs-directory>:% cd <nfs-directory>; ls ... fabric-ca-server ... % cd fabric-ca-server; ls ca db tlsca -
Verify that the
key_pkcs11files are present on the NFS server at<nfs-directory>:-rw-r--r--. 1 root root 8008 Jun 21 15:37 key_pkcs11_ua4ef5b903573703fc63055eb1579d217f6a4bf6df -rw-r--r--. 1 root root 8008 Jun 21 15:37 key_pkcs11_ua641a8aa31ee1b3f9c61353d322a95d3f28fe9720 -
If the CA is successfully deployed, you should see the following pod listing:
% oc get pods NAME READY STATUS RESTARTS AGE ibmblockchain-789d7689ff-r7ctp 2/2 Running 0 20h ibp-operator-6cc567667c-nqrlw 1/1 Running 0 20h ibpconsole-58b57bb947-jc26w 4/4 Running 0 20h nfs-client-provisioner-564f7cb984-bc9zh 1/1 Running 0 20h -
The CA key that was generated via PKCS #11 by the HSM is now stored and protected within the HSM.