Procedures
Prerequisites
Ensure the following prerequisites are implemented:
-
Install the Entrust nShield HSM using the instructions in the Installation Guide for the HSM.
-
Install the Entrust nShield Security World Software, and configure the Security World as described in the User Guide for the HSM.
-
Edit the
cknfastrcfile located in%NFAST_HOME%\cknfastrc.CKNFAST_OVERRIDE_SECURITY_ASSURANCES=explicitness,wrapping_crypt CKNFAST_FAKE_ACCELERATOR_LOGIN=1 CKNFAST_LOADSHARING=1 -
Install CyberArk Trust Protection Foundation. For more information, see the Online documentation.
Enable CyberArk Advanced Key Protect
CyberArk Advanced Key Protect is required for Central and Remote HSM Private Key Generation. In addition, CyberArk Code Signing Certificate Private Key Storage requires this feature to be enabled.
To enable CyberArk Advanced Key Protect:
-
Open the CyberArk Configuration Console.
-
Select the Connectors node.
-
Select Enable CyberArk Advanced Key Protect in the Actions panel.

-
Review the information and confirm the action by selecting Enable.
-
Restart the platform services:
Select the Product node. Under Windows Services do the following:
-
Select Website and then select Restart in the Actions panel.
-
Select Trust Protection Foundation Services and then select Restart in the Actions panel.
-
Select Logging and then select Restart in the Actions panel.
-
Create an HSM (Cryptoki) connector
You must setup an HSM connector before the nShield HSM functionally can be used within CyberArk Trust Protection Foundation.
To create an HSM (Cryptoki) connector:
-
Open the CyberArk Configuration Console.
-
Select the Connectors node.
-
Select Create HSM Connector in the Actions panel.
-
Enter your CyberArk TPF user credentials if required.
-
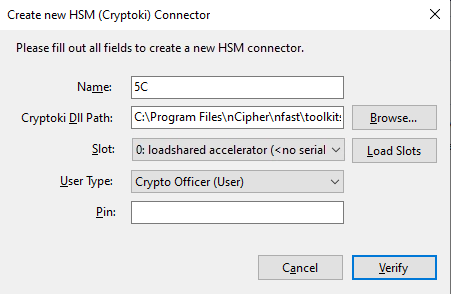
For Name, enter any name for the HSM connector.
-
For Cryptoki Dll Path, select Browse and locate the following path to the DLL file:
C:\Program Files\nCipher\nfast\toolkits\pkcs11\cknfast.dll. -
Select Load Slots.
-
Select a slot to use for the intended key protection type. This is the partition on the HSM where CyberArk Trust Protection Foundation will access the encryption keys.
Since Softcard and OCS protection methods are not currently support in the integration, select the loadshared accelerator slot. -
For User Type, select the required user to access the HSM keys on the designated partition.
-
For Pin, enter the passphrase of the Card Set being used. Since Module protection is being used, leave the pin blank.
-
Select Verify.
-
Generate a HSM protected key.
HSM-protected keys can be generated to encrypt data stored in the Trust Protection Foundation Secret Store.
-
Select New Key.
-
On the Create New HSM Key page, enter a Name and select a Type for the key.
-
Select Create.
-
The key gets shown in the Permitted Keys field.
-
-
Select Allow Key Storage checkbox.
-
Select the Key you just created.
-
Select Create.
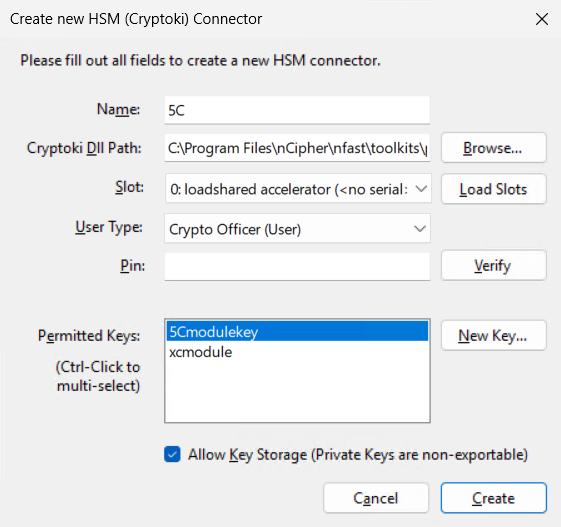
The HSM Connector gets created and displayed under the Encryption Connectors section under Platform Connectors.
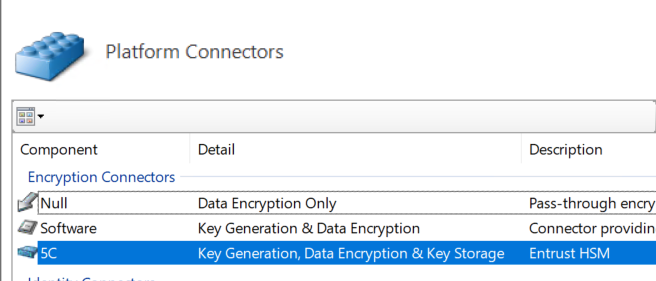
Notice the details of the Connector. It should say: Key Generation, Data Encryption & Key Storage. This is important for the rest of the integration. -
To list the newly created key and its protection type, open a command prompt and run the following command:
nfkminfo -l

Keys with module protection:
 key_pkcs11_ua63b67f4b141c2babd1f5f47e7aab4a3f68fbb851 `5cmodulekey'
HSM Central Private Key Generation
CyberArk Trust Protection Foundation uses the Entrust nShield HSM for private key generation for SSH keys and certificates.
| Certificate Authority (CA) template objects are used in CyberArk Trust Protection Foundation to manage the certificate lifecycle. Creating one is a prerequisite to HSM Central Key Generation. For more information, see the online documentation. |
We already configured the CyberArk platform policy to enable the Entrust nShield HSM for central HSM key generation.
-
Log in to admin console:
https://[IP_address_of_CyberArk_TPF]/Aperture. -
In the Application Menu in the top right side of the application, select Certificate Manager.
-
Select Policy Tree under the Certificate Manager Menu.
-
Select Policy, on the left pane.
-
On the right pane, select the Certificate tab.
-
Under Other Information, select your HSM Connector in the Key Generation drop-down menu.
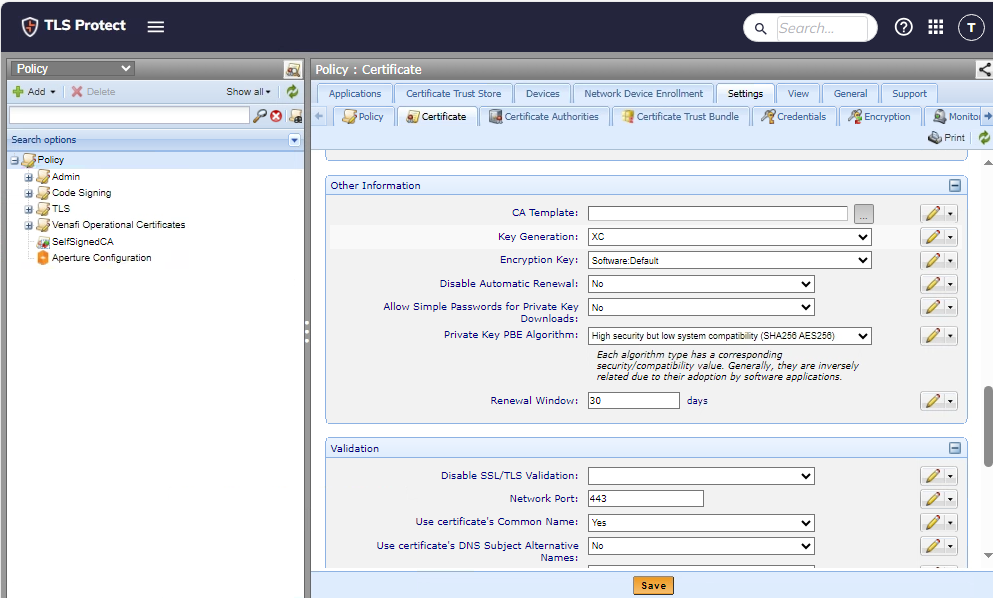
-
Select Save.
Generate the certificate:
-
Select Policy.
-
Select Add > Certificates > The Certificate Type you Want.
-
In the General Information tab:
-
Enter the Certificate Name and another other required information.
-
For Management Type, select Provisioning or Enrollment.
-
-
In the CSR Handling tab:
-
For CSR Generation, select Service Generated CSR.
-
For Generate Key/CSR on Application, select No.
-
-
In the Subject DN tab, enter the required information.
-
In the Private Key tab, enter the key information.
For Post Quantum, we selected ML-DSA44.
The current version of the Post Quantum HSM firmware does not support wrapping of Post Quantum keys. When a Post Quantum algorithm is used, an error will take place when you try to renew the certificate. The error is listed below. So for now use the system default algorithm RSA-2048 or a non Post Quantum algorithm. 
-
In the Other Information tab, search for the previously configured CA Template.
-
Select Save.
-
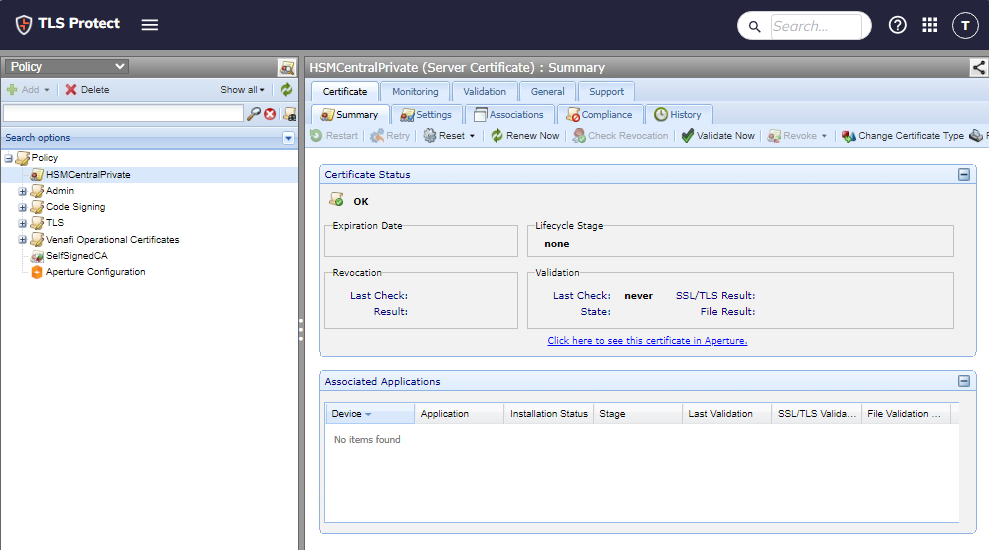
Select the newly generated certificate from the policy tree.
The Certificate Status should be OK.
-
Select Renew Now.
-
After a minute, Refresh the browser window.
Select the certificate and the certificate details will appear.
-
If you selected Provisioning for Management Type, associate the certificate to the intended application object.
-
Check to see if the certificate was installed on this application server.
Code signing
CyberArk Code Sign Manager can store private code signing keys in the Entrust nShield HSM. This section of the document describes the basic steps used to achieve this functionality for the integration. For more detailed procedures, see the online documentation.
| Certificate Authority (CA) template objects are used in CyberArk Trust Protection Foundation to manage the certificate lifecycle. Creating one is a prerequisite to CodeSign. For more information, see the online documentation. |
To use an HSM for key storage, you must first enable Key Storage on the HSM Connector:
| This should have been done already when the HSM connector was setup. Here are the instructions just in case. |
-
Open the CyberArk Configuration Console.
-
Select the Connectors node.
-
Select the HSM Component generated in an earlier step.
-
Select Properties in the Actions panel under Encryption Driver.
-
Enter your CyberArk Trust Protection Foundation user credentials if required.
-
Select Allow Key Storage.
-
Select Apply.
-
Select OK.
To choose a code signing Administrator:
-
Open the CyberArk Configuration Console.
-
Select the System Roles node.
-
Select Add CodeSign Manager Administrator in the Actions panel.
-
Select a user to gain CodeSign Manager Administrator rights.
To create a code signing flow:
-
Open the CyberArk Configuration Console.
-
Under the Code Signing node, select Custom Flows.
-
Select Add new Code Signing Flow in the Actions panel.
-
Enter a name for the Code Signing Flow and select Create.
-
Select the newly created Code Signing Flow and add an approver through the Actions panel.
-
Select Standard in the Actions panel.
-
Enter the name for the Approver.
-
When the properties window comes up, Select OK.
-
To create an environment template for the code signing project:
-
Open the CyberArk Configuration Console.
-
Under the Code Signing node, select Environment Templates.
-
Select Certificate in the Actions panel under Add Single Template.
-
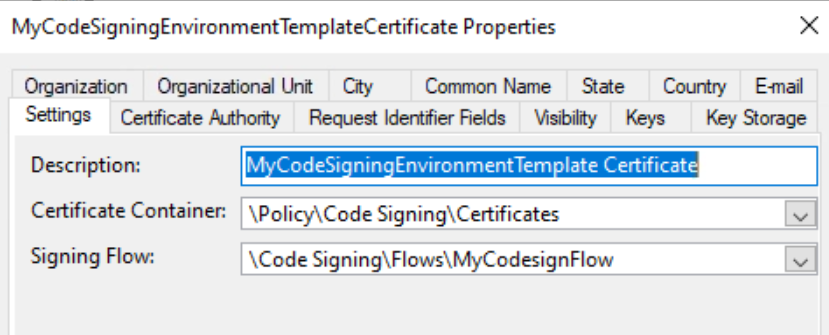
Enter a name for the Code Signing Environment Template.
-
In the Properties window that appears, enter the Description, Certificate Container, and Signing Flow within the Settings tab.
-
Open the Certificate Authority tab and search for the previously configured CA Template.
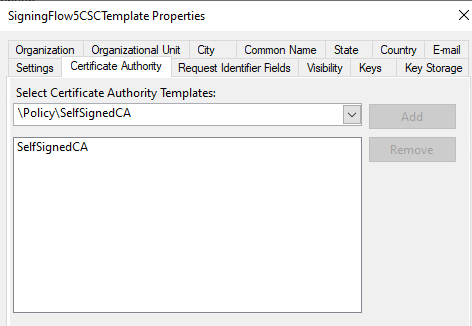
-
Select Add.
-
-
Open the Keys tab and select which key sizes to allow.
For Post Quantum testing, you can select the ML-DSA types. 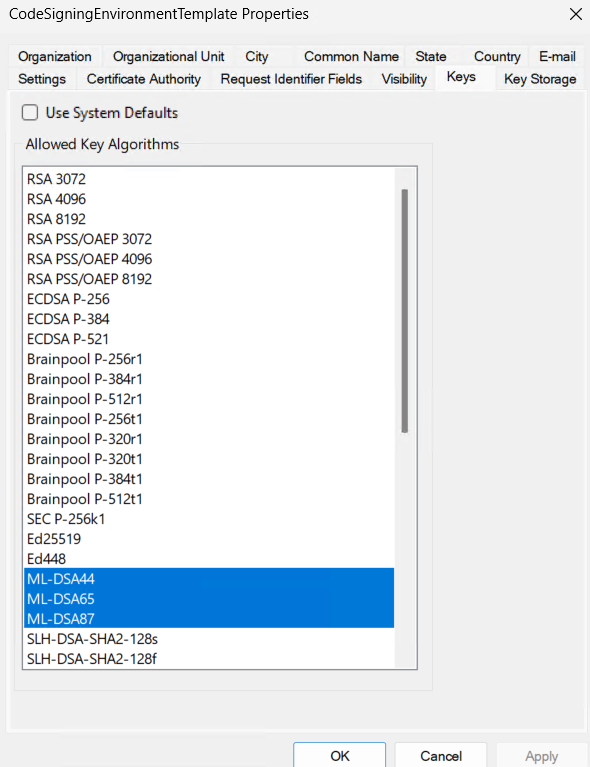
-
Open the Key Storage and open the drop-down menu.
-
Select the previously created HSM Connector.
-
Enter any optional information in the remaining tabs.
-
Select Apply and then OK.
To create a new code signing project:
-
Log in to Aperture:
https://[IP_address_of_CyberArk_TPF]/Aperture. -
In the Application Menu in the top right side of the application, select CodeSign Manager.
-
Select Projects under the CodeSign Project Menu.
-
Select Create Project.
-
Enter a Project Name and Description.
-
Select Create.
To create an environment for the project with a new HSM private key and certificate:
-
Select the Environments tab.
-
Select Create.
-
Enter the Environment Name.
-
For Environment Type, select Certificate & Key.
-
For Environment Template, select the previously created Environment Template.
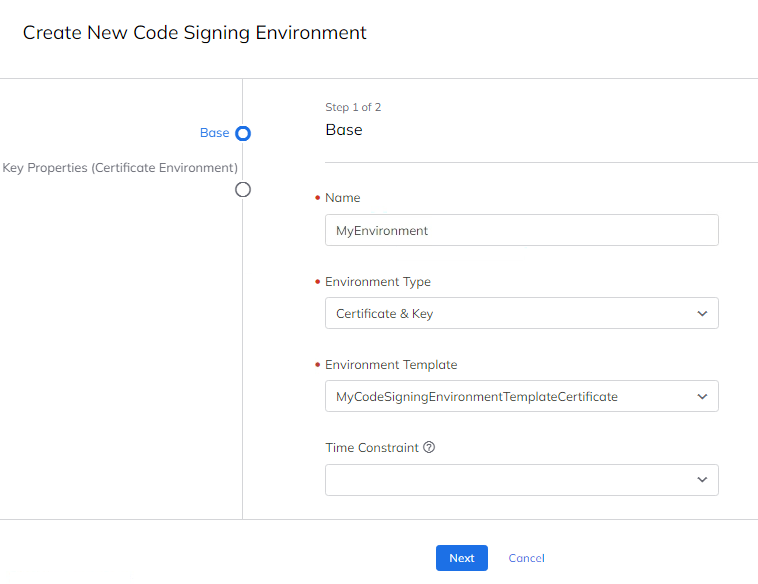
-
Optionally enter a value for Time Constraint and IP Restrictions.
-
Select Next.
-
For Key Storage Location, select the HSM Connector.
-
For Creation Type, select Create new key.
-
For Certificate Provider, select a CA.
-
For Key Algorithm, select a key algorithm.
For Post Quantum, select one of the Post Quantum algorithms that are available. -
Enter any other necessary information for the certificate.
-
Select Create Environment.
-
Select Submit for Approval to generate a new certificate and private key once it is approved.
To create an environment for the project with an existing HSM private key and certificate:
-
Select the Environments tab.
-
Select Create.
-
Enter the Environment Name.
-
For Environment Type, select Certificate & Key.
-
For Environment Template, select the previously created Environment Template.
-
Optionally enter a value for Time Constraint and IP Restrictions.
-
Select Next.
-
Signing Flow should list your code signing flow and Key Storage Location should list your HSM Connector.
-
For Creation Type, select Use Existing Key in HSM.
-
Select an existing Private HSM Key and Public HSM Key.
-
Import an existing certificate or manually enter its details.
-
Select Create Environment.
-
Select Submit for Approval to generate a new certificate and private key once it is approved.
To approve the project:
-
Log in to Aperture:
https://[IP_address_of_CyberArk_TPF]/Aperture. -
In the Application Menu in the top right side of the application, select CodeSign Manager.
-
Select Approvals under the CodeSign Project Menu.
-
Select Pending Approvals.
-
Select the request.
-
Select Approve/Reject.
-
Enter a Comment for the approval.
-
Select Approve.
-
If you selected the option to generate new keys, the keys are now created on the Entrust nShield HSM. To list it, open a command prompt and run the following command:
nfkminfo -l

Keys with module protection:
 key_pkcs11_ua0b301946b84b585e6d90fa676e24400a3ccb1d7f 'ML-DSA44 41b427bcf9a241b18d455a3584df5c1f'