Procedures
This guide uses a standalone CloudControl deployment and does not use Active Directory. All users are local to the system. CloudControl supports a cluster environment. For more information refer to Entrust CloudControl Installation Guide in the online documentation.
Download the CloudControl software
-
Log in and select HyTrust CloudControl.
-
Open the folder
HTCC_6.6.0_2023-02-24. This folder contains version 6.6.0 that was used in this guide. -
Select the
Entrust-CloudControl-6.6.0.660934.ziplink to download the file.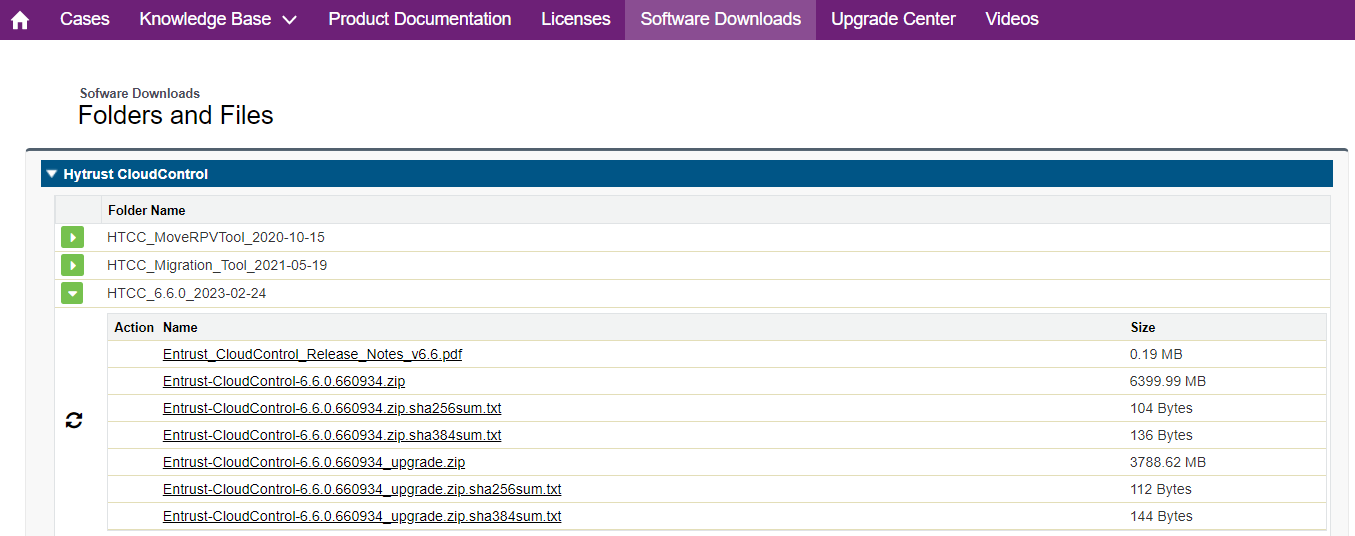
-
After the file has been downloaded, open the ZIP file to access to the OVA file.
Deploy the CloudControl VM from the OVA
-
Log in to vCenter.
-
Select the cluster to create the CloudControl VM in.
-
Select the Actions Menu and select Deploy OVF template.

-
Select Local File and upload the CloudControl OVA file.
-
Select Next.
Follow the instructions during the deployment as needed.
| For more information refer to Installing CloudControl from an OVA in the online documentation. |
Power on the appliance
-
Log in to the vSphere Client.
-
Locate the Entrust CloudControl virtual machine in the inventory.
-
Right-click the CloudControl virtual machine and select Power > Power On.
Configure the CloudControl virtual appliance
This guide uses a Standalone Node setup. For more information refer to Creating a Standalone Node in the online documentation.
Set up the CloudControl GUI
After the standalone node has been configured, finish the setup using the GUI. For more information refer to Setting Up the CloudControl GUI in the online documentation.
OpenShift prerequisites
There are some OpenShift Prerequisites so it can be used in CloudControl.
For more information refer to OpenShift Prerequisites in the online documentation.
OpenShift setup
This guide does not describe the deployment of a Red Hat OpenShift cluster. Refer to the Red Hat documentation for details.
Assuming there is a Red Hat OpenShift cluster set up, the cluster kubeconfig file is required to be able to onboard the cluster into CloudControl. A client machine with the OpenShift binaries installed is also required to run the commands specified in this guide.
This examples in this guide use a Red Hat 8 virtual machine running OpenShift Client Version: 4.11.20.
-
Log into the OpenShift client machine.
-
Set the
KUBECONFIGenvironment variable to point to the kubeconfig file for the cluster:% export KUBECONFIG=PATH_TO_KUBECONFIG_FILE/config -
Log into the cluster:
% oc loginThe login process will depend on the user’s specific setup. An API token may be needed to be able to login, or use the cluster login credentials. For example, using a token:
% oc login --token=OJTNnDj2743syq89ERQeNmTJ_qRP-zB4b8fEbUoanWw --server=https://api.openshiftxxxxxx.net:6443 -
After logging in, test the connection by listing all the nodes:
% oc get nodes

NAME                        STATUS   ROLES    AGE   VERSION
ocp411-wqrcr-master-0       Ready    master   66d   v1.24.6+5658434
ocp411-wqrcr-master-1       Ready    master   66d   v1.24.6+5658434
ocp411-wqrcr-master-2       Ready    master   66d   v1.24.6+5658434
ocp411-wqrcr-worker-fd52p   Ready    worker   66d   v1.24.6+5658434
ocp411-wqrcr-worker-mtx46   Ready    worker   66d   v1.24.6+5658434
ocp411-wqrcr-worker-v9xc8   Ready    worker   66d   v1.24.6+5658434
Now add the OpenShift cluster into CloudControl, see On-board the OpenShift Cluster.
On-board the OpenShift Cluster
On-boarding is the process of adding the OpenShift Kubernetes Cluster into CloudControl.
For more information refer to Adding an OpenShift Cluster in the online documentation.
-
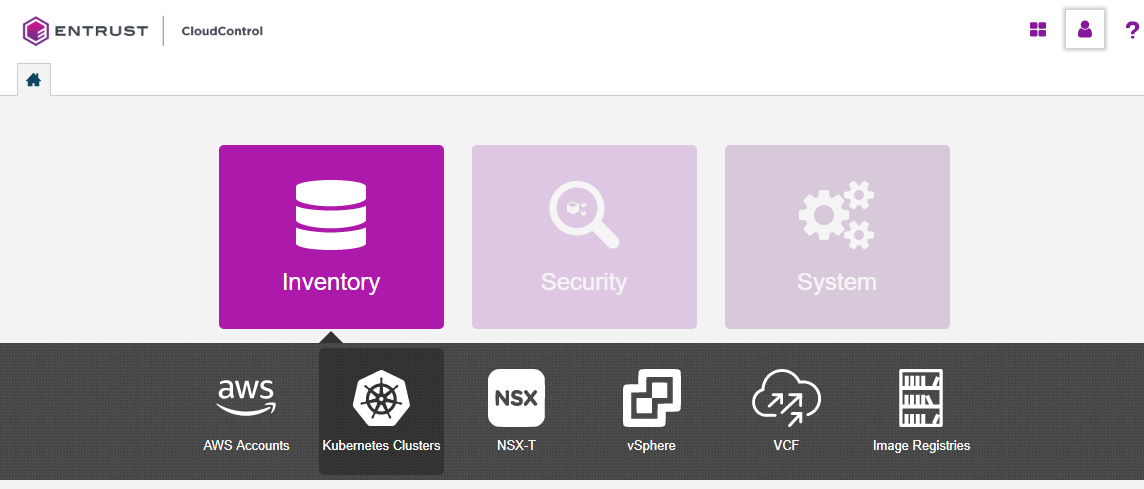
From the Home tab, select Inventory > Kubernetes Clusters.
-
On the Clusters page, select Actions > Add Kubernetes Cluster.
If there are no clusters in the system, the user can also select Add Kubernetes Cluster on the Kubernetes Clusters page.
-
On the Add Kubernetes Cluster Import tab, choose one of the following:
-
Select Import File, then select Browse and choose the kubeconfig file to import.
-
Select Enter Text, then paste the contents of the kubeconfig file as plain text.
A kubeconfig file is a configuration file written in YAML that describes the cluster. It is the file used to set the KUBECONFIGenvironment variable earlier in this guide.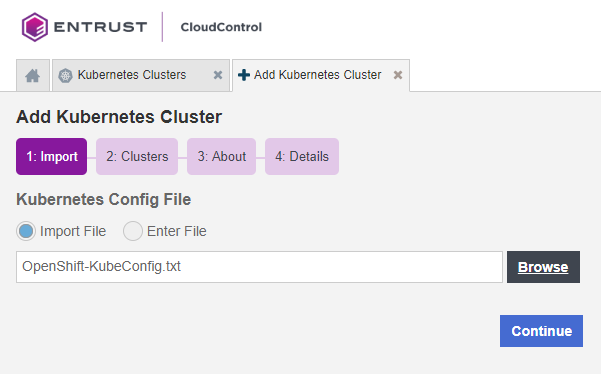
-
-
Select Continue.
-
On the Clusters tab, select the cluster to add and select Continue.
Only one cluster can be selected.

-
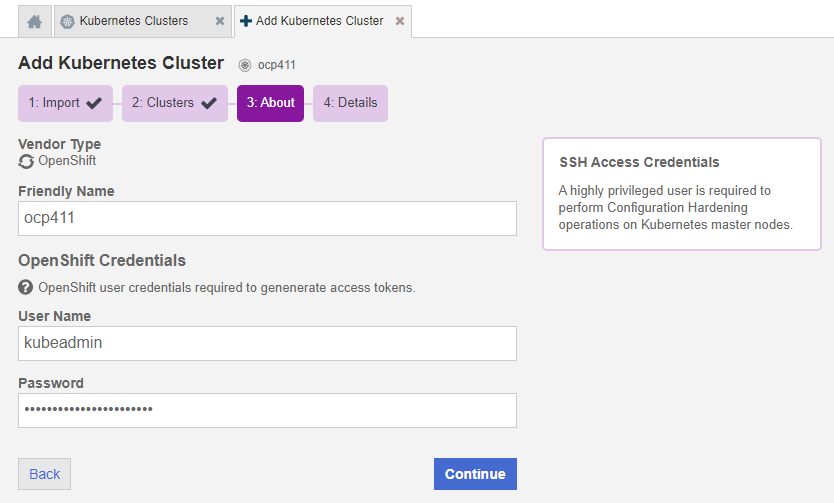
On the About tab, enter the following:
-
Friendly Name: Enter the user-facing name for the cluster.
-
User: Enter the user name for the OpenShift Credentials.
-
Password: Enter the password for the OpenShift Credentials.
-
-
Select Continue.
If the following error appears, the OpenShift Prerequisites for CloudControl have not been met. Set up the cluster for CloudControl and try again.
Forbidden, User "kubeadmin" doesn't have permission. nodes is forbidden: User "system:anonymous" cannot list resource "nodes" in API group "" at the cluster scope. -
On the Details tab, monitor the process.
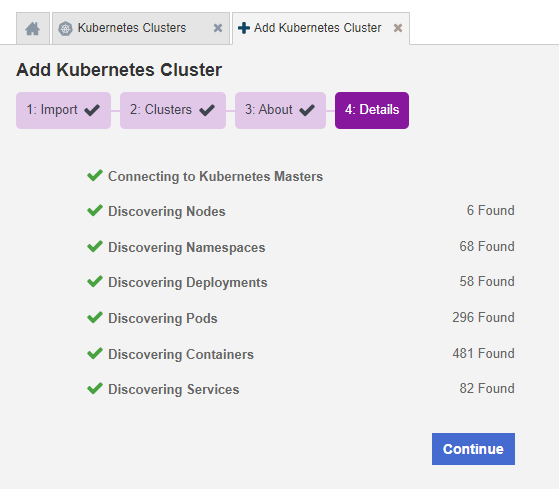
-
Select Continue.
-
In the Enable Access Control dialog box, select Enable Access Control to enable the ROOT Access Control Trust Manifest, or No, not now to wait until later.
-
If ROOT Access Control is enabled, CloudControl will take control of managing access to the cluster and a Trust Manifest Access Control Policy will have to be created to be able to create and manage objects in the cluster.
-
If ROOT Access Control is not enabled, that’s OK as this feature can be enabled after the cluster has been onboarded.
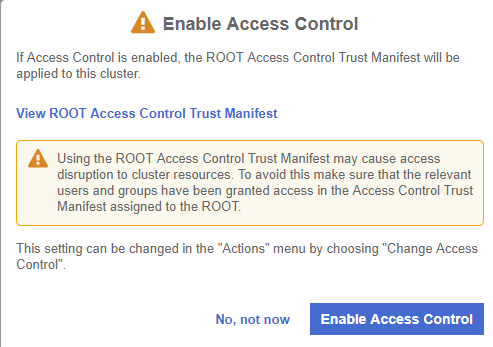
After this, the user will be able to view the dashboard for the newly added cluster. The user will also enable root access control.
-
-
After the cluster has been imported into CloudControl the cluster dashboard is shown.
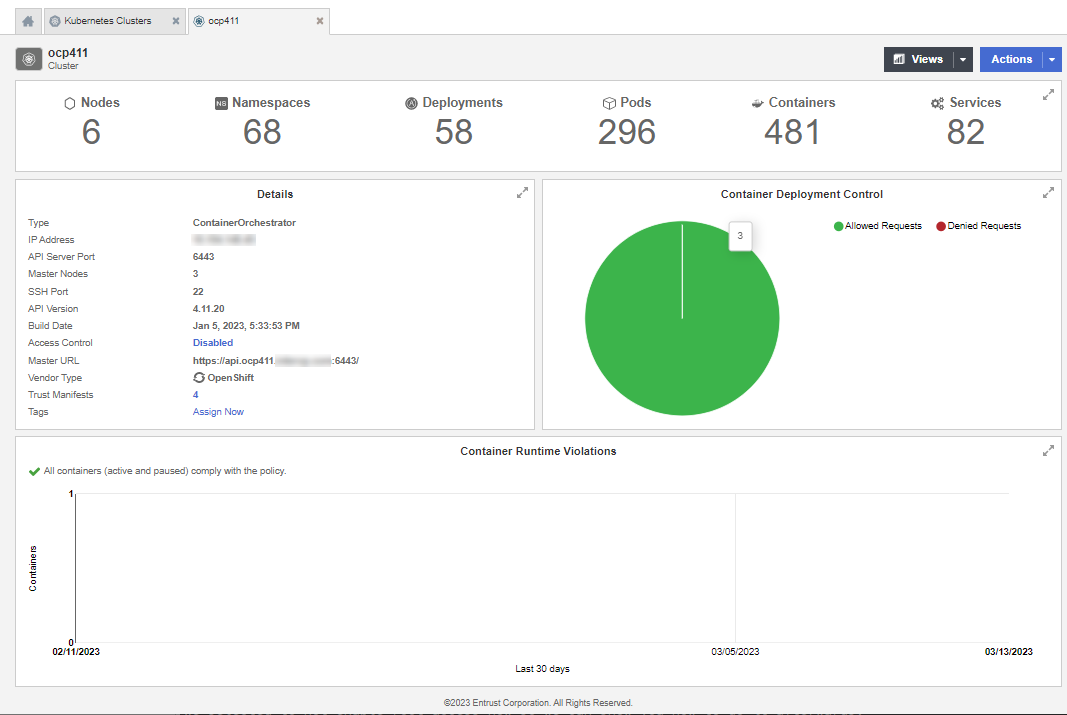
View OpenShift Kubernetes cluster inventory
From the Home page, select Inventory > Kubernetes Clusters to view the Kubernetes Clusters page. From here, in depth information of all of the objects in that cluster can be viewed, as well as any tags or policies related to those objects. This information is included in a dashboard or a resource page.
For more information refer to Viewing Kubernetes Cluster in the online documentation.
Also refer to Navigating Kubernetes Inventory View Pages in the online documentation.
Transfer root access control to CloudControl
When root access control is enabled for the Kubernetes cluster, access control of the OpenShift cluster is transferred to CloudControl. This means that management of objects in the cluster will be controlled by CloudControl rules. These rules must be created and defined in CloudControl to be able to create, edit, and delete objects in the cluster.
Before root access control is enabled
During the on-boarding process, root access was not enabled for the imported cluster. As a result, the user can still create objects at the OpenShift level.
For example, a pod can still be created.
The pod.yaml file is below:
apiVersion: v1
kind: Pod
metadata:
    name: tutum-centos3
spec:
    containers:
    - name: tutum-ssh-server3
      image: tutum/centos
To create the pod:
% export KUBECONFIG=~/git/cloudcontrolopenshift/files/OpenShift-KubeConfig.txt
% oc login
You must obtain an API token by visiting https://oauth-openshift.xxxxxxxx.net/oauth/token/request. For instance:

% oc login --token=OJTNnDj2743syq89ERQeNmTJ_qRP-zB4b8fEbUoanWw --server=https://api.openshiftxxxxxxxxx.net:6443

Logged into "https://api.openshiftxxxxxxxxx.net:6443" as "kube:admin" using the token provided.

You have access to 57 projects, the list has been suppressed. You can list all projects with 'oc projects'

Using project "default".

% oc create -f pod.yaml
pod/tutum-centos3 created|
Security control policies have been implemented with the latests versions of Red Hat Openshift. The YAML files used in this guide do not take into account these control policies. Warning messages about them may appear and they can be ignored for the purpose of this guide. Messages like this for example: |
The pod is created successfully. This process will fail if root access control is enabled using default HyTrust Global Access Control Policy, which denies all operations. See Enable root access control.
To delete the pod:
% oc get pods
NAME            READY   STATUS    RESTARTS   AGE
tutum-centos3   1/1     Running   0          3m57s

% oc delete pod tutum-centos3
pod "tutum-centos3" deleted
The pod is deleted successfully. This process will fail if root access is enabled using default HyTrust Global Access Control Policy, which denies all operations. See Enable root access control.
Enable root access control
Enabling root access control for the Kubernetes cluster gives access control of the OpenShift cluster to CloudControl.
To enable root access control:
-
From the Home tab, select Inventory > Kubernetes Clusters.

-
Select Management to view the clusters.
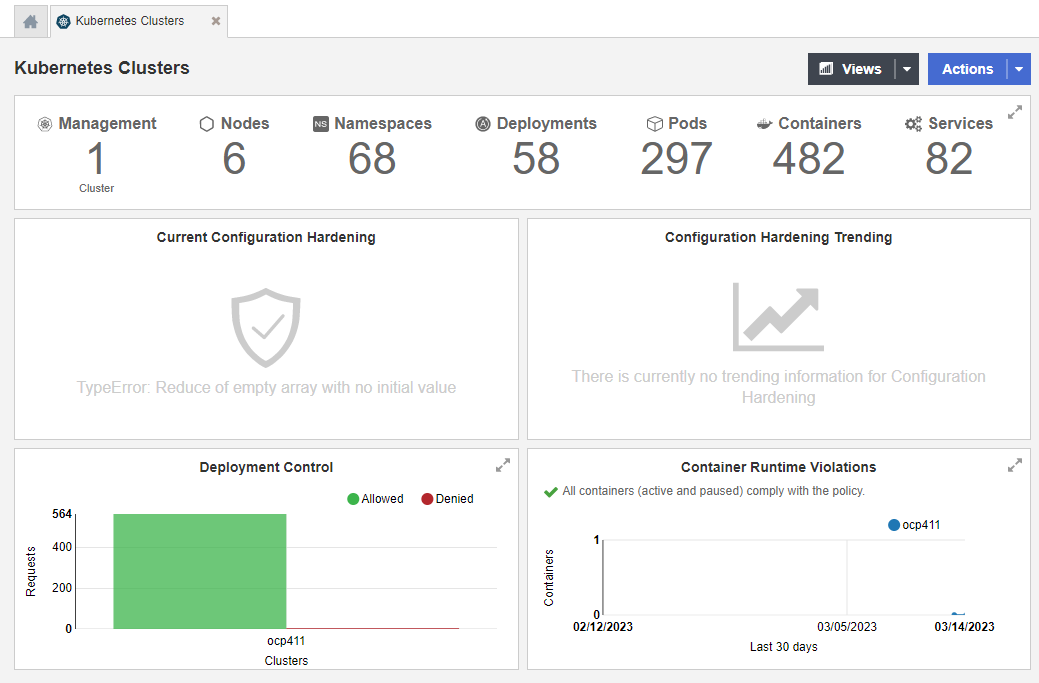
-
Select the Cluster Name link to enable root access.
This action will display the details about the cluster selected.
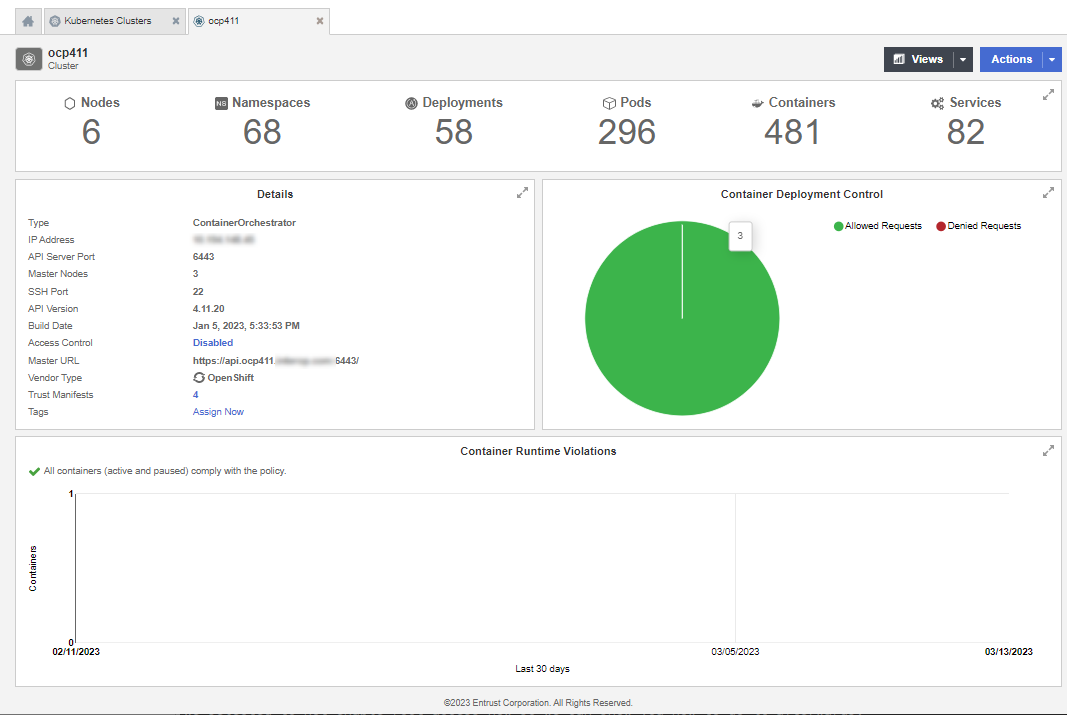
The Details section of the page shows that Access Control is Disabled.
-
Select the Disable link to Enable Root Access Control.
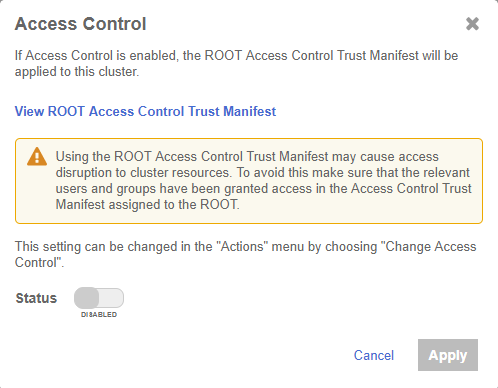
-
In the Access Control dialog, set Status to Enabled and select Apply.
After root access is enabled, the user cannot work with objects directly. For example, creating a pod:
% oc create -f pod.yaml

Error from server (Forbidden): error when creating "pod.yaml": admission webhook "accesscontrol.hytrust.com" denied the request: Permission Denied by HyTrust Security Policy.
In this example, the user is unable to create the pod, as CloudControl now controls permissions on the cluster. Now give users permissions to perform actions, see Create a Trust Manifest Access Control Policy.
Create a Trust Manifest Access Control Policy
After root access control is enabled in the cluster, users are unable to create objects in the cluster. This is because cluster permissions are then managed by CloudControl.
This section describes the process to create a Trust Manifest Access Control policy, so a user can manage objects in the cluster.
Log analysis
Use the logs in the system to check why access has been denied for a request. From this, create a Trust Manifest Access Control Policy to allow the user to perform the request successfully. For more information refer to Log Analysis in the online documentation.
-
Go to the Home tab, select Security > Log Analysis.
-
Select the record that shows the Deny status to see the reason for the denial.
Look for an entry similar to the following:

In this example, a request to create a pod was denied.
Now create a Trust Manifest Access Control Policy to allow the user to create the pod.
Create the Access Control Policy
This section describes how to use an Access Control Policy to allow users to create pods in the OpenShift cluster.
In the example below, the Access Control Policy will allow the kubeadmin user to create pods in the cluster.
Any other user in the system will be denied access.
For details of how to create an Access Control Policy, refer to Creating an Access Control Trust Manifest from the CloudControl GUI in the online documentation.
-
From the Home tab, select Security > Trust Manifests.
-
On the Manage Trust Manifests page, select Create Trust Manifest. That is, the plus sign in the GUI.
-
On the Details tab of the Create Trust Manifest page, enter the Name and optional Description for the Trust Manifest.
-
For Policy Type, select Access Control.
-
In the Access Control Policy section, enter the name of the rule. That is, ACP - Creation Rule.
-
For Rule Type, select allow.
-
-
For Role, select ASC_ContainerInfraAdmin.
This is the role that controls all operation related to creating objects in cluster.
-
Under Subjects:
-
For Type, select Kubernetes.
-
For Group or User, add:
-
k8s::user:system:admin
-
k8s::user:kube:admin
-
k8s::user:system:serviceaccount:openshift-machine-api:machine-api-operator
-
-
-
Select Validate to validate the policy.
-
Select Save to save the policy.
-
Select Publish to publish the policy.
When the policy is published it will ask the user to assign resources to the policy. Select the OpenShift cluster and select Assign.
-
Select Close.
Test the Access Control Policy
To test if the Access Control policy is working, create the pod:
% oc create -f pod.yaml

pod/tutum-centos3 created
The request is successful.
To test the deletion of a pod:
% oc delete pod tutum-centos3

Error from server (Forbidden): admission webhook "accesscontrol.hytrust.com" denied the request: Permission Denied by HyTrust Security Policy, Resource not found.
In this example, the resource is not found in CloudControl. This is because the CloudControl has not yet updated its cluster inventory. When a cluster is onboarded, it creates an internal job that runs every 5 minutes to update the cluster inventory. This means that the only way to delete the pod at this time is to:
-
Wait for the cluster inventory job to complete.
-
Manually sync the inventory.
To manually sync the inventory:
-
In the Cluster Detail tab, select Actions > Sync Inventory.
-
Select Initiate Sync.
After the sync completes, delete the pod. For example:
% oc delete pod tutum-centos3

pod "tutum-centos3" deleted
The pod deletes successfully.
Image registries
An image registry is a service that stores repositories and images. Each repository contains one or more version of the same image. All images in a repository must have the same name and be differentiated by tags. The tag name corresponds to the version of the image. The most recent image is also tagged as 'latest'.
Image registries are not protected by CloudControl, but adding a registry allows CloudControl to discover valuable information about the registry, such as the number of images and their specific vulnerabilities.
This allows more detailed rules when creating an Image Deployment Control Policy which will be discussed later in this guide. Entrust strongly suggests adding private image registries to CloudControl for better control during image deployment in Kubernetes.
Add the private registry to CloudControl: xxxx.yyyy.zzz
-
In the Home tab, Select Inventory > Image Registries to view the registries that have been added to CloudControl.
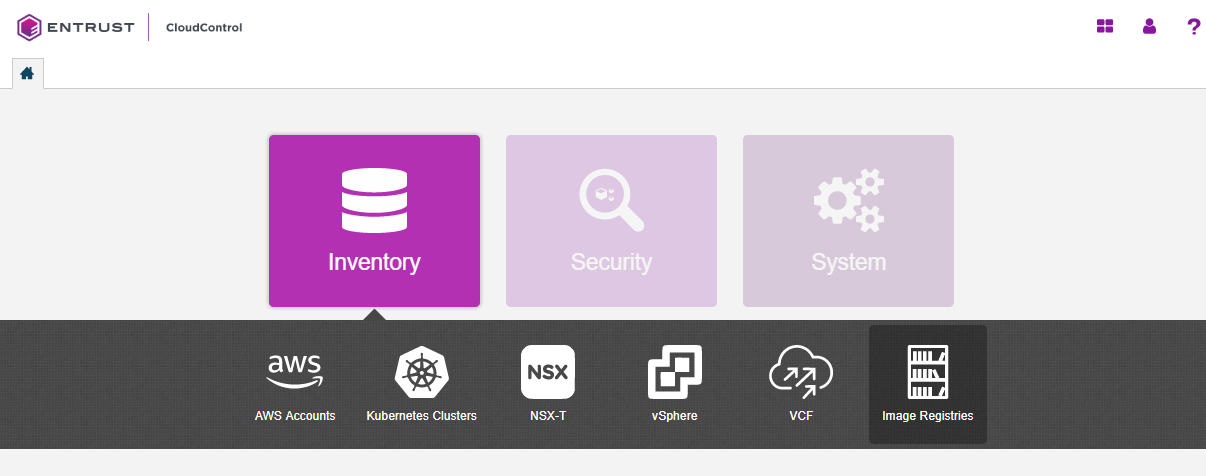
-
On the Image Registries page, select Actions > Add Registry.
If there are no registries in the system, select the Add Registry link on the Image Registries page.
-
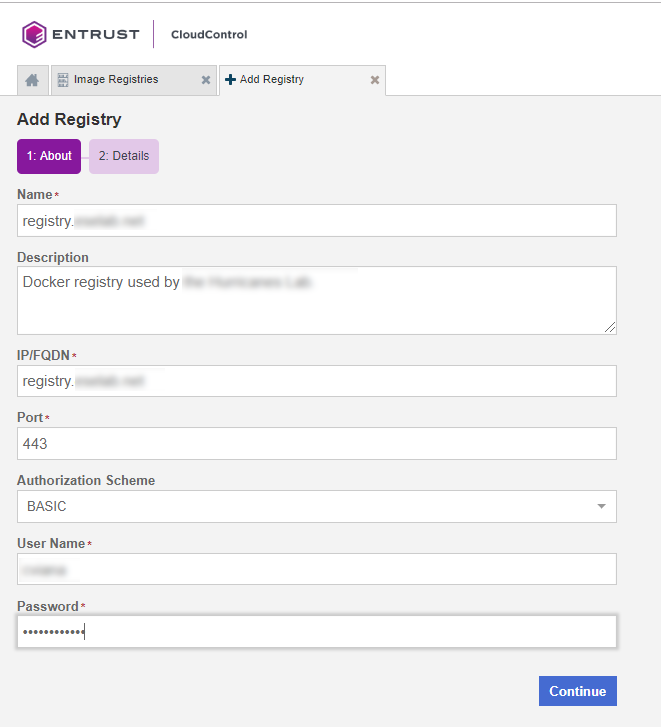
On the Add Registry page, in the About tab enter the following information:
-
Name - Name of the registry
-
IP/FQDN - Enter the IP Address or FQDN for the registry.
-
Port - Enter the registry port used in configuration of the local registry.
-
Authorization Schema - Choose one of the following to use for authorization: BASIC or OAUTH.
-
User - Enter the user name for the registry.
-
Password - Enter the password for this user.
-
Description - Enter an optional description.
-
-
Select Continue.
If a certificate authority has not been added, the system will prompt the user to add one.
-
In the Missing Certificate Authority window, select Install Certificate Authority Now.
-
On the Install Certificates page, do one of the following:
-
Select Import and then select Browse to locate the certificate file.
-
Select Enter Text and then paste the contents of the certificate as plain text into Certificate Data.
-
-
Select Continue.
-
On the Details page, monitor the process.
-
Select Continue to view the dashboard for the newly added registry.
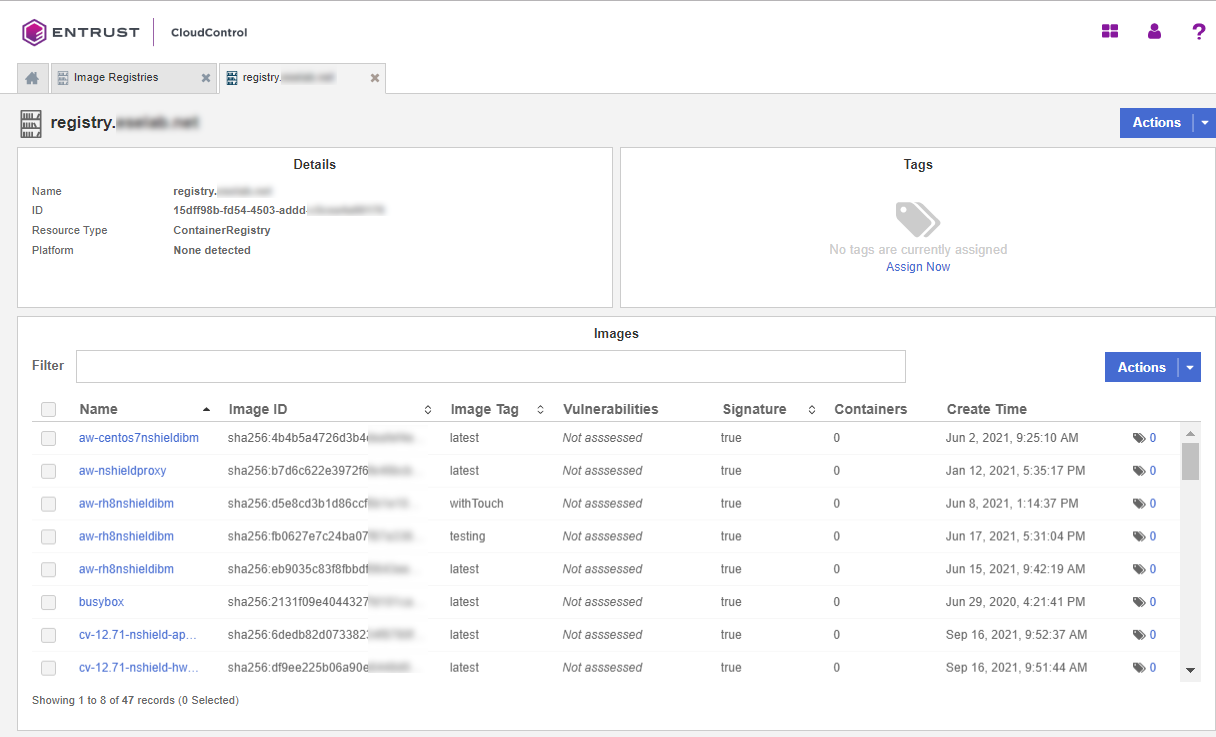
Now create an Image Deployment Control Policy, see Image Deployment Control Policy.
Image Deployment Control Policy
The Image Deployment Control Policy controls how images are deployed in the OpenShift cluster managed by CloudControl. As part of a Trust Manifest, it allows the user to determine what images from a registry are safe to be added to the protected clusters.
CloudControl enforces image security using Image Deployment Control Policies, which are comprised of one or more deployment rules:
Private registry rules
-
Private Registries
Allows the user to enter a list of private registries, either onboarded or not, to be evaluated with the trust manifest. Only the images from registries listed in the Allowed Registries section are evaluated to see if they can be deployed. Images from all other registries will be denied.
-
Signature Rule
Allows denial of images that do not have an associated digital signature.
-
Attributes Rule
Allows the system to deny or deploy images based on their image ID or image name.
-
Vulnerabilities Rule
Allows the system to deny or deploy images based on CVSS scores or specific CVEs.
Public registry rules
A public registry rule enables images from public registries to be deployed in the environment without any evaluation.
| Entrust strongly recommends leaving the public registry rule set to ENABLED and do not allow public registries to be deployed. If a public registry is used, then leave the rule set to ENABLED and enter that specific registry into the Allowed Registries property. This will allow only that specific registry image to be deployed, and will prevent all other public registry images from deployment. |
Other considerations
Rules can either have a True or False value and can also include a 'stop processing' clause. Deployment rules in a policy are evaluated in the following order:
-
If False, the image will not be deployed, and no further rules are evaluated.
-
If True, AND there is a 'stop processing' clause, the image is allowed to be deployed and no further rules are evaluated.
-
If True, the next rule in the policy is evaluated. If this is the only rule, then the image is allowed to be deployed.
-
If all rules are True, then the image is allowed to be deployed.
| Entrust recommends using the image SHA as it is a unique identifier for images. Pods can be created by using either an image name with tag, or an image name with SHA, and in many cases images with the same SHA could have been tagged with different tags. For example, a single image named TestImage could have different tags like TestImage:3, TestImage:4, and TestImage:5, but all these images will have the same SHA as the underlying image is the same for all three of them. |
When the user creates any Image Deployment Control Policy rules, use the image name with SHA to ensure that the intended image is evaluated no matter what tags are there. When an image name with tag is used, such as TestImage:3, then only the image that matches that specific tag will be selected. The other images, TestImage:4 and TestImage:5 will not be evaluated.
Create an Image Deployment Control Policy
This section will show how to use an Image Deployment Control Policy to control which images are allowed/denied in the deployment.
For more information refer to Creating a Deployment Control Trust Manifest from the CloudControl GUI in the online documentation.
-
From the Home tab, select Security > Trust Manifests.
-
On the Manage Trust Manifests page, select Create Trust Manifest. That is the plus sign in the GUI.
-
On the Details tab of the Create Trust Manifest page, enter the Name and optional Description for the trust manifest.
-
For Policy Type, select Deployment Control.
-
In the Deployment Control Rules: Private registries section:
-
For Allowed Registries, enter the registries to be allowed. That is:
-
Enter the registry that was onboarded: xxxxx.yyyy.zzz.
-
Registries can be existing onboarded registries or registries that are planned to be onboarded.
-
Registries that have not been onboarded are depicted with a yellow warning icon.
-
-
-
In the Deployment Control Rules: Rules section:
-
For Signature Rule, select either Enabled or Disabled. This determines whether to deny an image when no signature is present.
-
-
In the Deployment Control Rules: Rules section:
-
For Attribute Rule, select Enabled or Disabled to determine whether to evaluate using attributes, and then complete the following:
-
Name - Enter the name of the rule. The name cannot contain any special characters.
-
Exemption List - Deploy on Match
Select ENABLED or DISABLED to determine whether to use this when evaluating.
If ENABLED, use the + and - symbols to add the following criteria:
-
Image ID - Enter the image ID in SHA format to match.
-
Image Name - Enter the Name and Tag Regex to match.
If there is a match, the image will immediately be deployed, and no other deployment policy rules will be evaluated.
If there is no match, continue to the next enabled step.
If there are no other steps, continue to the next rule in the deployment policy.
-
-
Whitelist - Deny on No Match
Select ENABLED or DISABLED to determine whether to use this when evaluating.
If ENABLED, use the + and - symbols to add the following criteria:
-
Image ID - Enter the image ID in SHA format to match.
-
Image Name - Enter the Name and Tag Regex to match.
If there is no match, the image will immediately be denied, and no other deployment policy rules will be evaluated.
If there is a match, continue to the next enabled step.
If there are no other steps, continue to the next rule in the deployment policy.
-
-
Blacklist - Deny on Match
Select ENABLED or DISABLED to determine whether to use this when evaluating.
If ENABLED, use the + and - symbols to add the following criteria:
-
Image ID - Enter the image ID in SHA format to match.
-
Image Name - Enter the Name and Tag Regex to match.
If there is a match, the image will immediately be denied, and no other deployment policy rules will be evaluated.
If there is no match, continue to the next rule in the deployment policy.
-
-
-
Optional. In the Public Registries section, add public registries to be deployed without any evaluation.
Entrust recommends leaving this section enabled, but do not enter any values in Allowed Registries.
-
-
Select one of the following:
-
Validate - Validate the draft or existing trust manifest.
-
Save - Save the trust manifest as a draft.
-
Publish - Publish the trust manifest.
-
Image Deployment Control Policy examples
In this example, an Image Deployment Control Policy is created. It will only allow images that are in the private registry that was onboarded earlier. Any other image that is not in the private registry will be blocked and will not run.
To be able to publish the policy:
-
The Restrict Public Registry rule will be enabled.
-
A fake registry name abc will be added to the exception list. This will force the policy to only allow images in the private registry.
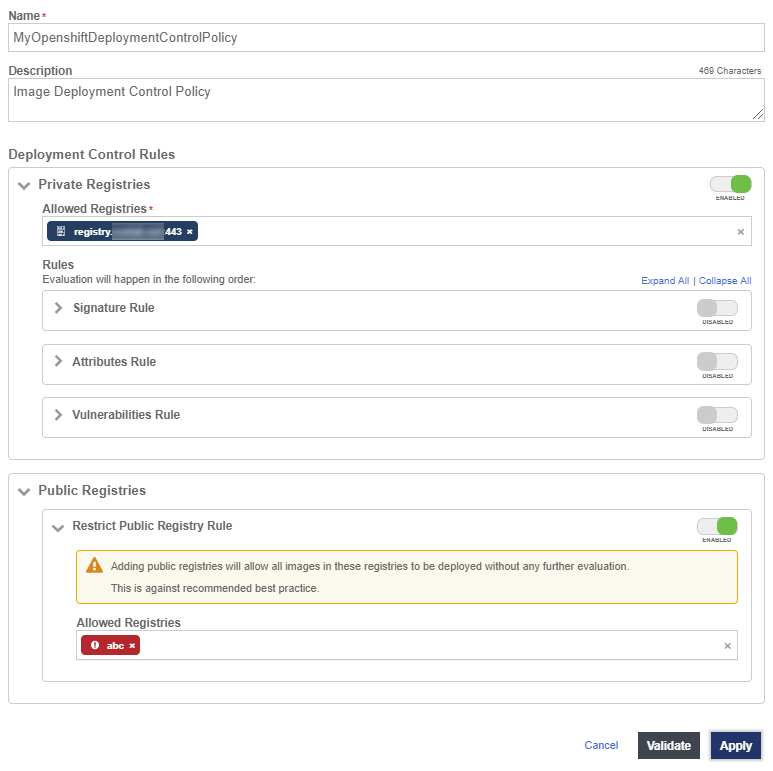
After this policy is published, users can attempt to deploy an image that is not in the registry.
For example, using the pod.yaml file again:
apiVersion: v1
kind: Pod
metadata:
    name: tutum-centos3
spec:
    containers:
    - name: tutum-ssh-server3
image: tutum/centos| The YAML file is not using an image from the private registry. |
% oc create -f pod.yaml

Error from server (Forbidden): error when creating "pod.yaml": admission webhook "deploymentcontrol.hytrust.com" denied the request: Permission Denied by HyTrust Security Policy.
In this example, the pod was not deployed because it uses an image from the tutum registry.
To use an image from a private registry using a different YAML file.
For example, pod-internal-registry.yaml with the following content:
apiVersion: v1
kind: Pod
metadata:
    name: internal-registry-centos
spec:
    imagePullSecrets:
    - name: regcred
    containers:
    - name: internal-registry-centos
      image: xxxxx.yyyy.zzz/cv-centos:latest
Create the pod:
% oc create -f pod-internal-registry.yaml

pod/internal-registry-centos created
The deployment is successful, because the Image Deployment Control Policy allows images from the private registry.
Add the tutum external registry to the external registry exception list, so an external image can also be deployed. For example:
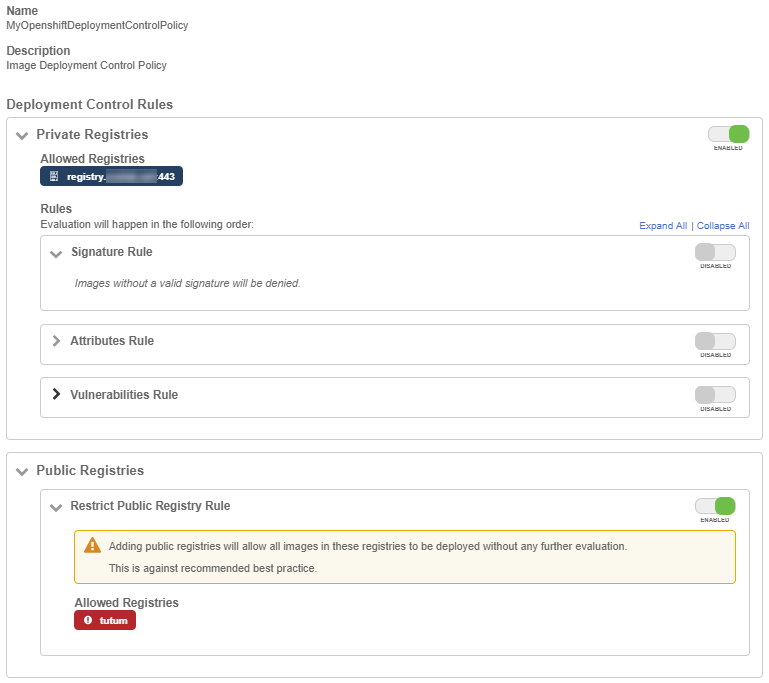
Create the pod using pod.yaml file again:
% oc create -f pod.yaml

pod/tutum-centos3 created
The deployment policy is working as designed.
Expand the policy by further restricting what images can be deployed from the private registry.
To determine what images are in the private registry:
-
In the Home tab, Select Inventory > Image Registries and select the private registry that was onboarded.

-
Look at the images that are available in the registry.
Change the deployment policy to only allow images with name cv-centos and with the latest tag. Any other image in the private registry that does not match this requirement in the name will be blocked.
To do this, add an Attribute Rule to the deployment policy. For example:
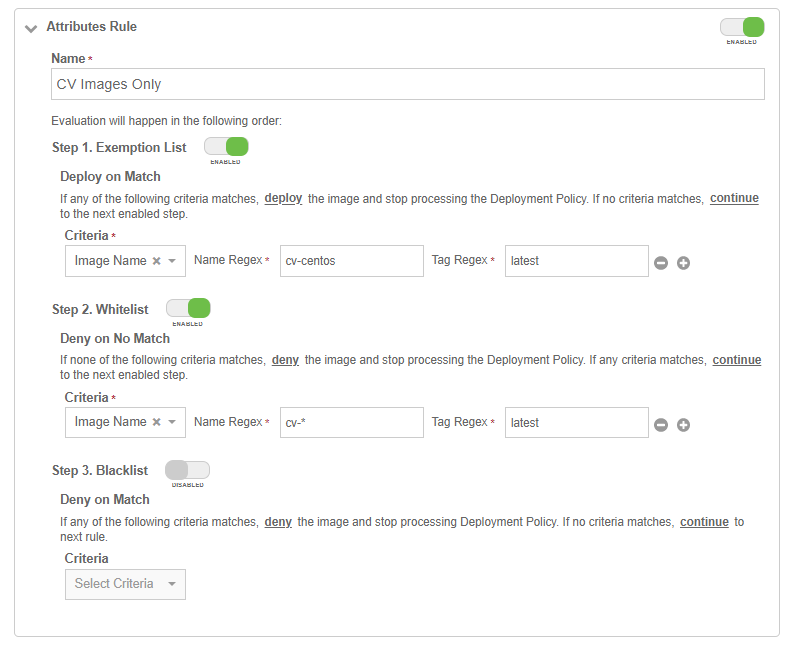
Now try to deploy the busybox image in the private registry.
To do this, create a file called pod-internal-busybox.yaml with the following content:
apiVersion: v1
kind: Pod
metadata:
    name: internalregistry-busybox
spec:
    imagePullSecrets:
    - name: regcred
    containers:
    - name: internalregistry-busybox-test
      image: xxxxx.yyyy.zzz/busybox
When the system tries to deploy this, it should fail and deny the deployment. For example:
% oc create -f pod-internal-busybox.yaml

Error from server (Forbidden): error when creating "pod-internal-busybox.yaml": admission webhook "deploymentcontrol.hytrust.com" denied the request: Permission Denied by HyTrust Security Policy.
Now deploy the cv-centos image in the private registry.
To do this, use the pod-internal-registry.yaml file again.
% oc create -f pod-internal-registry.yaml

pod/internal-registry-centos created
The deployment is successful.
This demonstrates how to harden the Image Deployment Control Policy.
Image Deployment Control Policy based on vulnerabilities
When a private registry is onboarded into CloudControl, the system checks the number of vulnerabilities in each image in the registry. Below is an example of a private registry that was onboarded.

For each image, CloudControl collects the number of vulnerabilities and their types. Select a link in the Vulnerabilities column to view a dialog with tabs that include the details.
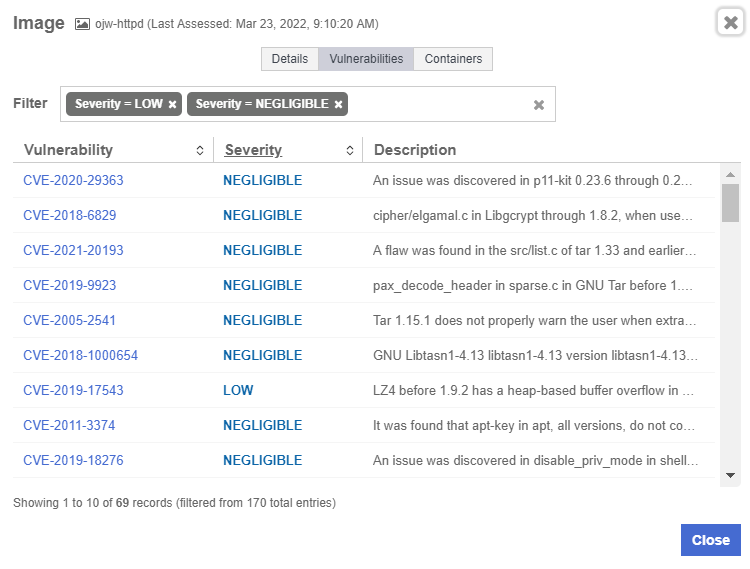
The Vulnerabilities tab lists each vulnerability with their CVE, severity, and description. Select the CVE link to view details about the CVE. For example:
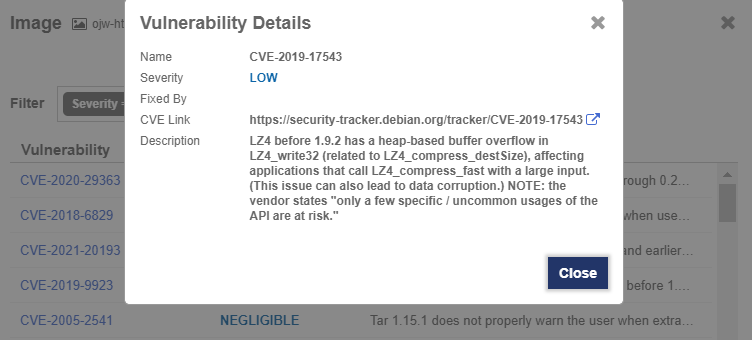
With this information on hand, now create/modify the Image Deployment Control Policy to allow/deny deployments based on the number of vulnerabilities an image contain.
For example, modify the current Image Deployment Control Policy to allow any image from the private registry, but only if it has no vulnerabilities. This requires the use of two images from the private registry:
-
cv-centos - which has no vulnerability.
-
ojw-httpd - which has some vulnerabilities.
Modify the Image Deployment Control Policy
Modify the policy by disabling the Attributes Rule and enabling the Vulnerabilities Rule. The default thresholds will be appropriate for testing.
-
From the Home tab, select Security > Trust Manifests.
-
On the Manage Trust Manifests page, select the MyOpenShiftDeploymentControlPolicy policy.
-
Select Edit.
-
Disable the Attribute Rule section under Rules, under Private Registries.
-
Enable the Vulnerability Rule section.
-
Give a name for the rule, My Vulnerability Rule.
-
Take the defaults for the Deny deployment thresholds values.
-
The ojw-httpd image has more than 30 low severity vulnerabilities.
-
-
-
Select Validate and the select Apply.
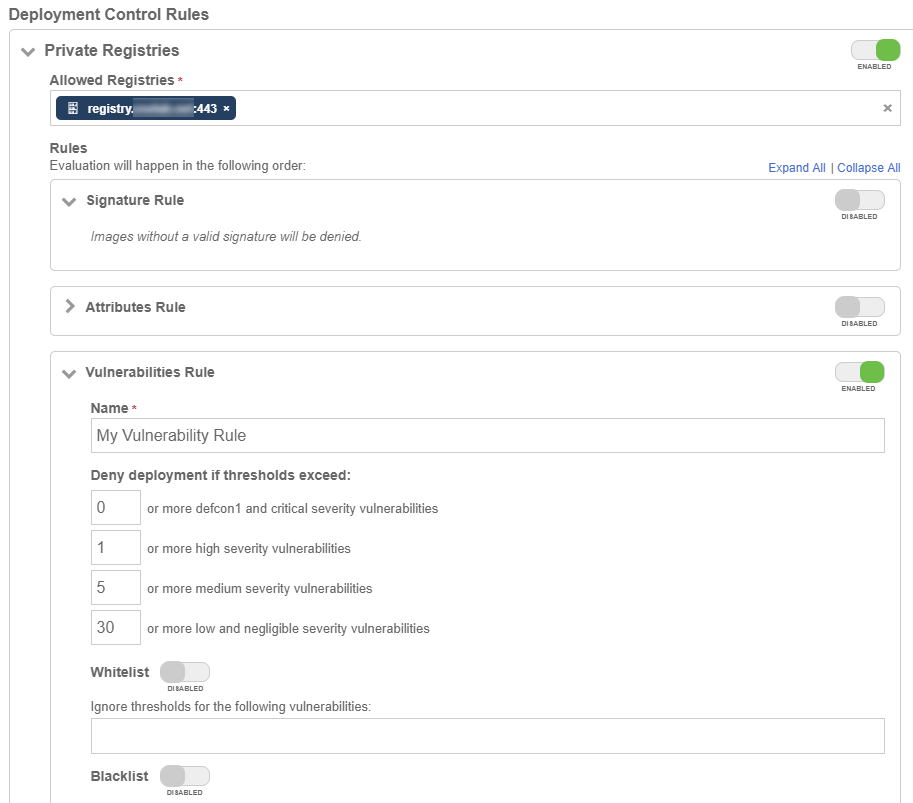
Now test the policy, see Test the policy.
Test the policy
To test the policy, attempt to deploy the cv-centos image.
Use the same pod-internal-registry.yaml file again.
% oc create -f pod-internal-registry.yaml

pod/internal-registry-centos created
The deployment succeeds.
Attempt to deploy the ojw-httpd image.
To do this, create a file called pod-internal-cve.yaml with the following content:
apiVersion: v1
kind: Pod
metadata:
    name: internalregistry-ojw-httpd
spec:
    imagePullSecrets:
    - name: regcred
    containers:
    - name: internalregistry-ojw-httpd
      image: xxxxx.yyyy.zzz/ojw-httpd:latest
It should fail and be denied.
% oc create -f pod-internal-cve.yaml

Error from server (Forbidden): error when creating "pod-internal-cve.yaml": admission webhook "deploymentcontrol.hytrust.com" denied the request: Permission Denied by HyTrust Security Policy.
Examine the logs to see the denial.
-
Go to the Home tab, select Security > Log Analysis.
-
Select the record that shows the Deny status to see the reason for the denial.
-
Look for something like this:

This feature from CloudControl allows users to put in place image deployment control policies that can harden the organization deployment requirements and tailor this capability according to the organization needs.