Procedures
The high-level procedure to install and configure a Palo Alto Network Firewall with an nShield HSM is as follows:
-
Set up the HSM and the security world.
-
Configure the Firewall to authenticate with the HSM(s).
-
Encrypt the master key on a Firewall and store it in the HSM.
-
Store the keys used for SSL forward proxy or SSL inbound inspection decryption.
-
Perform attestation that:
-
The master key is encrypted on the HSM.
-
The certificate use in SSL/TLS forward proxy is successfully imported into the Firewall.
-
Prepare the RFS and the HSM(s)
Each nShield HSM must have a remote file system (RFS) configured. The RFS includes master copies of all the files that the HSM requires, see the User Guide for your HSM.
If more than one HSM is used, they must use the same security world and be of the same type.
Set up connectivity between the Firewall, the HSM, and the RFS
Define connection settings for each HSM
The HSM authenticates the Firewalls based on their IP addresses. Therefore, you must configure the Firewalls to use static IP addresses. Dynamic addresses, assigned through DHCP, cannot be used.
If you want to set up connectivity to more than one HSM for high-availability, do it at this point. If more than one HSM is being used, the HSMs must share the same security world and be of the same type. For steps on loading an existing security world onto an HSM, see the nShield Connect User Guide. Adding more HSMs after the master key has been encrypted and stored in an HSM (see Encrypt the master key using the HSM) is only possible by first removing the master key from the HSM. The master key is required to perform the removal. Then encrypt and store the master key again in the HSM after adding new HSM to the list above.
-
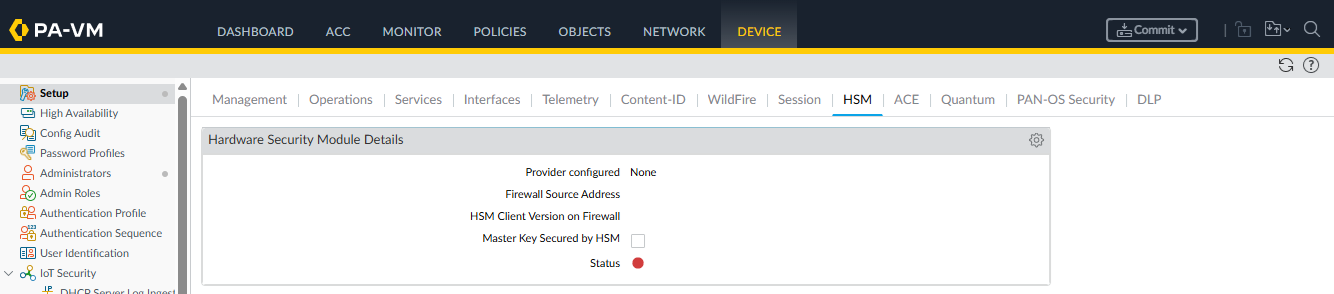
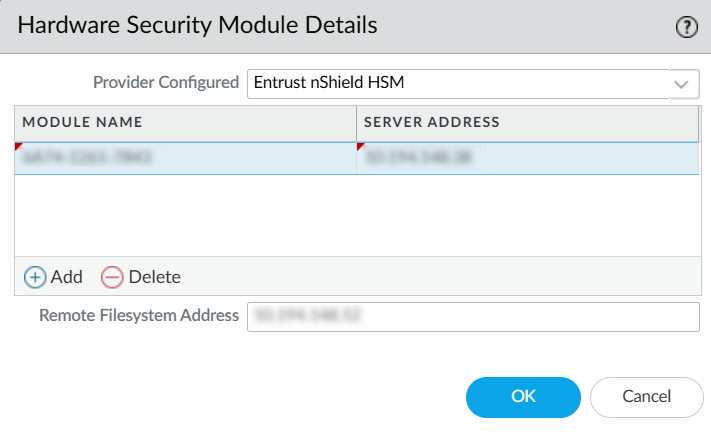
Sign in to the Palo Alto Networks Firewall web interface and select Device > Setup > HSM.
-
Edit the Hardware Security Module Provider settings and set the Provider Configured to Entrust nShield HSM.
-
Add each HSM as follows. A high-availability HSM configuration requires at least two HSMs.
-
Enter a module name for the HSM. This can be any ASCII string of up to 31 characters.
-
Enter an IPv4 address for the HSM.
-
Repeat the first two steps for all HSMs.
-
-
Enter an IPv4 address for the RFS.
-
Select OK.
-
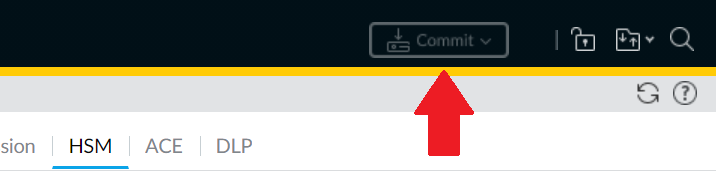
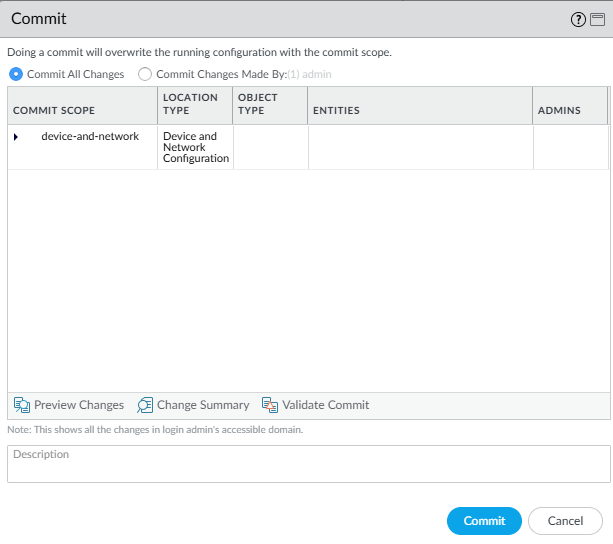
Select the Commit icon, shown with a red arrow in the following picture.
-
Once committed, select Close. The HSM configuration should be displayed.

Configure a service route to the HSM
Perform these optional steps if you do not want the Firewall to connect through the default management interface. If you are connecting through the default management interface, go to Register the Firewall as an HSM client.
-
Select Device > Setup > Services > Service Route Configuration.
-
Select Customize a service route.
The IPv4 tab is active by default.
-
For Service, select HSM.
-
Select a Source Interface for the HSM.
-
Select OK.
-
Select the Commit icon.
Register the Firewall as an HSM client
This can be done from the front panel of the HSM or from the RFS. These steps describe how to register the firewall as an HSM client from the RFS command line.
-
On the RFS, change to the HSM-specific directory to obtain the HSM configuration file and create a new configuration file:
cd /opt/nfast/kmdata/hsm-<HSM-ESN>/config/

touch config.new

cp config config.new
-
Edit
config.new:vi config.new
-
Add the following to the
[hs_clients]section:addr=<Firewall-IP> clientperm=unpriv keyhash=0000000000000000000000000000000000000000 esn= timelimit=0 datalimit=0 -----
-
Push
config.newto the HSM:cfg-pushnethsm --address=<HSM-IP> config.new
-
Check the
configfile for the changes made: (there should be no differences)diff config.new config
-
Repeat these steps for each HSM in the high-availability configuration.
Configure the RFS to accept connections from the Firewall and the HSM
The assumption here is the RFS is running on Linux.
To configure the RFS to accept connections from the Firewall and the HSM:
-
Sign in to the RFS.
-
Assume root privileges by running the
sucommand:su
-
Configure or disable the RFS firewall:
service firewalld stop
The RFS firewall is independent of the Palo Alto Networks Firewall.
An RFS reboot re-enables the RFS firewall. -
Verify that the RFS firewall stopped:
service firewalld status
-
Set up the RFS. The following command must be run for each HSM being added to your high-availability configuration:
rfs-setup --force <HSM_IP_address> $(anonkneti <HSM_IP_address>)
-
Run the following command to permit HSM client submissions on the RFS:
rfs-setup --gang-client --write-noauth <Firewall-IP-address>
You can use the following commands to configure the RFS to accept connections from the client Firewall.
rfs-setup is run on the RFS.
rfs-sync is run on the client.
RFS     rfs-setup --gang-client --write-noauth --force <client_IP_address>
Client  rfs-sync --setup --no-authenticate <RFS_IP_Address>
        rfs-sync --update
        rfs-sync --commit
For security reasons, the Firewall has a protected command-line interface that does not allow direct access to rfs-setup and rfs-sync in its built-in nfast server.
Instead, equivalent commands are available in the protected Palo Alto Networks Firewall command-line interface and can be useful for debugging.
| nShield Command | Palo Alto Networks Command |
|---|---|
|
|
|
|
|
|
Authenticate the Firewall to the HSM
To authenticate the Firewall to the HSM:
-
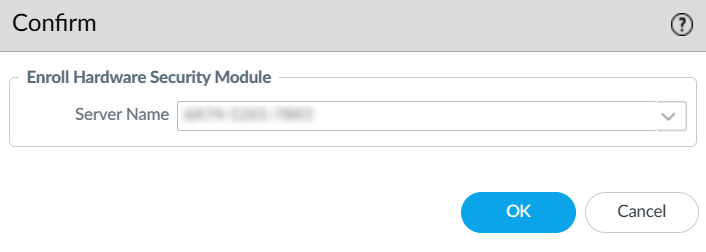
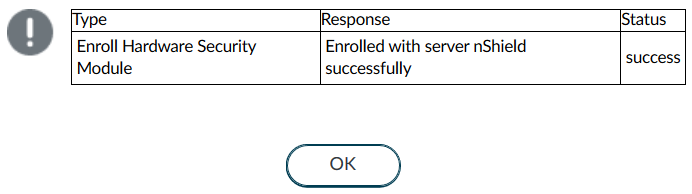
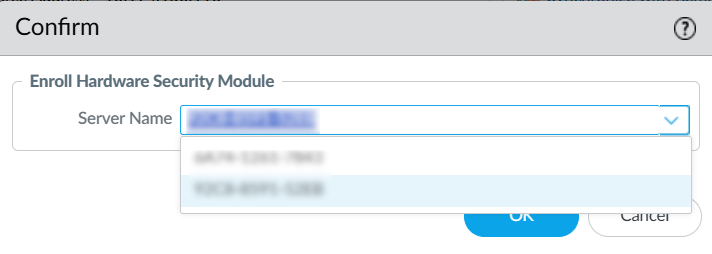
In the Palo Alto Networks Firewall web interface, select Device > Setup > HSM > Setup Hardware Security Module.
A confirmation dialog appears. For the Enroll Hardware Security Module, select one of the HSMs.
-
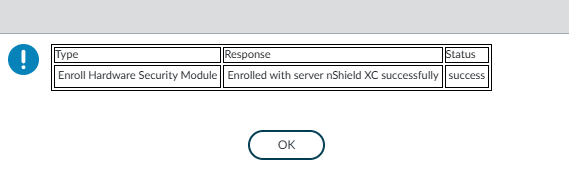
Select OK.
The Firewall authenticates to the HSM and displays a completion message:
-
Select OK.
Synchronize the Firewall with the RFS
To synchronize the Firewall with the RFS:
-
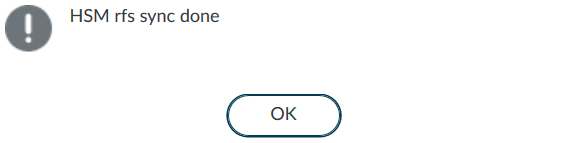
In the Palo Alto Networks Firewall web interface, select Device > Setup >HSM > Synchronize with Remote Filesystem.
The Firewall synchronizes with the RFS and displays a completion message:
-
Select OK.
Verify Firewall connectivity and authentication with the HSM
To verify Firewall connectivity and authentication with the HSM:
-
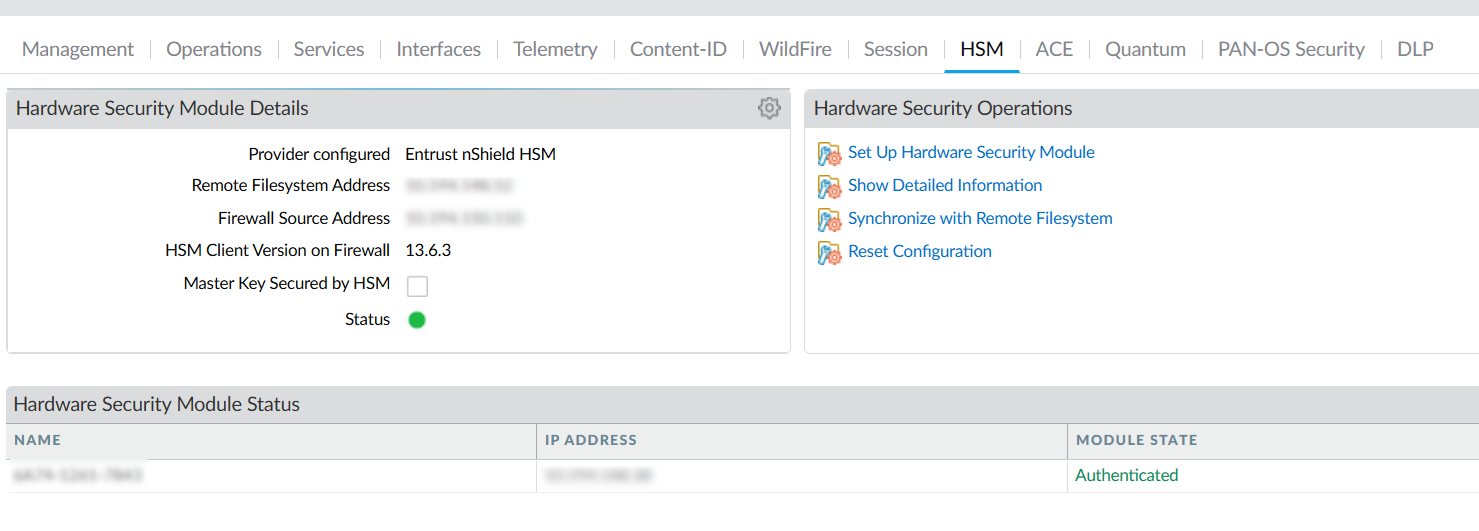
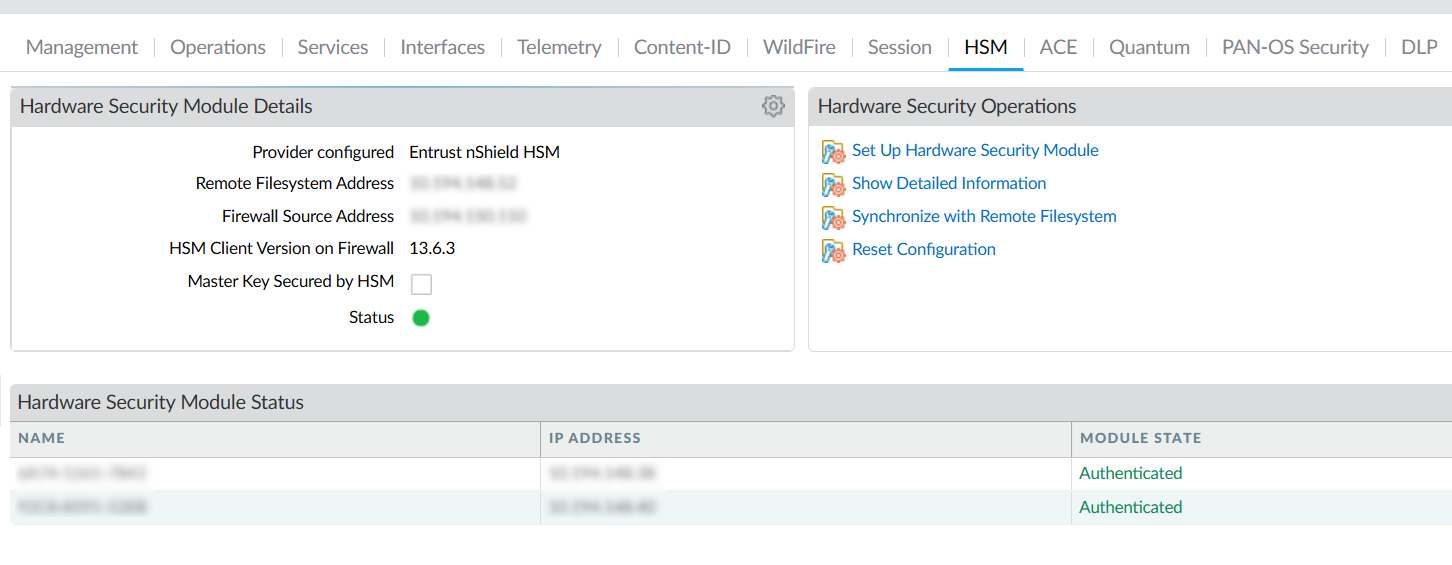
In the Palo Alto Networks Firewall web interface, select Device > Setup > HSM.
-
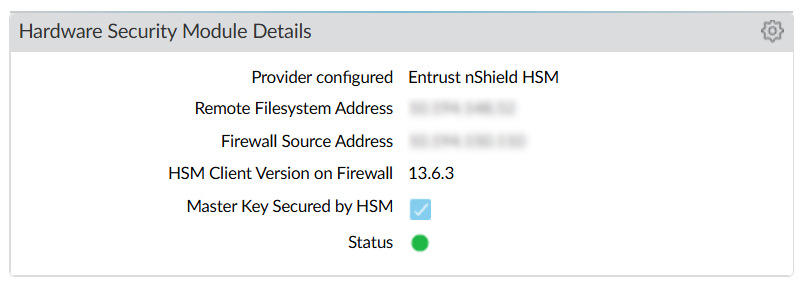
Check the Hardware Security Module Status. It should show Authenticated.
-
Name - The name of the HSM.
-
IP address - The IP address of the HSM.
-
Module State - The current state of the HSM connection: Authenticated or NotAuthenticated.
-
-
Check the connection status:
-
Green - The Firewall is successfully authenticated and connected to the HSM.
-
Red - The Firewall failed to authenticate to the HSM, or network connectivity to the HSM is down.
A left-over
rfs-synclock from a failed attempt could cause red status. Launch a command-line interface on the RFS, remove the/opt/nfast/kmdata/local/.nft-lockfile, then re-run the instructions in Synchronize the Firewall with the RFS.
-
-
Finally, select Device > Setup > HSM > Show Detailed Information. This is equivalent to running enquiry on the firewall.

Encrypt the master key using the HSM
A master key encrypts all private keys and passwords on the Palo Alto Networks Firewall. Every time the Firewall is required to decrypt a password or private key, it requests the HSM to decrypt the master key.
The HSM encrypts the master key using a wrapping key. To maintain security, you must occasionally change (refresh) this wrapping key.
Encrypt the master key
Use this procedure for first time encryption of a key, or if you define a new master key and you want to encrypt it.
-
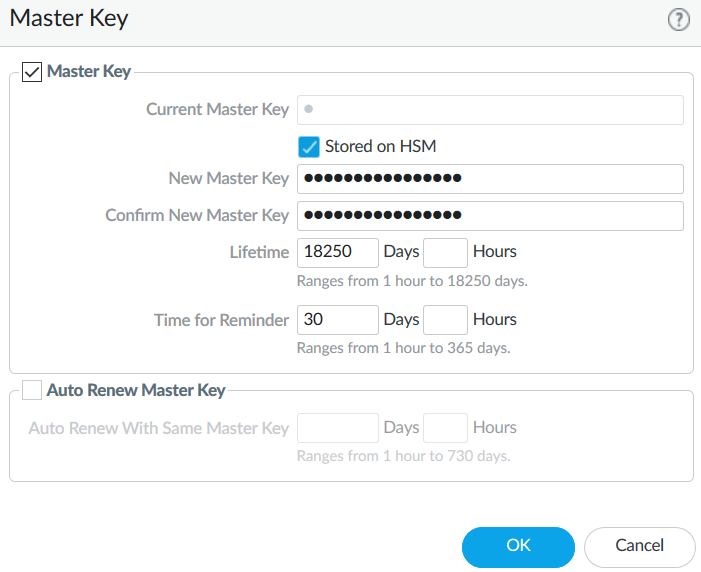
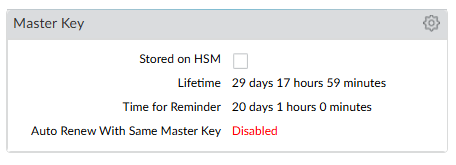
In the Palo Alto Networks Firewall web interface, select Device > Master Key and Diagnostics.
-
Select the gear icon next to Master Key.
-
Select the Master Key check box.
-
For Current Master Key, enter the key that is currently used to encrypt all of the private keys and passwords on the Firewall (if applicable).
-
Select the Stored on HSM check box.
-
Enter the new master key and confirm.
-
Enter the following information:
-
Life Time - The number of days and hours after which the master key expires (1-18250 days).
-
Time for Reminder - The number of days and hours before expiration when the user is notified of the impending expiration (1-365 days).
-
-
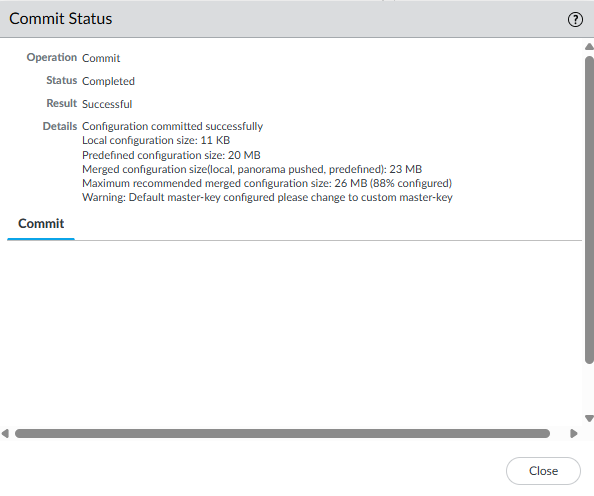
Select OK and then select Commit.
The Master Key information is updated.
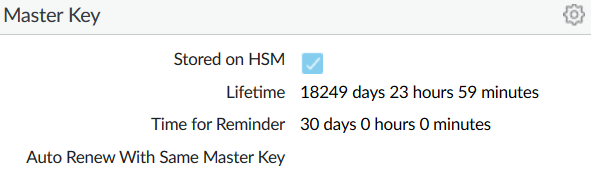
The new key is also visible in Device > Setup > HSM > Hardware Security Module Details.
-
Sync the newly created Master Key to the RFS.
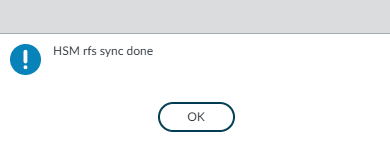
Select Device > Setup > HSM > Synchronize with Remote Filesystem.
A pop-up should appear saying HSM rfs sync done.
You should see the newly created in key in
/opt/nfast/kmdata/localin the RFS.% cd /opt/nfast/kmdata/local % ls -al key_* -rw-r--r--. 1 nfast nfast 7040 Aug 26 14:19 key_pkcs11_ua210478667b71fd9d55ef10a2d3d2f21b681a03dd
Refresh the master key encryption
Refresh the master key encryption by rotating the wrapping key that encrypts it. The wrapping key resides on the HSM.
-
Sign in to the Palo Alto Networks Firewall command-line interface.
-
Use the following command to rotate the wrapping key for the master key on an HSM:
request hsm mkey-wrapping-key-rotation
For example:
admin@PA-VM> request hsm mkey-wrapping-key-rotation
Mkey wrapping key rotation succeeded. New key handle 1119.
admin@PA-VM>
The
mkey-wrapping-key-rotationcommand does not delete the old wrapping key.-
If the master key is encrypted on the HSM, the command generates a new wrapping key on the HSM and encrypts the master key with the new wrapping key.
-
If the master key is not encrypted on the HSM, the command generates a new wrapping key on the HSM for future use.
-
-
Sync the newly created Key to the RFS.
Select Device > Setup > HSM > Synchronize with Remote Filesystem.
A pop-up should appear saying HSM rfs sync done.
You should see the newly created in key in
/opt/nfast/kmdata/localin the RFS.% cd /opt/nfast/kmdata/local % ls -al key_* -rw-r--r--. 1 nfast nfast 7040 Aug 26 14:19 key_pkcs11_ua210478667b71fd9d55ef10a2d3d2f21b681a03dd -rw-r--r--. 1 nfast nfast 7040 Aug 26 14:20 key_pkcs11_uaac73f6835c0efe822f6add4ad1cffc0fec60963b
Store the key used in SSL/TLS decryption
The HSM can be used to securely store the private keys used in SSL/TLS decryption for:
-
SSL forward proxy - Store the private key of the Forward Trust certificate that signs certificates in SSL/TLS forward proxy operations. The Firewall will then send the certificates that it generates during such operations to the HSM for signing before forwarding these to the clients.
-
SSL inbound inspection - Store the private keys for the internal servers for which it is performing SSL/TLS inbound inspection.
Generate a self-signed certificate and key
This section describes a method to generate a self-signed certificate and key for purposes of this guide using the HSM. This is the preferred method to generate such key and certificate. For information about importing existing keys and certificates, see the User Guide for your HSM.
The HSM generatekey command generates a key file with the same syntax as an RSA private key file, but contains the key identifier rather than the key itself, which remains protected in the HSM.
-
Sign in to the RFS.
-
Assume root privileges by running the
sucommand:su
-
Run the
generatekeycommand:cd /opt/nfast/kmdata/local generatekey pkcs11 selfcert=yes
Currently, only module protected keys are supported. For example:
[root@red_hat_8_rfs local]# generatekey pkcs11 selfcert=yes
module: Module to use? (1, 2) [1] >
protect: Protected by? (token, softcard, module) [token] > module
recovery: Key recovery? (yes/no) [yes] >
type: Key type? (DES3, DH, DHEx, DSA, HMACSHA1, HMACSHA256, HMACSHA384,
HMACSHA512, RSA, DES2, AES, Rijndael, Ed25519, X25519) [RSA]
>
size: Key size? (bits, minimum 1024) [2048] >
OPTIONAL: pubexp: Public exponent for RSA key (hex)? []
>
plainname: Key name? [] > paloaltossl
x509country: Country code? [] > US
x509province: State or province? [] > FL
x509locality: City or locality? [] > Sunrise
x509org: Organization? [] > SWTesting
x509orgunit: Organization unit? [] > InterOp
x509dnscommon: Domain name? [] > paloaltofirewall
x509email: Email address? [] > test@test.com
nvram: Blob in NVRAM (needs ACS)? (yes/no) [no] > no
digest: Digest to sign cert req with? (md5, sha1, sha256, sha384, sha512)
[default sha256] >
key generation parameters:
operation      Operation to perform            generate
application    Application                     pkcs11
module         Module to use                   1
protect        Protected by                    module
recovery       Key recovery                    yes
verify         Verify security of key          yes
type           Key type                        RSA
size           Key size                        2048
pubexp         Public exponent for RSA key (hex)
plainname      Key name                        HSMKey
x509country    Country code                    US
x509province   State or province               FL
x509locality   City or locality                Sunrise
x509org        Organization                    SWTesting
x509orgunit    Organization unit               InterOp
x509dnscommon  Domain name                     paloaltofirewall
x509email      Email address                   test@test.com
nvram          Blob in NVRAM (needs ACS)       no
digest         Digest to sign cert req with    sha256

Please wait........
Key successfully generated.
Path to key: /opt/nfast/kmdata/local/key_pkcs11_ua5efdb72cb623c41d6ec9baeacc1eac95be8ada2b
Path to self-cert: /opt/nfast/kmdata/local/pkcs11_ua5efdb72cb623c41d6ec9baeacc1eac95be8ada2b_selfcert
[root@red_hat_8_rfs local]#
-
If you selected
tokenfor OCS protection, you must provide the OCS 1/N quorum forfips-authwhen a strict FIPS 140 Level 3 world is used. If you provide the ACS quorum, thegeneratekeycommand will fail.Token (OCS) protection is not currently supported.
-
If you selected
modulefor module protection, you must provide the OCS 1/N quorum to providefips-authfor this HSM operation when a strict FIPS 140 Level 3 world is used.
-
-
Two files are created. The key file has the same syntax as an RSA private key file, but actually contains the key identifier rather than the key itself, which remains protected. The file type and naming are:
File Type Naming Key file (key identifier rather than the key itself)
key_pkcs11_…Self-signed certificate
pkcs11_…_selfcert -
You can view the content of the certificate created above by viewing the self-signed certificate (
.crt):openssl x509 -text -noout -in /opt/nfast/kmdata/local/pkcs11_ua5efdb72cb623c41d6ec9baeacc1eac95be8ada2b_selfcert
Synchronize the key data from the RFS to the Firewall
To synchronize the key data from the RFS to the Firewall:
-
In the Palo Alto Networks Firewall web interface and select Device > Setup > HSM.
-
In the Hardware Security Operations settings, select Synchronize with Remote Filesystem.
The Firewall confirms when the synchronization is complete.
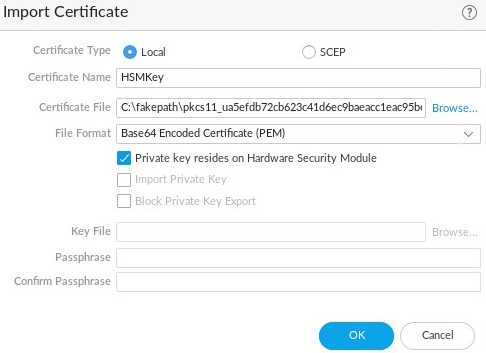
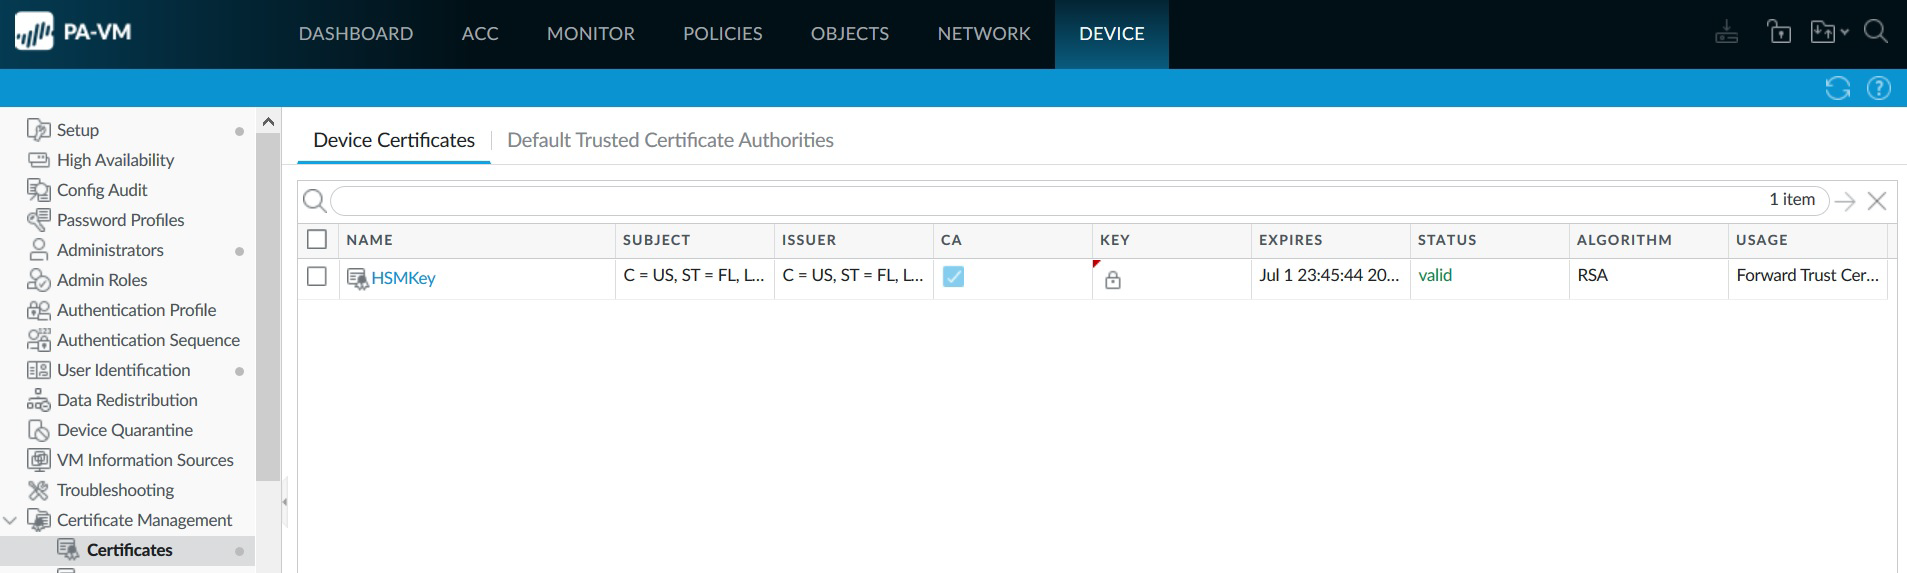
Import the certificate that corresponds to the HSM-stored key into the Firewall
To import the certificate that corresponds to the HSM-stored key into the Firewall:
-
Sign in to the Palo Alto Networks Firewall web interface from the RFS.
-
Launch the browser from the RFS to be able to upload files from the RFS files system to the Palo Alto Networks Firewall.
-
Select Device > Certificate Management > Certificates > Device Certificates
-
Select Import.
-
For Certificate Type, select the Local option.
-
Enter the Certificate Name.
-
Browse to the Certificate File on the RFS. This is the file ending in
_selfcertfrom the certificate generated in the previous step./opt/nfast/kmdata/local/pkcs11_ua5efdb72cb623c41d6ec9baeacc1eac95be8ada2b_selfcert
-
From the File Format list, select Base64 Encoded Certificate (PEM).
-
Select the Private key resides on Hardware Security Module check box.
-
Select OK.
-
Select the Commit icon and close the dialog.
A new certificate has been imported:

Under the KEY column, you should see a lock symbol, indicating the private key for the certificate is on the HSM. If you see an error symbol, either the private key is not on the HSM or the HSM is not properly authenticated or connected.
Enable the certificate for use in SSL/TLS forward proxy
To enable the certificate for use in SSL/TLS forward proxy:
-
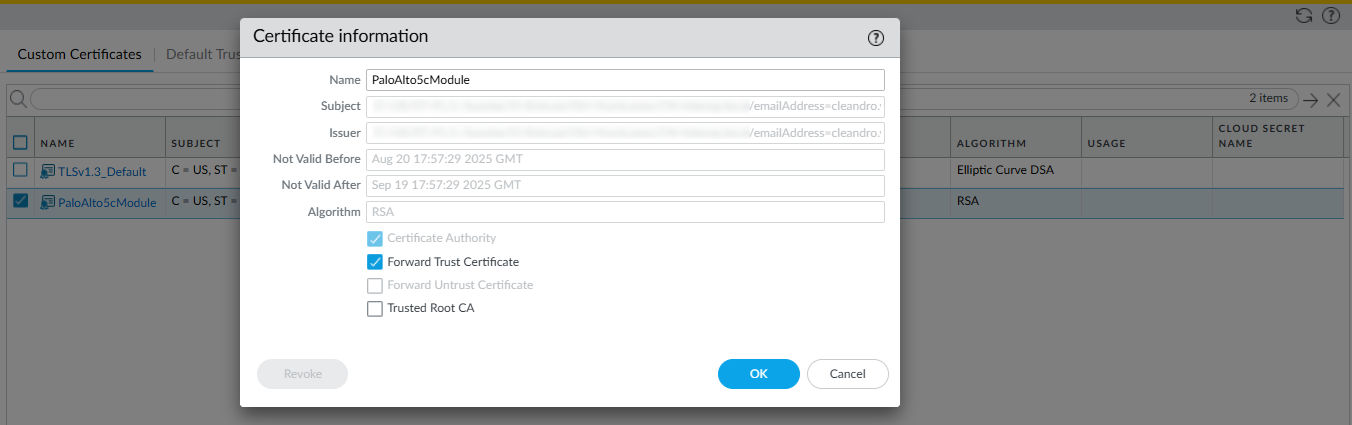
In the Firewall web interface, open the certificate that you have imported: select Device > Certificate Management > Certificates > Custom Certificates.
-
Select the certificate to open it.
-
Select the Forward Trust Certificate check box.
-
Select OK.
-
Commit your changes.
The USAGE column now shows Forward Trust Certificate.
Verify the certificate import into the Firewall
To verify the certificate import into the Firewall:
-
Locate the certificate that you imported.
-
Check the icon in the KEY column:
-
Lock icon — The private key for the certificate is on the HSM.
-
Error icon — The private key is not on the HSM or the HSM is not properly authenticated or connected.
-
-
Check the USAGE column. It should show Forward Trust Certificate.
Adding more HSMs
Adding more HSMs after the master key has been encrypted and stored in an HSM (see Encrypt the master key using the HSM) is only possible by first removing the master key from the HSM. The master key is required to perform the removal. Then encrypt and store the master key again in the HSM after adding a new HSM. Any new HSMs that are added must share the same security world being used.
-
On the Firewall GUI, select Device > Master Key and Diagnostics.
-
Select the gear icon next to Master Key.
-
Enter the current master key and uncheck the box for Stored on HSM.
-
You can keep the same master key or make a new one temporarily. This is just the intermediate step to remove the key from the HSM so more HSMs can be added.
-
Select OK and select Commit.
-
Go to Device > Setup > HSM and select the gear icon next to *Hardware Security Module Details.
-
In the Hardware Security Module Details Dialog:
-
In the Provider Configured dropdown, select Entrust nShield HSM.
-
Select Add and enter a name for the module, like nShield XC.
-
Under Server Address, enter the IP address of the HSM.
-
In the Remote Filesystem Address field, enter the IP address of the RFS, then select OK.

-
-
Select the Commit button in the top right of the GUI to apply the configuration to the firewall.
-
Wait until it is committed.
-
Select Close.
-
You should be sharing the same security world across all of the HSMs.
-
In the PanOS WebGUI, select Device > Setup > HSM > Set Up Hardware Security Module.
A confirmation dialog appears. For the Enroll Hardware Security Module, select one of the HSMs.
Select OK. The firewall attempts to authenticate to the HSM. Make sure the status message that is displayed shows the authentication was successful.
You should see both HSMs where the MODULE STATE is Authenticated.
-
Synchronize the firewall with the RFS. Select Device > Setup > HSM > Synchronize with Remote Filesystem. A pop-up should appear saying HSM rfs sync done.
-
When you have finished adding HSMs, re-create the master key, selecting the checkbox for Stored on HSM. This will encrypt the new master key and store it with multiple HSMs configured.