Migrate from Oracle TDE to Oracle Key Vault
The section describes the following migration from Oracle TDE to Oracle Key Vault:
TDE environment:
-
Non-multitenant database.
-
The TDE database is configured to use the following key encryption methods:
- File Keystore
-
KeystorePasswod1
- HSM Softcard
-
softcard1|scard1
-
The TDE database encryption is using the HSM Softcard.
-
Set up using the instructions in https://docs.oracle.com/en/database/oracle/key-vault/18.6/okvag/security_objects.html#GUID-4FDDCC75-3AC1-4ABC-83C1-BF437487B574
Oracle Key Vault environment:
-
Standalone.
Hardware and software versions
-
VM running Oracle Database 19c (TDE Environment)
-
VM running Oracle Key Vault 18.6
-
Operating System: Red Hat 7 Linux 64
Scenario
A customer has nShield HSMs, probably Connect XCs, nShield Security World software, and is using Oracle TDE that uses that HSM in a Security World. They want to migrate to Oracle Key Vault and use the nShield HSM to protect the OKV master key. They also want to enroll their existing TDE database as an endpoint, along with any other endpoints they might use.
Assumptions:
-
nShield software and all Security World files are installed on a separate RFS.
-
nShield software is installed and Security World files are synchronized to the Oracle TDE clients.
-
Oracle TDE servers are enrolled as clients to the HSMs.
Procedure overview:
-
Reverse migrate the TDE with HSM setup to use an Oracle software wallet only.
Verify that their data can still be encrypted and decrypted using the software wallet, and can read the columns.
-
Un-enroll the HSM from the TDE server (using
nethsmenrol -rif using an nShield Connect). -
Uninstall the Security World software from the TDE server, backing up any Security World files that haven’t been synced to the RFS.
At this stage they have an Oracle TDE setup using only the software wallet.
There is no nShield software or hardware in the configuration.
The Security World files are on the RFS and also a backup.
There is no reason to have nShield software installed or the HSM enrolled on the TDE server at this point as they are not going to be used after this step.
-
Set up a separate server with an Oracle Key Vault installation and enroll the Oracle TDE client that is using a software-based wallet as an endpoint within OKV.
-
Verify that you can still encrypt and decrypt data and read columns on the TDE end.
-
Execute the steps in Install HSM client software on the Key Vault server to install Security World software on the OKV server.
-
Enroll the HSM and configure RFS sync so the Security World files are present. There is the option to create a brand new Security World at this point.
-
Execute the steps in Enable HSM mode in Key Vault to initialize the HSM using the OKV web UI and verify the status is active.
-
Verify that you can still encrypt and decrypt within Oracle TDE and read the columns.
The nShield HSM is not used to perform encryption or decryption. It only protects the master key protected by OKV master key(s), which in turn is protected by the HSM.
Some of these steps can be interchangeable. You can initialize OKV with an HSM and then enroll the endpoint afterwards.
Prerequisites
-
The OKV system is already set up and is ready to receive the migration.
-
The steps below start from migrating back from the HSM wallet to the software wallet, and then migrating the wallet to the OKV environment.
-
Software wallet: KeystorePassword1
-
HSM wallet: softcard1|scard1
-
OKV wallet: okvwallet
-
-
All SQL commands are to be executed as the
oracleuser whose environment is configured.The
oracleuser will run thesqlplusutility as thesysdbauser.% sqlplus / as sysdba
Migrate back from HSM wallet to Software wallet
-
Set the Keystore configuration to
FILE:ALTER SYSTEM SET TDE_CONFIGURATION = "KEYSTORE_CONFIGURATION=FILE" SCOPE=BOTH SID='*';Exit the
sqlplussection and establish a new section so this takes effect. -
Show the wallet parameters:
SHOW PARAMETER WALLET_ROOT; SHOW PARAMETER TDE_CONFIGURATION; -
Make sure
KEYSTORE_CONFIGURATIONis set toFILE. -
Migrate from Softcard to keystore:
ADMINISTER KEY MANAGEMENT SET ENCRYPTION KEY IDENTIFIED BY "KeystorePassword1" REVERSE MIGRATE USING "softcard1|scard1" WITH BACKUP USING 'HSM.bkp';
SELECT * FROM sys.v_$encryption_wallet;
The expected output is similar to the following:
keystore altered. WRL_TYPE -------------------- WRL_PARAMETER ------------------------------------------------------------------------------------------- STATUS WALLET_TYPE WALLET_OR KEYSTORE FULLY_BAC CON_ID ------------------------------ -------------------- --------- -------- --------- ---------- FILE /opt/oracle/admin/CDB1/keystore-folder/tde/ OPEN PASSWORD PRIMARY NONE NO 0 HSM CLOSED UNKNOWN SECONDARY NONE UNDEFINED 0 WRL_TYPE -------------------- WRL_PARAMETER ------------------------------------------------------------------------------------------- STATUS WALLET_TYPE WALLET_OR KEYSTORE FULLY_BAC CON_ID ------------------------------ -------------------- --------- -------- --------- ---------- -
Check the encryption Keys.
SELECT * FROM v$encryption_keys; SELECT KEYSTORE_TYPE FROM V$ENCRYPTION_KEYS; -
Check that you can see the encrypted table content in plaintext.
If you can see tables in plaintext, the TDE is working with the software wallet. This can be done in various ways and it is going to be based on each environment.
Example:
SET SERVEROUTPUT ON;

SET FEEDBACK OFF;
CREATE OR REPLACE PROCEDURE display (p_string IN VARCHAR2) IS
BEGIN
    dbms_output.put_line(p_string);
END;
/
SET FEEDBACK ON;

SET FEEDBACK OFF;
exec display('CDB1Table3DES168In3DES168 contents:');
SET FEEDBACK ON;
SELECT FirstName,LastName,FavColor,TeamName FROM CDB1Table3DES168In3DES168;
Configure the Oracle TDE VM as an endpoint to the OKV server
Enrolling using administrator-initiated type of enrollment instead of self-enrollment.
Enroll and provision the endpoint
-
Sign in to the OKV web UI.
-
Navigate to Endpoints.
-
Select Add, and enter the endpoint details, that is, the Oracle TDE Database VM.

-
Select Register.

-
Copy the Enrollment Token.
-
Sign out of the OKV web UI.
-
Before entering the credentials, select the Endpoint Enrollment and Software Download link at the bottom of the page.

-
Enter in the Enrollment Token as seen in the Endpoint section.
-
Select Submit Token.
The response should be Valid Token.

-
Select Enroll.
This downloads the
okvclient.jarfile.
Install the Oracle Key Vault Client Software on the Oracle TDE VM endpoint
Install the OKV utilities in the TDE Environment
-
Install JDK 1.4 to 7 on the endpoint. In this example,
jdk1.7.0_80was used. SetJAVA_HOMEand add it to thePATH. -
Copy the
okvclient.jarfile to the TDE VM endpoint. -
Create a
$ORACLE_BASE/okvutilfolder. This is the directory location of the Oracle Key Vault software and configuration files.$OKV_HOMEshould be set to this folder. -
Ensure
ORACLE_HOME1,ORACLE_BASE, andOKV_HOMEare set.OKV_HOMEis the folder created above. -
As the
oracleuser, run:% java -jar okvclient.jar -d $OKV_HOME/okvutil -v Detected JAVA_HOME: /opt/oracle19c5/product/19.5.0/dbhome_1/jdk Detected ORACLE_HOME: /opt/oracle19c5/product/19.5.0/dbhome_1 Detected ORACLE_BASE: /opt/oracle19c5 Using OKV_HOME: /opt/oracle19c5/okvutil Please set environment variables ORACLE_HOME, ORACLE_BASE, and OKV_HOME consistently across processes. Enter new Key Vault endpoint password (<enter> for auto-login): Confirm new Key Vault endpoint password: The endpoint software for Oracle Key Vault installed successfully.Password was okvwallet. This is the password for the Oracle Key Vault endpoint and is needed later for the migration.
Setup communication to the OKV server
Switch to root and run $OKV_HOME/bin/root.sh.
This copies the liborapkcs.so file, which contains the library that the Oracle database uses to communicate with Oracle Key Vault.
% sudo su - root
$OKV_HOME/bin/root.sh

Creating directory: /opt/oracle/extapi/64/hsm/oracle/1.0.0/
Copying PKCS library to /opt/oracle/extapi/64/hsm/oracle/1.0.0/
Setting PKCS library file permissions
Installation successful.
Create a virtual wallet in Oracle Key Vault
-
In the OKV web UI, select Keys & Wallets, and create a new wallet. The example in this guide uses TDE_WALLET.

-
Select Save.
The wallet is created.
-
At the top of the web UI in the menu bar, select Endpoints.
-
Edit the endpoint that you created by selecting its name.
-
Make the wallet the default wallet for the endpoint.
Remove Security World Software from the TDE system
Perform these steps as the root user.
-
Back up of the
/opt/nfastfolder.% cd /opt; cp -rp nfast nfast.backup -
Uninstall the Security World.
% /opt/nfast/sbin/install -u
% rm -rf /opt/nfast
Migrate the software TDE wallet to Oracle Key Vault
-
Copy the encryption keys to a wallet in the OKV system.
As the
oracleuser, run the following:Use the wallet name that you created in the OKV web UI.
$OKV_HOME/bin/okvutil upload -t WALLET -l SOFTWARE_WALLET_LOCATION -g TDE_WALLET

Enter source wallet password: KeystorePassword1

Enter Oracle Key Vault endpoint password: okvwallet

Upload succeeded
Example:
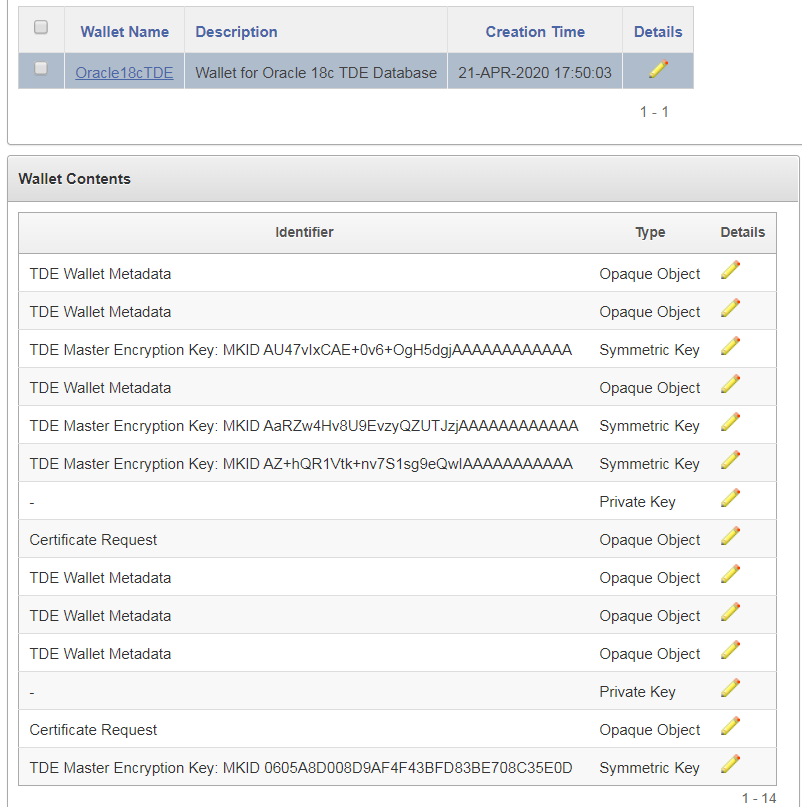
$OKV_HOME/bin/okvutil upload -t WALLET -l /opt/oracle/admin/CDB1/keystore-folder/tde/ -g TDE_WALLETThe Oracle Key Vault web UI shows some activity for a TDE Master Encryption Key:

-
In the OKV web UI, select Keys & Wallets, and navigate to the wallet that you created.
You should see all the security objects for the database in the virtual wallet.
If you cannot see them, then tick all of the items which have the owner / wallet membership of the Oracle 19c TDE database and select Save. You can now see all security objects for the database in this virtual wallet, including the TDE Master Encryption Keys.

Configure the TDE environment to start using the OKV wallet in the OKV system
Configure the TDE environment to start using the OKV system.
-
Set the keystore configuration to
OKV|FILE.ALTER SYSTEM SET TDE_CONFIGURATION = "KEYSTORE_CONFIGURATION=OKV|FILE" SCOPE=BOTH SID='*'; -
Show the wallet parameters.
SHOW PARAMETER WALLET_ROOT; SHOW PARAMETER TDE_CONFIGURATION; NAME TYPE VALUE ------------------------------------ ----------- -------------------------------------- wallet_root string /opt/oracle/admin/CDB1/keystore-folder NAME TYPE VALUE ------------------------------------ ----------- -------------------------------------- tde_configuration string KEYSTORE_CONFIGURATION=OKV|FILE -
Make sure that the OKV wallet points to
$OKV_HOME.If
$OKV_HOMEis not<wallet_root>/okv, make sure that<wallet_root>/okvexists by creating a link to it.In the example, <wallet_root is set to
/opt/oracle/admin/CDB1/keystore-folder% cd /opt/oracle/admin/CDB1/keystore-folder % ln -s $OKV_HOME okv -
Migrate from the software wallet to the OKV wallet:
ADMINISTER KEY MANAGEMENT SET ENCRYPTION KEY IDENTIFIED BY "okvwallet" MIGRATE USING "KeystorePassword1" WITH BACKUP; keystore altered. -
Check that you can see the encrypted table content in plaintext.
If you can see tables in plaintext, the TDE is working with OKV.
-
Set the Keystore configuration to OKV.
ALTER SYSTEM SET TDE_CONFIGURATION = "KEYSTORE_CONFIGURATION=OKV" SCOPE=BOTH SID='*'; -
Remove the software wallet keystore
% cd /opt/oracle/admin/CDB1/keystore-folder/ % mv tde tde.removed -
Check that you can see the encrypted table content in plaintext.
If you can see tables in plaintext, the TDE is working with OKV.