Procedures
Install docker
On the RedHat Linux Server, install docker.
-
Make sure system is up to date.
% sudo yum update -
Remove Older Docker Versions.
If you have any older versions of Docker installed, it’s essential to remove them along with their associated dependencies. Use the following command to uninstall older Docker packages:
% sudo yum remove docker \ docker-client \ docker-client-latest \ docker-common \ docker-latest \ docker-latest-logrotate \ docker-logrotate \ docker-engine -
Install Required Dependencies.
To prepare your system for Docker installation, install the necessary dependencies:
% sudo yum install -y yum-utils device-mapper-persistent-data lvm2 -
Add Docker Repository.
Next, you need to add the official Docker repository to your system:
% sudo yum-config-manager --add-repo https://download.docker.com/linux/centos/docker-ce.repo -
Install Docker.
With the repository added, you’re now ready to install Docker:
% sudo yum install docker-ce -
Start and Enable Docker.
After the installation is complete, start the Docker service and enable it to start on boot:
% sudo systemctl start docker % sudo systemctl enable docker -
Verify Docker Installation.
Confirm that Docker is installed and running by checking its version:
% sudo docker --version -
Test Docker with a Hello World Container.
Test your Docker installation by running a "Hello World" container:
% sudo docker run hello-world -
Managing Docker as a Non-root User.
To avoid using the
sudocommand with every Docker command, you can add your user to thedockergroup:% sudo usermod -aG docker <your_userid> -
Reboot the system for the changes to take effect.
Install k3s
We will use k3s environment to deploy our Kubernetes cluster to demonstrate this integration. It is up to the user to select and use the best Kubernetes environment of choice for a Kubernetes cluster. You can find information on how to deploy a k3s Kubernetes cluster here: https://k3s.io/.
On the RedHat Linux Server, install the Kubernetes Cluster.
-
Install the latest k3s release.
To install the latest k3s stable release do the following:
% curl -sfL https://get.k3s.io | sh - [INFO] Finding release for channel stable [INFO] Using v1.30.4+k3s1 as release [INFO] Downloading hash https://github.com/k3s-io/k3s/releases/download/v1.30.4+k3s1/sha256sum-amd64.txt [INFO] Downloading binary https://github.com/k3s-io/k3s/releases/download/v1.30.4+k3s1/k3s [INFO] Verifying binary download [INFO] Installing k3s to /usr/local/bin/k3s [INFO] Finding available k3s-selinux versions Updating Subscription Management repositories. Rancher K3s Common (stable) 3.3 kB/s | 1.3 kB 00:00 Dependencies resolved. ===================================================================================================================================================================================================== Package Architecture Version Repository Size ===================================================================================================================================================================================================== Installing: k3s-selinux noarch 1.5-1.el9 rancher-k3s-common-stable 22 k Transaction Summary ===================================================================================================================================================================================================== Install 1 Package Total download size: 22 k Installed size: 96 k Downloading Packages: k3s-selinux-1.5-1.el9.noarch.rpm 68 kB/s | 22 kB 00:00 ----------------------------------------------------------------------------------------------------------------------------------------------------------------------------------------------------- Total 68 kB/s | 22 kB 00:00 Rancher K3s Common (stable) 35 kB/s | 2.4 kB 00:00 Importing GPG key 0xE257814A: Userid : "Rancher (CI) <ci@rancher.com>" Fingerprint: C8CF F216 4551 26E9 B9C9 18BE 925E A29A E257 814A From : https://rpm.rancher.io/public.key Key imported successfully Running transaction check Transaction check succeeded. Running transaction test Transaction test succeeded. Running transaction Preparing : 1/1 Running scriptlet: k3s-selinux-1.5-1.el9.noarch 1/1 Installing : k3s-selinux-1.5-1.el9.noarch 1/1 Running scriptlet: k3s-selinux-1.5-1.el9.noarch 1/1 Verifying : k3s-selinux-1.5-1.el9.noarch 1/1 Installed products updated. Installed: k3s-selinux-1.5-1.el9.noarch Complete! [INFO] Creating /usr/local/bin/kubectl symlink to k3s [INFO] Creating /usr/local/bin/crictl symlink to k3s [INFO] Skipping /usr/local/bin/ctr symlink to k3s, command exists in PATH at /usr/bin/ctr [INFO] Creating killall script /usr/local/bin/k3s-killall.sh [INFO] Creating uninstall script /usr/local/bin/k3s-uninstall.sh [INFO] env: Creating environment file /etc/systemd/system/k3s.service.env [INFO] systemd: Creating service file /etc/systemd/system/k3s.service [INFO] systemd: Enabling k3s unit Created symlink /etc/systemd/system/multi-user.target.wants/k3s.service → /etc/systemd/system/k3s.service. [INFO] systemd: Starting k3s -
Set up
KUBECONFIGfor the user:% export KUBECONFIG=~/.kube/config % mkdir ~/.kube 2> /dev/null % sudo /usr/local/bin/k3s kubectl config view --raw > "$KUBECONFIG" % chmod 600 "$KUBECONFIG"You may want to put this in your profile so when you login into the server it gets set:
export KUBECONFIG=~/.kube/config -
Check the cluster.
% kubectl get nodes NAME STATUS ROLES AGE VERSION redhat-9-kcv-secrets Ready control-plane,master 9m29s v1.30.4+k3s1 -
Test the server connection.
Run the following command and notice the server attribute:
% kubectl config view

apiVersion: v1
clusters:
- cluster:
    certificate-authority-data: DATA+OMITTED
    server: https://127.0.0.1:6443
  name: default
contexts:
- context:
    cluster: default
    user: default
  name: default
current-context: default
kind: Config
preferences: {}
users:
- name: default
  user:
    client-certificate-data: DATA+OMITTED
    client-key-data: DATA+OMITTED
The server* attribute is set to:
server: https://127.0.0.1:6443The KeyControl node will need access to that URL. Since it is using the localhost IP address, you can just replace that with the server IP address. Now open a browser and attempt to connect to that url. In our case:
https://1X.19X.14X.XXX:6443Attempt the connection from another server in the same subnet as the KeyControl nodes. If you can’t connect, the port may be blocked by the firewall.
Open port 6443 on the firewall in the server:
% sudo firewall-cmd --zone=public --add-port=6443/tcp --permanent

success

% sudo firewall-cmd --reload

success
Test the connection again.
Some VPN blocks access to port 6443. Make sure you test the connect from a server that will not use a VPN.
Deploy the KeyControl vault cluster
For this integration, KeyControl Vault is deployed as a two-node cluster.
Follow the installation and setup instructions in KeyControl Vault Installation and Upgrade Guide.
Create a secrets vault to be used with Kubernetes
-
Sign in to the KeyControl Vault Manager.
-
In the home page, select Create Vault.
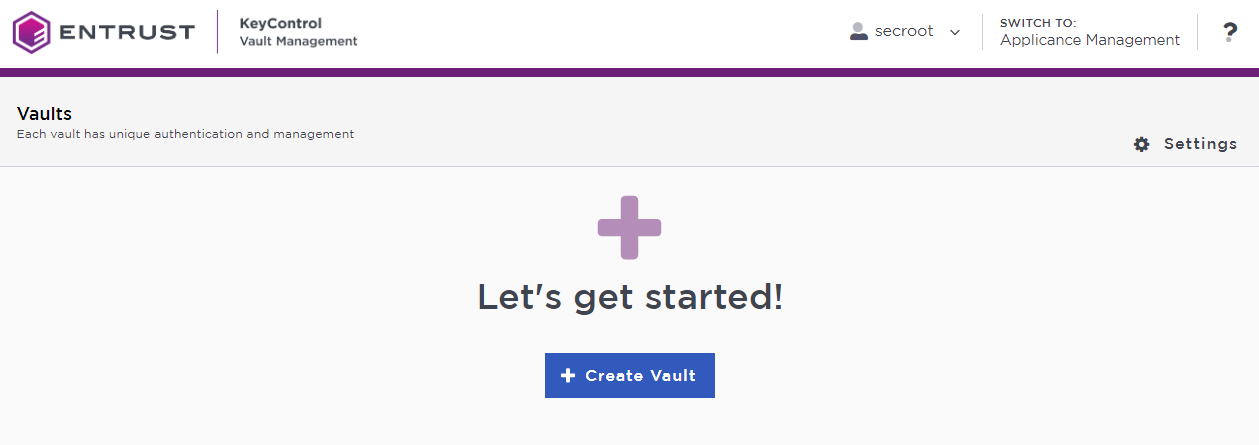
The Create Vault dialog appears.
-
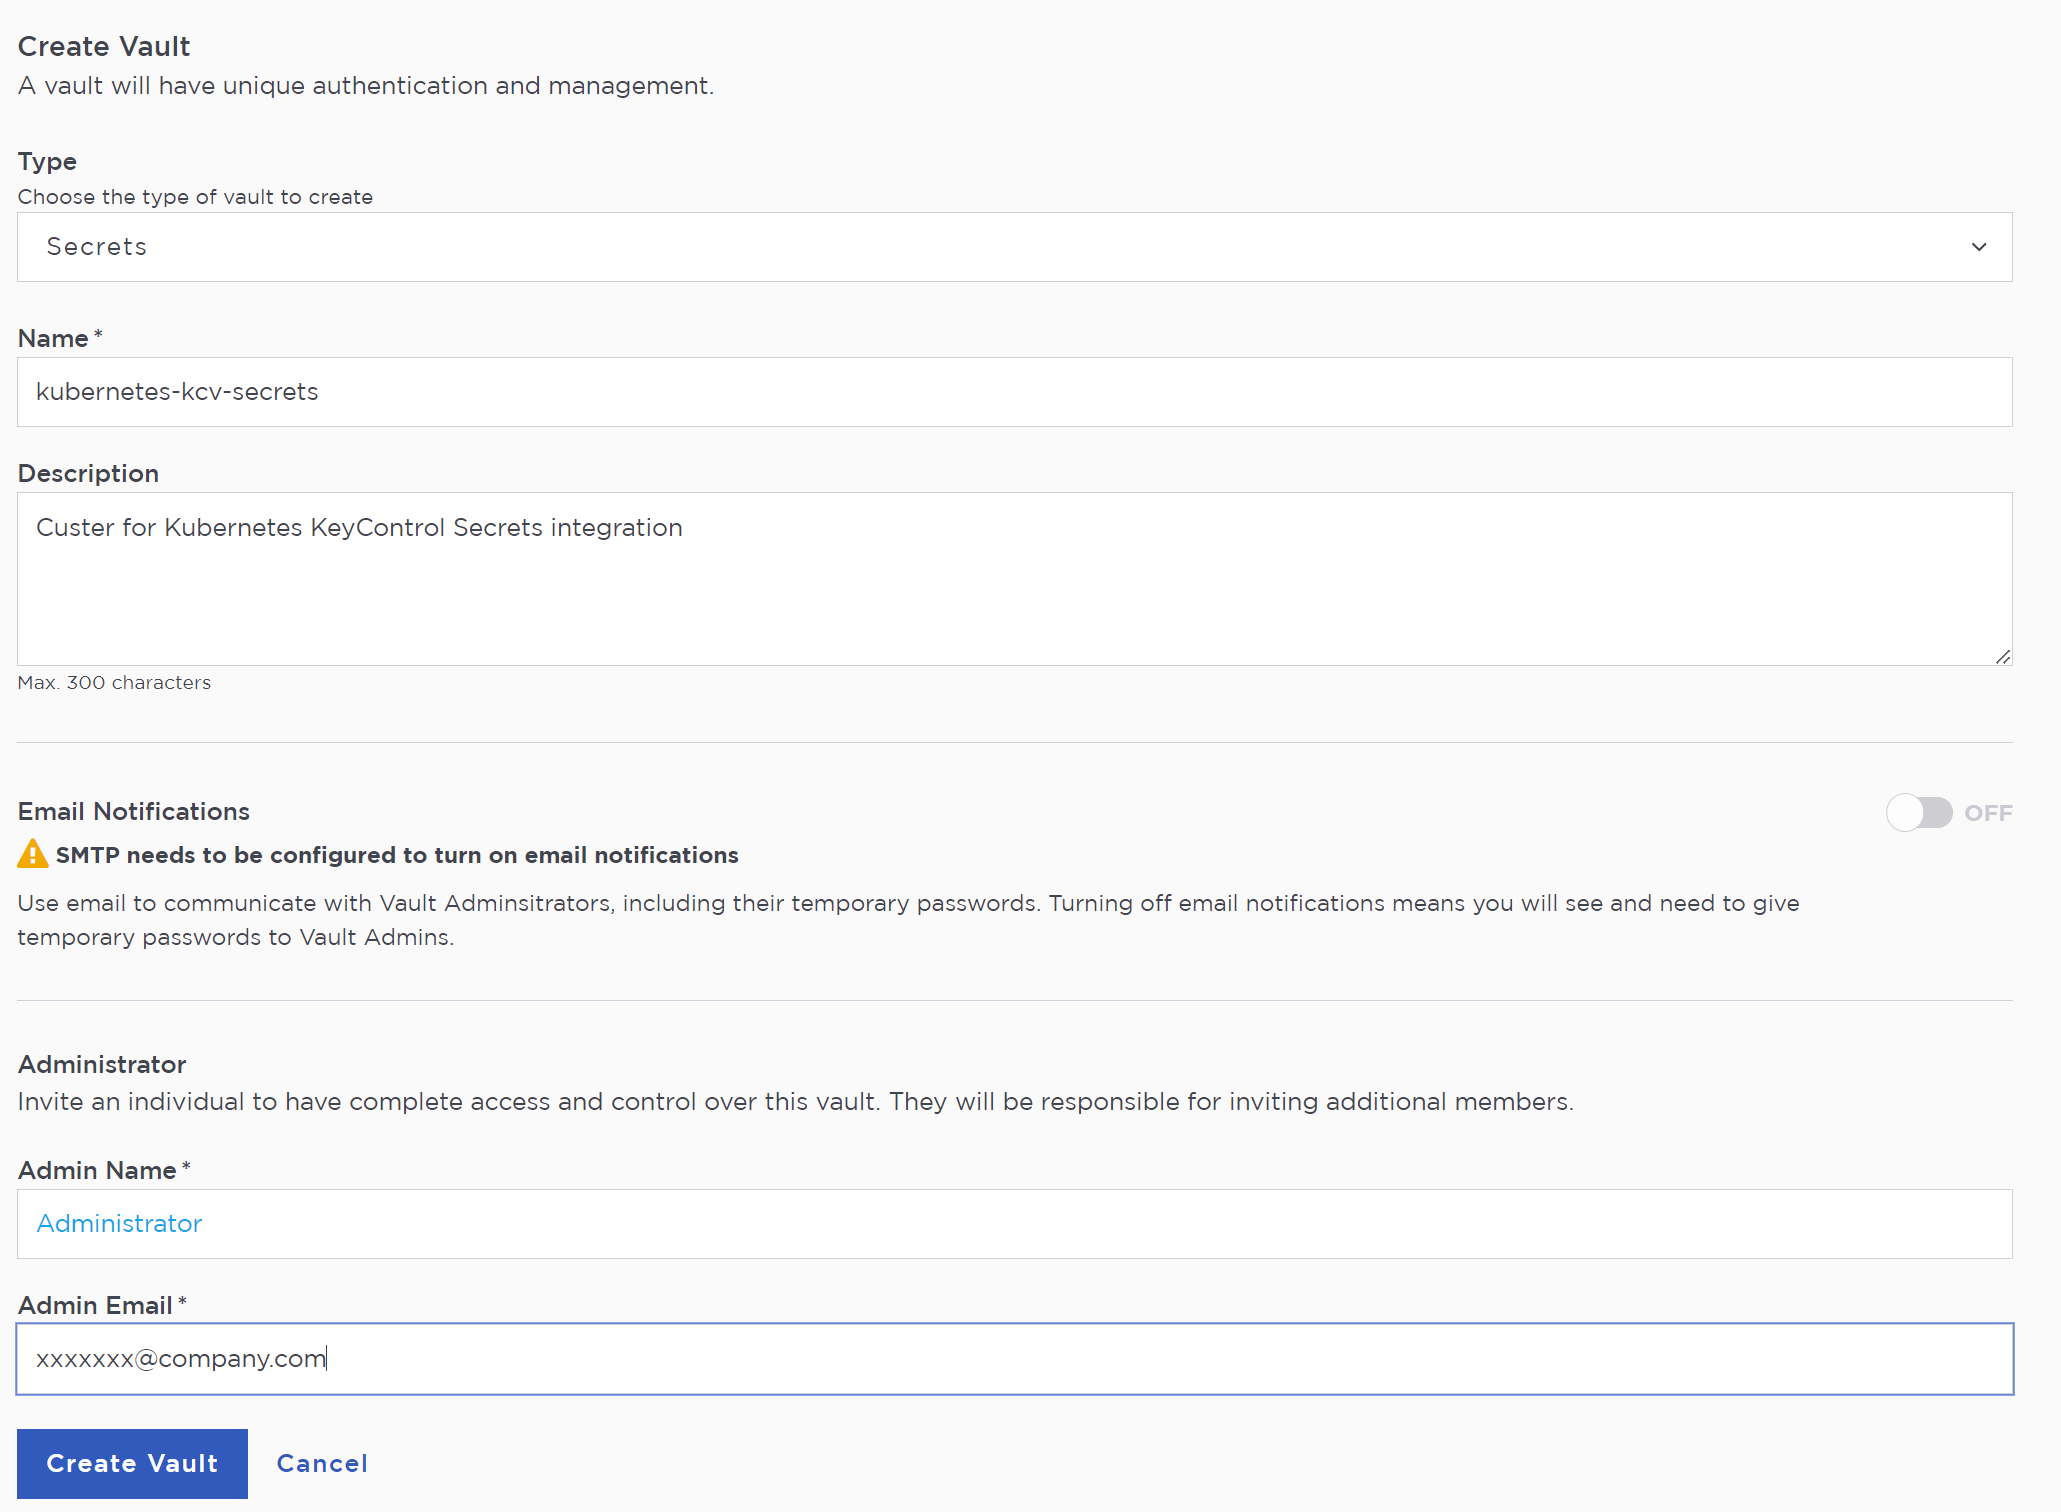
In the Type drop-down box, select Secrets. Enter the required information.
-
Select Create Vault.
For example:
-
When you receive an email with a URL and sign-in credentials to the KeyControl vault, bookmark the URL and save the credentials.
You can also copy the sign-in credentials when the vault details are displayed.
-
Sign in to the URL provided.
-
Change the initial password when prompted.
Create a secret in the secrets vault
After you sign in to the secrets vault, create a box that will contain the secret.
-
Select Manage in the Secrets Vault Home tab, then select Manage Boxes.
-
In the Manage Boxes Tab, select Add a Box Now.
-
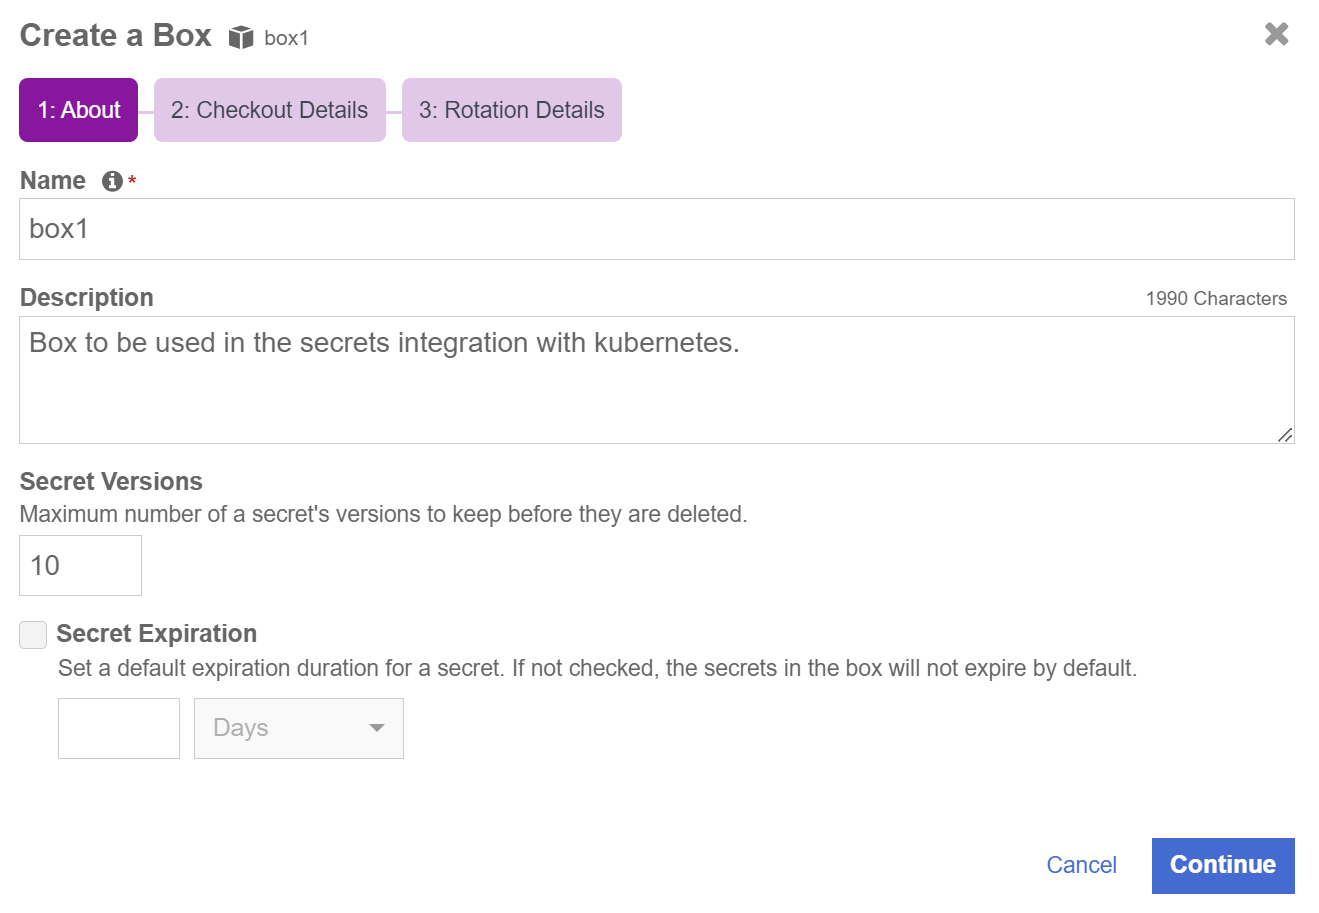
In the Create a Box Window, enter the Name and Description.
In this integration guide and the configuration file examples it contains, the box will be named box1.
-
Select Continue.
-
In Checkout Details, select Continue.
-
In Rotation Details, select Create. The box gets created.
-
Select the new box.
-
In the Secrets Pane, select Add a Secret Now.
-
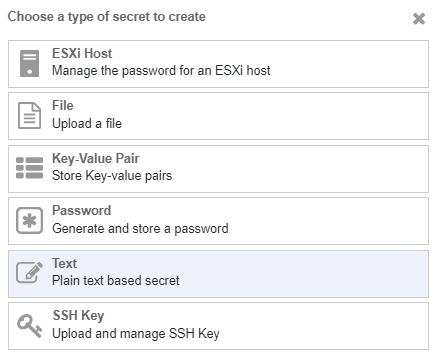
From the Choose a type of secret to create list, select Text.
-
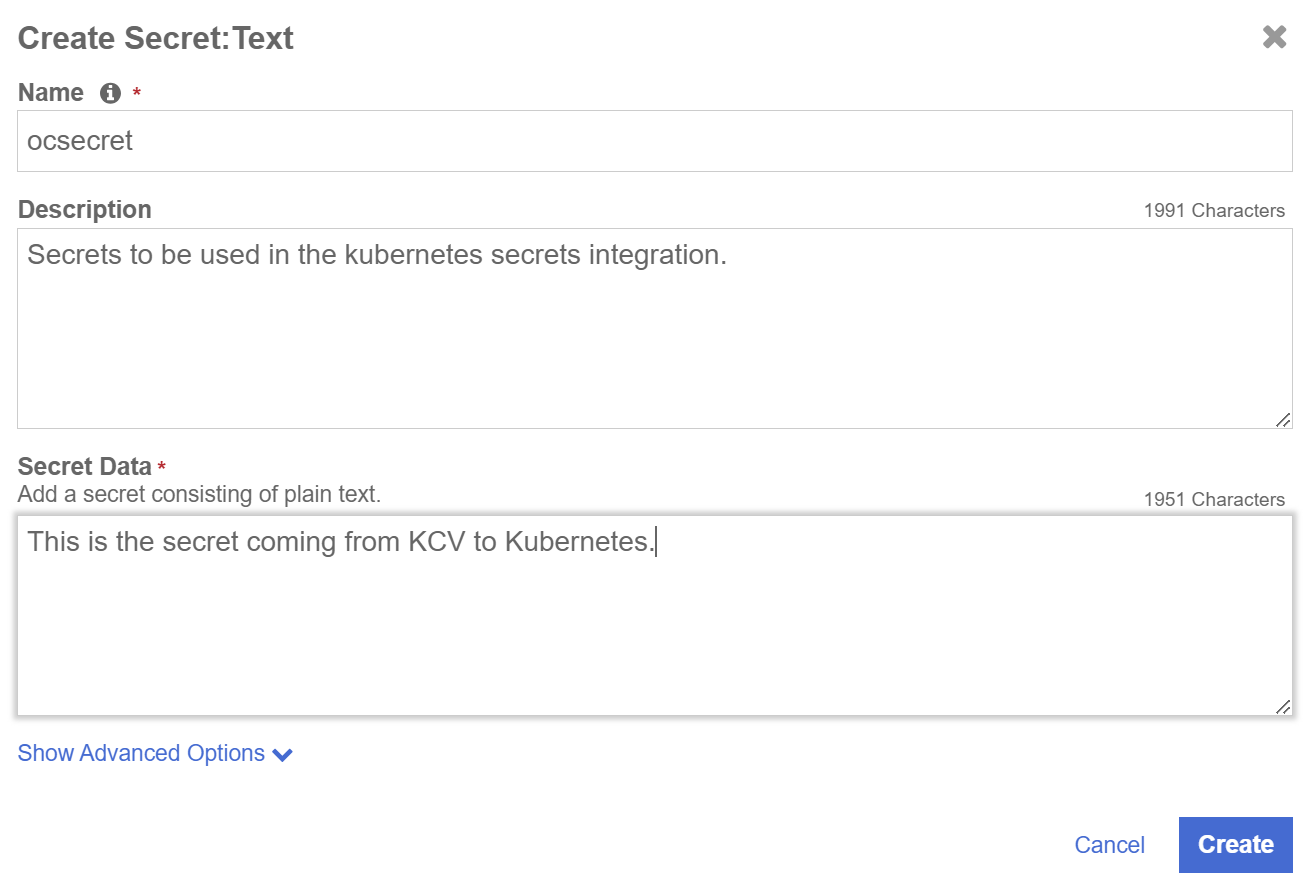
In the Create Secret: Text window, enter the following:
-
Name: Enter the name of the secret. This will be used later in configuration files in this integration.
-
Description: Enter a brief description.
-
Secret Data: Enter the value of the secret. This is the value the Kubernetes containers will try to retrieve during the integration.
-
-
Select Create.
Set up and configure the integration environment
From this point on, all setup and configuration will be done from the Linux server that you configured earlier.
Set up KUBECONFIG
This should give you access to the Kubernetes cluster.
% export KUBECONFIG=~/.kube/configCheck that you can see the Kubernetes cluster nodes:
% kubectl get nodes

NAME                   STATUS   ROLES                  AGE    VERSION
redhat-9-kcv-secrets   Ready    control-plane,master   2d2h   v1.30.4+k3s1
Set up namespaces
The integration will use two namespaces in Kubernetes.
-
Set up the mutating webhook namespace.
-
Create a
yamlfile containing the following code:apiVersion: v1 kind: Namespace metadata: name: mutatingwebhook -
Name the file
mutatingwebhooknamespace.yaml -
Create the namespace:
% kubectl create -f mutatingwebhooknamespace.yaml
-
-
Set up the test namespace.
-
Create a yaml file containing the following code:
apiVersion: v1 kind: Namespace metadata: name: testnamespace -
Name the file
testnamespace.yaml. -
Create the namespace:
% kubectl create -f testnamespace.yaml
-
Register Docker container images with the Docker registry
Register some of the Docker container images to a Docker registry so they can be used inside the Kubernetes cluster.
-
Set up
DOCKER_CONFIGExport
DOCKER_CONFIGto the directory where your docker configuration will be stored:% export DOCKER_CONFIG=~/.docker -
Log in to the registry:
% docker login -u YOURUSERID <registry-url> -
Deploy the init container image.
The
initcontainer image needs to be deployed to the Docker registry.Download the init container image:
% wget https://github.com/EntrustCorporation/PASM-Vault-Kubernetes-Agent/releases/download/v1.0/init-container.tar -
Load the provided image
init-container.tarinto the Docker registry:% docker load --input init-container.tar -
Check the image:
% docker images REPOSITORY TAG IMAGE ID CREATED SIZE localhost/init-container latest 1c476f57b72c 10 months ago 186 MB -
Tag the image:
% docker tag localhost/init-container:latest <registry-url>/init-container -
Push the image into the Docker registry that is used within Kubernetes:
% docker push <registry-url>/init-container:latest -
Deploy the mutating webhook image.
The webhook code is in the form of image and needs to be deployed as container. It needs to be deployed to the Docker registry.
Download the webhook container image:
% wget https://github.com/EntrustCorporation/PASM-Vault-Kubernetes-Agent/releases/download/v1.0/mutating-webhook.tar -
Load the provided image
mutating-webhook.tarinto the Docker registry:% docker load --input mutating-webhook.tar -
Check the image:
% docker images REPOSITORY TAG IMAGE ID CREATED SIZE localhost/mutating-webhook latest 805efa734095 10 months ago 222 MB -
Tag the image:
% docker tag localhost/mutating-webhook:latest <registry-url>/mutating-webhook -
Push the image into the Docker registry that is used within Kubernetes:
% docker push <registry-url>/mutating-webhook:latest
Get the secrets vault authentication token for the vault admin user
-
Sign in to the secrets vault as admin using the KeyControl Vault Rest API and get the vault authentication token.
https://<VAULT-IP>/vault/1.0/Login/<VAULT-UUID>This URL is visible on vault management UI of the KeyControl. Also note the
VAULT-UUIDfrom the URL. This will be required in further steps.Here is an example:
https://xx.xxx.xxx.xxx/vault/1.0/Login/d86e3c22-6563-45b4-bfb9-45ba6c911ec8The request body should be in the form:
{
 "username":"admin",
 "password":"password"
}
The
usernameshould be one of the administrators of the vault. The examples usesadmin, but this should be the actual admin user name. -
Get the token using the following curl command:
% curl -k -X POST https://xx.xxx.xxx.xxx/vault/1.0/Login/d86e3c22-6563-45b4-bfb9-45ba6c911ec8/ -d '{ "username": "admin", "password":"xxxxxxx" }'The response body for the command above should be similar to this:
{ "is_user": false, "box_admin": false, "appliance_id": "bc1a085c-70c9-476c-b4f6-abff0c73cce4", "is_secondary_approver": false, "access_token": "ZDg2ZTNjMjItNjU2My00NWI0LWJmYjktNDViYTZjOTExZWM4.eyJkYXRhIjoiU0ZSWFVBRUFKbktGNXNnWlBRSGJQNEQ3T2xTR2NXUHM2aVdqdzVJN21jRythdXZ5NUhIQjZYQ0tPRG9iK0FGcjRsSjNDZm1oZGZZbVc4aUt5aEtENmgydnlRQUFBQ1FBQUFBYkxndE9LcE1mTDIyK1JzQXQ4ZVlYanRyQ3QrL2JBWFU0OFNYZGx4YVd1Qjl6N3RvYk8xRDhPOVZlbFFWdkZKenNIU3F6OXQ5VHd1TVhtMHNUMk11bjB0clRSakdDOUsva1VQdXRMMUxDT2dXK00xd0ZSM1BUZjZTbGZoZ3BUc3IwVjJCcEVPL3FRME1LaHVucUNiRUNjVldJNkVIbDQrWER0WUNiYzVCYTl5NWpqR0NVSHRFa2trcXdjQjBiTjl0SVBoSitCcnU5ZjVqV3I0ZUFvNW5ZQ1U4d3VKZmRqYkMvTWJ3R3RsNGpxSzRERnlwRVFzQUk5bGdRM3Nvcm0wKzNlQjBKb0pWQ00wVTJZakZsWVRNM1pDMWlaVEF4TFRRd1pqVXRZV1l4TnkxaE5tTXpNek5rTlRVNU9UWT0iLCJzcGVjIjoxLCJpZCI6IjZiMWVhMzdkLWJlMDEtNDBmNS1hZjE3LWE2YzMzM2Q1NTk5NiJ9", "expires_at": "2024-09-03T19:08:52.175191Z", "admin": true, "user": "admin" } -
Copy the token received in the response body in the field
access_token.This is required when executing APIs described in further steps and is referred to as Vault Authentication Token. The
access_tokenfield will be used in thecurlheaders from now on for the rest of the configuration calls. For example:curl -H "X-Vault-Auth: ZDg2ZTNjMjItNjU2My00NWI0LWJmYjktNDViYTZjOTExZWM4.eyJkYXRhIjoiU0ZSWFVBRUFKbktGNXNnWlBRSGJQNEQ3T2xTR2NXUHM2aVdqdzVJN21jRythdXZ5NUhIQjZYQ0tPRG9iK0FGcjRsSjNDZm1oZGZZbVc4aUt5aEtENmgydnlRQUFBQ1FBQUFBYkxndE9LcE1mTDIyK1JzQXQ4ZVlYanRyQ3QrL2JBWFU0OFNYZGx4YVd1Qjl6N3RvYk8xRDhPOVZlbFFWdkZKenNIU3F6OXQ5VHd1TVhtMHNUMk11bjB0clRSakdDOUsva1VQdXRMMUxDT2dXK00xd0ZSM1BUZjZTbGZoZ3BUc3IwVjJCcEVPL3FRME1LaHVucUNiRUNjVldJNkVIbDQrWER0WUNiYzVCYTl5NWpqR0NVSHRFa2trcXdjQjBiTjl0SVBoSitCcnU5ZjVqV3I0ZUFvNW5ZQ1U4d3VKZmRqYkMvTWJ3R3RsNGpxSzRERnlwRVFzQUk5bGdRM3Nvcm0wKzNlQjBKb0pWQ00wVTJZakZsWVRNM1pDMWlaVEF4TFRRd1pqVXRZV1l4TnkxaE5tTXpNek5rTlRVNU9UWT0iLCJzcGVjIjoxLCJpZCI6IjZiMWVhMzdkLWJlMDEtNDBmNS1hZjE3LWE2YzMzM2Q1NTk5NiJ9" ...
Configure the Kubernetes cluster with the KeyControl secrets vault
To configure a Kubernetes cluster in the KeyControl vault, the following API needs to be executed.
https://<VAULT-IP>/vault/1.0/SetK8sConfigurationThe headers must have the vault authentication token, X-Vault-Auth*: <VAULT-AUTHENTICATION-TOKEN>.
The request body should be in the form:
{
 // URL of the Kubernetes API server (or Loadbalancer if one is setup in front of
 // control plane) along with port. This URL must be accessible by PASM vault.
 // If Cluster is behind a service mesh, a proper ingress should be configured
 // so that API server is accessible.
 "k8s_url": "https://<KC-ACCESSIBLE-IP>/<FQDN of K8s API server>:6443",

 // Base64 encoded string of the certificate presented by API server during SSL handshake
 "k8s_ca_string": "<BASE64-ENCODED-CA-STRING>",

 // Indicates whether this configuration should be enabled or not. Valid values
 // are 'enabled' or 'disabled'. If the value is 'disabled', then "k8s_url" and
 // "k8s_ca_string" won't be validated and won't be saved in the configuration.
 "k8s_status": "enabled",
}
The certificate string can be obtained from the kube config file (~/.kube/config):
% cat ~/.kube/config

apiVersion: v1
clusters:
- cluster:
    certificate-authority-data: LS0tLS1CRUdJTiBDRVJUSUZJQ0FURS0tLS0tCk1JSUJlRENDQVIyZ0F3SUJBZ0lCQURBS0JnZ3Foa2pPUFFRREFqQWpNU0V3SHdZRFZRUUREQmhyTTNNdGMyVnkKZG1WeUxXTmhRREUzTWpVME5EZzJOekF3SGhjTk1qUXdPVEEwTVRFeE56VXdXaGNOTXpRd09UQXlNVEV4TnpVdwpXakFqTVNFd0h3WURWUVFEREJock0zTXRjMlZ5ZG1WeUxXTmhRREUzTWpVME5EZzJOekF3V1RBVEJnY3Foa2pPClBRSUJCZ2dxaGtqT1BRTUJCd05DQUFUQzFGNE1uQTMzb3RpcERCT2V2M1ltV1BpRmc4QUtVV2U3MkhFRXNUdFUKbE5mSStLMmVOalh0MVZkREhrZ1ZUQUZ5Q0VIRDhIbmtYU2F5YUhWUnZONThvMEl3UURBT0JnTlZIUThCQWY4RQpCQU1DQXFRd0R3WURWUjBUQVFIL0JBVXdBd0VCL3pBZEJnTlZIUTRFRmdRVTU2bERZK2ZiL2xvck5MdlBpWGZ2CjJIK1V4dW93Q2dZSUtvWkl6ajBFQXdJRFNRQXdSZ0loQUxrU1Z4M2I1ell3YzFuRlBUNzVMcTJpMGZ2UEhMRWsKbm5qRk1VOFp3d2VoQWlFQXh1K2NjZlQ1VC9pbmVMUW1KaERIcmlHVjRRTDBUbmVKVTRqcmVDaHpvcVU9Ci0tLS0tRU5EIENFUlRJRklDQVRFLS0tLS0K
    server: https://127.0.0.1:6443
  name: default
contexts:
- context:
    cluster: default
    user: default
  name: default
current-context: default
kind: Config
preferences: {}
users:
- name: default
  user:
    client-certificate-data: LS0tLS1CRUdJTiBDRVJUSUZJQ0FURS0tLS0tCk1JSUJrRENDQVRlZ0F3SUJBZ0lJUUM5QWRSdlZ4dWN3Q2dZSUtvWkl6ajBFQXdJd0l6RWhNQjhHQTFVRUF3d1kKYXpOekxXTnNhV1Z1ZEMxallVQXhOekkxTkRRNE5qY3dNQjRYRFRJME1Ea3dOREV4TVRjMU1Gb1hEVEkxTURrdwpOREV4TVRjMU1Gb3dNREVYTUJVR0ExVUVDaE1PYzNsemRHVnRPbTFoYzNSbGNuTXhGVEFUQmdOVkJBTVRESE41CmMzUmxiVHBoWkcxcGJqQlpNQk1HQnlxR1NNNDlBZ0VHQ0NxR1NNNDlBd0VIQTBJQUJCdW54clR2cC9XNDdTVkEKWU1kdmEwckhaQ09kb0dLSUZHN0hKQU1KSzdIN1FSV28xeG0ycHVpN3pwSUNmQUc2N2I1bUJ1NVJzZFRENTBFUgp4ZGxzaTRDalNEQkdNQTRHQTFVZER3RUIvd1FFQXdJRm9EQVRCZ05WSFNVRUREQUtCZ2dyQmdFRkJRY0RBakFmCkJnTlZIU01FR0RBV2dCUVlvQVRyQ1BKYkRpejJacTJTay80MXFESjB1VEFLQmdncWhrak9QUVFEQWdOSEFEQkUKQWlCVUQyWHBMM3k0NW8rbVlGZXAvSzQ5cDdVVW41RS85LyttRkRERVdQaXRFQUlnRDlPVDREdFFrMFdQMHkyMQpiMCtaajdIcmF3WDBaeDh1MTNPVjJKdUdhbUU9Ci0tLS0tRU5EIENFUlRJRklDQVRFLS0tLS0KLS0tLS1CRUdJTiBDRVJUSUZJQ0FURS0tLS0tCk1JSUJkakNDQVIyZ0F3SUJBZ0lCQURBS0JnZ3Foa2pPUFFRREFqQWpNU0V3SHdZRFZRUUREQmhyTTNNdFkyeHAKWlc1MExXTmhRREUzTWpVME5EZzJOekF3SGhjTk1qUXdPVEEwTVRFeE56VXdXaGNOTXpRd09UQXlNVEV4TnpVdwpXakFqTVNFd0h3WURWUVFEREJock0zTXRZMnhwWlc1MExXTmhRREUzTWpVME5EZzJOekF3V1RBVEJnY3Foa2pPClBRSUJCZ2dxaGtqT1BRTUJCd05DQUFUVlFicGRhZ0hnU2REVDFjcWVSNy8zZTN5b21RL1ZJVXRwNnFiVmQxVG0KbFhneXB6NmluMXBEMjd0Rk1ZczhxOE0xZEx6YzdGMDNRVnN0Q0lGMzU4aC9vMEl3UURBT0JnTlZIUThCQWY4RQpCQU1DQXFRd0R3WURWUjBUQVFIL0JBVXdBd0VCL3pBZEJnTlZIUTRFRmdRVUdLQUU2d2p5V3c0czltYXRrcFArCk5hZ3lkTGt3Q2dZSUtvWkl6ajBFQXdJRFJ3QXdSQUlnWUlHQUI0TzRiQjhBR3lhRGxNQlpjdGNXSG9DZXJZemoKcWU1U09PQmtYVXdDSUNtVDBPREF0RUVIeldmcTQ4aFdiT0FldmU5anppcGgwTXR3UmoyS2tmZmQKLS0tLS1FTkQgQ0VSVElGSUNBVEUtLS0tLQo=
    client-key-data: LS0tLS1CRUdJTiBFQyBQUklWQVRFIEtFWS0tLS0tCk1IY0NBUUVFSUtWdHlza1UvSEx3Y3VHS2RpWVZMOW5uOC9NRVh6ZEJFVVRMNW1QbVpxT3lvQW9HQ0NxR1NNNDkKQXdFSG9VUURRZ0FFRzZmR3RPK245Ymp0SlVCZ3gyOXJTc2RrSTUyZ1lvZ1Vic2NrQXdrcnNmdEJGYWpYR2JhbQo2THZPa2dKOEFicnR2bVlHN2xHeDFNUG5RUkhGMld5TGdBPT0KLS0tLS1FTkQgRUMgUFJJVkFURSBLRVktLS0tLQo=
Look at the certificate-authority-data attribute. It contains the base64 encoded certificate string needed for the configuration.
Now look at the server attribute. This is the field that we are going to use to get to the needed k8s_url.
This attribute content is https://127.0.0.1:6443.
Replace the 127.0.0.1 in the URL with the IP address of the server. This URL needs to be accessible from the KeyControl server. Make sure port 6443 is not blocked by the firewall. If using a VPN, make sure you can access the URL from a server on the same subnet as the KeyControl node.
The URL in our case is https://1X.19X.14X.XXX:6443.
You should get the following response:
{
  "kind": "Status",
  "apiVersion": "v1",
  "metadata": {},
  "status": "Failure",
  "message": "Unauthorized",
  "reason": "Unauthorized",
  "code": 401
}
The final request body:
{
 "k8s_url": "https://1X.19X.14X.XXX:6443",
 "k8s_ca_string": "<certificate-string>",
 "k8s_status": "enabled"
}
Save the request body in a file named SetK8sConfiguration.body and execute the following command:
% curl -H "X-Vault-Auth: ZDg2ZTNjMjItNjU2My00NWI0LWJmYjktNDViYTZjOTExZWM4.eyJkYXRhIjoiU0ZSWFVBRUFKbktGNXNnWlBRSGJQNEQ3T2xTR2NXUHM2aVdqdzVJN21jRythdXZ5NUhIQjZYQ0tPRG9iK0FGcjRsSjNDZm1oZGZZbVc4aUt5aEtENmgydnlRQUFBQ1FBQUFBYkxndE9LcE1mTDIyK1JzQXQ4ZVlYanRyQ3QrL2JBWFU0OFNYZGx4YVd1Qjl6N3RvYk8xRDhPOVZlbFFWdkZKenNIU3F6OXQ5VHd1TVhtMHNUMk11bjB0clRSakdDOUsva1VQdXRMMUxDT2dXK00xd0ZSM1BUZjZTbGZoZ3BUc3IwVjJCcEVPL3FRME1LaHVucUNiRUNjVldJNkVIbDQrWER0WUNiYzVCYTl5NWpqR0NVSHRFa2trcXdjQjBiTjl0SVBoSitCcnU5ZjVqV3I0ZUFvNW5ZQ1U4d3VKZmRqYkMvTWJ3R3RsNGpxSzRERnlwRVFzQUk5bGdRM3Nvcm0wKzNlQjBKb0pWQ00wVTJZakZsWVRNM1pDMWlaVEF4TFRRd1pqVXRZV1l4TnkxaE5tTXpNek5rTlRVNU9UWT0iLCJzcGVjIjoxLCJpZCI6IjZiMWVhMzdkLWJlMDEtNDBmNS1hZjE3LWE2YzMzM2Q1NTk5NiJ9" -k -X POST https://xx.xxx.xxx.xxx/vault/1.0/SetK8sConfiguration/ --data @./SetK8sConfiguration.bodyThe response should be:
{
  "Status": "Success",
  "Message": "Kubernetes configuration updated successfully"
}
Set the namespace
Before proceeding with the rest of the configuration, set the namespace in Kubernetes to the mutatingwebhook namespace created earlier.
% kubectl config set-context --current --namespace=mutatingwebhookCreate the registry secrets inside the namespace
The credentials for the external Docker registry access need to be created so they can be mentioned in the pod deployment specification.
-
Create the secret in the namespace:
% kubectl create secret generic regcred --from-file=.dockerconfigjson=$HOME/.docker/config.json --type=kubernetes.io/dockerconfigjson -
Confirm that the secret has been created:
% kubectl get secret regcred
Deploy the webhook container
Use the following yaml specification to deploy the webhook container in Kubernetes:
apiVersion: apps/v1
kind: Deployment
metadata:
  name: mutatingwebhook
  namespace: mutatingwebhook
  labels:
    app: mutatingwebhook
spec:
  replicas: 1
  selector:
    matchLabels:
      app: mutatingwebhook
  template:
    metadata:
      labels:
        app: mutatingwebhook
    spec:
      containers:
      - name: mutatingwebhook
        image: 1.2.3.4:5000/mutating-webhook:latest
        ports:
        - containerPort: 5000
        env:
        # Specify these variables either as a mutatingwebhook container environment variables or
        # add appropriate annotations in the pod specification. Refer documentation further to get
        # the details about annotations. The annotations in pod specifications, if specified, take
        # precedance over these environment variables.
        - name: ENTRUST_VAULT_IPS
          value: <comma-separated-list-of-vault-ips>
        - name: ENTRUST_VAULT_UUID
          value: <uuid-of-vault-from-which-secrets-to-be-fetched>
        - name: ENTRUST_VAULT_INIT_CONTAINER_URL
          value: <complete-url-of-init-container-image-from-image-registry>
If image registry requires authentication, then make sure to add the credentials as secret in the yaml specification by adding the imagePullSecrets tag in the containers section.
Save the yaml in a file called mutatingwebhook.yaml.
apiVersion: apps/v1
kind: Deployment
metadata:
  name: mutatingwebhook
  namespace: mutatingwebhook
  labels:
    app: mutatingwebhook
spec:
  replicas: 1
  selector:
    matchLabels:
      app: mutatingwebhook
  template:
    metadata:
      labels:
        app: mutatingwebhook
    spec:
      imagePullSecrets:
        - name: regcred                         # external registry secret created earlier
      containers:
      - name: mutatingwebhook
        image: >-
          <registry-url>/mutating-webhook
        ports:
        - containerPort: 5000
        env:
        # Specify these variables either as a mutatingwebhook container environment variables or
        # add appropriate annotations in the pod specification. Refer documentation further to get
        # the details about annotations. The annotations in pod specifications, if specified, take
        # precedance over these environment variables.
        - name: ENTRUST_VAULT_IPS
          value: 1x.19x.14x.20x,1x.19x.14x.21x
        - name: ENTRUST_VAULT_UUID
          value: d86e3c22-6563-45b4-bfb9-45ba6c911ec8
        - name: ENTRUST_VAULT_INIT_CONTAINER_URL
          value: <registry-url>/init-container
Pay attention to these sections and adjust according to your environment.
      imagePullSecrets:
        - name: regcred                         # external registry secret created earlier

        image: >-
          <registry-url>/mutating-webhook

        - name: ENTRUST_VAULT_IPS
          value: 1x.19x.14x.20x,1x.19x.14x.21x
        - name: ENTRUST_VAULT_UUID
          value: d86e3c22-6563-45b4-bfb9-45ba6c911ec8
        - name: ENTRUST_VAULT_INIT_CONTAINER_URL
          value: <registry-url>/init-container
Deploy the file:
% kubectl create -f mutatingwebhook.yamlCheck that the mutating webhook deployment is running:
% kubectl get pods
NAME                               READY   STATUS    RESTARTS   AGE
mutatingwebhook-7666fc54d7-jxs2s   1/1     Running   0          19s

% kubectl describe pod mutatingwebhook-7666fc54d7-jxs2s

Name:             mutatingwebhook-7666fc54d7-jxs2s
Namespace:        mutatingwebhook
Priority:         0
Service Account:  default
Node:             redhat-9-kcv-secrets/1X.19X.14X.XXX
Start Time:       Wed, 04 Sep 2024 09:42:51 -0400
Labels:           app=mutatingwebhook
                  pod-template-hash=7666fc54d7
Annotations:      <none>
Status:           Running
IP:               10.42.0.7
IPs:
  IP:           10.42.0.7
Controlled By:  ReplicaSet/mutatingwebhook-7666fc54d7
Containers:
  mutatingwebhook:
    Container ID:   containerd://49b07ac85063041fe772194dece7bb416965d13ebec2c74418d67bbd3a474a1a
    Image:          <registry-ulr>/mutating-webhook
    Image ID:       <registry-url>/mutating-webhook@sha256:d5379f9b116f725c1e34cda7f10cba2ef7ed369681a768fb985d098cd24f1b1d
    Port:           5000/TCP
    Host Port:      0/TCP
    State:          Running
      Started:      Wed, 04 Sep 2024 09:43:06 -0400
    Ready:          True
    Restart Count:  0
    Environment:
      ENTRUST_VAULT_IPS:                 1X.19X.14X.XXX,1X.19X.14X.XXX
      ENTRUST_VAULT_UUID:                d86e3c22-6563-45b4-bfb9-45ba6c911ec8
      ENTRUST_VAULT_INIT_CONTAINER_URL:  <registry-url>/init-container
    Mounts:
      /var/run/secrets/kubernetes.io/serviceaccount from kube-api-access-trrn7 (ro)
Conditions:
  Type                        Status
  PodReadyToStartContainers   True
  Initialized                 True
  Ready                       True
  ContainersReady             True
  PodScheduled                True
Volumes:
  kube-api-access-trrn7:
    Type:                    Projected (a volume that contains injected data from multiple sources)
    TokenExpirationSeconds:  3607
    ConfigMapName:           kube-root-ca.crt
    ConfigMapOptional:       <nil>
    DownwardAPI:             true
QoS Class:                   BestEffort
Node-Selectors:              <none>
Tolerations:                 node.kubernetes.io/not-ready:NoExecute op=Exists for 300s
                             node.kubernetes.io/unreachable:NoExecute op=Exists for 300s
Events:
  Type    Reason     Age   From               Message
  ----    ------     ----  ----               -------
  Normal  Scheduled  67s   default-scheduler  Successfully assigned mutatingwebhook/mutatingwebhook-7666fc54d7-jxs2s to redhat-9-kcv-secrets
  Normal  Pulling    67s   kubelet            Pulling image "<registry-url>/mutating-webhook"
  Normal  Pulled     52s   kubelet            Successfully pulled image "<registry-url>/mutating-webhook" in 14.716s (14.716s including waiting). Image size: 86935850 bytes.
  Normal  Created    52s   kubelet            Created container mutatingwebhook
  Normal  Started    52s   kubelet            Started container mutatingwebhook
Deploy the entrust-pasm service
-
Create a
yamlfile namedentrustpasmservice.yamlthat contains the following code:apiVersion: v1 kind: Service metadata: name: entrust-pasm # DO NOT CHANGE THIS namespace: mutatingwebhook # DO NOT CHANGE THIS spec: selector: app: mutatingwebhook ports: - protocol: TCP port: 5000 targetPort: 5000 -
Run the following command to create the service:
% kubectl create -f entustpasmservice.yaml -
Check the service:
% kubectl get service

NAME           TYPE        CLUSTER-IP     EXTERNAL-IP   PORT(S)    AGE
entrust-pasm   ClusterIP   10.43.26.173   <none>        5000/TCP   9s
Obtain the webhook server certificate
After the container is deployed, obtain the webhook server certificate. This certificate will be needed to configure the webhook in Kubernetes. Use the following command:
% kubectl exec -it -n mutatingwebhook $(kubectl get pods --no-headers -o custom-columns=":metadata.name" -n mutatingwebhook) -- wget -q -O- localhost:8080/ca.pemThe output should be something like this:
LS0tLS1CRUdJTiBDRVJUSUZJQ0FURS0tLS0tCk1JSUZTekNDQXpPZ0F3SUJBZ0lVRUFiWFlYazZHVUVJM2lrUGZQbnp4MVRMRjdVd0RRWUpLb1pJaHZjTkFRRUwKQlFBd1FERXhNQzhHQTFVRUF3d29TSGxVY25WemRDQkxaWGxEYjI1MGNtOXNJRU5sY25ScFptbGpZWFJsSUVGMQpkR2h2Y21sMGVURUxNQWtHQTFVRUJoTUNWVk13SGhjTk1qUXdPREkzTVRjeU1ERTNXaGNOTXpRd09ESTFNVGN5Ck1ERTNXakJBTVRFd0x3WURWUVFERENoSWVWUnlkWE4wSUV0bGVVTnZiblJ5YjJ3Z1EyVnlkR2xtYVdOaGRHVWcKUVhWMGFHOXlhWFI1TVFzd0NRWURWUVFHRXdKVlV6Q0NBaUl3RFFZSktvWklodmNOQVFFQkJRQURnZ0lQQURDQwpBZ29DZ2dJQkFMTlVMQk5KVVVzYU1nSHlrR3hHOWcvdFBtZXdFTi9DODVlSFJjMmREOHZyZndiNkZ5dFg3UG1BCnRhSVliMmJ4OUdTaldXVFlNNXlPL0g5WkY5L3BjUmJuYkdaNFBMTzBGdG1vM2FicCszRVJjTENWREZCamszQlcKTW9hOWQ1VVBkU2kzYnFBdGFrT2xFZHdOQ2ZvSWhlMDZNOGF2TDcrVWtZV1FQWGppMzBDODZCUTRRWE01dkFKQwpwaFg1NmhCY3N1RjJDc0w2cGZYUjlJbFVjVTgwZFBKN1BiT3ZubWdNbGpYakpYUnpHREJOUG9VS25HNmJ5N0tpCjV2TkNBaXYxRmJPQUxXUlZCZWdRUHZEdmpJRmVoMzBZUDRkamlydk5Yc1pNZnRiamFzZFVPWGhIMGFYK1BYN3cKYTNFRUpZL290TjR4VVlLaTFGRlhteDRRWTZaSTVheWdnTzNHSTZEWDJUcENQUzFqcnpXL2xETzhtd1QzNEhFSApKSno1T05abkRGME40YXJJWnFKa2dUVTd2Q1RaL3ltaWFsc2lDNkJQM1lUTkl5NmlKY1loczFUYWRQUVpmaElnCmxqeFhPQ2dDTXdLV1poNjdPdEtWTkNmeC83ZzBsbHhyeW1YY0xoY25aRy81azRDbmlmZHVTQWl4a1hRRVpXaTcKenRJL0ZIZjJMVGNrVkNnSms5NDlJSlNpSTdVREQwQkFHTkVnTE5hVnFBQ0pRbTNlQmVTS24xZ0c0ODNHMTRQawp5MkYyMEpEelBreG5ZVlBoVkVpK29scXZ3ZFVPVlFNWFV5UTUyQTZ5RTQwZFZsSjBIZGJoTjdzOUJZQWJSUjB4Ck9xalcvTW0yL2trUE1rZ3IyRlNsK2JhcVlzS1hKUktsNFVIemZlQUxNRXNIeCs3L2lMK0hBZ01CQUFHalBUQTcKTUF3R0ExVWRFd0VCL3dRQ01BQXdLd1lEVlIwUkJDUXdJb0lnWlc1MGNuVnpkQzF3WVhOdExtMTFkR0YwYVc1bgpkMlZpYUc5dmF5NXpkbU13RFFZSktvWklodmNOQVFFTEJRQURnZ0lCQU1aVFpPNmhSS29HVEs0eHB3b1hqY3p1CnloSzZCbURsejg0akd2ek85Q083dkZJblFRSkVlK1Mrc3lBb1l6N3kwNlpnUDZJYi9lZEx5by9aTFB0UDAralAKSnloSUNoN3lXVldhNkJyNEE3VExBT1BpSWEvQmtaZHBaR3NMdENrbE5uckF1MFBBbXY0QWpUZUZzZWF2aXREeApBTWlYSUlTYk1TZG55bEhFVTUrMWREdzRMRTBtN01UR2JlU2E3TnZEelVZdWhCNkxDVlhxTWlUQTQ3MCtpdXF4Cm10dkZ3WVU5RVgvV3ZLdlNibWFZZjRKR24rL3pBMlNpU0d5V0R1NW03RCtjazZoTXBKenRXWW91YlNROWxQQTUKWmZxcDhBYkdnc1J3a1IyTjF1VzZFK1BJNWEzb1llU2NKMUJJeG5GTTBxNjJuV3ppdHB3SlRQN2VsNTlkSWFEQwpYaEc3UWVxbDFCSUpWUHR6M2Nra1dCTzhuNlJhOHNtVWxTMVNSNkdUWDZ5RGIrV1YzVzVranhmZ0lrNXJCRnlyClRXeEVPSHlJQkdQc1d2UnAvNFlyTHRzOW10ekpPUVJqeVpLUVZlaUhmaGI1T1JTSE9MT1Y3MERESHd5K2hIc0wKemtKRkc3Mm9ocDJYeDkweHdoeUVFdlhWYU5mRFpTekdKVXpWSFhTSDRWdG1WaXFBbkFYQkhLYXdHVlA1OXBRVwphOEtuZWNVZkk3VExlSk9ya09HelZLeU05YUFHaS83MW92WFUwZnZOWXZscTlENU9FajVKME5mQ1hzWXdlcDE5CnVyYlFpRUJJRFNMbElpekIxK1lUYUsvOTJHQ1IwaU1JeG5ON2NWU3l1UEJ1emRZSkt4QjdNZEhhZXFsM1FERzQKcUpjSm5BNmRhUFZ1dzFqMi9sZmgKLS0tLS1FTkQgQ0VSVElGSUNBVEUtLS0tLQo=This is a base64 encoded certificate. With this value, configure webhook in Kubernetes.
Configure the webhook in Kubernetes
In sample YAML spec replace the caBundle value with the value obtained in the previous section and configure the webhook with the kubectl apply command.
-
Create a
webhook.yamlwith the following code:apiVersion: admissionregistration.k8s.io/v1 kind: MutatingWebhookConfiguration metadata: name: "entrust-pasm.mutatingwebhook.com" webhooks: - name: "entrust-pasm.mutatingwebhook.com" objectSelector: matchLabels: entrust.vault.inject.secret: enabled rules: - apiGroups: ["*"] apiVersions: ["*"] operations: ["CREATE"] resources: ["deployments", "jobs", "pods", "statefulsets"] clientConfig: service: namespace: "mutatingwebhook" name: "entrust-pasm" path: "/mutate" port: 5000 # Replace value below with the value obtained from command caBundle: LS0tLS1CRUdJTiBDRVJUSUZJQ0FURS0tLS0tCk1JSUZTekNDQXpPZ0F3SUJBZ0lVRUFiWFlYazZHVUVJM2lrUGZQbnp4MVRMRjdVd0RRWUpLb1pJaHZjTkFRRUwKQlFBd1FERXhNQzhHQTFVRUF3d29TSGxVY25WemRDQkxaWGxEYjI1MGNtOXNJRU5sY25ScFptbGpZWFJsSUVGMQpkR2h2Y21sMGVURUxNQWtHQTFVRUJoTUNWVk13SGhjTk1qUXdPREkzTVRjeU1ERTNXaGNOTXpRd09ESTFNVGN5Ck1ERTNXakJBTVRFd0x3WURWUVFERENoSWVWUnlkWE4wSUV0bGVVTnZiblJ5YjJ3Z1EyVnlkR2xtYVdOaGRHVWcKUVhWMGFHOXlhWFI1TVFzd0NRWURWUVFHRXdKVlV6Q0NBaUl3RFFZSktvWklodmNOQVFFQkJRQURnZ0lQQURDQwpBZ29DZ2dJQkFMTlVMQk5KVVVzYU1nSHlrR3hHOWcvdFBtZXdFTi9DODVlSFJjMmREOHZyZndiNkZ5dFg3UG1BCnRhSVliMmJ4OUdTaldXVFlNNXlPL0g5WkY5L3BjUmJuYkdaNFBMTzBGdG1vM2FicCszRVJjTENWREZCamszQlcKTW9hOWQ1VVBkU2kzYnFBdGFrT2xFZHdOQ2ZvSWhlMDZNOGF2TDcrVWtZV1FQWGppMzBDODZCUTRRWE01dkFKQwpwaFg1NmhCY3N1RjJDc0w2cGZYUjlJbFVjVTgwZFBKN1BiT3ZubWdNbGpYakpYUnpHREJOUG9VS25HNmJ5N0tpCjV2TkNBaXYxRmJPQUxXUlZCZWdRUHZEdmpJRmVoMzBZUDRkamlydk5Yc1pNZnRiamFzZFVPWGhIMGFYK1BYN3cKYTNFRUpZL290TjR4VVlLaTFGRlhteDRRWTZaSTVheWdnTzNHSTZEWDJUcENQUzFqcnpXL2xETzhtd1QzNEhFSApKSno1T05abkRGME40YXJJWnFKa2dUVTd2Q1RaL3ltaWFsc2lDNkJQM1lUTkl5NmlKY1loczFUYWRQUVpmaElnCmxqeFhPQ2dDTXdLV1poNjdPdEtWTkNmeC83ZzBsbHhyeW1YY0xoY25aRy81azRDbmlmZHVTQWl4a1hRRVpXaTcKenRJL0ZIZjJMVGNrVkNnSms5NDlJSlNpSTdVREQwQkFHTkVnTE5hVnFBQ0pRbTNlQmVTS24xZ0c0ODNHMTRQawp5MkYyMEpEelBreG5ZVlBoVkVpK29scXZ3ZFVPVlFNWFV5UTUyQTZ5RTQwZFZsSjBIZGJoTjdzOUJZQWJSUjB4Ck9xalcvTW0yL2trUE1rZ3IyRlNsK2JhcVlzS1hKUktsNFVIemZlQUxNRXNIeCs3L2lMK0hBZ01CQUFHalBUQTcKTUF3R0ExVWRFd0VCL3dRQ01BQXdLd1lEVlIwUkJDUXdJb0lnWlc1MGNuVnpkQzF3WVhOdExtMTFkR0YwYVc1bgpkMlZpYUc5dmF5NXpkbU13RFFZSktvWklodmNOQVFFTEJRQURnZ0lCQU1aVFpPNmhSS29HVEs0eHB3b1hqY3p1CnloSzZCbURsejg0akd2ek85Q083dkZJblFRSkVlK1Mrc3lBb1l6N3kwNlpnUDZJYi9lZEx5by9aTFB0UDAralAKSnloSUNoN3lXVldhNkJyNEE3VExBT1BpSWEvQmtaZHBaR3NMdENrbE5uckF1MFBBbXY0QWpUZUZzZWF2aXREeApBTWlYSUlTYk1TZG55bEhFVTUrMWREdzRMRTBtN01UR2JlU2E3TnZEelVZdWhCNkxDVlhxTWlUQTQ3MCtpdXF4Cm10dkZ3WVU5RVgvV3ZLdlNibWFZZjRKR24rL3pBMlNpU0d5V0R1NW03RCtjazZoTXBKenRXWW91YlNROWxQQTUKWmZxcDhBYkdnc1J3a1IyTjF1VzZFK1BJNWEzb1llU2NKMUJJeG5GTTBxNjJuV3ppdHB3SlRQN2VsNTlkSWFEQwpYaEc3UWVxbDFCSUpWUHR6M2Nra1dCTzhuNlJhOHNtVWxTMVNSNkdUWDZ5RGIrV1YzVzVranhmZ0lrNXJCRnlyClRXeEVPSHlJQkdQc1d2UnAvNFlyTHRzOW10ekpPUVJqeVpLUVZlaUhmaGI1T1JTSE9MT1Y3MERESHd5K2hIc0wKemtKRkc3Mm9ocDJYeDkweHdoeUVFdlhWYU5mRFpTekdKVXpWSFhTSDRWdG1WaXFBbkFYQkhLYXdHVlA1OXBRVwphOEtuZWNVZkk3VExlSk9ya09HelZLeU05YUFHaS83MW92WFUwZnZOWXZscTlENU9FajVKME5mQ1hzWXdlcDE5CnVyYlFpRUJJRFNMbElpekIxK1lUYUsvOTJHQ1IwaU1JeG5ON2NWU3l1UEJ1emRZSkt4QjdNZEhhZXFsM1FERzQKcUpjSm5BNmRhUFZ1dzFqMi9sZmgKLS0tLS1FTkQgQ0VSVElGSUNBVEUtLS0tLQo= admissionReviewVersions: ["v1", "v1beta1"] sideEffects: None timeoutSeconds: 5 -
Run the following command to apply the changes:
% kubectl apply -f webhook.yaml

mutatingwebhookconfiguration.admissionregistration.k8s.io/entrust-pasm.mutatingwebhook.com created
Test the integration
Now that the Kubernetes cluster and KeyControl Vault are properly configured and set up let’s deploy a couple of pods that will attempt to use the ocsecret created earlier inside the pod containers.
Important points:
-
The deployment of pod (in which the secrets need to be fetched) must happen by the service accounts mentioned in the policy created above.
-
The service accounts added in policy must have system:auth-delegator ClusterRole at the Kubernetes side.
Set the namespace
We created two namespaces earlier. Currently the integration should be set to the mutatingwebhook namespace. Change the namespace so it points to the test namespace.
> kubectl config set-context --current --namespace=testnamespaceCreate the registry secrets inside the namespace
The credentials for the external Docker registry access need to be created so they can be mentioned in the pod deployment specification.
-
Create the secret in the namespace:
% kubectl create secret generic regcred --from-file=.dockerconfigjson=$HOME/.docker/config.json --type=kubernetes.io/dockerconfigjson -
Confirm that the secret has been created:
% kubectl get secret regcred
Create a policy in Secrets Vault for Kubernetes service accounts
Create a policy in the Secrets Vault that will enable Kubernetes service accounts to read secrets from the vault. To create such policy, the following API needs to be executed.
The headers must have the vault authentication token.
X-Vault-Auth: <VAULT-AUTHENTICATION-TOKEN>
The request body should be in the form:
{
  "name": "vault_user_policy",		   // Name of the policy to be created
  "role": "Vault User Role",          	   // Role of user. DO NOT CHANGE THIS
  "principals": [
     {
       "k8s_user": {
         "k8s_namespace": "default",       // Namespace in which the service account resides
         "k8s_service_account": "default"  // Name of the service account
       }
     }
  ],
  "resources": [
     {
       "box_id": "box1", // Name of the box in which the secret(s) that need access reside. Can be '*' to indicate all boxes
       "secret_id": [ 	 // List of secrets to which access needs to be granted. Can be '*' to indicate all secrets.
         "secret1",
         "secret2
       ]
     }
  ]
}
You must match the namespace k8s_namespace to the same namespace the service account resides in and where you will be deploying the pods.
-
Save the request body for the environment to a file named
createpolicy.body:{ "name": "kubernetes_vault_user_policy", "role": "Vault User Role", "principals": [ { "k8s_user": { "k8s_namespace": "testnamespace", "k8s_service_account": "default" } } ], "resources": [ { "box_id": "box1", "secret_id": [ "*" ] } ] }In this example, the policy will allow the
defaultuser in thetestnamespaceto have access to any secret inbox1in the KeyControl Secrets vault. -
Check and adjust the following sections according to your environment:
"k8s_user": { "k8s_namespace": "testnamespace", "k8s_service_account": "default" "box_id": "box1", "secret_id": [ "*" ] -
Create the policy:
curl -H "X-Vault-Auth: <VAULT-IDENTIFICATION-TOKEN>" -k -X POST https://1X.19X.14X.XXX/vault/1.0/CreatePolicy/ --data @./createpolicy.body

{"policy_id": "kubernetes_vault_user_policy-82756a"}
Create the clusterrolebinding
Create the clusterrolebinding to allow the default user access to the secrets:
% kubectl create clusterrolebinding authdelegator --clusterrole=system:auth-delegator --serviceaccount=testnamespace:defaultTest the access by running the following command:
% kubectl auth can-i create tokenreviews --as=system:serviceaccount:testnamespace:defaultThe output should be yes if set up correctly.
Deploy the pod with secrets
Secrets can be added to the pod either as volume mounts or as environment variables.
Add secrets as volume mounts to the pod
The sample pod specification along with labels and annotations required for successfully pulling secrets as volumes mounts:
apiVersion: v1
kind: Pod
metadata:
  name: pod1
  namespace: testnamespace
  labels:
    app: test
    entrust.vault.inject.secret: enabled		# Must have this label
  annotations:
    entrust.vault.ips: <comma-separated-list-of-vault-ips>
    entrust.vault.uuid: <uuid-of-vault-from-which-secrets-to-be-fetched>
    entrust.vault.init.container.url: <complete-url-of-init-container-image-from-image-registry>
    entrust.vault.secret.file.k8s-box.ca-cert: output/cert.pem	# box and secret name from vault and value denoting location of secret on the container. The location
spec:
  serviceAccountName: k8suser	       # Service account name configured in PASM Vault Policy
  containers:
  - name: ubuntu
    image: 10.254.154.247:5000/ubuntu:latest
    command: ['cat','/output/ans.txt']
    imagePullPolicy: IfNotPresent
The pod specification must have the following annotations:
-
entrust.vault.inject.secret: enabled: This label indicates that it needs secret. -
entrust.vault.ips: This value is a comma-separated list of IPs of vaults which are in the cluster.This annotation, if specified, will override the
ENTRUST_VAULT_IPSenvironment variable from the mutating webhook configuration. -
entrust.vault.uuid: This value denotes the UUID of the vault from which we need to fetch the secrets.This annotation, if specified, will override the
ENTRUST_VAULT_UUIDenvironment variable from the mutating webhook configuration. -
entrust.vault.init.container.url: This value denotes the complete URL of the init container image pushed into image registry.This annotation, if specified, will override the
ENTRUST_VAULT_INIT_CONTAINER_URLenvironment variable from the mutating webhook configuration. -
Annotations in the form of
entrust.vault.secret.file.{box-name}.{secret-name}.The
box-nameandsecret-nameplaceholders within the annotation should denote the name of the box and the secret name within that box that needs to be pulled.For example, if the secret was named
db-secretand the box wask8s-box, then the name of the annotation would beentrust.vault.secret.file.k8s-box.db-secret. The value of the annotation should be the path to the file where the secret needs to be stored within the container. The path should be relative to the/directory, meaning that if the secret needs to be present in/output/cert.pem, then the value of the annotation should beoutput/cert.pem -
In the
specsection, theserviceAccountNamevalue should be the name of the service account that was added in the policy in the Secrets vault.
To add the secrets as volume mounts to the pod:
-
Create a file named
pod1.yamlwith the yaml for the environment. We are using the box and secret we created earlier in the Secrets vault. (box1andocsecret). We also had to provide the credentials for the Docker registry.apiVersion: v1 kind: Pod metadata: name: pod1 namespace: testnamespace labels: app: test entrust.vault.inject.secret: enabled # Must have this label annotations: entrust.vault.ips: 1x.19x.14x.20x,1x.19x.14x.21x entrust.vault.uuid: d86e3c22-6563-45b4-bfb9-45ba6c911ec8 entrust.vault.init.container.url: <registry-url>/init-container entrust.vault.secret.file.box1.ocsecret: output/ocsecret.txt spec: imagePullSecrets: - name: regcred # external registry secret created earlier serviceAccountName: default # Service account name configured in PASM Vault Policy containers: - name: ubuntu image: ubuntu command: ["sh", "-c"] args: - echo "Getting secret from KeyControl Secrets Vault"; cat /output/ocsecret.txt; echo; echo "DONE" && sleep 3600 imagePullPolicy: IfNotPresent -
Check and adjust the following sections according to your environment:
annotations: entrust.vault.ips: 1x.19x.14x.20x,1x.19x.14x.21x entrust.vault.uuid: d86e3c22-6563-45b4-bfb9-45ba6c911ec8 entrust.vault.init.container.url: <registry-url>/init-container entrust.vault.secret.file.box1.ocsecret: output/ocsecret.txt imagePullSecrets: - name: regcred # external registry secret created earlier command: ["sh", "-c"] args: - echo "Getting secret from KeyControl Secrets Vault"; cat /output/ocsecret.txt; echo; echo "DONE" && sleep 3600 -
Deploy the pod:
% kubectl create -f pod1.yaml -
Check the pod to verify that it is capable of pulling the secret from a KeyControl Secrets Vault:
% kubectl logs pod/pod1

Defaulted container "ubuntu" out of: ubuntu, secret-v (init)
Getting secret from KeyControl Secrets Vault
This is the secret coming from KCV to Kubernetes.
DONE
Pull a secret as an environment variable into the pod
Kubernetes supports initiating environment variables for a container either directly or from Kubernetes secrets. For security purposes, the Secrets Vault takes the later approach. Also, if secrets are injected using environment variables, a sidecar container will be added which will delete the Kubernetes secrets after the successful injection of KeyControl Secret Vault secrets as environment variables in the main application container. Since we need to create and delete Kubernetes secrets for this, the service account must also have the required permissions to create and delete the Kubernetes secrets.
-
Grant the service account with required permissions: (replace the
namespaceandserviceaccountvalues appropriately)% kubectl create rolebinding secretrole --namespace testnamespace --clusterrole=edit --serviceaccount=testnamespace:default -
To check if proper permissions are set up for the service account, use the following commands:
% kubectl auth can-i create secrets -n testnamespace --as=system:serviceaccount:testnamespace:default
% kubectl auth can-i delete secrets -n testnamespace --as=system:serviceaccount:testnamespace:default
The output of both the above commands should be yes.
-
Save the following sample pod specification yaml in a file called
pod2.yaml. It shows how to deploy a pod with secrets as environment variables.apiVersion: v1 kind: Pod metadata: name: pod2 namespace: testnamespace labels: app: test2 entrust.vault.inject.secret: enabled # Must have this label annotations: entrust.vault.ips: 10.19x.14x.20x.,10.19x.14x.21x entrust.vault.uuid: d86e3c22-6563-45b4-bfb9-45ba6c911ec8 entrust.vault.init.container.url: <registry-url>/init-container entrust.vault.secret.env.box1.ocsecret: OCSECRET spec: imagePullSecrets: - name: regcred # external registry secret created earlier serviceAccountName: default # Service account name configured in PASM Vault Policy containers: - name: ubuntu image: ubuntu command: ["sh", "-c"] args: - echo "Getting secret from KeyControl Secrets Vault"; printenv OCSECRET; echo "DONE" && sleep 3600 imagePullPolicy: IfNotPresent -
To pull the secret as an environment variable, add an annotation of the form
entrust.vault.secret.env.{box-name}.{secret-name}. The value of the annotation should indicate the name of the environment variable in which the secret data is expected to be present. -
Check and adjust the following sections according to your environment. These annotations are as documented in the previous section.
annotations: entrust.vault.ips: 10.19x.14x.20x.,10.19x.14x.21x entrust.vault.uuid: d86e3c22-6563-45b4-bfb9-45ba6c911ec8 entrust.vault.init.container.url: <registry-url>/init-container entrust.vault.secret.env.box1.ocsecret: OCSECRET imagePullSecrets: - name: regcred # external registry secret created earlier command: ["sh", "-c"] args: - echo "Getting secret from KeyControl Secrets Vault"; printenv OCSECRET; echo "DONE" && sleep 3600 -
Create and test the pod:
% kubectl create -f pod2.yaml -
Check the pod output to verify that it is capable of pulling the secret from the KeyControl Secrets vault:
% kubectl logs pod/pod2

Defaulted container "ubuntu" out of: ubuntu, pasm-sidecar, secret-v (init)
Getting secret from KeyControl Secrets Vault
This is the secret coming from KCV to Kubernetes.
DONE