Procedures
Install k3s
We will use k3s environment to deploy our Kubernetes cluster to demonstrate this integration. It is up to the user to select and use the best Kubernetes environment of choice for a Kubernetes cluster. You can find information on how to deploy a k3s Kubernetes cluster here: https://k3s.io/.
On the RedHat Linux Server, install the Kubernetes Cluster.
-
Install the latest k3s release.
K3s need to be deployed using
etcdas the default datastore. To install the latest k3s stable release do the following:% curl -sfL https://get.k3s.io | K3S_TOKEN=SECRET sh -s - server --cluster-init [INFO] Finding release for channel stable [INFO] Using v1.32.3+k3s1 as release [INFO] Downloading hash https://github.com/k3s-io/k3s/releases/download/v1.32.3+k3s1/sha256sum-amd64.txt [INFO] Downloading binary https://github.com/k3s-io/k3s/releases/download/v1.32.3+k3s1/k3s [INFO] Verifying binary download [INFO] Installing k3s to /usr/local/bin/k3s [INFO] Finding available k3s-selinux versions Updating Subscription Management repositories. Rancher K3s Common (stable) 50 kB/s | 2.9 kB 00:00 Dependencies resolved. ====================================================================================================================================================================================================== Package Architecture Version Repository Size ====================================================================================================================================================================================================== Installing: k3s-selinux noarch 1.6-1.el9 rancher-k3s-common-stable 22 k Transaction Summary ====================================================================================================================================================================================================== Install 1 Package Total download size: 22 k Installed size: 96 k Downloading Packages: k3s-selinux-1.6-1.el9.noarch.rpm 451 kB/s | 22 kB 00:00 ------------------------------------------------------------------------------------------------------------------------------------------------------------------------------------------------------ Total 416 kB/s | 22 kB 00:00 Running transaction check Transaction check succeeded. Running transaction test Transaction test succeeded. Running transaction Preparing : 1/1 Running scriptlet: k3s-selinux-1.6-1.el9.noarch 1/1 Installing : k3s-selinux-1.6-1.el9.noarch 1/1 Running scriptlet: k3s-selinux-1.6-1.el9.noarch 1/1 Verifying : k3s-selinux-1.6-1.el9.noarch 1/1 Installed products updated. Installed: k3s-selinux-1.6-1.el9.noarch Complete! [INFO] Skipping /usr/local/bin/kubectl symlink to k3s, already exists [INFO] Creating /usr/local/bin/crictl symlink to k3s [INFO] Skipping /usr/local/bin/ctr symlink to k3s, command exists in PATH at /usr/bin/ctr [INFO] Creating killall script /usr/local/bin/k3s-killall.sh [INFO] Creating uninstall script /usr/local/bin/k3s-uninstall.sh [INFO] env: Creating environment file /etc/systemd/system/k3s.service.env [INFO] systemd: Creating service file /etc/systemd/system/k3s.service [INFO] systemd: Enabling k3s unit Created symlink /etc/systemd/system/multi-user.target.wants/k3s.service → /etc/systemd/system/k3s.service. [INFO] systemd: Starting k3s--cluster-init is the option used to tell K3s to use etcdas the default datastore. -
Set up
KUBECONFIGfor the user:% export KUBECONFIG=~/.kube/config % mkdir ~/.kube 2> /dev/null % sudo /usr/local/bin/k3s kubectl config view --raw > "$KUBECONFIG" % chmod 600 "$KUBECONFIG"You may want to put this in your profile so when you login into the server it gets set:
export KUBECONFIG=~/.kube/config -
Check the cluster.
% kubectl get nodes

NAME                             STATUS   ROLES                       AGE   VERSION
redhat-9-openshift-kcv-secrets   Ready    control-plane,etcd,master   64s   v1.32.3+k3s1
Make sure etcdis listed as one of the roles. -
Get the Kubernetes version
Client Version: v1.31.0 Kustomize Version: v5.4.2 Server Version: v1.32.3+k3s1 -
Test the server connection.
Run the following command and notice the server attribute:
% kubectl config view

apiVersion: v1
clusters:
- cluster:
    certificate-authority-data: DATA+OMITTED
    server: https://127.0.0.1:6443
  name: default
contexts:
- context:
    cluster: default
    user: default
  name: default
current-context: default
kind: Config
preferences: {}
users:
- name: default
  user:
    client-certificate-data: DATA+OMITTED
    client-key-data: DATA+OMITTED
The server attribute is set to:
server: https://127.0.0.1:6443The KeyControl node will need access to that URL. Since it is using the localhost IP address, you can just replace that with the server IP address. Now open a browser and attempt to connect to that url. In our case:
https://1X.19X.14X.XXX:6443Attempt the connection from another server in the same subnet as the KeyControl nodes. If you can’t connect, the port may be blocked by the firewall.
Open port 6443 on the firewall in the server:
% sudo firewall-cmd --zone=public --add-port=6443/tcp --permanent

success

% sudo firewall-cmd --reload

success
Test the connection again.
VPN configurations can block access to port
6443. Make sure you test the connection from a server that will not use a VPN.
Deploy the KeyControl vault cluster
For this integration, KeyControl Vault is deployed as a two-node cluster.
Follow the installation and setup instructions in KeyControl Vault Installation and Upgrade Guide.
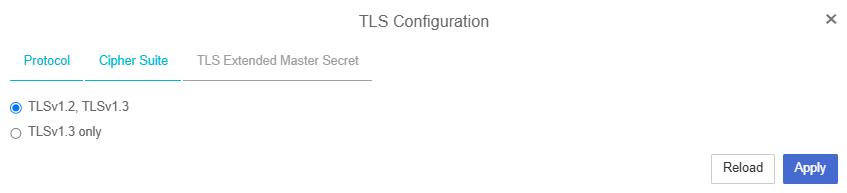
Enable TLS 1.2 in KeyControl
-
Log in to the KeyControl web interface.
-
Navigate to Appliance Management > Settings > TLS Configuration > Protocol.
-
Select TLSv1.2, TLSv1.3 (instead of "TLSv1.3 only").
-
Click Apply to save the changes.
Create a VM Encryption vault to be used with Kubernetes
-
Sign in to the KeyControl Vault Manager.
-
In the home page, select Create Vault.
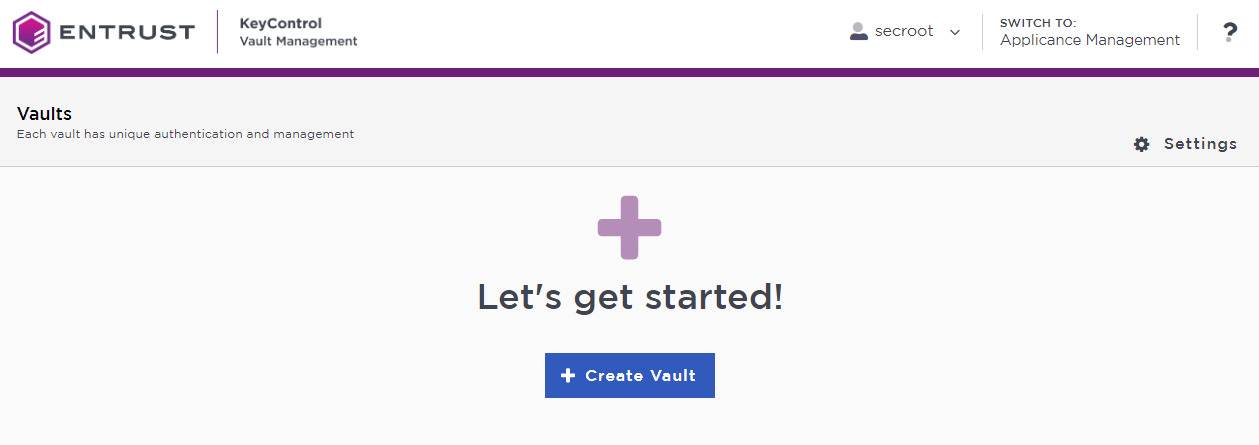
The Create Vault dialog appears.
-
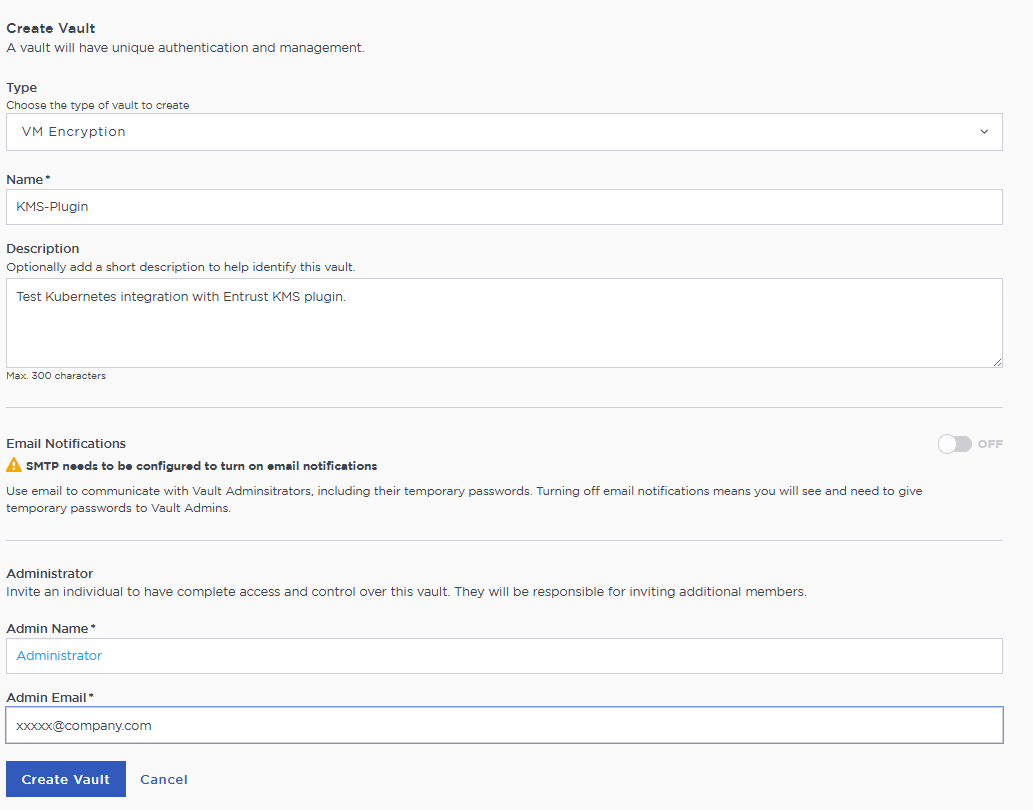
In the Type drop-down box, select VM Encryption. Enter the required information.
-
Select Create Vault.
For example:
-
When you receive an email with a URL and sign-in credentials to the KeyControl vault, bookmark the URL and save the credentials.
You can also copy the sign-in credentials when the vault details are displayed.
-
Sign in to the URL provided.
-
Change the initial password when prompted.
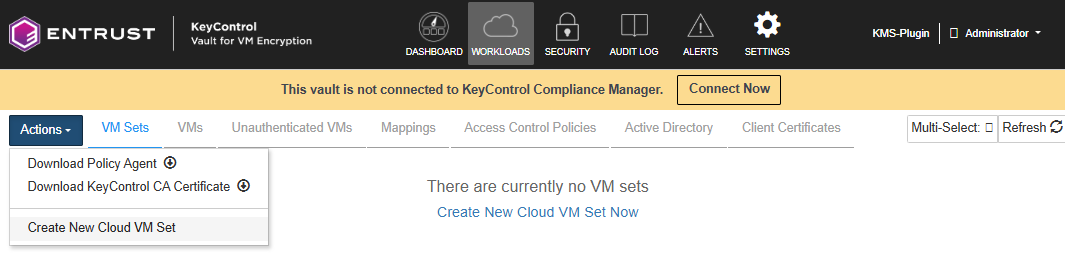
Create a Cloud VM Set for the KMSPlugin in the VM Encryption vault
After you sign in to the VM Encryption vault, create a Cloud VM Set that will be used by the KMSPlugin.
-
Select Workloads in the VM Encryption Vault top bar, then select the VM Sets tab.
-
In the Actions Menu, select Create a New Cloud VM Set.
-
In the Create Cloud VM Set Window, enter the Name, Group, Description and Boundary Controls.
-
For Group, set it to Cloud Admin Group.
-
For Boundary Controls: Leave the defaults.
-
-
Select Create.
Once created, select Close. The new VM Set is shown.
Create a D in the Cloud VM Set for the KMSPlugin.
-
Select the newly created Cloud VM Set. In the Actions menu, select Create KeyID.
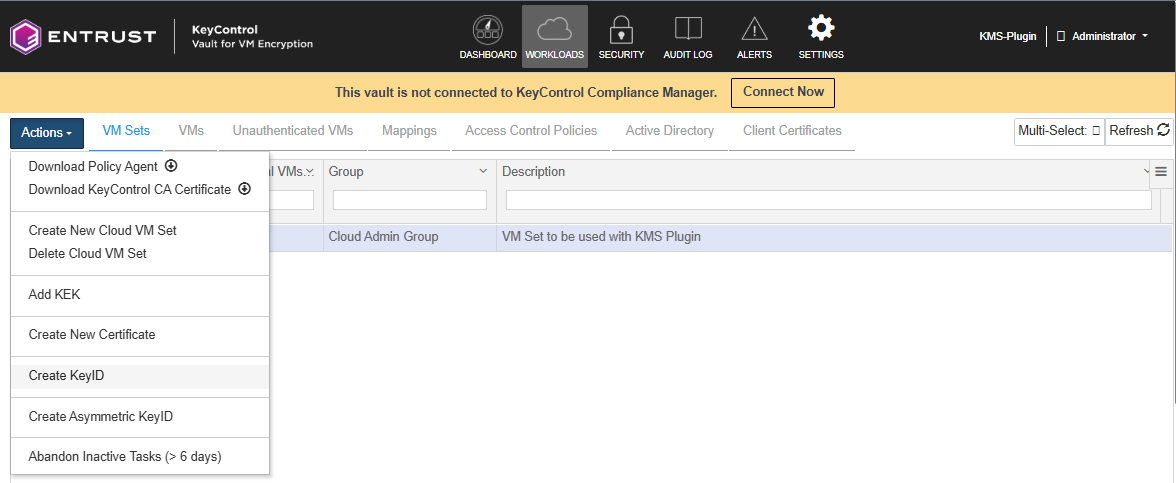
-
In the Create New KeyID Window, enter the following:
KeyID Name KMS-KeyId
VM Set Name The selected VM Set should already be shown.
Description Key to be used by KMSPlugin
Algorithm AES-256
-
Select Create.
The KeyID is created. To view it, select the KeyIDs tab under the VM Set that you have already selected.
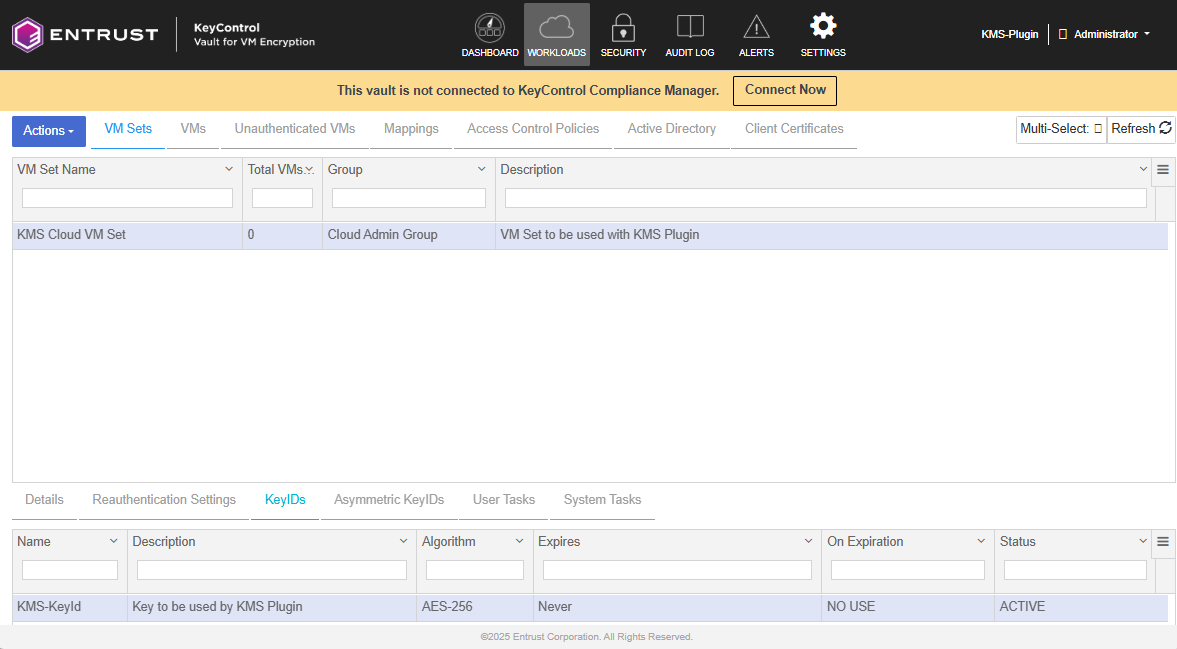
-
Save the KeyID name. You will need it for the KMSPlugin configuration.
Create a Client Certificate in the Cloud VM Set for the KMSPlugin.
-
Select the newly created Cloud VM Set. In the Actions menu, select Create New Certificate.
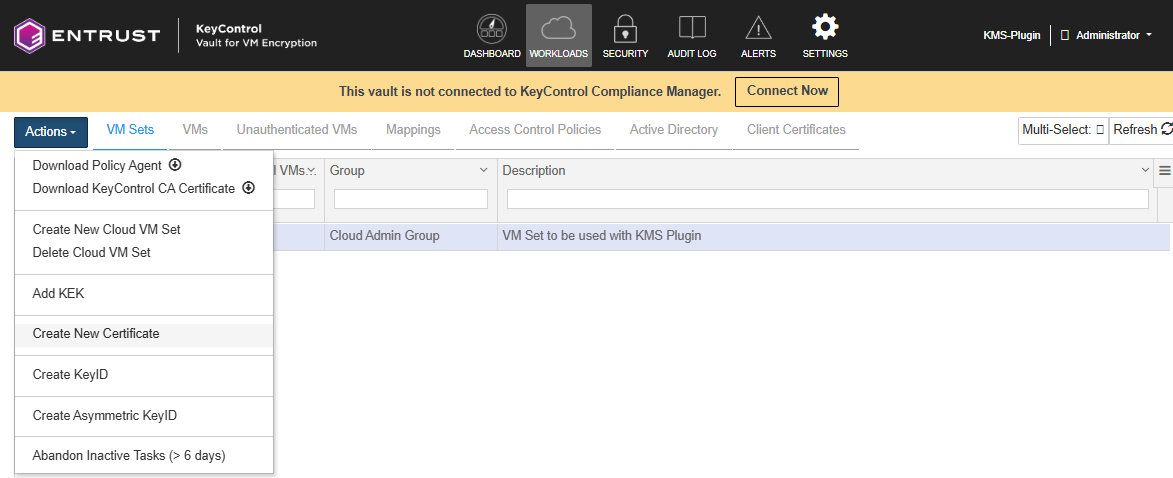
-
In the Create New Certificate window, accept the defaults and select Create & Download.
The new certificate is created and downloaded. Save the certificate as it will be used to configure the KMSPlugin. We will refer to the certificate from now on as the
client.certfile.
Install KeyControl KMSPlugin for Kubernetes
In the Kubernetes server:
-
Download the plugin tar file for your OS
% mkdir ~/plugin % cd ~/plugin % wget https://github.com/EntrustCorporation/keycontrol-kms-plugin/releases/download/v2.0.0/kms-plugin-linux-amd64.tar.gz -
Untar the plugin tar file
% tar zxvf kms-plugin-linux-amd64.tar.gzYou should end up with the plugin binary
kms-plugin-server. -
Create a system folder for the plugin and copy the plugin binary to it.
% sudo mkdir -p /etc/kubernetes % sudo cp kms-plugin-server /etc/kubernetes/. % sudo chmod +x /etc/kubernetes/kms-plugin-server -
Clone the plugin git repository
% git clone https://github.com/EntrustCorporation/keycontrol-kms-plugin.git -
Transfer the client certificate downloaded earlier to the Kubernetes server.
The client certificate was saved as
client.certpreviously.% scp client.cert xxxx@1x.1xx.1xx.xx:/home/userid/plugin/.
KMSPlugin Configuration
When you cloned the plugin repo, it created a folder keycontrol-kms-plugin in the plugin folder.
-
Change directory to the
keycontrol-kms-pluginfolder.% cd keycontrol-kms-plugin -
Display SSL certificate and private key to be used in the KMSPlugin
% ./kms_plugin_setup.py show_client_cert <path to client certificate file>In our example:
% ./kms_plugin_setup.py show_client_cert ../client.cert Bag Attributes localKeyID: FA 35 11 AD 6D 8E 6A 8F A0 3E 8C EB EC A6 4C F0 8A 31 13 4A subject=C=US, O=HyTrust Inc., CN=2e5edbb0-203b-4cb2-817d-67ea76001edc issuer=C=US, O=HyTrust Inc., CN=HyTrust KeyControl Certificate Authority -----BEGIN CERTIFICATE----- MIIFgTCCA2mgAwIBAgIFAM7uwlYwDQYJKoZIhvcNAQELBQAwVzELMAkGA1UEBhMC VVMxFTATBgNVBAoTDEh5VHJ1c3QgSW5jLjExMC8GA1UEAxMoSHlUcnVzdCBLZXlD . . . YKawWtwQFpdaC2fIMJKzwUK4bzwKThjCoM5wUiyO7I3MKRIWNNCG9crp5G3i3rRJ e7HecTV4V5YH7CZX+wwvPxsoC0MW0A4= -----END PRIVATE KEY----- -
Display the CA certificate to verify KeyControl.
% ./kms_plugin_setup.py show_ca_cert <path to client certificate file>In our example:
% ./kms_plugin_setup.py show_ca_cert ../client.cert Certificate: Data: Version: 3 (0x2) Serial Number: 1743700551 (0x67eec247) Signature Algorithm: sha256WithRSAEncryption . . . sGIh/jDuwRa/mJ85h1+0LO+z/kKrHhIT1iywmg8+9XPNyMMHJEKt4OnEkY3r1Qod P7+h3JwBEdUdFRJzwWRqWtdBsPDNu1CET4X4Y8Y8FnQ1EDsoqTSD/h0= -----END CERTIFICATE----- -
Store the output to
kc_client_cert.pemandkc_ca_cert.pemrespectively.These files will be stored in the
/etc/kubernetesfolder we created earlier.% ./kms_plugin_setup.py show_client_cert ../client.cert > kc_client_cert.pem % ./kms_plugin_setup.py show_ca_cert ../client.cert > kc_ca_cert.pem % sudo cp kc_client_cert.pem /etc/kubernetes/. % sudo cp kc_ca_cert.pem /etc/kubernetes/. -
Create a kms-plugin config file with the following contents on the k3s server.
{
"kmsServer" : "KC IP",
"certFile" : "kc_client_cert.pem",
"caCertFile" : "kc_ca_cert.pem",
"keyId" : "KeyID name"
}
In our example, this file should look like this:
{ "kmsServer" : "1x.1xx.1xx.2xx", "certFile" : "/etc/kubernetes/kc_client_cert.pem", "caCertFile" : "/etc/kubernetes/kc_ca_cert.pem", "keyId" : "KMS-KeyId" } -
Copy the file to
/etc/kubernetes.% sudo cp kms-plugin.config /etc/kubernetes/.
Run the KMSPlugin
Run the plugin to make sure it comes up properly.
-
Execute the following commands to run the plugin.
% /etc/kubernetes/kms-plugin-server --sockFile <socket-file-path> --confFile <config-file-path>-
socket-file-path is the path to the Unix socket file, for example
/etc/kubernetes/kmsplugin.sock. -
config-file-path is the KMSPlugin configuration file path, for example
/etc/kubernetes/kms_plugin.config.For our environment, we used the following command so the output is captured in a log file:
% sudo bash -c '/etc/kubernetes/kms-plugin-server \
  --sockFile /etc/kubernetes/kmsplugin.sock \
  --confFile /etc/kubernetes/kms-plugin.config > /etc/kubernetes/kms-plugin.log 2>&1' &

% sudo tail /etc/kubernetes/kms-plugin.log

time="2025-04-10T10:18:25-04:00" level=info msg="initalizing KeyControlKmsService" caller="main.main:36"
time="2025-04-10T10:18:25-04:00" level=info msg="successfully initialized KeyControlKmsService" caller="main.main:36"
time="2025-04-10T10:18:25-04:00" level=info msg="creating new grpc service instance" caller="main.main:40"
time="2025-04-10T10:18:25-04:00" level=info msg="attempting to serve on /etc/kubernetes/kmsplugin.sock" caller="main.main.func1:43"
time="2025-04-10T10:18:25-04:00" level=info msg="litening on /etc/kubernetes/kmsplugin.sock" caller="main.main.func1:43"
-
Testing the KMSPlugin
A scenario to test the KMSPlugin and see that secrets created in the kubernetes cluster are encrypted using KeyControl Vault.
-
This will be done by creating secrets in the K3s datastore which is using
etcd. -
A secret will be created before running the KMSPlugin. This secret will not be encrypted.
-
Then we will start the KMSPlugin and configure K3s to use it.
-
Another secret will be created and this time you will see that the secret is encrypted through the KMSPlugin.
Install etcdctl
We will need to install etcdctl so we can use it to query the K3s etcd datastore.
-
Use the following script:
#!/bin/bash set -x ETCD_VER=v3.5.0 DOWNLOAD_URL=https://storage.googleapis.com/etcd rm -f /tmp/etcd-${ETCD_VER}-linux-amd64.tar.gz rm -rf /tmp/etcd-download-test mkdir -p /tmp/etcd-download-test curl -L ${DOWNLOAD_URL}/${ETCD_VER}/etcd-${ETCD_VER}-linux-amd64.tar.gz -o /tmp/etcd-${ETCD_VER}-linux-amd64.tar.gz tar xzvf /tmp/etcd-${ETCD_VER}-linux-amd64.tar.gz -C /tmp/etcd-download-test --strip-components=1 rm -f /tmp/etcd-${ETCD_VER}-linux-amd64.tar.gz chmod +x /tmp/etcd-download-test/etcdctl /tmp/etcd-download-test/etcdctl version sudo mv /tmp/etcd-download-test/etcdctl /usr/local/bin -
Run the script in the Kubernetes server
Assuming you created the script in the plugin folder:
% cd ~/plugin % ./etcd_install.shetcdctlshould be available under/usr/local/bin.
Open up the firewall ports
sudo firewall-cmd --permanent --add-port=2379/tcp
sudo firewall-cmd --permanent --add-port=2380/tcp
sudo firewall-cmd --reload
Set up KUBECONFIG
This should give you access to the Kubernetes cluster.
% export KUBECONFIG=~/.kube/configCheck that you can see the Kubernetes cluster nodes:
% kubectl get nodes

NAME                             STATUS   ROLES                       AGE   VERSION
redhat-9-openshift-kcv-secrets   Ready    control-plane,etcd,master   79m   v1.32.3+k3s1
Create a secret using the kubectl command and verify the secret text is clear.
-
Create the secret.
% kubectl create secret generic secret1 -n default --from-literal=mykey=mydata secret/secret1 created -
Verify that secret text is stored in clear by querying etcd
% sudo /usr/local/bin/etcdctl \
  --cacert=/var/lib/rancher/k3s/server/tls/etcd/server-ca.crt \
  --cert=/var/lib/rancher/k3s/server/tls/etcd/client.crt \
  --key=/var/lib/rancher/k3s/server/tls/etcd/client.key \
  --endpoints=https://127.0.0.1:2379 get /registry/secrets/default/secret1 | hexdump -C

00000000  2f 72 65 67 69 73 74 72  79 2f 73 65 63 72 65 74  |/registry/secret|
00000010  73 2f 64 65 66 61 75 6c  74 2f 73 65 63 72 65 74  |s/default/secret|
...
00000100  75 65 1a 00 22 00 0a                              |ue.."..|
00000107
Start the KMSPlugin.
This time we will start the plugin with a different path for the sock file.
Specify the sockFile path as /var/lib/rancher/k3s/server/kmsplugin.sock
% sudo bash -c '/etc/kubernetes/kms-plugin-server \
  --sockFile /var/lib/rancher/k3s/server/kmsplugin.sock \
  --confFile /etc/kubernetes/kms-plugin.config > /etc/kubernetes/kms-plugin.log 2>&1' &

% sudo tail /etc/kubernetes/kms-plugin.log

time="2025-04-10T16:17:16-04:00" level=info msg="initalizing KeyControlKmsService" caller="main.main:36"
time="2025-04-10T16:17:16-04:00" level=info msg="successfully initialized KeyControlKmsService" caller="main.main:36"
time="2025-04-10T16:17:16-04:00" level=info msg="creating new grpc service instance" caller="main.main:40"
time="2025-04-10T16:17:16-04:00" level=info msg="attempting to serve on /var/lib/rancher/k3s/server/kmsplugin.sockk" caller="main.main.func1:43"
time="2025-04-10T16:17:16-04:00" level=info msg="litening on /var/lib/rancher/k3s/server/kmsplugin.sockk" caller="main.main.func1:43"
Create the KMSPlugin encryption config yaml file.
Create this file in the /etc/kubernetes folder and name it enc.yaml.
apiVersion: apiserver.config.k8s.io/v1
kind: EncryptionConfiguration
resources:
  - resources:
    - secrets
    providers:
    - kms:
        apiVersion: v2
        name: KeyControlKmsPlugin
        endpoint: unix:///var/lib/rancher/k3s/server/kmsplugin.sock
        timeout: 3s
- identity: {}| Note that the endpoint is the sock file used when we started the KMSPlugin. |
Specify the encryption provider in k3s service startup file.
Now we need to modify K3s service startup file so it points to the KMSPlugin encryption configuration file.
Modify the ExecStart line in /etc/systemd/system/k3s.service file as follows:
ExecStart=/usr/local/bin/k3s \
    server \
        '--cluster-init' '--kube-apiserver-arg' 'encryption-provider-config=/etc/kubernetes/enc.yaml' \
Restart the K3s cluster
-
Restart K3s.
% sudo systemctl daemon-reload % sudo systemctl start k3s % kubectl get nodes NAME STATUS ROLES AGE VERSION redhat-9-openshift-kcv-secrets Ready control-plane,etcd,master 79m v1.32.3+k3s1 -
Check the
/etc/kubernetes/kms-plugin.logfile for the connection:% sudo tail /etc/kubernetes/kms-plugin.log time="2025-04-11T12:31:33-04:00" level=info msg="initalizing KeyControlKmsService" caller="main.main:36" time="2025-04-11T12:31:33-04:00" level=info msg="successfully initialized KeyControlKmsService" caller="main.main:36" time="2025-04-11T12:31:33-04:00" level=info msg="creating new grpc service instance" caller="main.main:40" time="2025-04-11T12:31:33-04:00" level=info msg="attempting to serve on /var/lib/rancher/k3s/server/kmsplugin.sock" caller="main.main.func1:43" time="2025-04-11T12:31:33-04:00" level=info msg="litening on /var/lib/rancher/k3s/server/kmsplugin.sock" caller="main.main.func1:43" time="2025-04-11T12:33:41-04:00" level=info msg="status request recieved" caller="k8s.io/kms/apis/v2._KeyManagementService_Status_Handler:487" time="2025-04-11T12:33:41-04:00" level=info msg="status request completedVersionv2HealthzokKeyIDKMS-KeyId" caller="k8s.io/kms/apis/v2._KeyManagementService_Status_Handler:487" time="2025-04-11T12:33:41-04:00" level=info msg="encrypt request recieved" caller="k8s.io/kms/apis/v2._KeyManagementService_Encrypt_Handler:523" time="2025-04-11T12:34:02-04:00" level=info msg="status request recieved" caller="k8s.io/kms/apis/v2._KeyManagementService_Status_Handler:487" time="2025-04-11T12:34:02-04:00" level=info msg="status request completedVersionv2HealthzokKeyIDKMS-KeyId" caller="k8s.io/kms/apis/v2._KeyManagementService_Status_Handler:487"
Create another secret and verify that is encrypted using the KMSPlugin.
This time the plugin should be used.
-
Create the secret.
% kubectl create secret generic secret2 -n default --from-literal=mykey=mydata secret/secret2 created -
Verify that is encrypted using the KMSPlugin.
You should see KeyControlKmsPlugin in the hexdump.
% sudo /usr/local/bin/etcdctl \ --cacert=/var/lib/rancher/k3s/server/tls/etcd/server-ca.crt \ --cert=/var/lib/rancher/k3s/server/tls/etcd/client.crt \ --key=/var/lib/rancher/k3s/server/tls/etcd/client.key \ --endpoints=https://127.0.0.1:2379 get /registry/secrets/default/secret2 | hexdump -C 00000000 2f 72 65 67 69 73 74 72 79 2f 73 65 63 72 65 74 |/registry/secret| 00000010 73 2f 64 65 66 61 75 6c 74 2f 73 65 63 72 65 74 |s/default/secret| 00000020 32 0a 6b 38 73 3a 65 6e 63 3a 6b 6d 73 3a 76 32 |2.k8s:enc:kms:v2| 00000030 3a 4b 65 79 43 6f 6e 74 72 6f 6c 4b 6d 73 50 6c |:KeyControlKmsPl| ... 00000240 4d 34 4f 41 3d 3d 28 01 0a |M4OA==(..| 00000249 -
Verify that the KeyControl Vault was used for this process
-
Login to the KeyControl VM Encryption Vault and select Audit Log.
You should be able to see the encryption and decryption messages with the KeyId created for the KMSPlugin.

-
Encrypt all existing K3s secrets
-
Use the following command to encrypt all of the existing K3s secrets:
% kubectl get secrets --all-namespaces -o json | kubectl replace -f - secret/secret1 replaced secret/secret2 replaced secret/chart-values-traefik replaced secret/chart-values-traefik-crd replaced secret/k3s-serving replaced secret/redhat-9-openshift-kcv-secrets.node-password.k3s replaced secret/sh.helm.release.v1.traefik-crd.v1 replaced secret/sh.helm.release.v1.traefik.v1 replaced -
Verify that the secret1 created earlier is encrypted
You should see KeyControlKmsPlugin in the hexdump.
% sudo /usr/local/bin/etcdctl \
  --cacert=/var/lib/rancher/k3s/server/tls/etcd/server-ca.crt \
  --cert=/var/lib/rancher/k3s/server/tls/etcd/client.crt \
  --key=/var/lib/rancher/k3s/server/tls/etcd/client.key \
  --endpoints=https://127.0.0.1:2379 get /registry/secrets/default/secret1 | hexdump -C

00000000  2f 72 65 67 69 73 74 72  79 2f 73 65 63 72 65 74  |/registry/secret|
00000010  73 2f 64 65 66 61 75 6c  74 2f 73 65 63 72 65 74  |s/default/secret|
00000020  31 0a 6b 38 73 3a 65 6e  63 3a 6b 6d 73 3a 76 32  |1.k8s:enc:kms:v2|
00000030  3a 4b 65 79 43 6f 6e 74  72 6f 6c 4b 6d 73 50 6c  |:KeyControlKmsPl|
...
00000240  4d 34 4f 41 3d 3d 28 01  0a                       |M4OA==(..|
00000249
Disable encryption
-
Modify the
/etc/kubernetes/enc.yamlas follows and make sure identity: {} is the first encryption provider.apiVersion: apiserver.config.k8s.io/v1 kind: EncryptionConfiguration resources: - resources: - secrets providers: - identity: {} - kms: apiVersion: v2 name: KeyControlKmsPlugin endpoint: unix:///var/lib/rancher/k3s/server/kmsplugin.sock timeout: 3s -
Stop and Start K3s
% sudo systemctl stop k3s % sudo systemctl start k3s -
Decrypt all existing records
% kubectl get secrets --all-namespaces -o json | kubectl replace -f - secret/secret1 replaced secret/secret2 replaced secret/chart-values-traefik replaced secret/chart-values-traefik-crd replaced secret/k3s-serving replaced secret/redhat-9-openshift-kcv-secrets.node-password.k3s replaced secret/sh.helm.release.v1.traefik-crd.v1 replaced secret/sh.helm.release.v1.traefik.v1 replaced -
Verify that secret1 and secret2 are now stored in clear.
secret1
% sudo /usr/local/bin/etcdctl \
  --cacert=/var/lib/rancher/k3s/server/tls/etcd/server-ca.crt \
  --cert=/var/lib/rancher/k3s/server/tls/etcd/client.crt \
  --key=/var/lib/rancher/k3s/server/tls/etcd/client.key \
  --endpoints=https://127.0.0.1:2379 get /registry/secrets/default/secret1 | hexdump -C

00000000  2f 72 65 67 69 73 74 72  79 2f 73 65 63 72 65 74  |/registry/secret|
00000010  73 2f 64 65 66 61 75 6c  74 2f 73 65 63 72 65 74  |s/default/secret|
...
000000f0  65 79 12 06 6d 79 64 61  74 61 1a 06 4f 70 61 71  |ey..mydata..Opaq|
00000100  75 65 1a 00 22 00 0a                              |ue.."..|
00000107
secret2
% sudo /usr/local/bin/etcdctl \
  --cacert=/var/lib/rancher/k3s/server/tls/etcd/server-ca.crt \
  --cert=/var/lib/rancher/k3s/server/tls/etcd/client.crt \
  --key=/var/lib/rancher/k3s/server/tls/etcd/client.key \
  --endpoints=https://127.0.0.1:2379 get /registry/secrets/default/secret2 | hexdump -C

00000000  2f 72 65 67 69 73 74 72  79 2f 73 65 63 72 65 74  |/registry/secret|
00000010  73 2f 64 65 66 61 75 6c  74 2f 73 65 63 72 65 74  |s/default/secret|
...
00000100  75 65 1a 00 22 00 0a                              |ue.."..|
00000107