Procedures
Prerequisites
-
A BIG-IP system must be deployed before following the steps in this guide.
BIG-IP Virtual Edition was used for this guide, but the procedures can be applied to other deployments. -
The BIG-IP system must be licensed for External Interface and Network HSM.
-
Access to the command-line interface of the BIG-IP machine and to the Configuration utility web interface is required.
-
A Security World ISO file is required to install the nShield Security World software.
Install the Security World software
The following steps describe a manual installation of Security World on the BIG-IP machine. Automatic installation steps exist for older versions of Security World software. See the F5 documentation for more information.
-
Mount the Security World ISO file:
% cd /shared % mkdir SecWorld % mount -o loop SecWorld_Lin64-13.6.8.iso SecWorld -
Untar the Security World files:
% cd /shared % sudo tar -zxvf /shared/SecWorld/linux/amd64/ctd.tar.gz -
Repeat for all
tar.gzfiles in theamd64directory. -
Fix installation directory paths:
% mv /shared/opt/nfast/ /shared % rmdir /shared/opt -
Create a symbolic link from
/shared/nfastto/opt/nfast:% ln -s /shared/nfast /opt/nfast -
Run the installation:
% /opt/nfast/sbin/install -
Run the
enquiryutility to verify that the hardserver is up and running:% /opt/nfast/bin/enquiry
Configure the Security World
To configure the Security World:
-
Enroll the HSM onto the BIG-IP machine. The machine must be a client of the HSM. For more information, see the User Guide for the HSM.
% /opt/nfast/bin/nethsmenroll -p <HSM_IP_Address> % /opt/nfast/bin/enquiry -
Create or import the Security World. For more information, see the User Guide for the HSM.
-
Edit
cknfastrcin/opt/nfastand update it to contain one of the following configurations:-
For Module-Only protection:
CKNFAST_OVERRIDE_SECURITY_ASSURANCES=wrapping_crypt CKNFAST_FAKE_ACCELERATOR_LOGIN=1 -
For OCS or Softcard protection:
CKNFAST_OVERRIDE_SECURITY_ASSURANCES=wrapping_crypt
CKNFAST_LOADSHARING=1
CKNFAST_NO_ACCELERATOR_SLOTS=1
-
-
Restart the
pkcs11dservice to apply the new settings to the system:% tmsh restart sys service pkcs11d % tmsh restart sys service tmmWhenever you change the cknfastrcfile, you must restart thepkcs11dservice for the changes to take effect. -
Append
*to the/shared/opt/nfast/kmdata/config/cardlistfile.
Configure HSM connectivity to BIG-IP
To configure HSM connectivity to BIG-IP:
-
Use the following F5 commands to verify the setup and to check the name of the partition to be used. For OCS or Softcard protection, this is typically the name of the card set.
% pkcs11d_test_suite % pkcs11d_test_one -
Take note of the partition name. This integration uses Module-Only protection, so the partition name was
accelerator. -
Log in to the Configuration utility using an account with the administrator role.
-
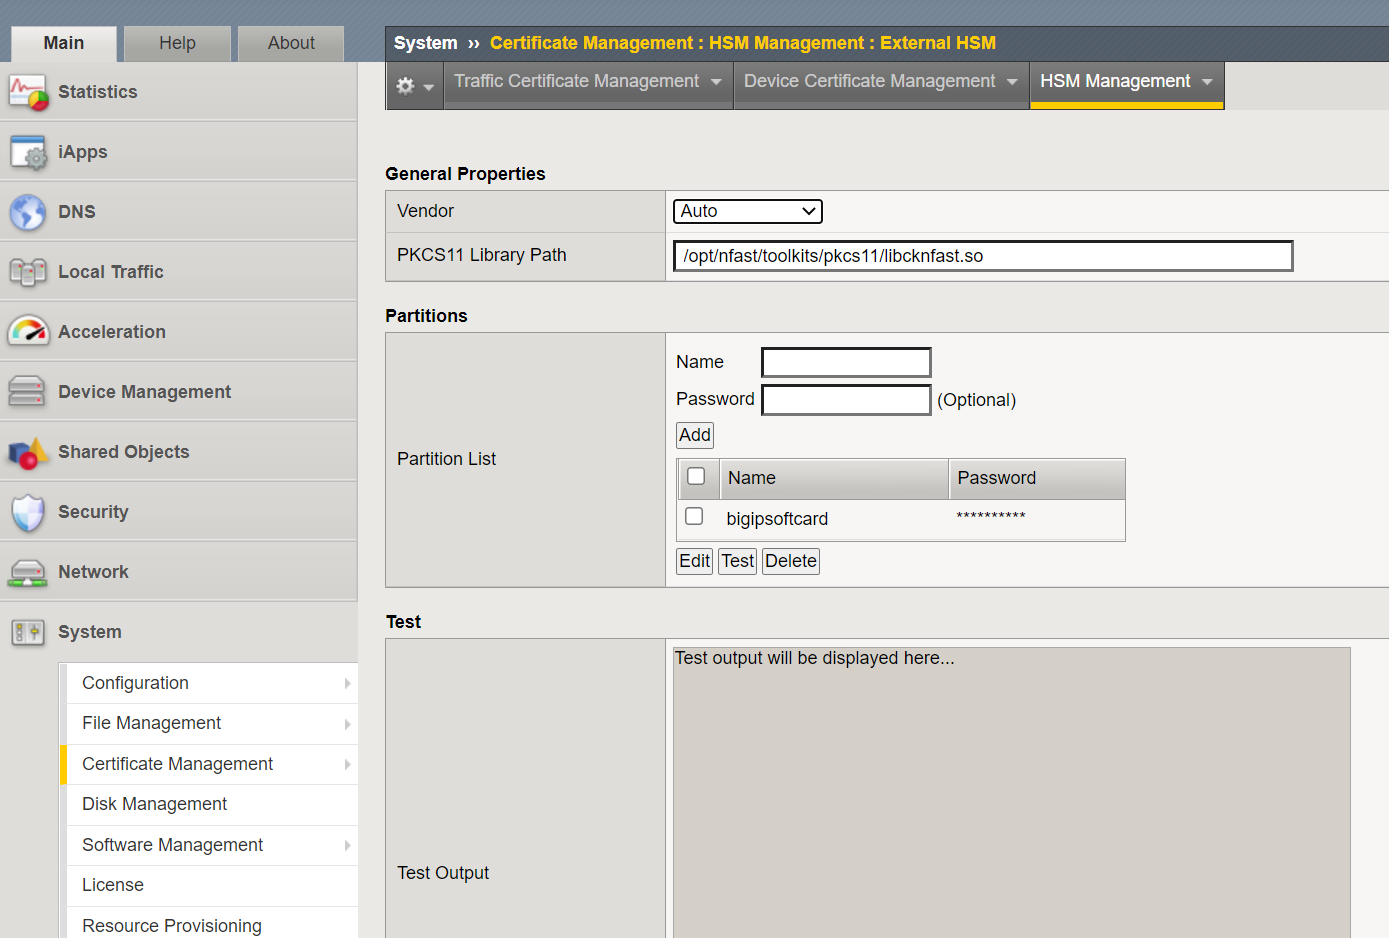
Add the following information under System > Certificate Management > HSM Management > External HSM.
-
For Vendor, select Auto.
-
For PKCS11 Library Path, enter /opt/nfast/toolkits/pkcs11/libcknfast.so.
-
For Partition, enter the partition name.
-
For Password, enter the card set passphrase.
-
-
Select Add to add the partition.
-
Select Update.
-
Restart the
pkcs11dservice to apply the new settings to the system:% bigstart restart pkcs11d -
Confirm that
pkcs11dis running:% bigstart status pkcs11d
Manage HSM keys for LTM
Generate an HSM key
The Traffic Management Shell, tmsh, can be used to generate a key or certificate on the HSM.
-
Generate the key:
% tmsh create sys crypto key <key_name> gen-certificate common-name <cert_name> security-type nethsm -
Verify that the key was created:
% tmsh list sys crypto key test_key
Generate a self-signed digital certificate
To generate a self-signed digital certificate:
-
Log in to the Configuration utility using an account with the administrator role.
-
On the main page, select System > Certificate Management > Traffic Certificate Management.
The Traffic Certificate Management page appears.
-
Select Create.
-
Under General Properties:
-
For Name, enter a unique name for the SSL certificate.
-
-
Under Certificate Properties:
-
For Issuer, select Self.
-
For Common Name, enter a name. This is typically the name of a website, such as
www.siterequest.com. -
Enter the other certificate details.
-
-
Under Key Properties:
-
For Security Type, select NetHSM.
-
For NetHSM Partition, select a partition to use.
-
For Key Type, leave RSA selected as the default.
-
For Size, select a size in bits.
-
-
Under Certificate Order Properties:
-
For Provider, select the certificate provider.
-
For Certificate Manager Order, select the Manager.
-
-
Select Finished.
Request a certificate from a Certificate Authority
To request a certificate from a Certificate Authority, you must generate a certificate signing request (CSR) and then submit the CSR to a third-party trusted certificate authority (CA):
-
Log in to the Configuration utility using an account with the administrator role.
-
On the main page, select System > Certificate Management > Traffic Certificate Management.
The Traffic Certificate Management page appears.
-
Select Create.
-
Under General Properties:
-
For Name, enter a unique name for the SSL certificate.
-
-
Under Certificate Properties:
-
For Issuer, select Certificate Authority.
-
Enter the other certificate details as appropriate.
-
-
Under Certificate Signing Request Attributes:
-
For Administrator E-mail Address, enter the administrator’s email address.
-
For Challenge Password, type a password.
-
Confirm the password.
-
-
Under Key Properties:
-
For Security Type, select NetHSM.
-
For NetHSM Partition, select a partition to use.
-
For Key Type, leave RSA selected as the default.
-
For Size, select a size in bits.
-
-
Under Certificate Order Properties:
-
For Provider, select the certificate provider.
-
For Certificate Manager Order, select the Manager.
-
-
Select Finished.
The Certificate Signing Request page appears.
-
Do one of the following to download the request as a file on your system:
-
For Request Text, copy the certificate.
-
For Request File, select Download.
-
-
Submit the request to a certificate authority to be signed.
-
Select Finished.
An option appears to import the signed certificate.
-
Import the certificate.
Delete a key from the BIG-IP system
To delete a key from the BIG-IP system:
-
Log in to the Configuration utility using an account with the administrator role.
-
On the main page, select System > Certificate Management > Traffic Certificate Management.
The Traffic Certificate Management page appears.
-
For SSL Certificate List, select the key to delete.
-
Select Delete.
The key you selected is deleted from BIG-IP.
The key stored in NetHSM is not deleted. To delete it, find the key file in
/opt/nfast/kmdata/localand remove it.
Import a pre-existing NetHSM key to the BIG-IP system
To import a pre-existing NetHSM key to the BIG-IP system:
-
Log in to the command-line interface of the system using an account with administrator privileges.
-
Import the NetHSM key:
% tmsh install sys crypto key <nethsm_key_label> from-nethsm security-type nethsm
This step can also be performed in the Configuration utility. See the F5 documentation for more information.
Configure BIG-IP High Availability (HA) Failover
SSL traffic failover can work with HSM keys and certificates.
-
Attach the HSM key and certificate to a client SSL profile.
-
Assign the profile to a virtual server so that the virtual server can process SSL traffic according to the specified profile settings.
-
Verify that the virtual server passes traffic correctly.
-
Perform a manual failover of the HA pair.
The virtual server should still pass traffic correctly.
When a new HSM key for F5 BIG-IP HA is created or imported on an HA machine, you must copy the
key_pkcs11file from/opt/nfast/kmdata/localto the other machine in the HA setup. Entrust recommends using therfs-syncfeature for this. Other file transfer methods can also be used. Without this step, SSL traffic that uses this key fails when BIG-IP fails over to the peer machine that does not have the key file.For instructions on setting up two F5 BIG-IP machines in an HA pair, see https://techdocs.f5.com/en-us/bigip-14-0-0/big-ip-service-provider-sip-administration-14-0-0/high-availability-ha-failover.html.
For instructions on manual failover, see https://my.f5.com/manage/s/article/K42061352.