Procedures
Download the Entrust software packages and documentation
Download the software files needed for the setup and installation.
-
Log in to https://trustedcare.entrust.com.
-
Go to PRODUCTS > PKI > Entrust Validation Authority and select the version that you want to download. (2.4.3)
The Entrust Validation Authority Page appears.
-
From Software Downloads, download the Entrust Validation Authority files:
-
The
evactlcommand-line tool. -
The Entrust Validation Authority Installer (the solution file with the
slnextension). -
The
eva-config.jsonsample configuration file. -
The
eva-database-scripts.tar.gzfile that contains the database management scripts.
-
-
From Documents, download the Entrust Validation Authority Deployment Guide.
-
From the list of Related Software, select Entrust Deployment Manager.
You will need it to install Entrust Validation Authority. This guide uses the VMware vSphere deployment. The version used in this guide for Entrust Deployment Manager is 2.0.2.
Select the Entrust Deployment Manager for VMware vSphere and physical machines download option.
-
From Documents of the Entrust Deployment Manager, download the Entrust Deployment Manager Installation and Administration Guide.
Install and configure the database
Install and configure the database that will be used by Entrust Validation Authority.
As explained in Entrust Validation Authority requirements, the Entrust Validation Authority uses an external database.
To initialize this database, the eva-database-scripts.tar.gz, included with the software, provides scripts for each supported DBMS, which are:
-
PostgreSQL database
-
Oracle database
-
SQL Server database
See the Entrust Validation Authority Deployment Guide for specific instructions on how to use the script to initialize the database.
This guide uses a server running the PostgreSQL database. An Ubuntu 20 server was deployed and PostgreSQL was selected to be installed. To install PostgreSQL on Ubuntu and configure it to be used by Entrust Validation Authority, do the following:
-
Install the
postgresqlpackage% sudo apt install postgresql -
Allow other computers to connect to PostgreSQL database.
Edit the
/etc/postgresql/12/main/postgresql.conffile.% cd /etc/postgresql/12/main % vi postgresql.confLocate the line:
#listen_addresses = 'localhost'and change it to:
listen_addresses = '*' -
Set a password for the
postgresuser.Run the following command at a terminal prompt to connect to the default PostgreSQL template database:
% sudo -u postgres psql template1The above command connects to PostgreSQL database
template1as thepostgresuser. After you have connected to the PostgreSQL server, you will be at an SQL prompt. Run the following SQL command at thepsqlprompt to configure the password for thepostgresuser.ALTER USER postgres with encrypted password 'your_password';Quit psql:
\q -
Set the authentication type of the
postgresuser.Edit
/etc/postgresql/*/main/pg_hba.confto allow authentication with thepostgresuser from any system in the local network:host all all x.x.x.1/24 trust -
Restart the PostgreSQL service to initialize the new configuration.
% sudo systemctl restart postgresql.service -
Test the connection.
% psql --host <db_host> --username postgres --password --dbname template1 -
Transfer the Entrust Validation Authority database scripts (
eva-database-scripts.tar.gz) to the database server anduntarthe file.% tar zxvf eva-database-scripts.tar.gz % cd eva-database-scripts/postgresql -
Create the environment variables needed to run the database scripts.
The Values used here are the values used in the integration.
- DBNAME
-
The database name.
% export DBNAME=template1 - HOSTNAME
-
The name of the host to connect to.
% export HOSTNAME=<db_host> - USERNAME
-
The username to connect as.
% export USERNAME=postgres - PASSWORD
-
The password of the user to connect as.
% export PASSWORD='xxxxxx' - OCSPRESPONDER_DB_PASSWORD
-
The password of the OCSP Responder user with Read permissions on the
certStatusandmetadatatables.% export OCSPRESPONDER_DB_PASSWORD='xxxxxxxxx' - OCSPRESPONDER_DB_USER
-
The name of the OCSP Responder user with Read permissions on the
certStatusandmetadatatables.% export OCSPRESPONDER_DB_USER='ocspresponderuser' - STATUSFEEDER_DB_PASSWORD
-
The password of the Status Feeder user with Read and Write permissions on the
certStatusandmetadatatables.% export STATUSFEEDER_DB_PASSWORD='xxxxxxxx' - STATUSFEEDER_DB_USER
-
The name of the Status Feeder user with Read and Write permissions on the
certStatusandmetadatatables.% export STATUSFEEDER_DB_USER='statusfeederuser'
-
Run
certstatus_initial_schema.sql.% PGPASSWORD=$PASSWORD psql -d $DBNAME -U $USERNAME -h $HOSTNAME -v "ON_ERROR_STOP=1" -f ./certstatus_initial_schema.sql CREATE TABLE CREATE INDEX -
Run
metadata_initial_schema.sql.% PGPASSWORD=$PASSWORD psql -d $DBNAME -U $USERNAME -h $HOSTNAME -v "ON_ERROR_STOP=1" -f ./metadata_initial_schema.sql CREATE TABLE CREATE INDEX -
Run
create_users.sqlto create the database users.% PGPASSWORD=$PASSWORD psql -d $DBNAME -U $USERNAME -h $HOSTNAME \ -v STATUSFEEDER_DB_USER=$STATUSFEEDER_DB_USER \ -v OCSPRESPONDER_DB_USER=$OCSPRESPONDER_DB_USER \ -v STATUSFEEDER_DB_PASSWORD=$STATUSFEEDER_DB_PASSWORD \ -v OCSPRESPONDER_DB_PASSWORD=$OCSPRESPONDER_DB_PASSWORD \ -v "ON_ERROR_STOP=1" -f ./create_users.sql CREATE ROLE CREATE ROLE GRANT GRANT GRANT GRANT GRANT
Install and configure a Certificate Authority (CA)
Install and configure a Certificate Authority (CA) that will be used by Entrust Validation Authority. As explained in Entrust Validation Authority requirements, the Entrust Validation Authority uses a Certificate Authority (CA) to obtain the VA server certificate that will be used in the integration. Since the integration will not use a CA GW and instead it will use a Certificate Revocation List (CRL), the CA will also be used to generate the CRL list. The guide uses easy-RSA CA but any CA could be used in this case.
Install and configure a Certificate Authority Server
This guide uses the same server used for the database to install the CA. The installation instructions in this case are for an Ubuntu server. A separate server could be used if necessary.
-
Install the
easy-rsapackage.% sudo apt install easy-rsa -
Prepare the public Key Infrastructure directory.
% mkdir ~/easy-rsa % ln -s /usr/share/easy-rsa/* ~/easy-rsa/ % chmod 700 ~/easy-rsa % cd ~/easy-rsa % ./easyrsa init-pki init-pki complete; you may now create a CA or requests. Your newly created PKI dir is: ~/easy-rsa/pki -
Create a Certificate Authority.
-
Create the
varsfile.Before you can create your CA’s private key and certificate, you need to create and populate a
varsfile in theeasy-rsadirectory with some default values.set_var EASYRSA_REQ_COUNTRY "<country>" set_var EASYRSA_REQ_PROVINCE "<province>>" set_var EASYRSA_REQ_CITY "<city>" set_var EASYRSA_REQ_ORG "<organization>" set_var EASYRSA_REQ_EMAIL "xxxx.xxxx@entrust.com" set_var EASYRSA_REQ_OU "Interop" set_var EASYRSA_ALGO "ec" set_var EASYRSA_DIGEST "sha512" -
Create the root public and private key pair for your Certificate Authority.
% ./easyrsa build-ca ... Enter New CA Key Passphrase: Re-Enter New CA Key Passphrase: ... Common Name (eg: your user, host, or server name) [Easy-RSA CA]: CA Gateway CA creation complete and you may now import and sign cert requests. Your new CA certificate file for publishing is at: ~/easy-rsa/pki/ca.crt -
Save the
ca.crtfile.This file will be used in the Entrust Deployment Management server to generate the keys. It will also be used in the Entrust Validation Authority GUI configuration.
-
Generate a server key pair
This key pair will be used to generate a certificate that will be revoked so we can generate the CRL that will be used by the integration. To generate the key pair, run the following command:
% keytool -genkeypair -alias <alias> -dname <dn> -keyalg <keyAlg> -keysize <keySize> \
-sigalg sha256WithRSA -ext san=dns:<dns> -keystore <keystore> [-keypass <keyPass>] [-storepass <keystorePass>]
For this integration:
% mkdir ~/cagw
% cd ~/cagw
% keytool -genkeypair -alias example_alias -dname "cn=CA Gateway,ou=CA Entry,o=Interop,c=US" -keyalg RSA -keysize 2048 -sigalg sha256WithRSA -ext san=dns:interop.local -keystore ./keystore.ks

Enter keystore password:
Re-enter new password:
Enter key password for <example_alias>
        (RETURN if same as keystore password):
Re-enter new password:
Obtain the key pair CSR
Create a Certificate Signing Request (CSR) by entering the following command:
% keytool -certreq -alias <alias> -file <file> -storetype pkcs12 -keystore <keystore> [-storepass <keystorePass>]For this integration:
% keytool -certreq -alias example_alias -file ./cagw_csr.txt -keystore ./keystore.ks

Enter keystore password:
Obtain the server certificate from the CSR
-
Import the CSR
Using the CSR generated in the previous step (
cagw_csr.txt), import the CSR.% cd ~/easy-rsa % ./easyrsa import-req /tmp/cagw_csr.txt cagw Note: using Easy-RSA configuration from: ./vars Using SSL: openssl OpenSSL 1.1.1f 31 Mar 2020 The request has been successfully imported with a short name of: cagw You may now use this name to perform signing operations on this request. -
Sign the CSR.
% ./easyrsa sign-req server cagw

Note: using Easy-RSA configuration from: ./vars

Using SSL: openssl OpenSSL 1.1.1f  31 Mar 2020


You are about to sign the following certificate.
Please check over the details shown below for accuracy. Note that this request
has not been cryptographically verified. Please be sure it came from a trusted
source or that you have verified the request checksum with the sender.

Request subject, to be signed as a server certificate for 1080 days:

subject=
    countryName               = US
    organizationName          = Interop
    organizationalUnitName    = CA Entry
    commonName                = CA Gateway


Type the word 'yes' to continue, or any other input to abort.
  Confirm request details: yes
Using configuration from /home/xxxx/easy-rsa/pki/safessl-easyrsa.cnf
Enter pass phrase for /home/xxxx/easy-rsa/pki/private/ca.key:
Check that the request matches the signature
Signature ok
The Subject's Distinguished Name is as follows
countryName           :PRINTABLE:'US'
organizationName      :PRINTABLE:'Interop'
organizationalUnitName:PRINTABLE:'CA Entry'
commonName            :PRINTABLE:'CA Gateway'
Certificate is to be certified until Oct  4 18:55:17 2026 GMT (1080 days)

Write out database with 1 new entries
Data Base Updated

Certificate created at: /home/xxxx/easy-rsa/pki/issued/cagw.crt
Revoke the certificate to be able to create the CRL list
To create the CRL needed for the integration, we need to revoke the certificate created in the previous step.
% ./easyrsa revoke cagw

Note: using Easy-RSA configuration from: ./vars

Using SSL: openssl OpenSSL 1.1.1f  31 Mar 2020


Please confirm you wish to revoke the certificate with the following subject:

subject=
    countryName               = US
    organizationName          = Interop
    organizationalUnitName    = CA Entry
    commonName                = CA Gateway


Type the word 'yes' to continue, or any other input to abort.
  Continue with revocation: yes
Using configuration from /home/xxxx/easy-rsa/pki/safessl-easyrsa.cnf
Enter pass phrase for /home/xxxx/easy-rsa/pki/private/ca.key:
Revoking Certificate 5FB65DF1FBD42CCA25FEC514B415E1BE.
Data Base Updated

IMPORTANT!!!

Revocation was successful. You must run gen-crl and upload a CRL to your
infrastructure in order to prevent the revoked cert from being accepted.
Generate the Certificate Revocation List
-
Generate the CRL.
It will contain the certificate revoked in the previous step.
% ./easyrsa gen-crl Note: using Easy-RSA configuration from: ./vars Using SSL: openssl OpenSSL 1.1.1f 31 Mar 2020 Using configuration from /home/xxxx/easy-rsa/pki/safessl-easyrsa.cnf Enter pass phrase for /home/xxxx/easy-rsa/pki/private/ca.key: An updated CRL has been created. CRL file: /home/xxxx/easy-rsa/pki/crl.pem -
Convert the
crl.pemfile to DER formatEntrust Validation Authority expects the CRL to be in DER format.
% openssl crl -in /home/xxxx/easy-rsa/pki/crl.pem -out /home/xxxx/easy-rsa/pki/crl.der -outform DER -
Save the
crl.derfile so it can be made available in the HTTP host.The
crl.derfile needs to be made available via HTTP to Entrust Validation Authority.
Make the crl.der file available via http request
If a webserver is already available, use it and make the crl.der file available via that host.
Otherwise, install Apache to make the crl.der file available via HTTP.
In these instructions, we install Apache on the same Ubuntu server as the database server and CA server but it can be deployed on a separate server.
-
Install the
apache2package.% sudo apt install apache2 -
Enable Apache so if the server is rebooted the Apache server runs.
% sudo systemctl enable apache2 -
Start the Apache server.
% sudo service apache2 start -
Make the
crl.derfile available via URL in the Apache server.% cd /var/www/html % sudo mkdir crl % cp /home/xxxx/easy-rsa/pki/crl.der crl/.You should be able see the
crl.derfile now using the following URL:http://<apache_host>/crl/crl.der
Install and configure the nShield HSM
This guide does not cover the basic installation and configuration of the nShield HSM or the nShield Security World client software. For instructions, see the Installation Guide for your HSM.
Assuming Security World has been installed and configured and the World and modules have been created, prepare the cknfastrc file so it is setup according to the protection method selected for the integration.
The file is in the %NFAST_HOME%/kmdata directory.
NFAST_HOME is C:\Program Files\nCipher\nfast on Windows and /opt/nfast on Linux.
For more information about the environment variables used in cknfastrc, see:
-
The nShield Cryptography API Guide.
-
The PKCS #11 library environment variables section of the User Guide for the HSM.
Select the key protection method
Module protection
-
Add the following lines to the
cknfastrcfile of the Security World.CKNFAST_FAKE_ACCELERATOR_LOGIN=1 -
The token name used during module protection for the integration will be accelerator.
-
For FIPS 140 Level 3:
-
You must have an OCS card created and inserted to provide FIPS-authentication.
-
The ACS card can also be used to provide FIPS-authentication but it is not recommended.
-
Softcard protection
-
Add the following lines to the
cknfastrcfile of the Security World.CKNFAST_LOADSHARING=1 -
Create a softcard
% ppmk -n testSC Enter new pass phrase: Enter new pass phrase again: New softcard created: HKLTU 329333aa357af00ca57af28c3ca4a3b4e6d39afe -
The token name used during softcard protection for the integration will be the softcard name used when you created the softcard. In this case, testSC.
-
For FIPS 140 Level 3:
-
You must have an OCS card created and inserted to provide FIPS-authentication.
-
The ACS card can also be used to provide FIPS-authentication but it is not recommended.
-
OCS protection
-
Add the following lines to the
cknfastrcfile of the Security World.CKNFAST_LOADSHARING=1 -
Create the OCS card
% sudo /opt/nfast/bin/createocs -m1 -s2 --persist -N testOCS -Q 1/1 ``` Creating Cardset: Module 1: 0 cards of 1 written Module 1 slot 0: Admin Card #1 Module 1 slot 2: blank card Module 1 slot 3: empty Module 1 slot 4: empty Module 1 slot 5: empty Module 1 slot 2:- passphrase specified - writing card Card writing complete. cardset created; hkltu = a705fffe235cd68850ab08504622b233d7087d12 -
The token name used during OCS protection for the integration will be the name used when the OCS card was created. In this case, testOCS.
-
Insert the OCS card to provide FIPS-authorization.
cardlist file
If you are using a Remote administration card, add "*" to the kmdata/config/cardlist file to allow the usage of the remote admin card.
Create a tar file with the kmdata directory
When you are configuring Entrust Validation Authority, you will have to import the kmdata directory from the Security World into EVA.
-
Create a
tarfile that contains thekmdatadirectory.Make sure that the world, the modules, the cardlist, the softcard or the OCS cards, and the
cknfastrcfile have been created and that they are ready to be used by EVA.% cd /opt/nfast % tar czvf ~/kmdata.tgz kmdata -
Save the
tarfile so it can be used when the import takes place.
Set up and configure the Entrust Deployment Manager server
Entrust Deployment Manager (EDM) provides a Management Console to deploy and manage Entrust solutions like Entrust Validation Authority. It needs to be setup and configure first before you can deploy Entrust Validation Authority. For this integration, EDM is deployed on VMware vSphere. After downloading the Entrust Deployment Manager software for vSphere. Install it according to what is documented in the EDM Administration Guide.
This integration used a VM with the following configuration:
-
4 CPUs
-
8 GB RAM
-
175 GB Disk
Once deployed, sign in using the following credentials:
-
sysadmin/changeme
Follow the instructions on the Administration Guide to complete the installation. The EDM server was installed in single-mode for the integration.
% sudo clusterctl install --mode single-node-
Replace the default password of the Management console.
Open the following URL:
https://<edm_host>/management-console-
Log in with the
adminusername and thechangemepassword. -
Fill in the Change Password form and select SAVE.
-
-
Replace the default Grafana password.
Open the following URL:
https://<edm_host>/grafana-
Log in with the
adminusername and thechangemepassword. -
Go to Admin > Change Password and change the admin’s password.
-
Entrust Validation Authority setup and configuration
Entrust Deployment Manager provides a Management Console to deploy and manage Entrust solutions like Entrust Validation Authority.
Sign in to the admin account of the Entrust Deployment Management Console at the following URL:
https://<edm_host>/management-consoleRegister Entrust Validation Authority
-
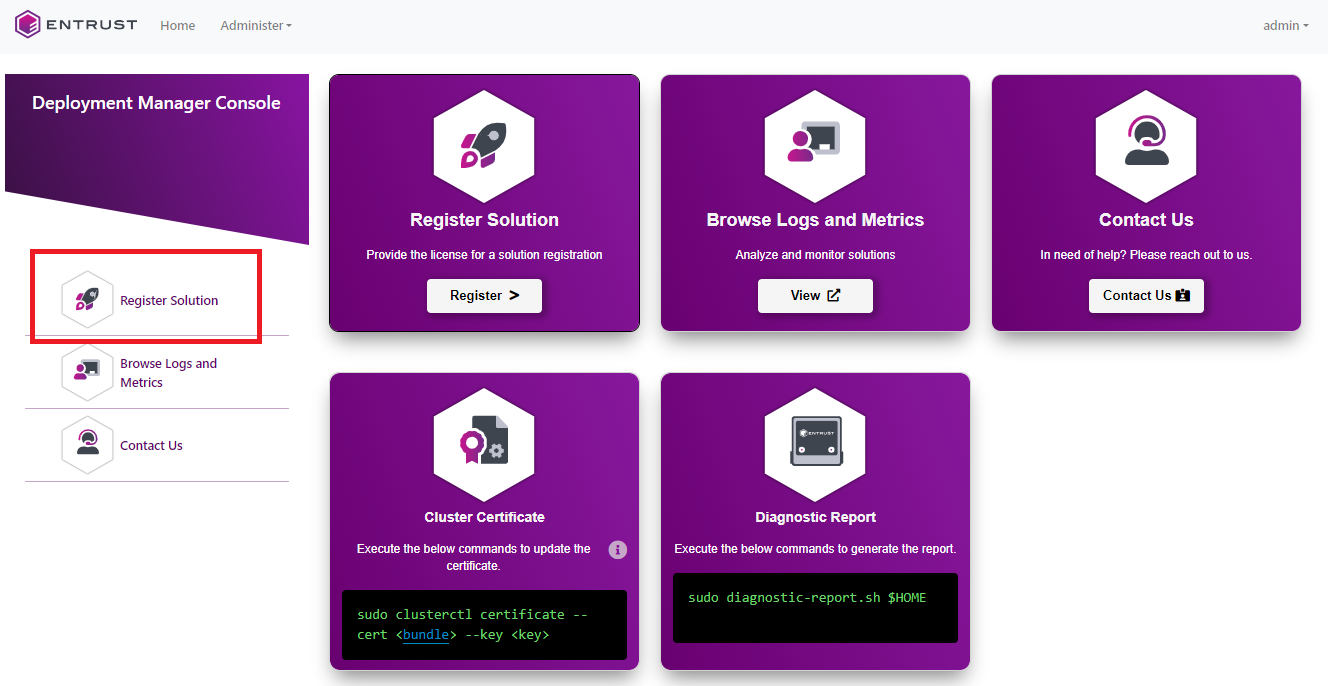
Select Register Solution in the sidebar menu to display the registration dialog.
-
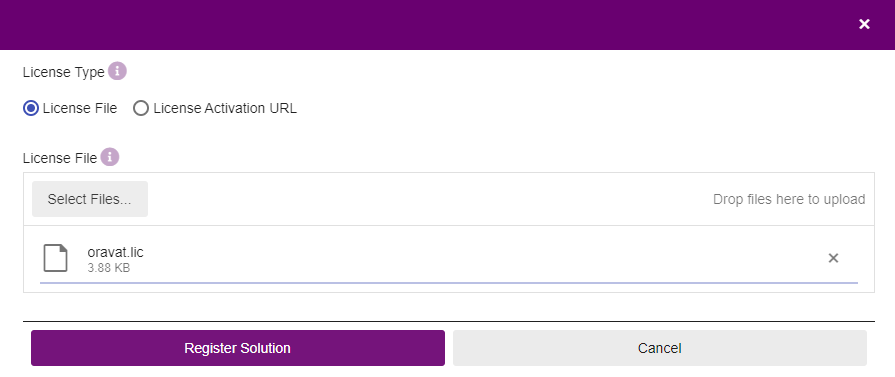
In the registration dialog:
-
Select License File to register the solution with a license file.
-
Select License Activation URL to register the solution with an activation URL and a license password.
-
-
Select Register Solution and wait until the solution is registered.
Manage Entrust Validation Authority
-
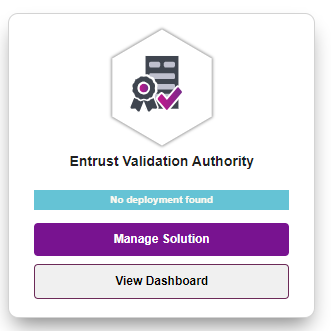
In the content pane, select Manage Solution for the newly registered solution for Entrust Validation Authority.
-
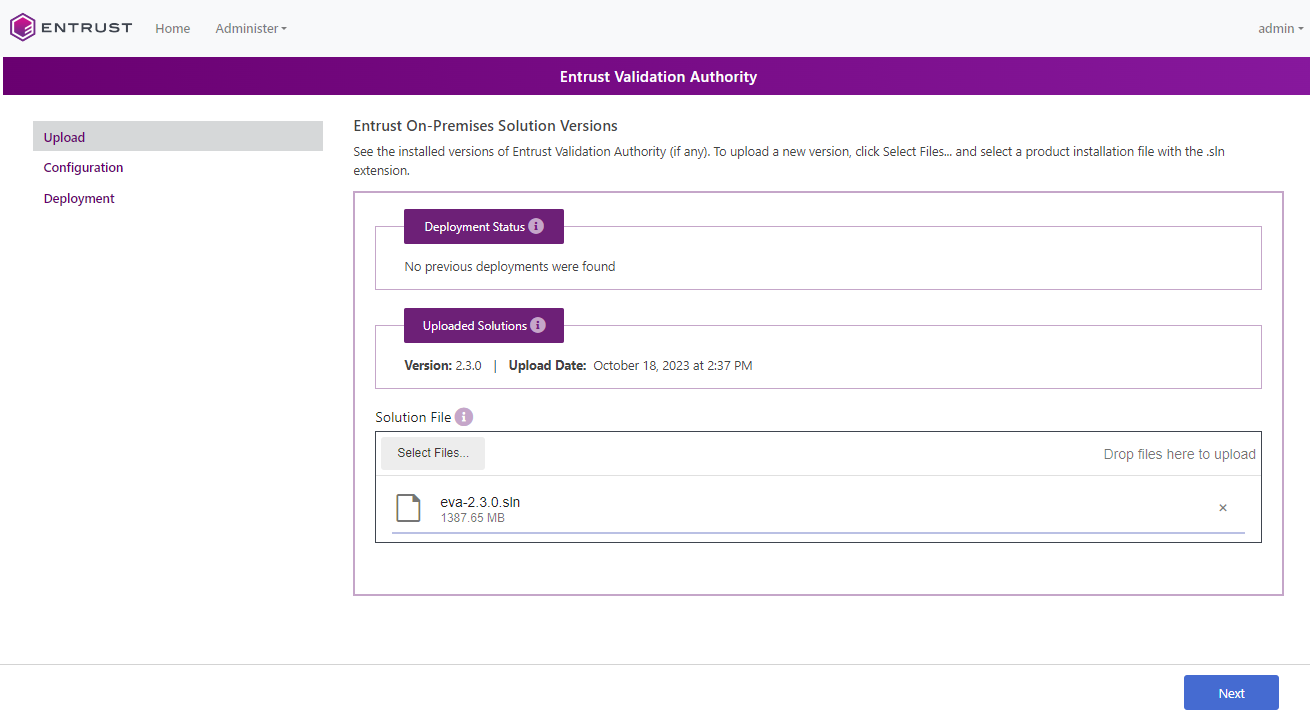
To upload the solution file with the Management Console:
-
In the Entrust On-Premises Product Information page, select Select Files.
-
Select the
.slninstallation file for the solution. -
Select Upload and wait until the installation file is uploaded.
-
Select Next.
-
Import the HSM configuration
-
As the
sysadminuser, transfer thekmdata.tgzfile created earlier with the HSMkmdatadirectory to the EDM server.% sftp sysadmin@<edm_host> > put kmdata.tgz -
Transfer the
evactlcommand that was downloaded with the EVA software downloaded to the EDM server.% sftp sysadmin@<edm_host> > put evactl -
ssh to the EDM server IP address using the
sysadminuser. -
Extract the contents of the
kmdata.tgzfile.% tar zxvf kmdata.tgzBefore importing the configuration, it is important to have the cknfastrcinside the kmdata folder. The file needs to be updated according to the type of HSM protection being used. See the Select the key protection method section for the contents of thecknfastrcfile based on the protection method being used. -
Run the
evactl import-nshieldcommand to import the configuration.% sudo ./evactl import-nshield -f /home/sysadmin/kmdata If there is a kmdata in EVA, it will be overwritten. Created keys will be lost. Continue? [y/N]: y Uploading done ╢▌▌▌▌▌▌▌▌▌▌▌▌▌▌▌▌▌▌▌▌▌▌▌▌▌▌▌▌▌▌╟ 100 % Secret(s) established. A redeploy of the eva solution is required for changes to take effect Importing nShield... Done
Generate the VA certificate key and CSR
-
Generate the private key for the VA certificate.
In the EDM server, run the
evactl create-keycommand to generate a private key for the VA certificate. Do this based on the protection method selected in the HSM configuration section. Keep in mind the token name to be used.-
If using softcard protection, change the token name to
testSC. -
If using module protection, change the token name to
accelerator. -
If using OCS protection, change the token name to
testOCS.The command will also create the CSR needed for the VA certificate.
% sudo ./evactl create-key -k RSA2048 -s "CN=OCSP Server" -o /tmp/certreq.txt -t testSC -v nshield

Obtaining necessary components for EVA...  Done
Enter HSM PIN:
Starting PKCS #11 Manager...               Done
Using token with label testSC
Created key with id 96579d9dcc7c9c5e73f85fe3d4fd03ab8c29e872
Uploading  done ╢▌▌▌▌▌▌▌▌▌▌▌▌▌▌▌▌▌▌▌▌▌▌▌▌▌▌▌▌▌▌╟ 100 %
Secret(s) established. A redeploy of the eva solution is required for changes to take effect
CSR written in path: /tmp/certreq.txt
-
-
Copy
/tmp/certreq.txt to /home/sysadmin/.% sudo chmod 777 /tmp/certreq.txt; cp /tmp/certreq.txt ~/. -
Check that you can read the keys in the token.
% sudo ./evactl list-keys -t testSC -v nshield

Obtaining necessary components for EVA...  Done
Enter HSM PIN:
Starting PKCS #11 Manager...               Done
Using token with label testSC
Private Key Object; RSA 2048 bits
  Label:      96579d9dcc7c9c5e73f85fe3d4fd03ab8c29e872
  ID:         96579d9dcc7c9c5e73f85fe3d4fd03ab8c29e872
  Usage:      sign

Public Key Object; RSA 2048 bits
  Label:      96579d9dcc7c9c5e73f85fe3d4fd03ab8c29e872
  ID:         96579d9dcc7c9c5e73f85fe3d4fd03ab8c29e872
  Usage:      verify
Process the VA certificate request
Send the VA certificate request to a CA for generating a certificate with the following extension values:
| Key Usage |
|
| Extended Key Usage |
|
Extended Key Usage value in the documentation is id-kp-OCSPSigning.
However, when we used easy-rsa, we had to set the value to OCSPSigning because using id-kp-OCSPSigning resulted in the following error message when the CRS was signed:
ERROR: adding extensions in section default
140384717350208:error:0D06407A:asn1 encoding routines:a2d_ASN1_OBJECT:first num too large:../crypto/asn1/a_object.c:73:
140384717350208:error:2206706E:X509 V3 routines:v2i_EXTENDED_KEY_USAGE:invalid object identifier:../crypto/x509v3/v3_extku.c:95:section:<NULL>,name:id-kp-OCSPSigning,value:<NULL>
140384717350208:error:22098080:X509 V3 routines:X509V3_EXT_nconf:error in extension:../crypto/x509v3/v3_conf.c:47:name=extendedKeyUsage, value=id-kp-OCSPSigning

Easy-RSA error:

signing failed (openssl output above may have more detail)
Transfer the certreq.txt file to the CA server.
In the CA server, do the following:
-
Import the certificate
% cd easy-rsa % ./easyrsa import-req /home/xxxx/certreq.txt va Note: using Easy-RSA configuration from: ./vars Using SSL: openssl OpenSSL 1.1.1f 31 Mar 2020 The request has been successfully imported with a short name of: va You may now use this name to perform signing operations on this request. -
Set the configuration of
easy-rsaso the extension values are available.The
keyUsageextension is already properly set. You only need to set theextendedKeyUsageextension. You do this by setting the following environment variable before signing the request:% export EASYRSA_EXTRA_EXTS='extendedKeyUsage = OCSPSigning' -
Sign the CSR.
% ./easyrsa sign-req client va Note: using Easy-RSA configuration from: ./vars Using SSL: openssl OpenSSL 1.1.1f 31 Mar 2020 You are about to sign the following certificate. Please check over the details shown below for accuracy. Note that this request has not been cryptographically verified. Please be sure it came from a trusted source or that you have verified the request checksum with the sender. Request subject, to be signed as a client certificate for 1080 days: subject= commonName = OCSP Server Type the word 'yes' to continue, or any other input to abort. Confirm request details: yes Using configuration from /home/xxxx/easy-rsa/pki/safessl-easyrsa.cnf Enter pass phrase for /home/xxxx/easy-rsa/pki/private/ca.key: Check that the request matches the signature Signature ok The Subject's Distinguished Name is as follows commonName :PRINTABLE:'OCSP Server' Certificate is to be certified until Oct 9 18:11:33 2026 GMT (1080 days) Write out database with 1 new entries Data Base Updated Certificate created at: /home/xxxx/easy-rsa/pki/issued/va.crt -
Verify extensions are in the certificate
% openssl x509 -text -in /home/xxxx/easy-rsa/pki/issued/va.crt Certificate: Data: Version: 3 (0x2) Serial Number: ad:27:00:4b:76:9d:ac:8d:4e:16:fb:36:49:cf:b8:30 Signature Algorithm: ecdsa-with-SHA512 Issuer: CN = CA Gateway Validity Not Before: Jan 2 16:16:06 2025 GMT Not After : Dec 18 16:16:06 2027 GMT Subject: CN = OCSP Server Subject Public Key Info: Public Key Algorithm: rsaEncryption RSA Public-Key: (2048 bit) Modulus: 00:b0:5e:60:16:7a:ad:e2:dd:4e:83:f0:2d:47:fc: dc:cc:79:09:77:35:8c:2e:ff:70:b7:f0:89:11:d2: e7:2f:41:59:60:b8:a8:7c:a4:2d:4a:0a:4d:a0:e9: be:da:99:dd:34:4c:c9:ab:b9:cd:1c:00:aa:7f:cb: a3:1d:9c:f5:50:99:d5:01:b3:45:19:79:f4:c7:8a: dc:b1:42:75:98:96:b6:71:9c:eb:21:a5:02:0a:0a: ff:45:c9:e3:7b:90:fb:3a:6b:f9:1f:17:57:cc:33: 51:3e:2a:b5:86:55:d6:59:d8:cb:84:ae:d7:17:4a: c7:fe:d6:15:69:8e:dd:b1:fb:94:d4:b2:07:75:04: 07:a5:d6:78:ad:f5:40:87:2d:fb:96:be:00:3c:ba: f3:24:13:4d:c2:bc:45:53:97:1f:01:0f:f2:25:b1: 95:3d:1d:79:ae:a8:68:d4:60:ed:73:54:e2:cf:55: a9:cf:0a:65:a8:c0:6e:ea:34:cf:f2:6b:fd:03:8b: 6e:b7:82:74:a3:91:77:a1:bf:20:8a:05:64:7a:66: 21:1b:21:72:54:72:8a:7f:3c:68:2c:68:99:e7:31: 5a:c2:5c:1d:fc:24:a7:84:ea:ba:65:a1:89:7c:6f: a3:ab:09:1a:c7:06:ee:e3:d2:ed:47:d1:20:b6:97: e2:47 Exponent: 65537 (0x10001) X509v3 extensions: X509v3 Basic Constraints: CA:FALSE X509v3 Subject Key Identifier: 6B:17:78:C0:8B:B5:AD:1B:0B:A4:36:31:00:C8:BB:65:7D:24:EE:99 X509v3 Authority Key Identifier: keyid:E3:CE:6B:C3:26:F5:73:DA:8A:5C:62:BC:C2:E5:79:FA:BE:6C:20:DB DirName:/CN=CA Gateway serial:37:A6:56:C2:7A:3C:0E:FB:03:B6:E6:89:CC:E9:7D:82:C5:FE:5B:21 X509v3 Key Usage: Digital Signature X509v3 Extended Key Usage: OCSP Signing Signature Algorithm: ecdsa-with-SHA512 30:65:02:31:00:fb:cc:02:22:59:68:8c:80:0d:27:54:cc:ba: 70:86:76:15:1e:0a:3b:c1:24:12:29:06:2c:19:f3:24:fc:ee: 20:93:0c:8a:b6:84:06:d7:1a:90:0a:d1:5b:62:6e:9a:2f:02: 30:0a:4f:86:e5:be:0a:94:4c:03:9b:aa:69:37:7b:d2:10:2e: da:97:8b:35:42:89:83:23:f8:7a:08:0a:30:db:1c:96:52:76: 16:f2:8f:8c:34:a1:4c:b7:90:39:1e:7e:62 -----BEGIN CERTIFICATE----- MIICtzCCAj2gAwIBAgIxxxxxxxxxxxxxxxxxxxxxxxxxxxYIKoZIzj0EAwQwFTET Qxxxxxxxxxxxxxxxxxxxxxxxxxxxxxxxxxxi -----END CERTIFICATE----- -
Save the
va.crtfile so you can transfer it during the Entrust Validation Authority GUI Configuration steps of the Certificate Authority.
Configure Entrust Validation Authority from the web UI
-
Sign in to the Entrust Deployment Management Console at the following URL:
https://<edm_host>/management-consoleUse the admin account and password that you configured during setup.
-
In the content pane, select Manage Solution for Entrust Validation Authority.

-
Select Configuration on the left.
-
In the Entrust On-Premises Product Configuration page, activate the Import configuration toggle switch, then select Select Files to import the sample configuration file included with the distribution package for Entrust Validation Authority.
-
Activate the Enable Advanced toggle to display advanced parameters on the next page. (Optional)
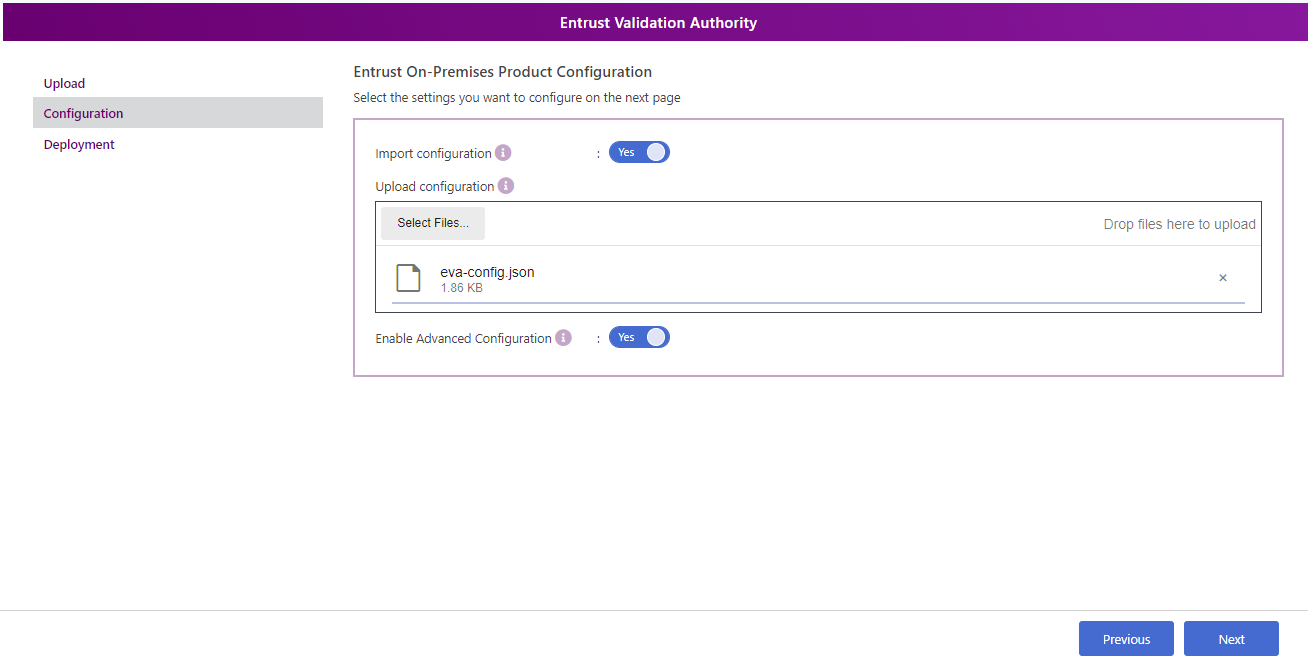
-
Select Next to display the configuration options.
During testing for EVA 2.4.3 we found an issue with the eva-config.jsonfile. When used the following error shows up when you validate the form data in the configuration: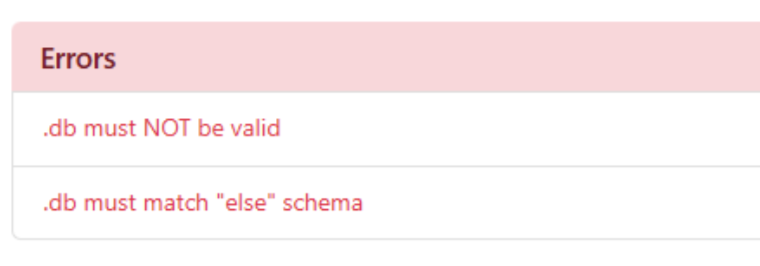
If that’s the case, Do not use the sample configuration file included in the distribution.
-
Configure the settings accordingly, then select Next.
Database name Parameters for the connection to the database. In our example: template1.
Driver The database driver name. In our example: postgres.
Max connections The number of maximum concurrent database connections. Both the Status Feeder and the OCSP Responder use this value. Therefore, the database must support the double of that. In our example: 100.
Host The IP or hostname of the database host (<db_host>).
OCSP Responder User OCSP Responder username (
ocspresponderuser).OCSP Responder password Use the password, as configured earlier the database setup.
Status Feeder User The Status Feeder username (
statusfeederuser).Status Feeder password Use the password, as configured earlier the database setup.
Port Leave the default port as 5432.
SSL mode Whether the EVA will use SSL in the DB connection or not. In our example: the postgres database is set to disable.
-
Configure the HSM settings.
Vendor The vendor name of the HSM that will be used. For software cryptography set it to
none. In our example: nshield.Token label The label of the HSM token that contains the private keys. It depends on the type of HSM protection selected. In our example: we created a softcard to hold the keys. Set it to the softcard name testSC.
HSM PIN The pin for the HSM (the passphrase used for the softcard). Use the password as configured when you created the softcard. If you are using module protection, the HSM PIN can be anything.
Number of sessions The maximum number of concurrent PKCS #11 sessions on the HSM. When no value is specified, the default is 64. Leave it blank.
-
Select Next.
-
Under OCS Responder-Server, take the default settings and select Next.
This section is only visible if the Advanced Configuration Toggle is enabled.
-
LDAP Servers:
We will not use LDAP so remove all the server settings from the template.
-
Configure the certificate authorities
This integration uses one certificate authority in the integration, so remove the two additional certificate authorities from the template:
-
Under Certificate Authority 1:
CA ID The identifier of the CA that issues the certificates. If using CAGW, the ID must match the one in CAGW. If you are using CRL as the source, it can be any name. In our example: we used the name of the CA, easyrsa.
Certificates Source The source of the certificates for this CA. For this integration, we used CRL.
-
Under Certificate Revocation List:
Wait to pull certs duration How often will EVA check for new certificate events to update the DB. Set it to 30s.
CRL warning time The period during which to enable the expiration warning for the last processed CRL. Set it to 4h.
CRL Host Server Select HTTP.
-
Under Certificate Revocation List in HTTP server:
CRL HTTP URL The URL of the HTTP server where the CRL is hosted. In our example: we deployed an Apache server and made the
crl.derfile available in the server. The URL:http://<apache_host>/crl/crl.derConnection timeout The timeout for connections with the HTTP server. When omitted, the timeout is set to 5s. Leave it blank (default).
Use SN Lists Set it to false.
-
Under OCS Responder:
Profile ID The identifier of the profile for processing the certificate status before generating an OCSP response Set it to CRLProfile or CRLProfileWithArchiveCutOff. In our example: CRLProfile.
CA Certificate The certificate as a
pemfile. It is the CA that issues the certificates for which EVA will give OCSP service. Upload theca.crtfile fromeasy-rsain this case because this is the CA we are using.VA Certificate The certificate as a
pemfile. It is the VA that will be used to sign the OCSP responses. This is the va certificate we signed usingeasy-rsa(va.crtfile).
-
-
Select Next.
Submit the configuration settings
-
Select Download to download the new configuration.
-
Select Validate to validate the configured settings.
-
Correct any detected configuration error.
-
Select Submit and wait while Entrust Deployment Manager uploads the configuration and any attached files.
Entrust Validation Authority Deployment
After you Submit the Entrust Validation Authority Configuration and there are no errors reported in the configuration, the system is ready to be deployed:
-
Select Deploy.
-
Select Yes in the confirmation dialog.
-
Wait until the solution is deployed.
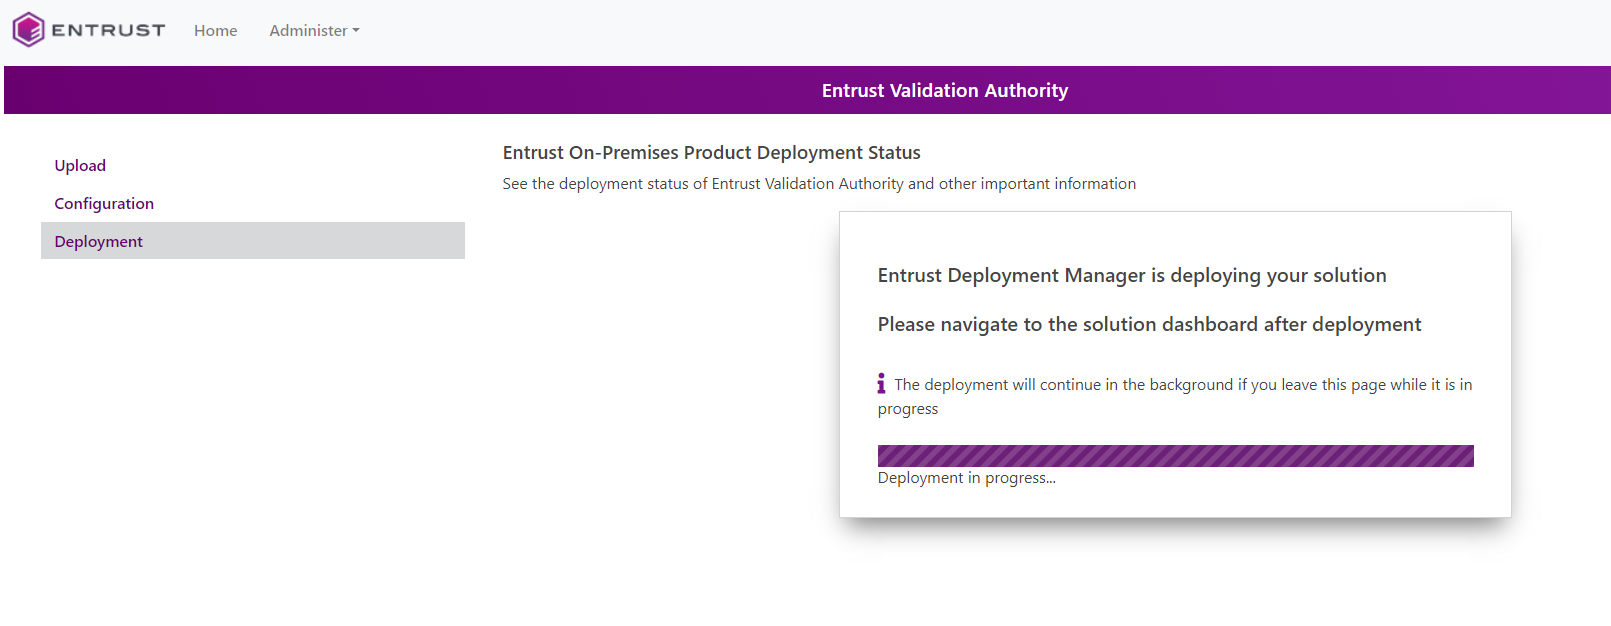
-
Once deployed, select Go to Dashboard.

-
You should see that EVA has been deployed successfully.
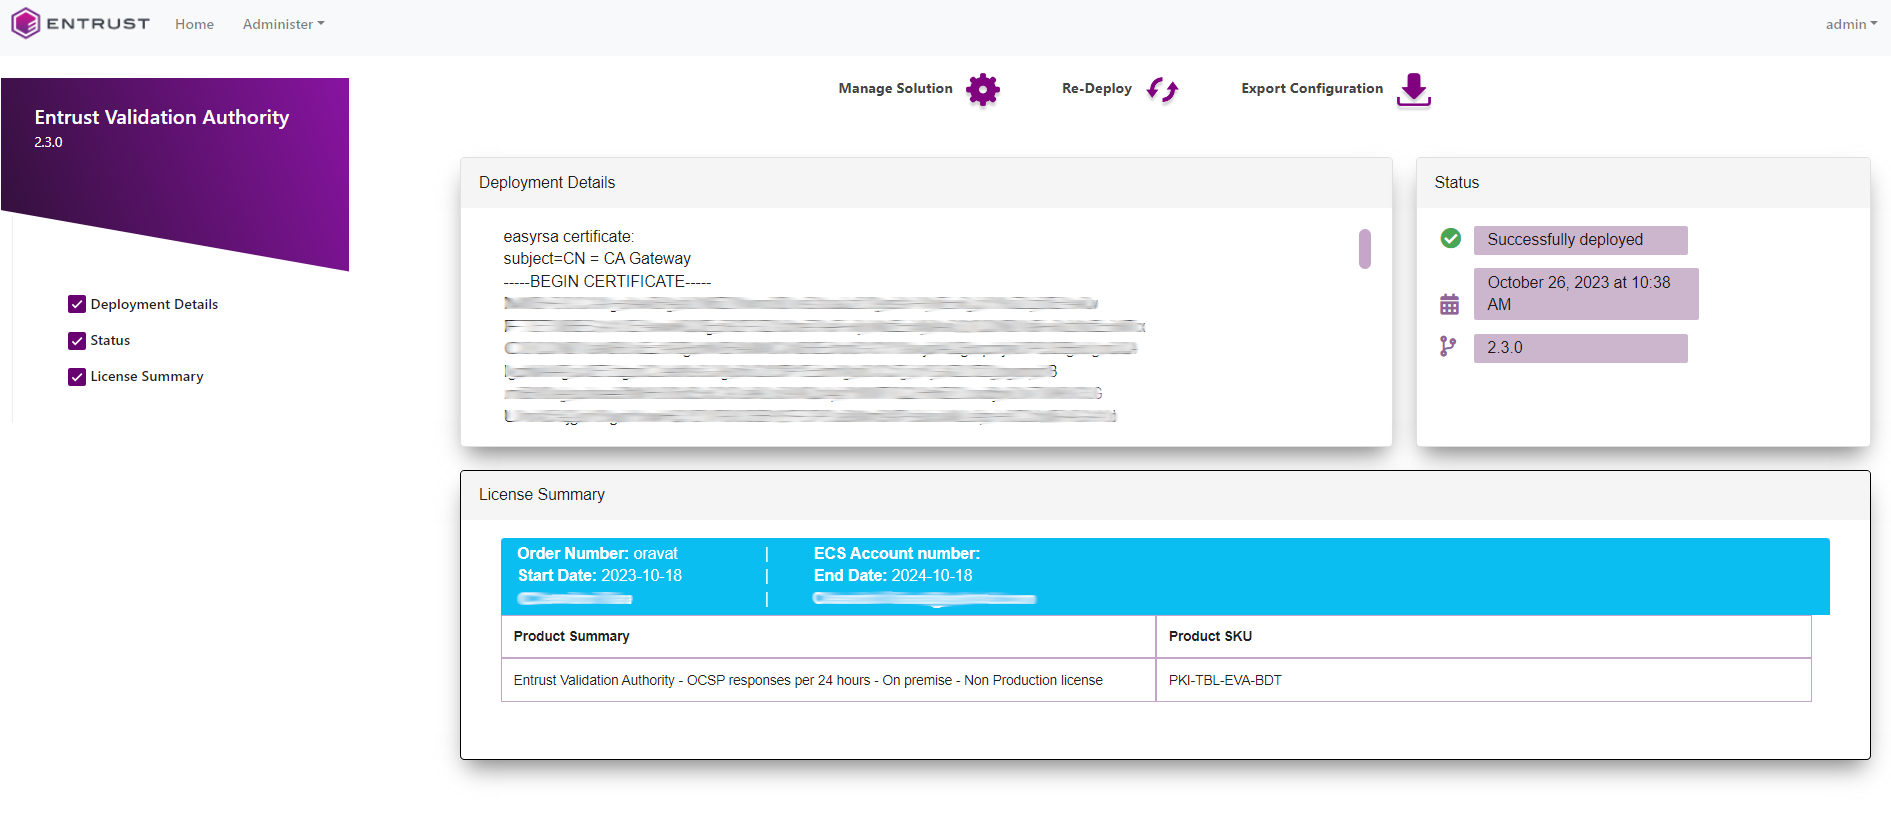
| If the deployment fails, follow the instructions in the Entrust Validation Authority Deployment Guide to see how to check the logs. |
When you are using OCS protection with an nShield Trusted Verification Device and Remote Administration Client, you might encounter failures during deployment in EVA. The issue is with the timer that EVA uses. It waits for the Kubernetes pods in the system to come up. Because OCS is a physical card and you present it remotely, the system takes longer to come up and the timer is exceeded. To fix the failure in the dashboard, just redeploy EVA using the Re-Deploy function in the UI.

To check that the system is up, run the following command in the EDM server:
% sudo kubectl get pods -n eva

NAME                                 READY   STATUS    RESTARTS   AGE
eva-ocspresponder-7c9d5fcc79-w69z7   2/2     Running   0          6m10s
eva-ocspresponder-7c9d5fcc79-zfwjr   2/2     Running   0          6m10s
eva-statusfeeder-655d6c98fd-dv5d4    1/1     Running   0          6m9s
eva-crlshim-0-0                      1/1     Running   0          5m37s
You can also run the EVA testing on the next section. It should be successful if the pods above are running.
Entrust Validation Authority Testing
After deploying Entrust Validation Authority, you can test the OCSP Responder service as follows.
-
With OpenSSL
-
With the health check endpoint
Test the OCSP Responder with OpenSSL
Run the following openssl command to test the OCSP Responder service.
% openssl ocsp -issuer **ca_cert** -serial **sn** -url **url** -VAfile **va_cert**If the serial number is not found in the CRL, EVA will return good status. If the serial is in the CRL, it’ll return the revoke information contained in the CRL
Test the OCSP Responder with a serial number that is not in the CRL
% openssl ocsp -issuer ./ca.crt -serial 0x000000002439fa8f5fe6370bb20ccb2556da6991 -url http://<host>/eva -VAfile ./va.crt

Response verify OK
0x000000002439fa8f5fe6370bb20ccb2556da6991: good
        This Update: Dec 31 20:17:38 2024 GMT
        Next Update: Jun 29 20:17:38 2025 GMT
Test the OCSP Responder with a serial number that is in the CRL
% openssl ocsp -issuer ./ca.crt -serial 0x5FB65DF1FBD42CCA25FEC514B415E1BE -url http://<host>/eva -VAfile ./va.crt

Response verify OK
0x5FB65DF1FBD42CCA25FEC514B415E1BE: revoked
        This Update: Dec 31 20:17:38 2024 GMT
        Next Update: Jun 29 20:17:38 2025 GMT
        Revocation Time: Oct 25 17:24:00 2023 GMT
Test the OCSP Responder with the health check endpoint
Entrust Validation Authority exposes the following endpoint to check the health of the database and HSM connections.
http://<edm-host>/eva/healthThis endpoint returns a HTTP 503 response when the health check fails.
$ wget --debug http://<edm-host>/eva/health


--- Request
GET /eva/health HTTP/1.1
Host: x.x.x.x
User-Agent: toybox wget/0.8.10
Connection: close

--- Response
HTTP/1.1 200 OK
date: Fri, 03 Jan 2025 17:24:14 GMT
content-length: 0
x-envoy-upstream-service-time: 4
x-content-type-options: nosniff
server: istio-envoy
connection: close
FIPS Level 3 remarks and recommendations
Recommendations when a FIPS Level 3 world file is used for the HSM configuration:
-
Create an OCS card 1/N where N is the number of HSMs in the configuration.
-
All HSMs in the configuration must use the same world file.
-
Leave the OCS card inserted on each HSM used in the configuration.
-
The OCS card is only used for FIPS authorization and not to protect the keys.
-
The OCS card must be present any time new key material is created.