Integrate Entrust Key Control Vault server and Entrust nShield HSM
This chapter describes the procedure to integrate Entrust KeyControl Vault server and Entrust nShield HSM for establishing a hardware root of trust for all encryption keys. This also describes how the KeyControl Admin Key is protected in the HSM.
These procedures are optional but the combined solution facilitates regulatory compliance with a FIPS 140 Level 3 and Common Criteria EAL4+ root of trust.
The guide covers FIPS 140 Level 2 compliance and will note when different instructions are needed for compliance with FIPS 140 Level 3.
| With Multi vault support, KMIP key wrapping is set at the vault level. Each KMIP vault will set up according to their requirements. Refer to Enable KMIP key wrapping (KMIP Vaults only) for details. |
Prerequisites
Before you integrate Entrust Key Control Vault server and Entrust nShield HSM, complete the following tasks:
-
Entrust KeyControl Vault server has been deployed and configured. For details, see Install and configure the Entrust KeyControl Vault server.
-
Entrust KeyControl Compliance Manager has been deployed and configured.
-
The Entrust nShield HSM has been deployed and configured. For details, see the Installation Guide for your HSM.
-
You have rights to add new clients to the HSM configuration.
Initialize the HSM on KeyControl Vault server
To initialize the HSM on KeyControl Vault server:
-
Log into the KeyControl Appliance Manager web user interface using an account with Security Admin privileges.
-
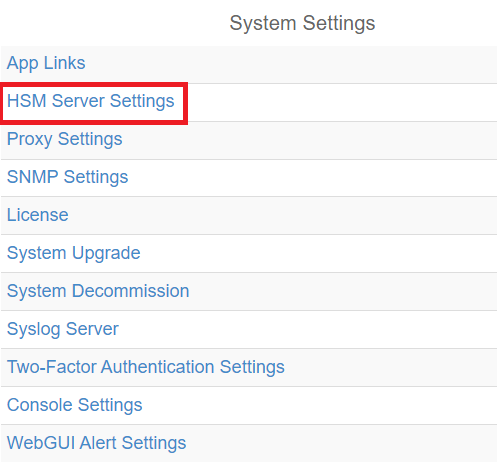
In the top menu bar, select Settings and then select System Settings > HSM Server Settings.
-
Select Actions > HSM Type > Entrust nShield HSM.

-
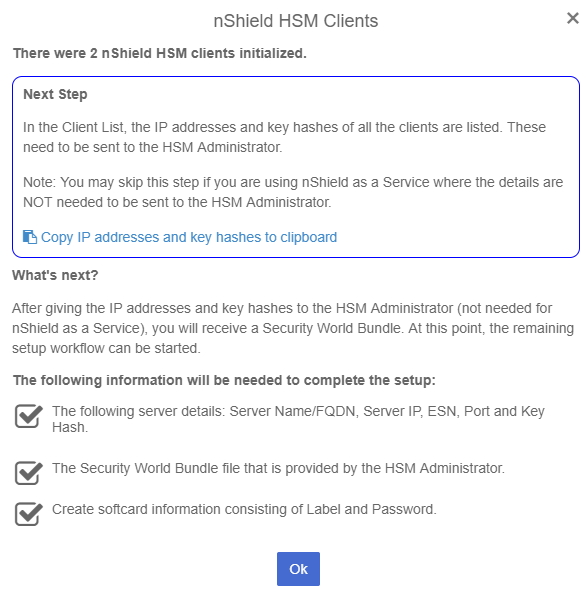
In the nShield HSM Clients dialog, select Copy IP address and key hashes to clipboard.
-
Paste the contents of the clipboard into a file.
Your HSM administrator will need the IP address and hash pairs to add the KeyControl nodes as an HSM clients.
The following is an example data file for a 2-node KeyControl Vault cluster:
172.16.124.100 32a28a759b2055cf3d2956eb295da931c205ae9c 172.16.124.101 56eb295da931c205ae9c32a28a759b2055cf3d29 -
Save the file.
Add one or more KeyControl Vault nodes to the HSM
Send the IP address and hash pair for each KeyControl Vault node in the cluster to the HSM administrator.
The HSM administrator adds each KeyControl Vault node as a client to the HSM and sends back the following information:
-
A zipped file that contains the nShield Security World and HSM module files.
Zipped file content example:
world
module_5F08-02E0-D947
When multiple HSMs are used there will be a
module_NNNfile for each HSM.The zipped file should contain the Security World and HSM module files. For a level 3 world, FIPS authorization is required. Entrust recommends that an OCS card is used to provide FIPS authorization for the generation of keys. The card and cards files in this case should also be included in the zipped file and the OCS card to be left inserted in the HSM. If more than one HSM is used, have the OCS card inserted in each HSM. Keep in mind that the OCS is only used for FIPS authorization and does not protect any keys. Zipped file content example with OCS card (FIPS Level 3 world file):
world module_5F08-02E0-D947 card_1296a68c901427d44bf68a029c0b72b8f4fb2e15_1 cards_1296a68c901427d44bf68a029c0b72b8f4fb2e15 -
The HSM server name. This can be the FQDN if defined, If an FQDN is not defined, it can be the ESN of the HSM.
-
The IP address of the HSM.
-
The Electronic Serial Number (ESN) and the key hash of the HSM. This can be obtained by running the following command on the nShield RFS server:
[anonkneti <hsm-ip-address>] -
The network port number that the HSM uses.
Set up the nShield HSM Server
To set up the nShield HSM Server:
-
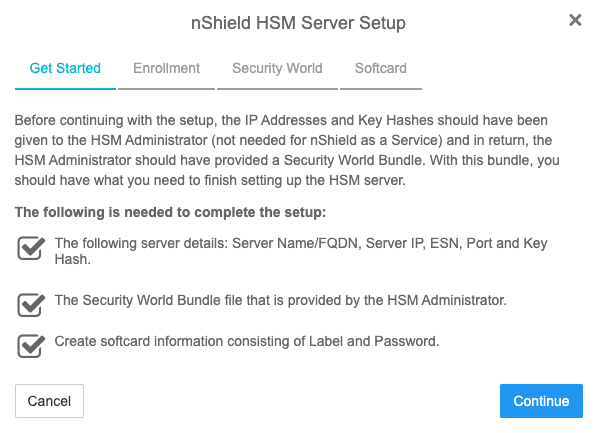
In the Get Started step of the nShield HSM Server Setup dialog, select Continue.
-
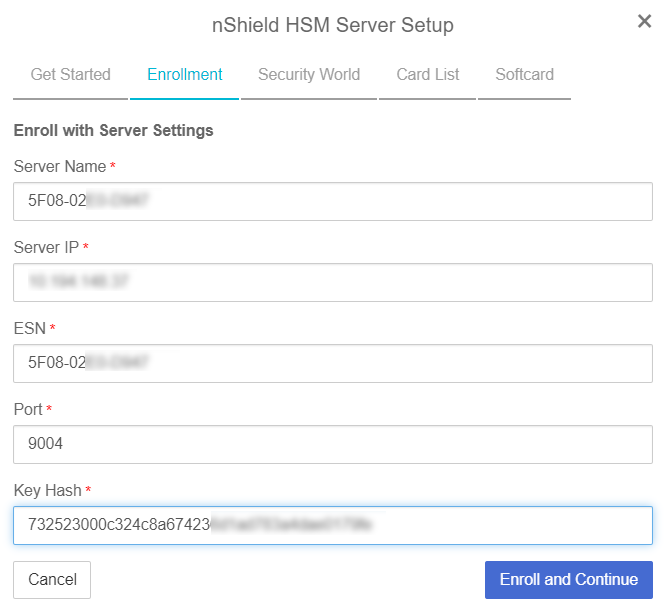
In the Enrollment step of the dialog:
-
For Server Name, enter the server FQDN for the HSM (if defined) or the ESN of the HSM.
-
For Server IP, enter the IP address of the HSM.
-
For ESN, enter the ESN of the HSM.
-
For Port, enter the required port. The default is 9004.
-
For Key Hash, enter the key hash of the HSM.
-
Select Enroll and Continue.
-
-
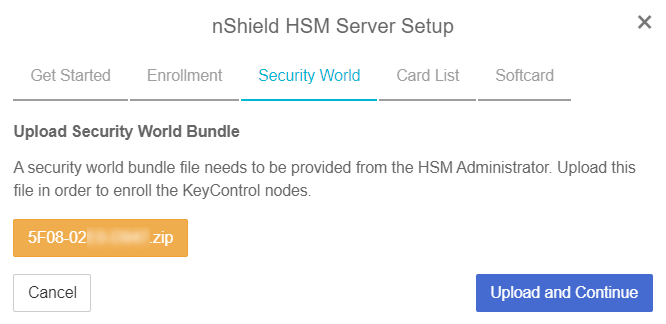
In the Security World step of the dialog:
-
Select Load File.
-
Browse to the zipped file that you received from the HSM administrator in Add one or more KeyControl Vault nodes to the HSM.
-
Select Upload and Continue.
-
-
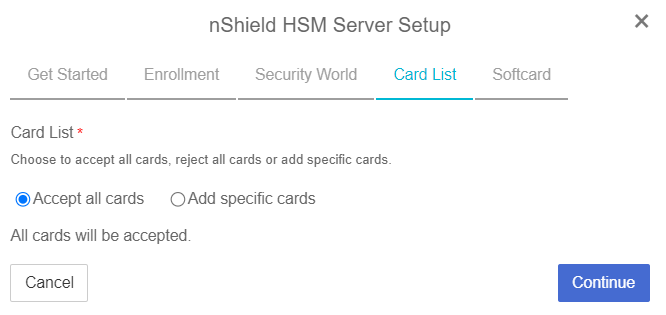
In the Card List step of the dialog:
-
Only used if using FIPS Level 3 world file with an OCS card.
-
Select Accept All Cards
-
Select Continue
-
-
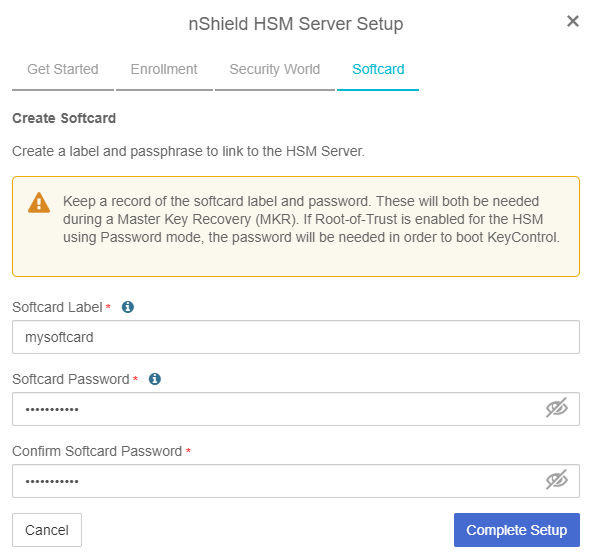
In the Softcard step of the dialog:
-
For Softcard Label, enter a unique name. This value is user-defined.
-
For Softcard Password, enter a password. This value is user-defined.
-
For Confirm Softcard Password, re-enter the password. For example:
-
Keep a record of the Softcard label and password. These will be needed during a Master Key Recovery (MKR). If Root-of-Trust is enabled for the HSM using Password mode, the password is also needed to boot KeyControl.
-
If using a FIPS Level 3 world file, the OCS card must be inserted in the HSM for the setup to complete successfully. If not inserted, you will get an error message at this stage. For example:
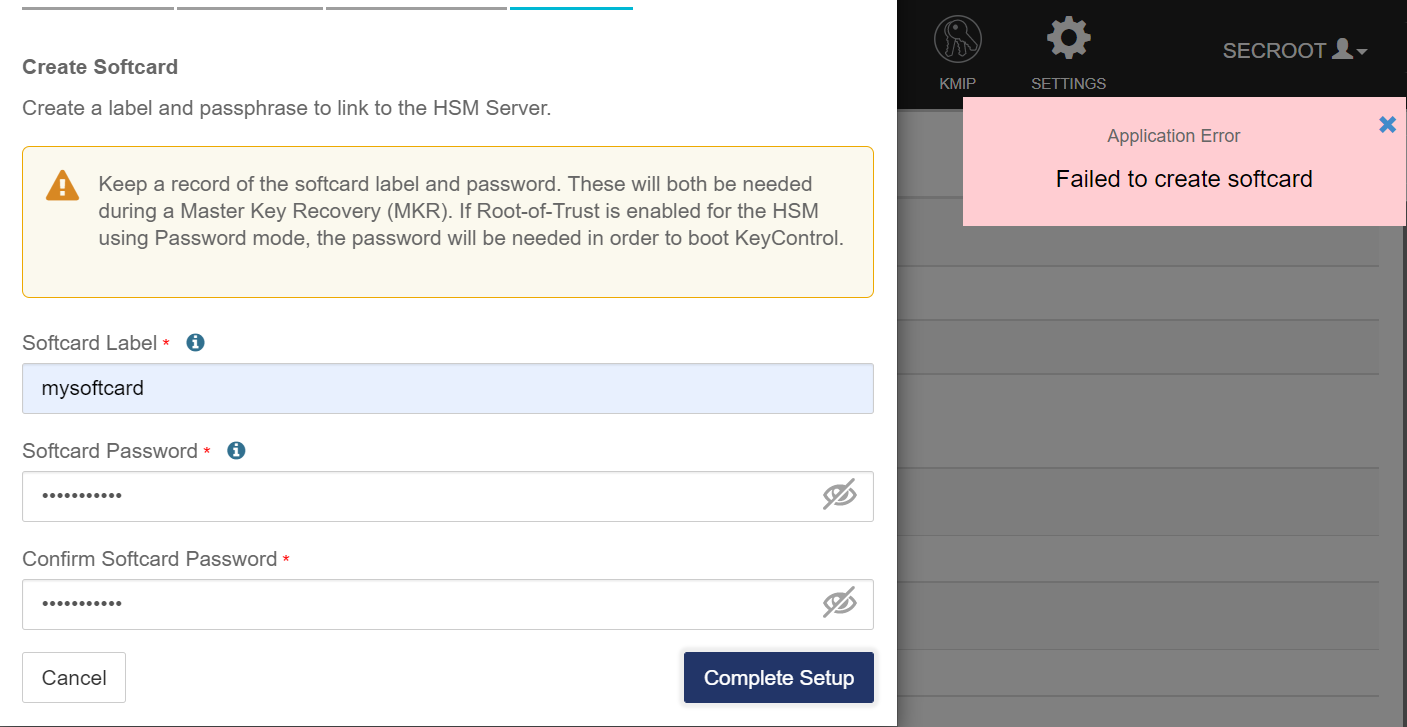
Insert the OCS card.
-
Select Complete Setup.
-
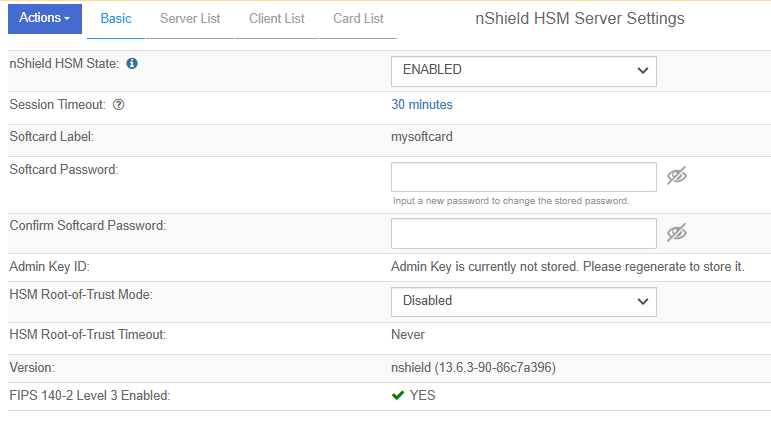
The nShield Connect HSM is now configured to work with Entrust KeyControl Vault. For example:
Enable HSM Root-of-Trust mode
HSM Root-of-Trust (ROT) is disabled by default. HSM ROT provides enhanced protection for the contents of the object store. HSM ROT is gained when the HSM provides the cryptographic keys necessary to unlock the object store.
If the HSM cannot be contacted when KeyControl Vault server boots, or if the correct keys cannot be located, trust cannot be established with the HSM and KeyControl Vault is not allowed to begin servicing key requests.
If you remove the HSM from the KeyControl Vault configuration, the HSM ROT configuration is also destroyed. Entrust strongly recommends enabling it by selecting one of the modes available. For example:

Once you Enable ROT, Apply the new configuration by selecting Apply.
-
Root-of-Trust mode using HWSIG:
The hardware signature is used to wrap the HSM configuration file. Unless there is a change to the KeyControl Vault hardware configuration, booting KeyControl Vault will require no user intervention before it can begin servicing requests.
Virtual machine configuration changes may result in a need to recover the HSM configuration changes. When this happens, the normal KeyControl Vault Masterkey Recovery procedure is used which requires the admin key that had been downloaded when KeyControl Vault was installed.
-
Root-of-Trust mode using Password:
The HSM’s softcard password is used to wrap the HSM configuration file. When KeyControl Vault boots, the UI will prompt for the HSM password. Only when the password is correctly entered is KeyControl Vault allowed to begin booting.
The HSM password must be entered on each node of the cluster. For instance, if the entire cluster is restarted, it will only begin servicing requests once the password has been entered on all of the nodes in the cluster.
| If you enable Root-of-Trust, you cannot reset the HSM configuration through the GUI unless you destroy the Root-of-Trust configuration using the console. Please contact Entrust support for details on how to destroy the Root-of-Trust configuration to be able to reset the HSM configuration. |
Test HSM connectivity
To test HSM connectivity:
-
Access the nShield HSM Server Settings screen.
-
Select the Actions menu.
-
In the Basic tab, select Test Connection to ensure that the HSM is fully connected to KeyControl Vault.
Generate new Admin Key
To make proper use of the HSM integration, regenerate the Admin Key in the HSM. Follow the instructions in the Generating the Admin Key section of the KeyControl Vault Administration guide.
Enable KMIP key wrapping (KMIP Vaults only)
KMIP key wrapping is set at the vault level. Each vault will be configured according to its requirements.
-
Log into the KMIP Vault web user interface using the Login URL.
The KMIP Vault Login URL is available by clicking the Vault View Details link available in the KeyControl Vault Management interface. This URL is different from the standard KeyControl Vault web user interface URL. -
In the top menu bar, select the Settings icon.
-
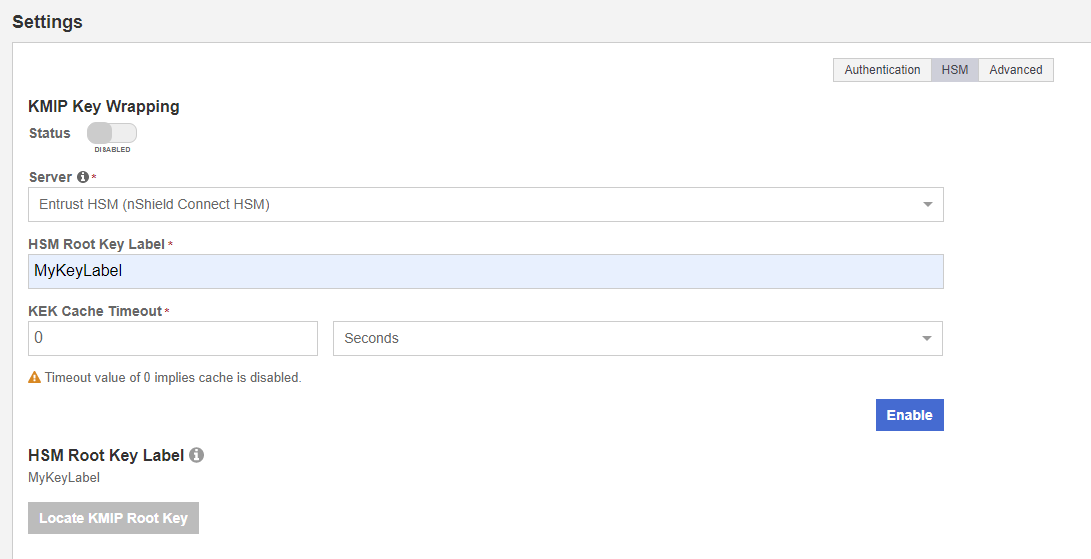
Select the Settings tab and then the HSM tab. For example:
-
For KMIP Key Wrapping, enable the Status. If this is the first time doing this, you will not be able to set Status to Enabled. This will happen when you select the Enable action at the bottom of the dialog.
-
For Server, select System HSM (nShield Connect HSM).
-
In the HSM Root Key Label field, enter a unique name for the HSM Root Key.
-
For KEK Cache Timeout, enter how long you want KeyControl to cache the HSM-derived Key Encryption Keys (KEKs). The maximum length is 24 hours. This guide uses 0 for the value so that no cache is used, which forces KeyControl to use the HSM every time.
-
If a FIPS level 3 world file is used, insert the OCS card in the HSM. If the OCS card is not inserted, an error appears when you select Enable. To resolve this, select OK and insert the OCS card in the HSM.
-
Select Enable.
Once you apply the changes, a re-key of the KMIP objects takes place. You can check the audit logs for this action record.
FIPS Level 3 remarks and recommendations
Recommendations for when a FIPS Level 3 world file is used for the HSM configuration:
-
Create an OCS card 1/N where N is at least the number of HSMs being used in the configuration.
-
All HSMs in the configuration must use the same world file.
-
Leave the OCS card inserted on each HSM used in the configuration. This will prevent issues in case of a failure of one of the HSMs configured.
-
The zipped bundle file used in the configuration must have the world, module, card and cards files in the bundle.
-
The OCS card is only used for FIPS authorization and not to protect the keys.
-
The OCS card must be present any time new key material is created (FIPS authorization).
-
Regenerate the Admin Key.
-
Enable HSM Root of Trust.
-
Enable KMIP key wrapping at the KMIP Vault.
TLS Configuration
Beginning with KeyControl Version 10.4.3, Secure Sockets Layer (SSL) has been replaced with Transport Layer Security (TLS). Support has also been added for Extended Master Secret (EMS).
The online documentation for this can be found here:
TLS Configuration section of the KeyControl Administration Guide.
By default, KeyControl comes setup with TLS 1.3 and EMS enforced. These settings may cause problems during the integration where the client software fails to communicate with KeyControl because either it does not support TLS 1.3 or EMS.
To change these settings:
-
Log into the KeyControl Appliance Manager web user interface.
-
Select Settings in the top level menu.
-
Under General Settings, select TLS Configuration.
-
To change the protocol version use the Protocol Tab. Supported options are:
-
TLSv1.2, TLSv1.3
-
TLSv1.3 only (default)
-
-
Adjust the protocol according to what the client software supports.
-
Under the TLS Extended Master Secret tab, you can change the EMS settings. They are:
-
Enforce EMS (default)
-
Do not enforce EMS (Not Recommended - has known vulnerabilities)
-
-
Adjust the EMS settings according to what the client software supports.
| When you change the EMS settings, the KeyControl nodes in the cluster will reboot and you will have to log back in. |