Procedures
Prerequisites
Before you can use nCOP and run the container images, complete the following steps:
-
Install Docker. For information, see Get Docker in the Docker online documentation.
-
Gain access to the CyberArk Secrets Manager appliance image.
-
Request the nCOP and Security World software from Entrust.
-
Set up the HSM. See the Installation Guide for your HSM.
-
Configure the HSM(s) to use the IP address of your container host machine as a client.
-
Load an existing Security World or create a new one on the HSM.
-
Copy the Security World and module files to your container host machine at a directory of your choice.
-
Create or edit the
cknfastrcfile in/opt/nfastand add one of the following config settings:-
For OCS or Softcard protection:
CKNFAST_LOADSHARING=1 CKNFAST_NO_ACCELERATOR_SLOTS=1 -
For Module protection:
CKNFAST_FAKE_ACCELERATOR_LOGIN=1 -
Optionally, the following can be added to generate PKCS #11 debug logs at the example location:
CKNFAST_DEBUG=10
CKNFAST_DEBUGFILE=/opt/ncop/pkcs11.log
-
-
Create a
pkcs11.ymlfile with the following content:library: /opt/nfast/toolkits/pkcs11/libcknfast.so wrapping_key: <wrapping_key name> pin: <passphrase of ocs/softcard if required> slot: <slot number for the intended key protection type>By default, the slot number for module protection is 0. For softcard and OCS protection, use the ckcheckinstcommand to find the slot number. The pin passphrase is not required if you are using module protection.For more information on configuring and managing nShield HSMs, Security Worlds, and Remote File Systems, see the User Guide for your HSM(s).
Here is an example for module protection:
library: /opt/nfast/toolkits/pkcs11/libcknfast.so
wrapping_key: wrappingkey
slot: 0
Here is an example for softcard protection:
library: /opt/nfast/toolkits/pkcs11/libcknfast.so
wrapping_key: wrappingkey
pin: ncipher
slot: 4
Here is an example for OCS protection:
library: /opt/nfast/toolkits/pkcs11/libcknfast.so
wrapping_key: wrappingkey
pin: ncipher
slot: 3
Create and configure the nshield-hwsp container
Configure the nShield hardserver container so it can communicate with the CyberArk Secrets Manager Master DAP Server in a later step. See Create and configure the CyberArk Secrets Manager application container and the Master DAP Server.
To deploy an nCOP container image for use with CyberArk Secrets Manager:
-
Log in to the container host machine server with
rootprivileges and launch a terminal window. -
Set up the nCOP working directory:
% mkdir -p /opt/ncop -
Transfer the nCOP tar file to the host machine and extract it into the
/opt/ncopdirectory:% tar xf ncop-1.1.3.tar -C /opt/ncop -
Chand directory to
/opt/ncop:% cd /opt/ncop -
Mount the Security World ISO file:
Transfer the Security World ISO file to the host machine, then mount it so it can be used by the nCOP script that will create the hardserver image.
% mkdir SecWorld-13.6.15 % mount -o loop SecWorld_Lin64-13.6.15.iso SecWorld-13.6.15 -
Set up the hardserver image:
% ./make-nshield-hwsp SecWorld-13.6.15 Detecting nShield software version Version is 13.6.15 Unpacking hwsp... Removing redundant files... Creating files... . . . => exporting to image 2.4s => => exporting layers 2.4s => => exporting manifest sha256:ae87790fc1a8b01a2f0fc5f2b9e8feed2b535e5f3c98978726b330e0e2a81a06 0.0s => => exporting config sha256:ea4ec1ba7399f18de5789fee02b05087cbbd3bb1ab30691504319e60bb9d8e78 0.0s => => exporting attestation manifest sha256:787ff411b7194fe027e5a5f35e3b497f7c312fb39ca89fe84f5eb58a047bcaa6 0.0s => => exporting manifest list sha256:7064478c1dfc6b3beca67ebc2399d405900bc01fc3dc1b110543d42ba346ca49 0.0s => => naming to docker.io/library/nshield-hwsp:13.6.15 0.0s => => unpacking to docker.io/library/nshield-hwsp:13.6.15 -
List the docker images to view the newly created hardserver image:
% docker images IMAGE ID DISK USAGE CONTENT SIZE EXTRA nshield-hwsp:13.6.15 7064478c1dfc 921MB 207MB -
Configure
nshield-hwsp:-
Set up the hardserver configuration file and directory:
% mkdir -p /opt/ncop/config1 % ./make-nshield-hwsp-config --output /opt/ncop/config1 config <hsm ip address> -
Check that the configuration file information matches your HSM deployment:
% cat /opt/ncop/config1/config syntax-version=1 [nethsm_imports] local_module=1 remote_esn=810B-03E0-D947 remote_ip=1X.1XX.1XX.XX remote_port=9004 keyhash=62fc598786930f5d6f81251bb5870b952323b0d3 privileged=0 -
Create a new socket so that application containers can use the hardserver:
% docker volume create socket1 -
Run the
nshield-hwspcontainer:% docker run -d -v /opt/ncop/config1:/opt/nfast/kmdata/config:ro -v socket1:/opt/nfast/sockets nshield-hwsp:13.6.15 -
Check the status of
nshield-hwspusing theenquirycommand:% NFAST_SERVER=/var/lib/docker/volumes/socket1/_data/nserver /opt/nfast/bin/enquiry
-
Create and configure the CyberArk Secrets Manager application container and the Master DAP Server
The assumption is that you are inside the /opt/ncop directory and that the Security World ISO file still mounted.
Transfer the conjur-appliance tar file to the host machine.
-
Load the `conjur-appliance into the local Docker registry:
The following command can be used to load the
conjur-appliance.tar file into the local Docker repository:% docker load -i <PATH-TO-TAR-FILE>/conjur-appliance-13.8.0.tar.gz -
Extend the
conjur-applianceimage with thenfastutilities:% ./extend-nshield-application --from registry.tld/conjur-appliance:13.8.0 --pkcs11 SecWorld-13.6.15 --tag conjur-appliance-wnfast:13.6.15 Detecting nShield software version Version is 13.6.15 NOTICE: --pkcs11 included by default with 12.60 ISO. Flag ignored Unpacking /opt/nfast/SecWorld-13.6.15/linux/amd64/hwsp.tar.gz ... Unpacking /opt/nfast/SecWorld-13.6.15/linux/amd64/ctls.tar.gz ... Adding files... Building image... [+] Building 0.9s (8/8) FINISHED docker:default => [internal] load build definition from Dockerfile 0.0s => => transferring dockerfile: 257B 0.0s => [internal] load metadata for registry.tld/conjur-appliance:13.8.0 0.0s => [internal] load .dockerignore 0.0s => => transferring context: 2B 0.0s => [internal] load build context 0.5s => => transferring context: 1.56MB 0.5s => [1/3] FROM registry.tld/conjur-appliance:13.8.0@sha256:2d8ffc83934d05e00dab785ea34c31711479a15e3dc120a87b40ff324b651f26 0.0s => => resolve registry.tld/conjur-appliance:13.8.0@sha256:2d8ffc83934d05e00dab785ea34c31711479a15e3dc120a87b40ff324b651f26 0.0s => CACHED [2/3] COPY opt /opt 0.0s => CACHED [3/3] RUN mkdir -p /opt/nfast/kmdata /opt/nfast/sockets && mkdir -m 1755 /opt/nfast/kmdata/tmp 0.0s => exporting to image 0.2s => => exporting layers 0.0s => => exporting manifest sha256:a44e962ab29ce9f8012b8d631bfa5c7e420a39de0875e61f612131fcf5281db7 0.0s => => exporting config sha256:74f732c46d1c2adb492b4b991d3aadd430e5b88d9a48f2d2b9bbf314def4d827 0.0s => => exporting attestation manifest sha256:b89d5e19ef3768e72ea11bce85616aead1996aaa6d66a32f83ec8dc1c77c941d 0.0s => => exporting manifest list sha256:0d70ce10872daee8b530c172a879c537ff718bbda05fb7ea915459ca4e59fbec 0.0s => => naming to docker.io/library/conjur-appliance-wnfast:13.6.15 0.0s => => unpacking to docker.io/library/conjur-appliance-wnfast:13.6.15 -
List the docker images
% docker images IMAGE ID DISK USAGE CONTENT SIZE EXTRA conjur-appliance-wnfast:13.6.15 0d70ce10872d 3.68GB 965MB nshield-hwsp:13.6.15 7064478c1dfc 921MB 207MB U registry.tld/conjur-appliance:13.8.0 2d8ffc83934d 2.75GB 759MB -
Run the
conjur-appliancecontainer with thenfastcontainer:% docker run --name dap-wnfast -d \ --restart=unless-stopped \ --security-opt seccomp=/path/to/conjur-seccomp.json \ -p "443:443" -p "5432:5432" -p "1999:1999" \ -v /opt/nfast/kmdata:/opt/nfast/kmdata:rw \ -v socket1:/opt/nfast/sockets \ conjur-appliance-wnfast:13.6.15 -
Check the running containers
% docker ps -a CONTAINER ID IMAGE COMMAND CREATED STATUS PORTS NAMES 3675b8a1cbd3 conjur-appliance-wnfast:13.6.15 "/usr/local/bin/entr…" 25 seconds ago Up 24 seconds 0.0.0.0:443->443/tcp, ... dap-wnfast 435c111f8ff8 nshield-hwsp:13.6.15 "/opt/nfast/sbin/nsh…" 26 hours ago Up 26 hours -
Perform the initial configuration of CyberArk Secrets Manager. The username is admin. For password requirements, see Configure the Secrets Manager cluster in the CyberArk online documentation.
% docker exec dap-wnfast evoke configure master \
  --accept-eula --hostname dap-wnfast.example.com \
  --leader-altnames master-cyberark-conjur.interops.local \
  --admin-password Mypassw0rD1! org1

I, [2026-04-01T14:54:34.641889 #79]  INFO -- : Performing Leader configuration...
I, [2026-04-01T14:54:34.641937 #79]  INFO -- : Validating Conjur configuration file...
I, [2026-04-01T14:54:35.337952 #79]  INFO -- : Configuration is valid. Server will not be restarted in test mode.
.
.
.
You have accepted the CyberArk End User License Agreement.
Use `evoke eula show` in the future to display the EULA.
Configuration successful. Conjur Leader up and running.
You will need to add an entry in your DNS for the hostname used with --leader-altnames. -
Copy the
cknfastrcandpkcs11.ymlconfiguration files into the running container:% docker cp /opt/nfast/cknfastrc dap-wnfast:/opt/nfast/cknfastrc % docker cp pkcs11.yml dap-wnfast:/opt/conjur/etc/pkcs11.yml -
Generate a new Key Encryption Key (KEK) for CyberArk Secrets Manager to be stored on the HSM:
% docker exec dap-wnfast evoke pkcs11 generate I, [2026-04-01T15:46:03.322892 #2258] INFO -- : Using nCipher PKCS#11 13.6.15-437-54fe. I, [2026-04-01T15:46:03.323446 #2258] INFO -- : Using slot from config file I, [2026-04-01T15:46:03.323583 #2258] INFO -- : Using 810B-03E0-D947 Rt1. I, [2026-04-01T15:46:03.324685 #2258] INFO -- : Generating a new wrapping key with ID "wrappingkey"... I, [2026-04-01T15:46:03.353412 #2258] INFO -- : All done. -
Start the
conjur-appliancecontainer, which will act as the Master DAP Server, in Interactive mode:% docker exec -i -t dap-wnfast /bin/bash -
Check for the generated key. Make sure it was created with the intended key protection type, defined by the
pkcs11.ymlfile.root@036009bab3fd:/# /opt/nfast/bin/nfkminfo -l Keys with module protection: key_pkcs11_uaf8ef20fe82a2b7f5089b8ebe957218b2b199a167 `Conjur master key wrapping key'
The KEK is now ready for use.
Web Interface
-
Log on to the web interface, for example https://master-cyberark-conjur.interops.local
You are going to use the server name used in the --leader-altnamesoption.-
User: admin
-
Password: Mypassw0rD1!
-
-
Select the Settings symbol in the top right.
-
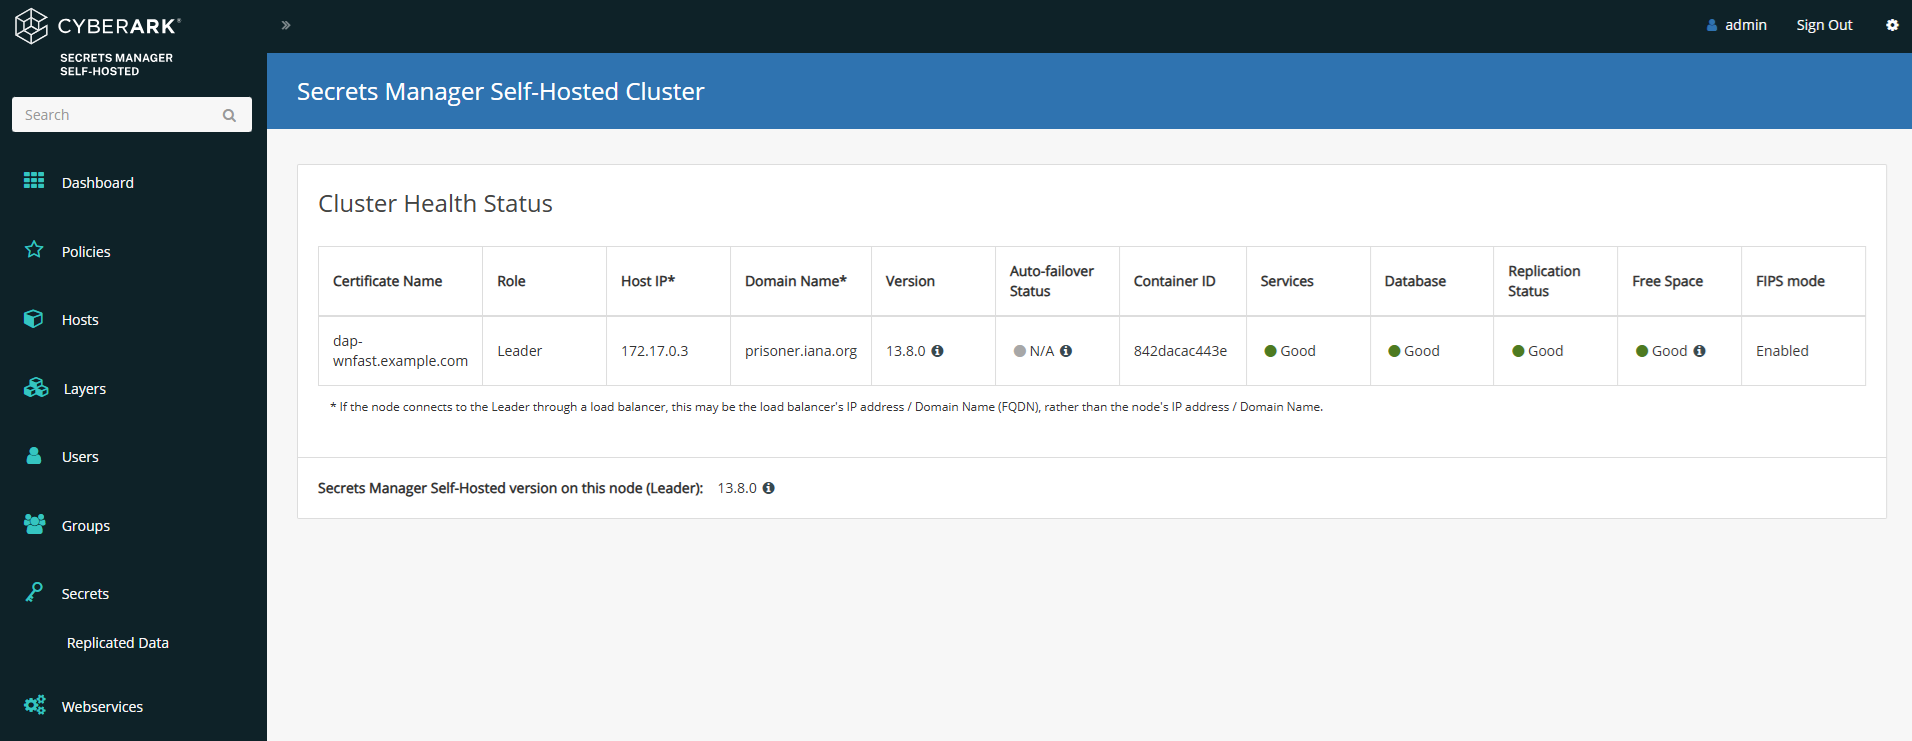
Select Secrets Manager Self-Hosted Cluster.
-
The master node should now be displayed.
Example commands used with the KEK
Here are some examples of commands that can be used inside the docker container. For more examples, see Server Key Encryption Methods in the CyberArk online documentation.
-
Start the
conjur-appliancecontainer, which will act as the Master DAP Server, in interactive mode:% docker exec -i -t dap-wnfast /bin/bash -
Generate a random master key. Keep this file secure.
root@036009bab3fd:/# mkdir -p /secrets root@036009bab3fd:/# openssl rand 32 > /secrets/master.key -
Encrypt the server keys with the 32-byte master key
root@036009bab3fd:/# evoke keys encrypt /secrets/master.key Encrypted 4 key files and adjusted 0 symlinks NOTE: To allow services access to keys, the keys must be unlocked. For more information, run 'evoke keys unlock --help'. -
Unlock the server keys and restart the CyberArk Secrets Manager services
root@036009bab3fd:/# evoke keys unlock /secrets/master.key evoke keys unlock /secrets/master.key Stopping service 'conjur'... Stopping service 'nginx'... Stopping service 'pg/main'... Stopping service 'pg/audit'... Stopping service 'seed'... Stopping service 'syslog-ng'... Starting service 'conjur'... Starting service 'nginx'... Starting service 'pg/main'... Starting service 'pg/audit'... Starting service 'seed'... Starting service 'syslog-ng'... Keys are unlocked. Services and scripts can now access encrypted data. -
Wrap the master key
root@036009bab3fd:/# evoke pkcs11 wrap /secrets/master.key Using nCipher PKCS#11 13.6.15-437-54fe Using slot from config file Using 810B-03E0-D947 Rt1. Using testSC. Using wrapping key "wrappingkey". Wrapping the master key... Wrapped key stored in /opt/conjur/etc/pkcs11-keys. -
Lock the keys
root@036009bab3fd:/# evoke keys lock Stopping service 'conjur'... Stopping service 'nginx'... Stopping service 'pg/main'... Stopping service 'pg/audit'... Stopping service 'seed'... Keys are Locked. Services and scripts can no longer access encrypted data. -
Unlock the keys
root@036009bab3fd:/#  evoke keys unlock

No master key found in the session keyring
Using PKCS#11 master key configuration...
Using nCipher PKCS#11 13.6.15-437-54fe
Using slot from config file
Using 810B-03E0-D947 Rt1.
Using wrapping key "wrappingkey"...
Service 'conjur' is not running. Skipping stop.
Service 'nginx' is not running. Skipping stop.
Service 'pg/main' is not running. Skipping stop.
Service 'pg/audit' is not running. Skipping stop.
Service 'seed' is not running. Skipping stop.
Stopping service 'syslog-ng'...
Starting service 'conjur'...
Starting service 'nginx'...
Starting service 'pg/main'...
Starting service 'pg/audit'...
Starting service 'seed'...
Starting service 'syslog-ng'...
Keys are unlocked. Services and scripts can now access encrypted data.