Procedures
Preparatory requirements
Before installing the software, Entrust recommends that you familiarize yourself with:
-
The Oracle database TDE documentation and setup process.
-
The Entrust Cryptographic Security Platform Key Management Vault Database Vault documentation.
-
Entrust recommends that you create a policy for managing SQL scripts that allow use of credentials for the Oracle database. These SQL scripts should only be available to authorized users.
This guide assumes that Oracle database software, and (at least) one Oracle database, is already installed on your system. With Oracle database software already installed, ensure that any required patches have been added. Oracle Data Guard is setup and working with a minimum of one standby server in place.
To integrate an Oracle database with Entrust Cryptographic Security Platform Key Management Vault Database Vault and Oracle Data Guard, the following steps are required:
-
Configure the environment.
-
Install the Entrust Cryptographic Security Platform Key Management Vault Database Vault software.
-
Configure Oracle database software to use the Entrust Cryptographic Security Platform Key Management Vault Database Vault.
-
Modify Oracle Data Guard configuration so encrypted data on primary server is also migrated and visible on the standby servers.
Details of your installation and configuration will depend on whether you want to migrate encryption keys from an existing Oracle software keystore to Entrust Cryptographic Security Platform Key Management Vault, or start directly with Entrust Cryptographic Security Platform Key Management Vault.
The default host server user is oracle unless stated otherwise.
The example database used in this guide is CDB1 unless stated otherwise.
For more information on how to configure your Entrust environment, see Key Management Vault Installation and Upgrade Guide.
For more information on how to configure your Oracle environment, see the Oracle documentation.
Oracle Data Guard Environment
For the purpose of this integration procedure, we will use a primary and standby server for Oracle Data Guard. For reference the following table has been created so the user can visualize the environment:
| Site | Primary | Standby |
|---|---|---|
|
|
|
|
|
|
|
|
|
|
|
|
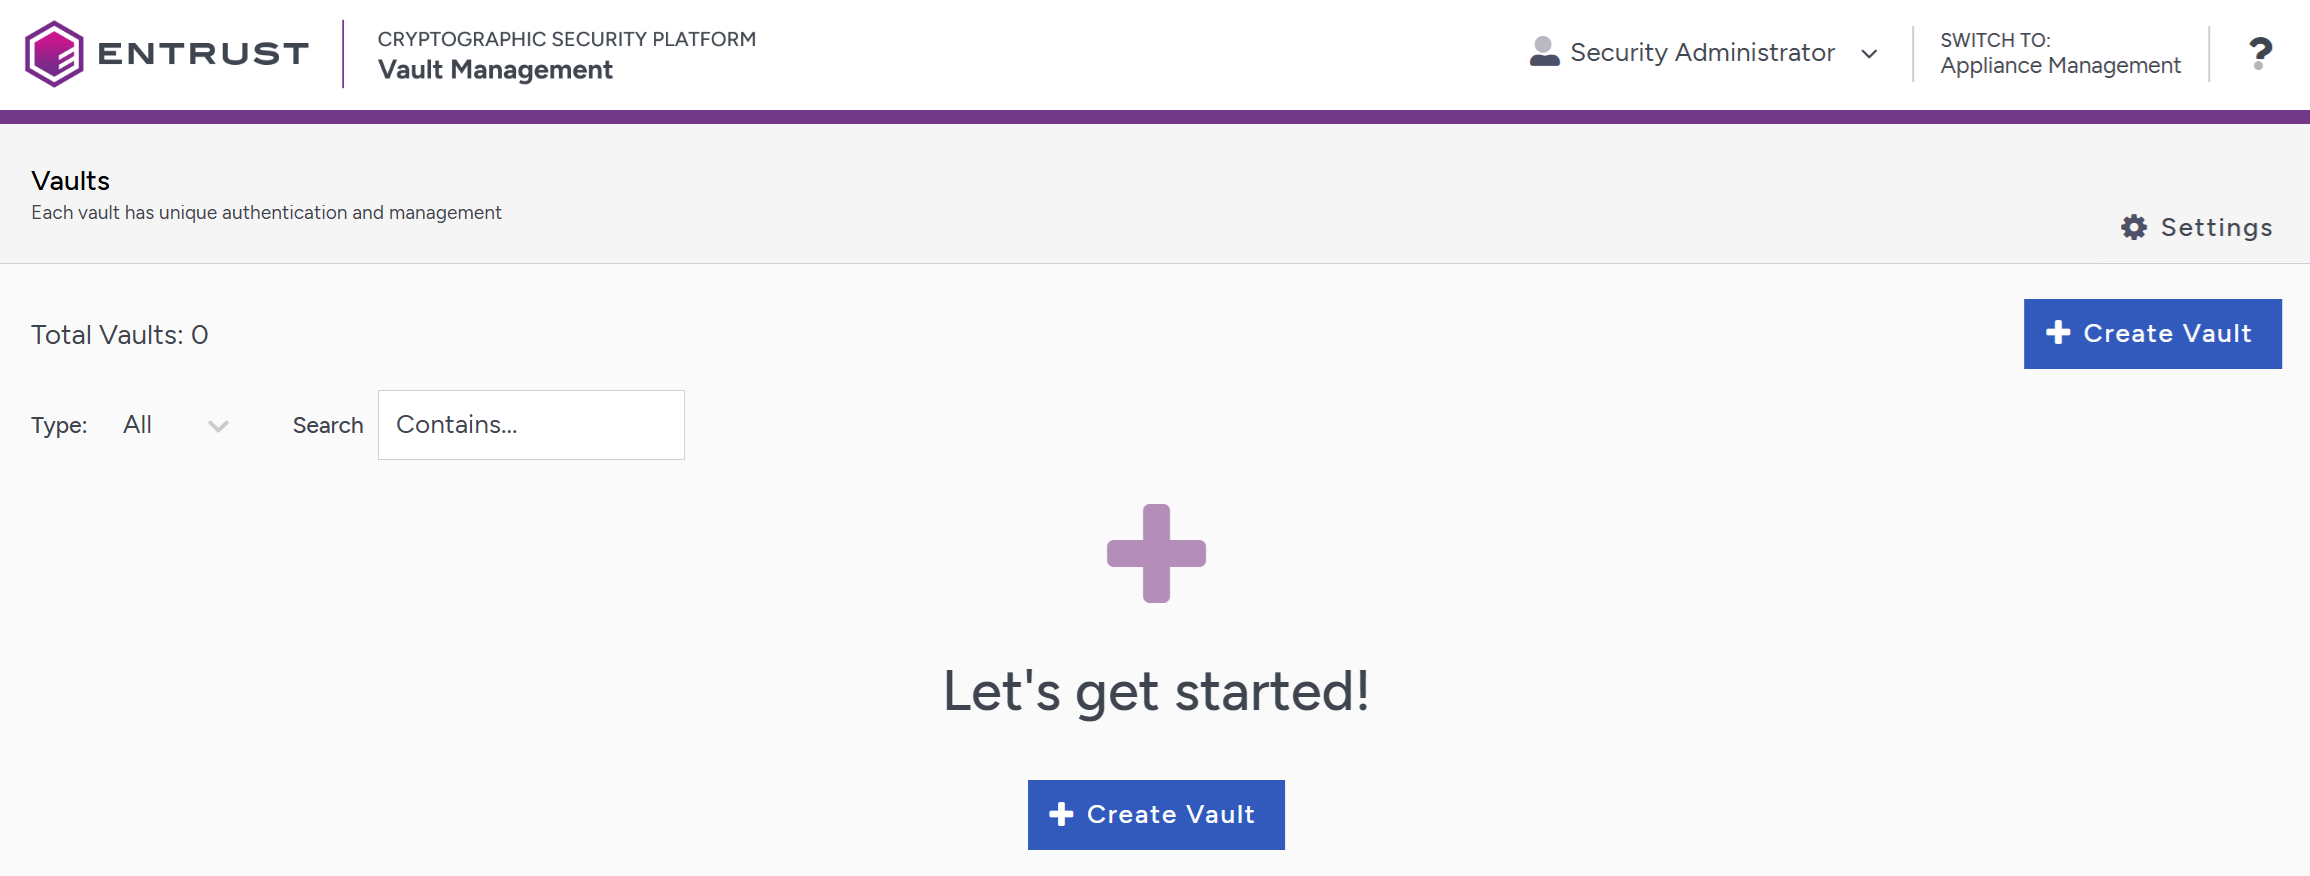
Create a Database Vault in the Key Management Vault Server
The Key Management Vault appliance supports different type of vaults that can be used by all type of applications. This section describes how to create a Database Vault in the Key Management Vault Server. Refer to Creating a Vault for more details.
-
Log in to the Key Management Vault server in your web browser using the secroot credentials to access the IP address of the server.
-
If you are not in the vault Management interface, select SWITCH TO: Manage Vaults in the Menu Header
-
Select Create Vault.
-
Create a Database Vault:
-
For Type, select Database.
-
For Name, enter the name of the vault.
-
For Description, enter the description of the vault.
-
For Admin Name, enter the name of the administrator of the vault.
-
For Admin Email, enter a valid email for the administrator.
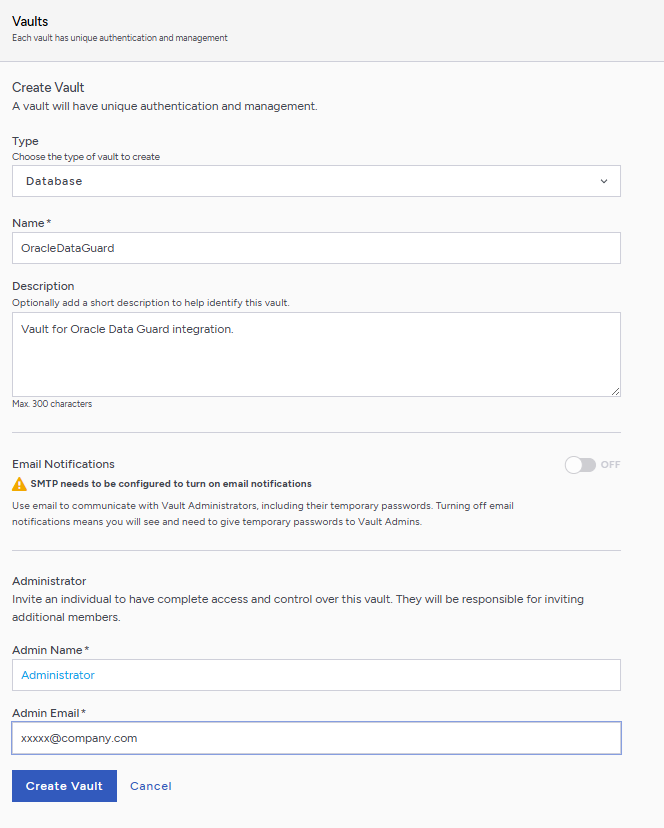
A temporary password will be emailed to the administrator’s email address. This is the password that will be used to sign in for the first time to the Database Vault space in the Key Management Vault. In a closed gap environment where email is not available, the password for the user is displayed when you first create the vault. That can be copied and sent to the user.
-
-
Select Create Vault.
-
Select Close when the vault creation completes.
-
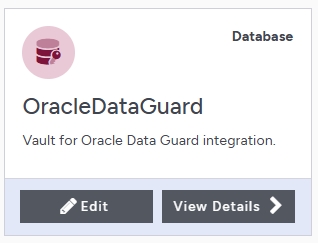
The newly vault is added to the vault dashboard.
Sign in to the Database Vault URL
-
Sign in to the Database Vault URL provided when it was created with the temporary password that was copied.
-
Change the initial password when prompted.
-
Sign in again to verify.
Create a Node Mapping
A Key Management Vault node mapping helps Entrust clients on the database server nodes to failover in case one of the Key Management Vault node fails.
In the Cryptographic Security Platform Key Management Vault Database Vault web GUI:
-
Navigate to Workloads
-
Select the Mappings tab.
-
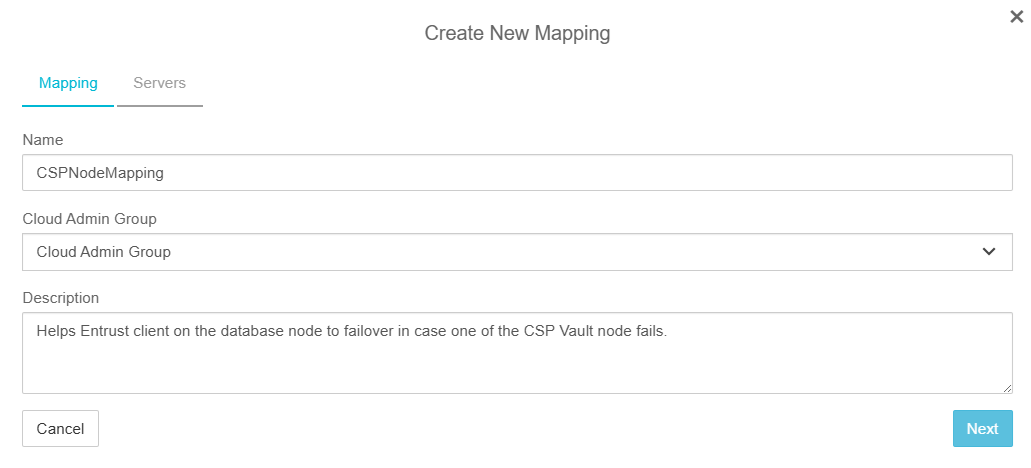
In the Actions menu choose Create Mapping to create a new mapping.

-
In the Create New Mapping Dialog, in the Mapping tab, enter the following:
-
Name: Name of the mapping.
-
Cloud Admin Group: Select Cloud Admin Group (default).
-
Description: Description of the mapping.
-
Select Next.
-
-
In the Create New Mapping Dialog, in the Servers tab, enter the following for each Node in the Key Management Vault cluster:
-
External IP: IP address of the node.
-
Port: Enter 443.
-
CSP Server: Select the Key Management Vault Server.
-
State: Select Enabled.
-
Description: Description of the node.

-
-
Select Create.
Once created the mapping gets listed.
Download TDE script bundle
In the Cryptographic Security Platform Key Management Vault Database Vault web GUI:
-
Navigate to Workloads.
-
Select the VM Sets tab.
-
In the Actions menu select Download TDE script bundle.
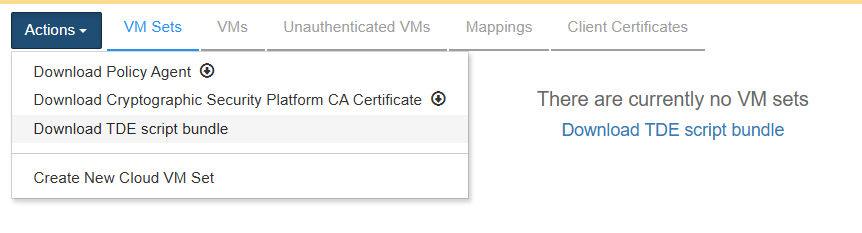
-
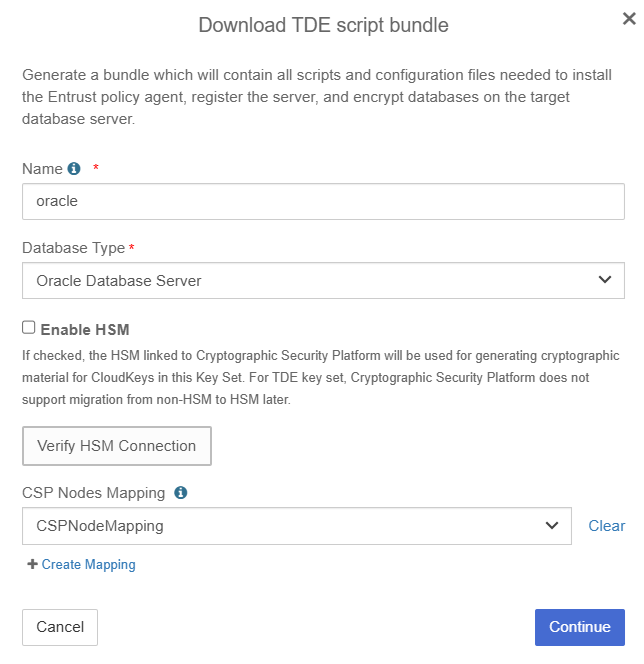
In the Download TDE Scripts bundle Dialog, enter the following:
-
Name: Provide a Name which will become prefix for your Keyset and CVMset. For example, if you choose oracle as Name then the setup script will create oracle_keyset and oracle_cvmset respectively.
-
Database Type: Select Oracle Database Server.
-
Enable HSM: If have an HSM configured and want to protect your TDE master keys with it, then choose Enable HSM. You will be required to verify the HSM connection to proceed, if you enable HSM.
-
CSP Nodes Mapping: In the drop down choose the CSP Nodes Mapping, if you have created one, or proceed without one.
-
Select Continue.
-
-
The TDE Scripts Bundle Details appear. Validate the information is correct and Select Download.
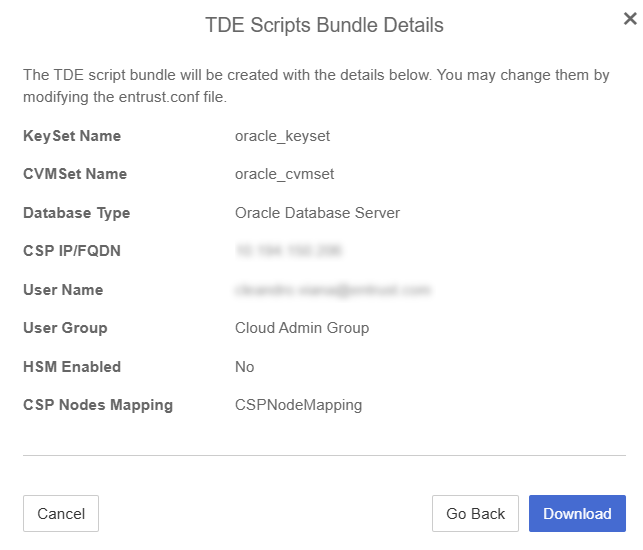
A zip file named with the name given in the Download TDE Scripts bundle dialog is downloaded, that is,
oracle.zip. Save this file as this will be used in each Oracle database instance server.
Entrust Cryptographic Security Platform Key Management Vault client setup on first Oracle database server node (primary)
-
Log in to the primary Oracle server as the
oracleuser. -
Create a directory for the bundle in the oracle’s user home directory.
% mkdir ~/csp -
Copy the TDE bundle downloaded earlier to the Primary Oracle server node.
The bundle is a zip file <name>.zip with <name> as provided by the admin while downloading the bundle. For this guide the name used was
oracle, so the name of the file isoracle.zip.% scp oracle.zip oracle@xx.xxx.xxx.xxx:/home/oracle/csp/. -
Extract the files in the bundle:
% cd ~/csp; unzip oracle.zip Archive: oracle.zip inflating: oracle/get_token.sh inflating: oracle/encrypt.sh inflating: oracle/setup.sh inflating: oracle/dgmappings.py inflating: oracle/entrust.conf -
Modify
entrust.conffile to match the environment.entrust.confis a config file which has most of the parameters pre-filled. You can still modify these values if you think that is required. There are some parameters which are specific to the Oracle database server and they need to be modified. Here is a list of the parameters which need to be set by the DB administrator:- oracle_user
-
this is the name of the database admin user, typically the value is
oracle - oracle_user_group
-
The group to which oracle_user belongs, typically the value is
oinstall.Here is the
entrust.conffor our environment:# # kind of a cluster or setup name for your oracle RAC # it should be unique in a vault # Make sure these same parameters are used from all the nodes in your RAC cluster and DR nodes # dbset_name="oracle" # # KeyControl parameters # --------------------- # kcv_ip_or_fqdn="xx.xxx.xxx.xxx" # # If KeyControl mapping has been setup on the KC cluster, it can be provided here # kc_mapping="CSPNodeMapping" # # If KeyControl is configured with HSM then it can be enabled using "yes" as value # if not specified here then the default value is yes if KC has hsm enabled # enable_hsm="no" # # Vault parameters # --------------------- vaultid="4b551f9d-0442-45e1-ad6e-6a45ec2ce0af" user_name="xxxx.xxxx@entrust.com" # # Uncomment the password parameter, if you want to set it here # if you do not provide password for vault admin then setup script will prompt you # # password="password23!" # user_group="Cloud Admin Group" # # Oracle user parameters # ---------------------- # oracle_user="oracle" oracle_user_group="oinstall" # # hostname suffix is used only in qa testing, please do not uncomment it # hostname_suffix="dr"
-
After editing entrust.conf, save the changes.
Set up the Client
-
Run the
setup.shscript as therootuser or usingsudo.% sudo ./setup.sh first entrust.confWe are doing this on the primary server, so we use
firstas the first argument.When we use this option, the
keyset/vmsetare created.The script asks for the Key Management Vault Database vault administrator password and it prints the name of the access token file:
Saving access token in file `/opt/oracle/entrust/oracle.conf`.Make a note of this as it will be used in the subsequent SQL statements to open the wallet.
For an example of the full output for this command, see here.
If the HSM is enabled in the settings of the Key Management Vault appliance manager and in the
entrust.conffile enable_hsm is set to no, you may get a message like this when you run thesetup.shscript:Create keyset oracle_keyset Server returned error: Failed to create Keyset root key Failed to download policy agentIf that is the case, disable the HSM settings in Key Management Vault to resolve the issue. If you selected to use the HSM (enable_hsm set to yes), then the HSM settings in the Key Management Vault must be enabled.
-
Set up the environment for the
encrypt.shscript:% ./encrypt.sh setenvFor an example of the full output for this command, see here.
-
Check the status:
% ./encrypt.sh statusFor an example of the full output for this command, see here.
Entrust Cryptographic Security Platform Key Management Vault client setup on second Oracle database server node (standby)
-
Login to the standby server as the
oracleuser. -
Create a directory for the bundle in the oracle’s user home directory.
% mkdir ~/csp -
Copy the TDE bundle downloaded earlier to the standby Oracle server node.
% scp oracle.zip oracle@xx.xxx.xxx.xxx:/home/oracle/csp/. -
Extract the files in the bundle:
% cd ~/csp; unzip oracle.zip Archive: oracle.zip inflating: oracle/get_token.sh inflating: oracle/encrypt.sh inflating: oracle/setup.sh inflating: oracle/dgmappings.py inflating: oracle/entrust.conf -
Copy the modified entrust.conf from the first (primary) Oracle server node and overwrite the config file from the bundle.
% scp oracle@xx.xxx.xxx.xxx:/home/oracle/csp/entrust.conf . -
Run
setup.shas therootuser or usingsudo.sudo ./setup.sh other entrust.confThe value of first argument is
other.For an example of the full output for this command, see here.
-
Set the environment for the standby setup.
% ./encrypt.sh setenvFor an example of the full output for this command, see here.
-
Perform initial setup of the standby server.
% ./encrypt.sh standby setupFor an example of the full output for this command, see here.
-
Check the status
% ./encrypt.sh statusFor an example of the full output for this command, see here.
Enable TDE on non-encrypted Oracle Database
This section describes how to enable TDE if the database has not been previously encrypted. If your database is already encrypted using a software wallet, go to section Migrate from software wallet to Key Management Vault.
The setup in this section uses a primary server and a standby server. No RAC is used. This setup uses CSP Vault as the keystore.
Use the encrypt.sh script included in the bundle to enable database encryption.
This script must be run as the oracle user.
We will do this on the primary server.
-
Set the environment.
The Oracle administrator must provide the following parameters to set the context. The following operation creates a file named
<dbset_name>.env, for exampleoracle.env, in the script directory.% ./encrypt.sh setenvFor an example of the full output for this command, see here.
-
Check the status.
After setting the environment variables, the administrator should check the status to determine the current state of the Oracle database server.
% ./encrypt.sh statusFor an example of the full output for this command, see here.
-
Encrypt the database:
% ./encrypt.sh encryptFor an example of the full output for this command, see here.
-
Check the status.
% ./encrypt.sh statusFor an example of the full output for this command, see here.
Database Encryption with TDE keys
There are two types of encryptions considered in the guide: column level encryption and tablespace level encryption.
Connect to the database as SYSDBA.
% sqlplus / as sysdbaColumn encryption
Since Columns are SYS owned objects, you will run into this error when attempting to encrypt a column in a database:
ERROR at line 1:
ORA-28336: cannot encrypt SYS owned objects
To get around the problem you need to create a user and grant the necessary permissions. You will use this user to create the table and encrypt the column.
-
Create the User
SQL> CREATE USER TESTER IDENTIFIED BY test_password; User created. -
Grant necessary privileges
SQL> GRANT CREATE SESSION, CREATE TABLE TO TESTER; Grant succeeded. SQL> ALTER USER TESTER QUOTA UNLIMITED ON USERS; User altered. SQL> ALTER USER TESTER QUOTA 100M ON USERS; User altered. SQL> SELECT tablespace_name, bytes, max_bytes FROM dba_ts_quotas WHERE username = 'C##TEST_USER'; TABLESPACE_NAME BYTES MAX_BYTES ------------------------------ ---------- ---------- USERS 0 104857600 -
Connect as the new user.
SQL> CONNECT TESTER/test_password; Connected. -
Create a table
SQL> CREATE TABLE CUSTOMERS (ID NUMBER(5), NAME VARCHAR(42), CREDIT_LIMIT NUMBER(10)); Table created. -
Add data to the table.
SQL> INSERT INTO CUSTOMERS VALUES (001, 'Rakesh Sharma', 10000); 1 row created. SQL> INSERT INTO CUSTOMERS VALUES (002, 'Betty John', 20000); 1 row created. SQL> INSERT INTO CUSTOMERS VALUES (003, 'T Ramchandran', 30000); 1 row created. SQL> INSERT INTO CUSTOMERS VALUES (004, 'Amir Khan', 40000); 1 row created. SQL> COMMIT; Commit complete. -
Encrypt a column.
SQL> ALTER TABLE CUSTOMERS MODIFY (CREDIT_LIMIT ENCRYPT); Table altered. -
List encrypted columns.
To do this you must connect as the sysdba user;
SQL> CONNECT sys/oracle as sysdba;
SQL> SELECT * FROM DBA_ENCRYPTED_COLUMNS;

OWNER     TABLE_NAME  COLUMN_NAME   ENCRYPTION_ALG    SAL INTEGRITY_AL
--------- ----------- ------------- ----------------- --- -----------------------
TEST_USER CUSTOMERS   CREDIT_LIMIT  AES 192 bits key  YES SHA-1
Verification
-
Connect as the test_user
SQL> CONNECT TESTER/test_password; Connected. -
Get the encrypted data back.
SQL> SELECT CREDIT_LIMIT FROM CUSTOMERS; CREDIT_LIMIT ------------ 10000 20000 30000 40000 -
Close the wallet
To do this you must connect as the sysdba user;
SQL> CONNECT sys/oracle as sysdba; -- Multitenant SQL> ADMINISTER KEY MANAGEMENT SET KEYSTORE CLOSE IDENTIFIED BY "file:/opt/oracle/entrust/oracle.conf" CONTAINER = ALL; keystore altered. -- Non-Multitenant SQL> ADMINISTER KEY MANAGEMENT SET KEYSTORE CLOSE IDENTIFIED BY "file:/opt/oracle/entrust/oracle.conf"; keystore altered. -
Connect as the test_user
SQL> CONNECT TESTER/test_password; Connected. -
Now data retrieval should fail.
SQL> SELECT CREDIT_LIMIT FROM CUSTOMERS; ERROR at line 1: ORA-28365: wallet is not open -
Works again after opening the key store.
To do this you must connect as the sysdba user;
SQL> CONNECT sys/oracle as sysdba; -- Multitenant SQL> ADMINISTER KEY MANAGEMENT SET KEYSTORE OPEN IDENTIFIED BY "file:/opt/oracle/entrust/oracle.conf" CONTAINER = ALL; keystore altered. -- Non-Multitenant SQL> ADMINISTER KEY MANAGEMENT SET KEYSTORE OPEN IDENTIFIED BY "file:/opt/oracle/entrust/oracle.conf"; keystore altered. -
Now the retrieval of the data should work.
You must connect as the test_user first.
SQL> CONNECT TESTER/test_password;

Connected.

SQL> SELECT CREDIT_LIMIT FROM CUSTOMERS;

CREDIT_LIMIT
------------
       10000
       20000
       30000
       40000
Tablespace encryption
Data encryption keys are managed by Oracle. They are created as tablespaces are encrypted. The DEKs are wrapped with the master key and the wrapped keys are stored with the data. Oracle communicates with Key Management Vault to wrap / unwrap these data keys.
Make sure you are connected as sysdba.
-
Create encrypted tablespace, for example using AES256 algorithm
SQL> CREATE TABLESPACE SECURESPACE DATAFILE '/opt/oracle/oradata/CDB1/SECURE01.DBF' SIZE 150M ENCRYPTION using 'AES256' DEFAULT STORAGE (ENCRYPT); Tablespace created. -
Create a table in encrypted tablespace.
SQL> CREATE TABLE EMPLOYEE (ID NUMBER(5),NAME VARCHAR(42),SALARY NUMBER(10)) TABLESPACE SECURESPACE; Table created. -
Insert data in the table.
SQL> INSERT INTO EMPLOYEE VALUES (001,'JOHN LENON',100000); 1 row created. SQL> INSERT INTO EMPLOYEE VALUES (002,'MARTINA HINGIS',200000); 1 row created. SQL> INSERT INTO EMPLOYEE VALUES (003,'R ATTENBOROUGH',350000); 1 row created. SQL> COMMIT; Commit complete. -
Display the data.
SQL> SELECT * FROM EMPLOYEE; ID NAME SALARY ---------- ------------------------------------------ ---------- 1 JOHN LENON 100000 2 MARTINA HINGIS 200000 3 R ATTENBOROUGH 350000 -
Display tablespaces.
SQL> SELECT t.name AS tablespace_name, e.encryptionalg AS encryption_algorithm FROM v$tablespace t JOIN v$encrypted_tablespaces e ON t.ts# = e.ts#;

TABLESPACE_NAME                ENCRYPT
------------------------------ -------
SECURESPACE                    AES256
Verification
-
Get the encrypted data back
SQL> SELECT * FROM EMPLOYEE; ID NAME SALARY ---------- ------------------------------------------ ---------- 1 JOHN LENON 100000 2 MARTINA HINGIS 200000 3 R ATTENBOROUGH 350000 -
Close the HSM wallet.
-- Multitenant SQL> ADMINISTER KEY MANAGEMENT SET KEYSTORE CLOSE IDENTIFIED BY "file:/opt/oracle/entrust/oracle.conf" CONTAINER = ALL; keystore altered. -- Non-Multitenant SQL> ADMINISTER KEY MANAGEMENT SET KEYSTORE CLOSE IDENTIFIED BY "file:/opt/oracle/entrust/oracle.conf"; keystore altered. -
Now data retrieval should fail.
SQL> SELECT * FROM EMPLOYEE; ERROR at line 1: ORA-28365: wallet is not open -
Open the keystore.
Data retrieval works again after opening the keystore.
-- Multitenant SQL> ADMINISTER KEY MANAGEMENT SET KEYSTORE OPEN IDENTIFIED BY "file:/opt/oracle/entrust/oracle.conf" CONTAINER = ALL; keystore altered. -- Non-Multitenant SQL> ADMINISTER KEY MANAGEMENT SET KEYSTORE OPEN IDENTIFIED BY "file:/opt/oracle/entrust/oracle.conf"; keystore altered. -
Retrieve the data - It should work!
SQL> SELECT * FROM EMPLOYEE;

        ID NAME                                           SALARY
---------- ------------------------------------------ ----------
         1 JOHN LENON                                     100000
         2 MARTINA HINGIS                                 200000
         3 R ATTENBOROUGH                                 350000
Oracle TDE Keys in the Key Management Vault web GUI
The Oracle TDE keys are created by Oracle using the pkcs11 API directly. However, Key Management Vault shows these keys in the web GUI. There are a limited set of operations that can be performed from the web GUI.
In the Entrust Cryptographic Security Platform Key Management Vault Database Vault web GUI:
-
Navigate to Cloudkeys.
-
Select the CloudKeys tab.
-
For the Key Set, select the TDE keyset created by the TDE setup scripts.
-
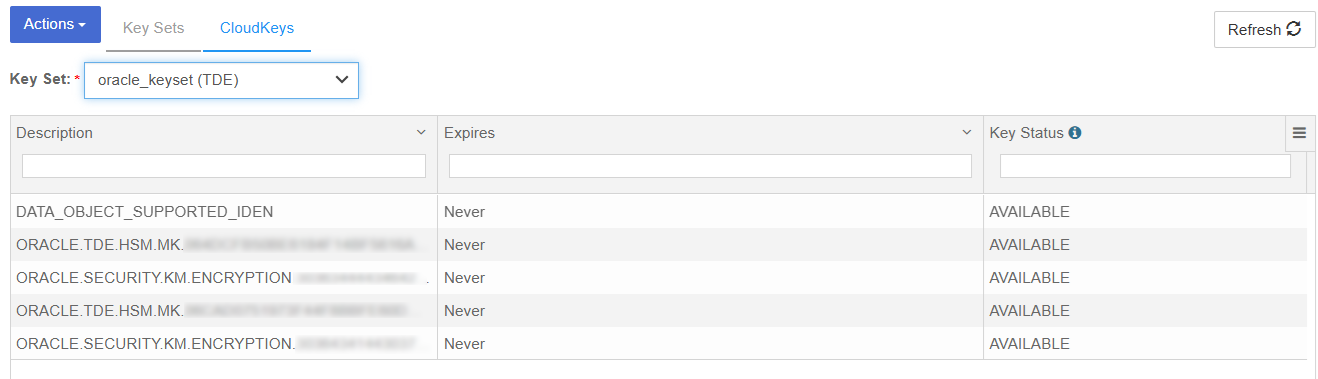
The Keys that have been created by our encryption process in the previous section should be listed.
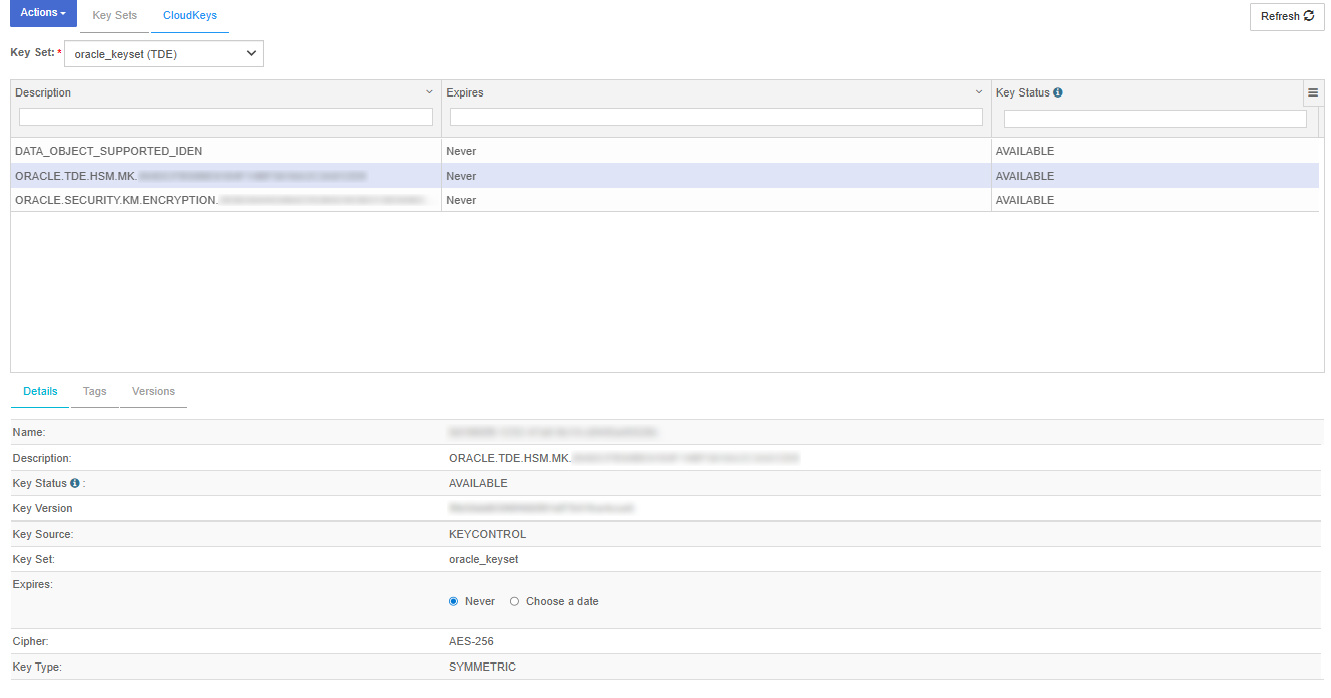
The keys starting with description:
-
ORACLE.TDE.HSM.MK : are the TDE master keys created by Oracle. These are used to encrypt TDE data encryption keys.
-
ORACLE.SECURITY.KM.ENCRYPTION : are generic keys managed by Oracle for TDE. They can be used to encrypt data or other keys.
-
DATA_OBJECT_SUPPORTED_IDEN : these are objects used by Oracle for access control purposes
-
Migrate from software wallet to Key Management Vault
If the database is already encrypted with a software keystore, use the migration process.
Oracle requires both the software keystore and the HSM keystore to be open when transitioning from a software wallet to an HSM keystore. However, the database administrator cannot open both stores simultaneously. Instead, Oracle uses an auto-login wallet to open both keystores during migration. This applies to both primary and standby servers or clusters.
| The following process guides the administrator to set up an auto-login wallet on the primary server and then copy the wallet files to the standby setup. These are mandatory steps, do not skip them. |
-
On the standby server, stop the Managed Recovery Process (MRP) using
stop_redo_log_apply.% ./encrypt.sh standby stop_redo_log_applyFor an example of the full output for this command, see here.
-
On the primary server, run
migrateand set up the auto-login wallet.% ./encrypt.sh migrateFor an example of the full output for this command, see here.
-
Set up auto-login.
% ./encrypt.sh setup_auto_loginFor an example of the full output for this command, see here.
-
Check the
WALLET_ROOTand the location of the wallet files.% ./encrypt.sh statusThe
WALLET_ROOTand wallet files appear in the output of theencrypt.sh statuscommand.Current wallet_root ------- /opt/oracle/oradata/CDB1/wallet . . . Wallet files ------------------------- /opt/oracle/oradata/CDB1/wallet/tde/cwallet.sso /opt/oracle/oradata/CDB1/wallet/tde/ewallet_2026041014532477.p12 /opt/oracle/oradata/CDB1/wallet/tde/ewallet_2026041017504798_tde_backup.p12 /opt/oracle/oradata/CDB1/wallet/tde/ewallet_2026041017505180_tde_backup.p12 /opt/oracle/oradata/CDB1/wallet/tde/ewallet_2026041017574123_tde_backup.p12 /opt/oracle/oradata/CDB1/wallet/tde/ewallet.p12 -
Copy
WALLET_ROOTfiles from the primary wallet to the standby wallet.WALLET_ROOTis set to/opt/oracle/oradata/CDB1/wallet.% scp $WALLET_ROOT/tde/* oracle@standby:$WALLET_ROOT/tde cwallet.sso 100% 5160 2.8MB/s 00:00 ewallet_2026041014532477.p12 100% 2555 965.1KB/s 00:00 ewallet_2026041017504798_tde_backup.p12 100% 3995 3.2MB/s 00:00 ewallet_2026041017505180_tde_backup.p12 100% 3995 2.9MB/s 00:00 ewallet_2026041017574123_tde_backup.p12 100% 3995 3.2MB/s 00:00 ewallet.p12 -
On the standby server, restart the database and then restart redo log apply.
You want to make sure the MRP process is running. Connect to the database as sysdba and run the following commands:
% sqlplus / as sysdba SQL> ALTER SYSTEM SET TDE_CONFIGURATION="KEYSTORE_CONFIGURATION=HSM|FILE" scope=both; SQL> SHUTDOWN IMMEDIATE; SQL> STARTUP MOUNT; SQL> ALTER DATABASE OPEN READ ONLY; SQL> select DB_UNIQUE_NAME, SWITCHOVER_STATUS, DATABASE_ROLE, OPEN_MODE from V$DATABASE; DB_UNIQUE_NAME SWITCHOVER_STATUS DATABASE_ROLE OPEN_MODE ------------------------------ -------------------- ---------------- -------------------- CDB1S NOT ALLOWED PHYSICAL STANDBY READ ONLY SQL> ALTER DATABASE RECOVER MANAGED STANDBY DATABASE USING CURRENT LOGFILE DISCONNECT FROM SESSION; -
Check the status.
% ./encrypt.sh statusFor an example of the full output for this command, see here.
-
Check that you can read data on the standby.
Connect to the database as sysdba and run the following commands:
% sqlplus / as sysdba

SQL> SELECT * FROM EMPLOYEE;

        ID NAME                                           SALARY
---------- ------------------------------------------ ----------
         1 JOHN LENNON                                    100000
         2 MARTINA HINGIS                                 200000
         3 R ATTENBOROUGH                                 350000
Rotation of the TDE Key
As with the other key operations, rekeying is also initiated on the Oracle server. The Oracle server deactivates the existing key and creates a new master key. The encryption key is then wrapped using the new master key. Note that the older key is deactivated but not destroyed.
If the master key has to be rotated while there is an active Data Guard managed standby, the admin must first stop the redo log apply on the standby.
-
Stop the redo log apply on standby.
% ./encrypt.sh standby stop_redo_log_applyFor an example of the full output for this command, see here.
-
Rotate the key on Primary.
You must execute this command on the primary node.
> ./encrypt.sh rotate_keyFor an example of the full output for this command, see here.
-
Restart the redo log apply.
Once the master key is rotated on primary, the admin should restart the redo log apply on the standby.
% ./encrypt.sh standby restart_redo_log_applyFor an example of the full output for this command, see here.
-
Check the status of the MRP process.
When the key is rotated on the primary, the Managed Recovery Process (MRP) on the standby does not get the key immediately. After restarting the redo log, check the status of MRP using the following command:
% ./encrypt.sh standby redo_log_statusThe status appears in the following section of the output:
Managed Recovery Process
-------------------------
PROCESS   STATUS          THREAD#  SEQUENCE#
--------- ------------ ---------- ----------
MRP0      APPLYING_LOG          1         21
For an example of the full output for this command, see here.
If the MRP has not started applying log, then wait for a couple of seconds and then try to restart it again. -
Check the status.
% ./encrypt.sh statusFor an example of the full output for this command, see here.
Check the rotation of the keys in the Key Management Vault web GUI.
You can check rotation of the keys by using the Key Management Vault web GUI. You should see the new keys that have been created in the UI.
In the Cryptographic Security Platform Key Management Vault Database Vault web GUI:
-
Navigate to Cloudkeys.
-
Select the CloudKeys tab.
-
For the Key Set, select the TDE keyset created by the TDE setup scripts.
-
You should see the new keys that have been created by the key rotation.
Disable or enable the Database Connector
Disable the Database Connector
-
Log in to the Key Management Vault Database Vault.
-
Select CLOUDKEYS in the top bar.
-
Select the Key Sets tab.
-
Select the desired Key Set and proceed to Database Connectors.
-
Choose the appropriate Database connector and access its settings.
-
Under Actions, locate the option to Disable Connector.
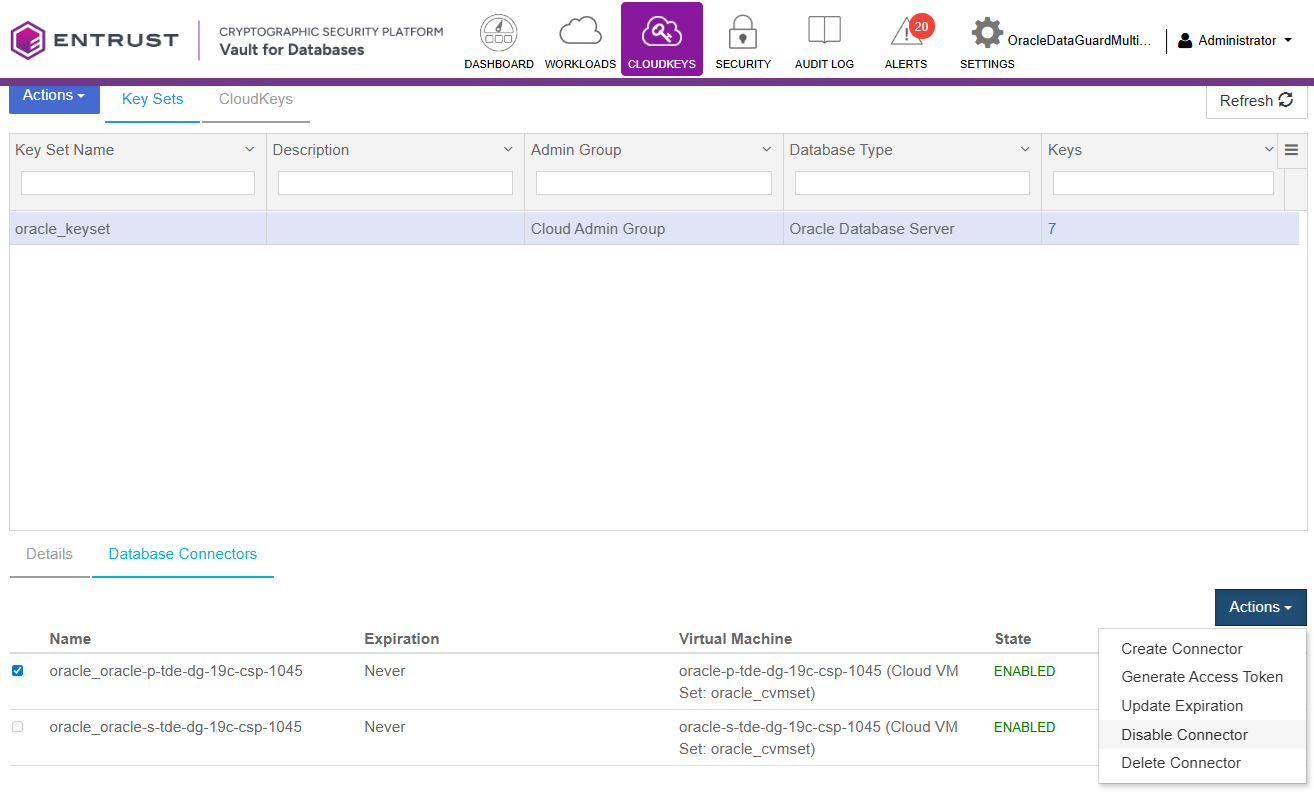
-
Select Disable.
-
Confirm that the state is DISABLED.
-
Return to the Oracle Server and login to SQL as
sysdba. -
When you run the commands to verify the tables, you will notice that it shows the wallet is not open:
ERROR at line 1: ORA-28365: wallet is not open -
Confirm the wallet is closed with the following command:
SQL> select CON_ID,WRL_TYPE,STATUS from V$ENCRYPTION_WALLET;

    CON_ID WRL_TYPE             STATUS
---------- -------------------- ------------------------------
         1 HSM                  CLOSED
         2 HSM                  CLOSED
         3 HSM                  CLOSED
         4 HSM                  CLOSED
Enable the Database Connector
-
Log in to the Key Management Vault Database Vault.
-
Select CLOUDKEYS in the top bar.
-
Select the Key Sets tab.
-
Select the desired Key Set and proceed to Database Connectors.
-
Choose the appropriate Database connector and access its settings.
-
Under Actions, locate the option to Enable Connector.
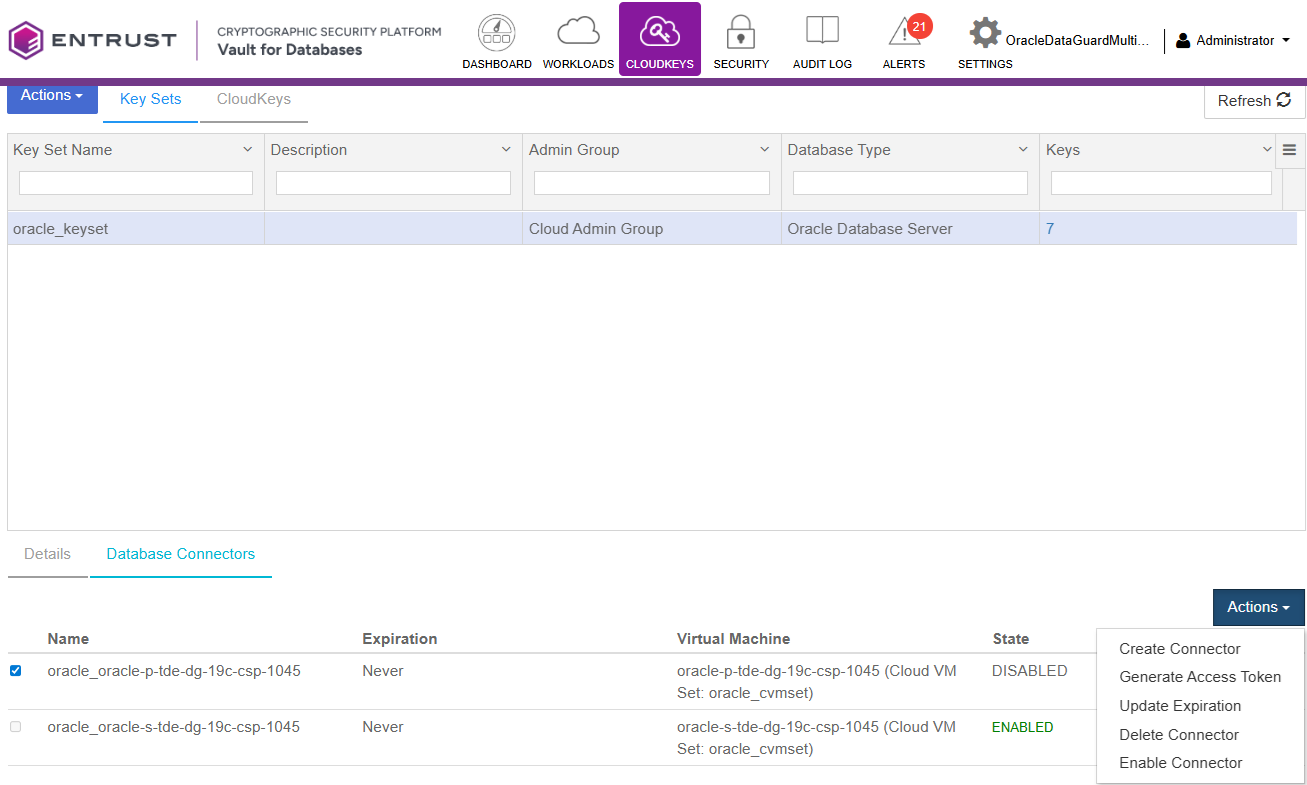
-
Open the keystore:
Return to the Oracle Server and login as
sysdbaand run the following SQL command:SQL> ADMINISTER KEY MANAGEMENT SET KEYSTORE OPEN IDENTIFIED BY "file:/opt/oracle/entrust/oracle.conf" CONTAINER=ALL; SQL> select CON_ID,WRL_TYPE,STATUS from V$ENCRYPTION_WALLET; CON_ID WRL_TYPE STATUS ---------- -------------------- ------------------------------ 1 HSM OPEN 2 HSM OPEN 3 HSM OPEN 4 HSM OPEN
Check that you can see the encrypted table content in plaintext
You should be able to do queries on the encrypted tables and see the table content in plaintext.
SQL> select * from employee;

        ID NAME                                           SALARY
---------- ------------------------------------------ ----------
         1 JOHN LENON                                     100000
         2 MARTINA HINGIS                                 200000
         3 R ATTENBOROUGH                                 350000
Reverse Migration from Key Management Vault to software wallet
In this section, we will migrate back from the CSP Vault keystore to the software wallet.
-
On Standby, stop Managed Recovery Process, i.e. stop redo log apply
% ./encrypt.sh standby stop_redo_log_applyFor an example of the full output for this command, see here.
-
On the primary, use reverse migrate. This will also set up auto-login.
% ./encrypt.sh reverse_migrateFor an example of the full output for this command, see here.
-
Add the config file as secret for a client HSM_PASSWORD.
Add the secret to the software keystore. This secret represents the config file, with the client identified as HSM_PASSWORD. HSM_PASSWORD is an oracle defined client name that represents the HSM password as a secret in the software keystore.
Connect to the database as sysdba and run the following commands:
% sqlplus / as sysdba SQL> ADMINISTER KEY MANAGEMENT ADD SECRET 'file:/opt/oracle/entrust/oracle.conf' for client 'HSM_PASSWORD' identified by "mypassword" with backup; SQL> ADMINISTER KEY MANAGEMENT CREATE AUTO_LOGIN KEYSTORE FROM KEYSTORE IDENTIFIED BY "mypassword"; -
Copy WALLET_ROOT files to standby.
Notice WALLET_ROOT is set to
/opt/oracle/oradata/CDB1/wallet.% scp $WALLET_ROOT/tde/* oracle@standby:$WALLET_ROOT/tde cwallet.sso 100% 5160 2.8MB/s 00:00 ewallet_2026041014532477.p12 100% 2555 965.1KB/s 00:00 ewallet_2026041017504798_tde_backup.p12 100% 3995 3.2MB/s 00:00 ewallet_2026041017505180_tde_backup.p12 100% 3995 2.9MB/s 00:00 ewallet_2026041017574123_tde_backup.p12 100% 3995 3.2MB/s 00:00 ewallet.p12 -
On Standby server, bounce the database and restart redo log apply.
Connect to the database as sysdba and run the following commands:
% sqlplus / as sysdba SQL> ALTER SYSTEM SET TDE_CONFIGURATION="KEYSTORE_CONFIGURATION=HSM|FILE" scope=both; SQL> SHUTDOWN IMMEDIATE; SQL> STARTUP MOUNT; SQL> ALTER DATABASE OPEN READ ONLY; SQL> select DB_UNIQUE_NAME, SWITCHOVER_STATUS, DATABASE_ROLE, OPEN_MODE from V$DATABASE; DB_UNIQUE_NAME SWITCHOVER_STATUS DATABASE_ROLE OPEN_MODE ------------------------------ -------------------- ---------------- -------------------- CDB1S NOT ALLOWED PHYSICAL STANDBY READ ONLY SQL> ALTER DATABASE RECOVER MANAGED STANDBY DATABASE USING CURRENT LOGFILE DISCONNECT FROM SESSION; -
Check the status:
% ./encrypt.sh statusFor an example of the full output for this command, see here.
Backup or restore
When using Key Management Vault, when doing a backup and restore, make sure Entrust policy agent is setup on the restore node as well. Before recovering the restored database, the HSM keystore has to be opened. Refer the Oracle documentation for details of RMAN based backup /restore.