Procedures
Select the protection method
OCS or Module protection can be used to authorize access to the keys protected by the HSM. Follow your organization’s security policy to select an authorization access method.
Install the HSM
Install the nShield Connect HSM locally, remotely, or remotely via the serial console. See the following nShield Support articles and the Installation Guide for the HSM:
| Access to the Entrust nShield Support Portal is available to customers under maintenance. To request an account, contact nshield.support@entrust.com. |
Install the nShield Security World Software and create the Security World
To install the nShield Security World Software and create the Security World:
-
Install the Security World software as described in Installation Guide and the User Guide for the HSM. This is supplied on the installation disc.
-
Add the Security World utilities path
/opt/nfast/binto the system path. -
Open the firewall port 9004 for the HSM connections.
-
Open a command window and confirm the HSM is
operational:# enquiry Server: enquiry reply flags none enquiry reply level Six serial number 530E-02E0-D947 7724-8509-81E3 09AF-0BE9-53AA 9E10-03E0-D947 mode operational ... Module #1: enquiry reply flags none enquiry reply level Six serial number 530E-02E0-D947 mode operational ... -
Create your Security World if one does not already exist, or copy an existing one. Follow your organization’s security policy for this. Create extra ACS cards as spares in case of a card failure or a lost card.
ACS cards cannot be duplicated after the Security World is created. -
Confirm the Security World is
usable:# nfkminfo World generation 2 state 0x37270008 Initialised Usable ... ... Module #1 generation 2 state 0x2 Usable ...
Generate the OCS
The OCS and associated passphrase will be used to authorize access to the keys protected by the HSM. Typically, one or the other will be used, but rarely both.
When selecting your protection method take your organization’s security policy into consideration.
Create the OCS
To create the OCS:
-
Ensure the
/opt/nfast/kmdata/config/cardlistfile contains the serial number of the card(s) to be presented, or the asterisk wildcard (*). -
Open a command window as an Administrator.
-
Run the
createocscommand as described below, entering a passphrase or password at the prompt.Create one card for each person with access privilege, plus the spares.
After an Operator Card Set has been created, the cards cannot be duplicated. # createocs -m1 -s2 -N testOCS -Q 1/1 FIPS 140-2 level 3 auth obtained. Creating Cardset: Module 1: 0 cards of 1 written Module 1 slot 0: Admin Card #1 Module 1 slot 2: empty Module 1 slot 3: empty Module 1 slot 2: blank cardSteps: Module 1 slot 2:- passphrase specified - writing card Card writing complete. cardset created; hkltu = a165a26f929841fe9ff2acdf4bb6141c1f1a2eed -
Verify the OCS was created:
# nfkminfo -c
Cardset list - 2 cardsets:  (P)ersistent/(N)ot, (R)emoteable/(L)ocal-only
 Operator logical token hash               k/n timeout  name
 edb3d45a28e5a6b22b033684ce589d9e198272c2  1/5  none-NL testOCS
The
rocsutility also shows the OCS was created:# rocs `rocs' key recovery tool Useful commands: `help', `help intro', `quit'. rocs> list cardset No. Name Keys (recov) Sharing 1 testOCS 2 (2) 1 of 1; rocs> quit
Generating a PKCS11 key
Creating a PKCS11 key is a crucial step in setting up the integration. This key will be used to generate an AWS KMS key via the external key store proxy on your AWS Linux server. Currently, only module and OCS generated keys are supported.
As per the AWS documentation, you must create keys in your HSM and map them to the external key store resource in KMS. These keys are used with AWS services supporting customer keys or within your applications for data encryption. Refer to https://aws.amazon.com/blogs/aws/announcing-aws-kms-external-key-store-xks/
In an external key store, the key must be a 256-bit AES key, enabled, and capable of performing encryption and decryption. For specific requirements regarding a KMS key in an external key store. For more comprehensive information, refer to the AWS documentation at: https://docs.aws.amazon.com/kms/latest/developerguide/keystore-external.html
Follow these steps to generate the key:
-
Open your terminal and execute the
generatekey pkcs11command as shown below:generatekey pkcs11 -
During the key generation process, make sure to specify the following parameters:
-
Protection Type: Choose module or token (OCS) protection.
-
Key Type: Select AES as the key type.
-
Key Size: Use a 256-bit key size.
-
Key Name: Enter a descriptive plain name that will be used to identify the
xks_key_id_setin a later step. -
NVRAM: Leave the default as "no" for now.
Example of module protected generated key:
# generatekey pkcs11 protect: Protected by? (token, softcard, module) [token] > module type: Key type? (DES3, DH, DHEx, DSA, HMACSHA1, HMACSHA256, HMACSHA384, HMACSHA512, RSA, DES2, AES, Rijndael, ECDSA, ECDH) [RSA] > AES size: Key size? (bits, 128-256) [] > 256 plainname: Key name? [] > xks-keyset-1 nvram: Blob in NVRAM (needs ACS)? (yes/no) [no] > -
-
After the key is successfully generated, the system will provide you with the path to the key file. For example:
Key successfully generated. Path to key: /opt/nfast/kmdata/local/key_pkcs11_ua44483047694932fb31383141f6cd8d89a7fc9c3c -
Save and keep track of this key, as it is required for the
settings_nshield.tomlfile.To verify that the key was generated correctly, you can list the keys created using the
nfkminfo -lcommand, as shown below:# nfkminfo -l Keys with module protection: key_pkcs11_ua44483047694932fb31383141f6cd8d89a7fc9c3c `xks-keyset-1`You can also use the
rocstool to view your keys. To list all keys, run the following command in your terminal:# rocs `rocs' key recovery tool Useful commands: `help', `help intro', `quit'. rocs> list keys No. Name App Protected by 1 xks-keyset-1 pkcs11 module
Remember to use the correct key when configuring the settings_nshield.toml file for seamless integration with AWS KMS.
Clone the Git repository and configure the settings
The Git repository to be cloned plays a significant role in driving the development of XKS, an Open interoperability specification for regulated workloads. It provides essential materials, including the XKS proxy API specification, enabling Entrust to create an XKS proxy for their nShield Hardware Security Module (HSM).
Additionally, it offers a reference implementation of an XKS proxy and a test client to ensure compliance with the specification. Integrating this repository with AWS KMS XKS Proxy enhances security and fosters standardized security practices for secure workloads. For more information, refer to: https://github.com/aws/aws-kms-xksproxy-api-spec.
To set up the integration with AWS KMS XKS Proxy, follow these steps:
-
Clone the Git repository to your AWS Linux Server by executing the following command:
git clone https://github.com/aws-samples/aws-kms-xks-proxy/ -
Next, configure the
settings_nshield.tomlfile located underaws-kms-xks-proxy/xks-axum/configuration/settings_nshield.toml. -
Start by configuring the
[server]section of the file. To do this:-
Enter the IP of your server and set the port to 443.
-
Keep the other settings as default.
-
Ensure that any firewalls between AWS KMS and the external key store proxy allow traffic to and from port 443 on the proxy. AWS KMS communicates on port 443.
[server] ip = "10.0.11.48" port = 443 region = "us-east-1" service = "kms-xks-proxy" -
-
Now, configure the
[security]section of the file. Enableis_sigv4_auth_enabledandis_tls_enabled.[security] is_sigv4_auth_enabled = true is_tls_enabled = true is_mtls_enabled = false -
Proceed to configure the
[external_key_stores]section of the file. For theuri_path_prefix, use/nshield/xks. Generate thesigv4_access_key_idandsigv4_secret_access_keywith the specified character requirements. Set thexks_key_id_setto match the plain name of the PKCS11 key you generated in the previous step.Before generating the keys, ensure that you follow your organizations’s policy and guidelines for key generation. These keys securing your system, so adhere to the specified character requirements and security best practices during the process. [[external_key_stores]] uri_path_prefix = "/nshield/xks" sigv4_access_key_id = "2J6C4RFB3A5XMWYTHPKX" sigv4_secret_access_key = "rD5/fh6yK4dDjnrj4g9znwTJxYnPhB99Qemv71g5Wv38QoO6vuR/+ba6rgsD0ap" xks_key_id_set = ["xks-keyset-1"]If there is another [external_key_stores]section, you can delete it and keep the one you configured. -
Now, configure the
[tls]section of the file for TLS communication during the integration process. You must obtain a TLS certificate issued by a public certificate authority supported for external key stores. For a list, see https://github.com/aws/aws-kms-xksproxy-api-spec/blob/main/TrustedCertificateAuthorities.-
First, ensure that you have obtained the necessary certificate files required for TLS communication.
-
Copy these certificate files to the designated folder
/aws-kms-xks-proxy/xks-axum/tls, which will be utilized by the xks-proxy for TLS communication. -
Make sure the certificate chain is in a single file called
tls_cert_pem. -
Confirm that the
tls_key_pemspecified in the configuration file matches the key used when generating the Certificate Signing Request (CSR) for the certificate. This ensures the proper functioning of the TLS communication.
After completing these steps, your
[tls]section in the configuration file should look like this:[tls] # Applicable when is_tls_enabled = true tls_cert_pem = "tls/combined.crt" tls_key_pem = "tls/private.key" # Applicable when is_mtls_enabled = true mtls_client_ca_pem = "" mtls_client_dns_name = ""By adhering to these configurations, your TLS communication will be successfully set up for AWS KMS XKS Proxy integration.
-
-
If you are using OCS protection, provide the passphrase of the OCS in the
user_pinsection of thesettings_nshield.tomlfile. If there is no passphrase, leave it blank ("").[pkcs11] user_pin = "standard" -
Keep the rest of the settings as default and save the file.
Configure the cknfastrc variables
To configure the cknfastrc variables:
-
Ensure that you have edited the
cknfastrcfile found under/opt/nfast/cknfastrcto enable module protection:CKNFAST_FAKE_ACCELERATOR_LOGIN=1 -
If you are using OCS protection, edit the
cknfastrcto include this variable:CKNFAST_NO_ACCELERATOR_SLOTS=1
Key Administrators - AWS IAM user
To enable the integration, you must designate an IAM user as a key Administrator. This user will have permissions to manage and use the KMS key for cryptographic operations.
-
Log into the AWS Management Console.
-
Search for the Identity and Access Management (IAM) service and select it.
-
In the IAM console, select Access Management in the left tab and then choose Users.
-
You can either select an existing user or create a new user to be the Key Administrator. In this example integration, a new user named
xks-useris created as the Key Administrator.

Getting started with the XKS proxy
Before proceeding with the integration of the AWS XKS and nShield HSM, note that the following section demonstrates an example of deploying the XKS Proxy using Rust Cargo. However, the choice of build and deployment environment may vary based on your organization’s preferences and toolset.
The provided steps illustrate how to set up the XKS Proxy using Rust Cargo as a reference implementation for this integration guide. This is an example utilizing the tools available at the time of testing. There are various other build and deployment options. Adapt the process based on your specific requirements and infrastructure.
To use the XKS Proxy, follow these steps:
-
Install Rust Cargo. This command may differ based on your setup:
# yum install rust cargo -
Create an executable file named
xks_nshield_runwith the following contents:# cat xks_nshield_run cd <directory>/aws-kms-xks-proxy/xks-axum XKS_PROXY_SETTINGS_TOML=configuration/settings_nshield.toml cargo run -
Run the executable
xks_nshield_runby executing the following command:# ./xks_nshield_run
Upon successful execution, you should see the XKS Proxy start and display relevant information:
    Finished dev [unoptimized + debuginfo] target(s) in 0.22s
     Running `target/debug/xks-proxy`
2023-07-19T17:53:24.718713Z  INFO main xks_proxy: 276: Tracing level="DEBUG" is_file_writer_enabled=true
2023-07-19T17:53:24.719126Z  INFO main xks_proxy: 278: Tracing file rotation_kind="HOURLY"
2023-07-19T17:53:24.719224Z  INFO main xks_proxy: 67: Starting service="kms-xks-proxy" region="us-east-1"
2023-07-19T17:53:24.719744Z  INFO tokio-runtime-worker xks_proxy: 195: http://10.0.11.48:80/ping available for health check
2023-07-19T17:53:24.719868Z  INFO tokio-runtime-worker xks_proxy: 113: is_sigv4_enabled=true is_tls_enabled=true is_mtls_enabled=false secondary_auth=None
2023-07-19T17:53:24.720202Z  INFO tokio-runtime-worker xks_proxy: 133: Ciphertext Metadata is not configured.
2023-07-19T17:53:24.720397Z  INFO tokio-runtime-worker xks_proxy: 144: TCP Keepalive secs=Some(60s) interval_secs=Some(1s) retries=Some(3)
2023-07-19T17:53:24.720599Z  INFO tokio-runtime-worker xks_proxy: 149: v3.1.2-unknown listening on 10.0.11.48:443 for traffic
With these instructions, you now have the XKS Proxy up and running, ready to handle your KMS-related tasks.
Creating the External Key Store on AWS
To set up the External Key Store on AWS, follow these steps:
-
Log in to the AWS console and navigate to the Key Management Server (KMS) section.
-
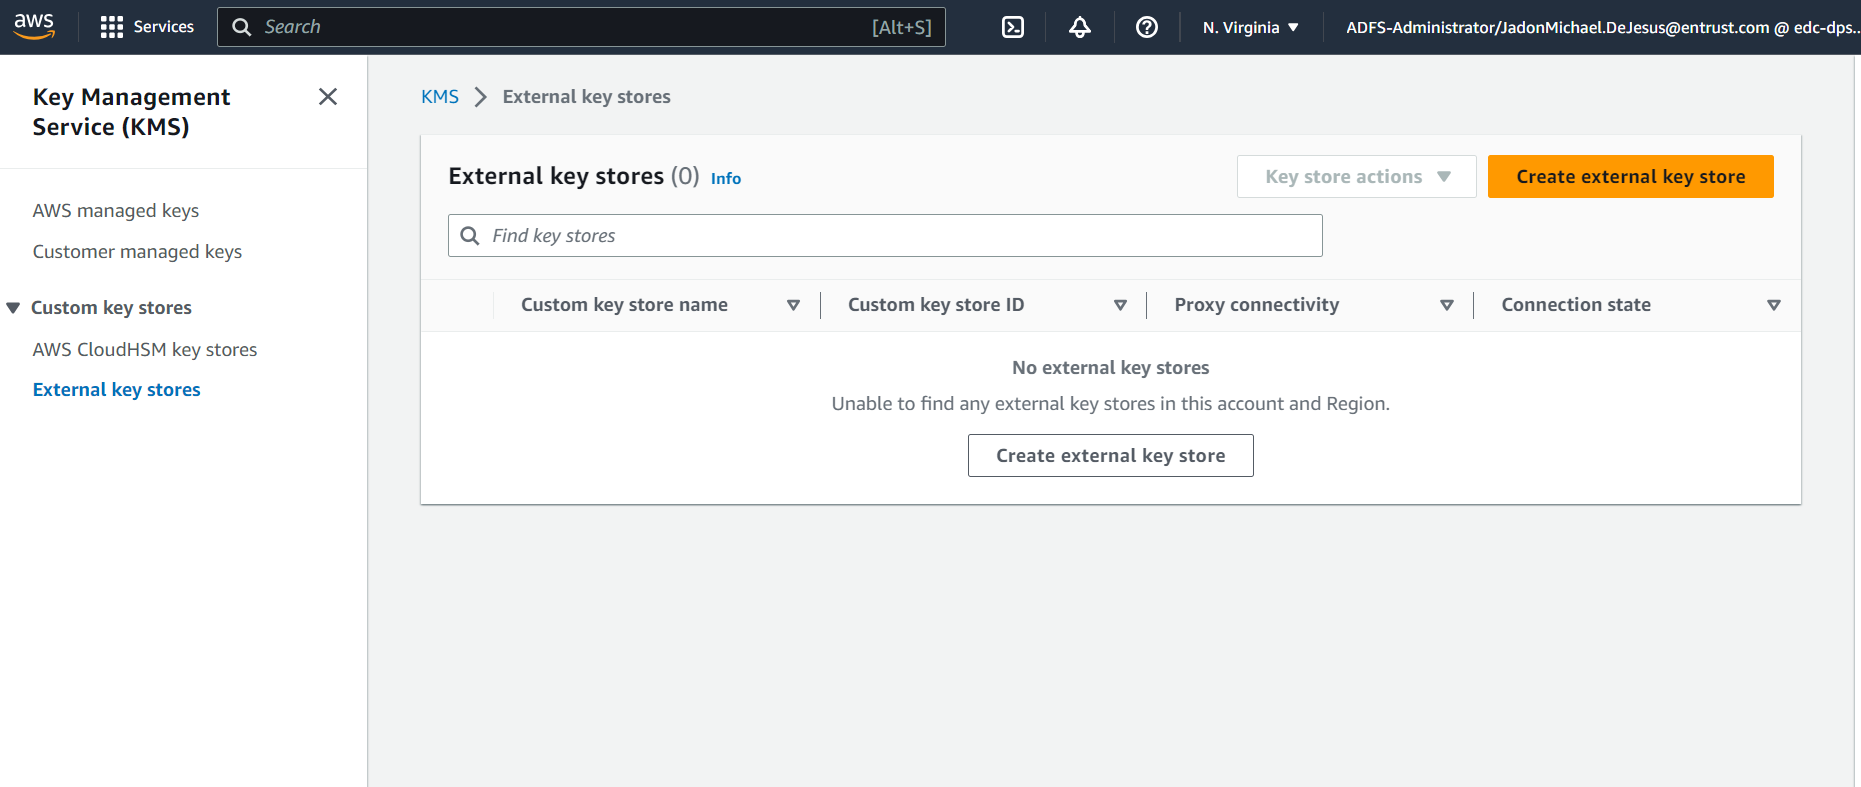
In KMS, go to Custom key stores > External key stores.
-
Select Create external key store.
-
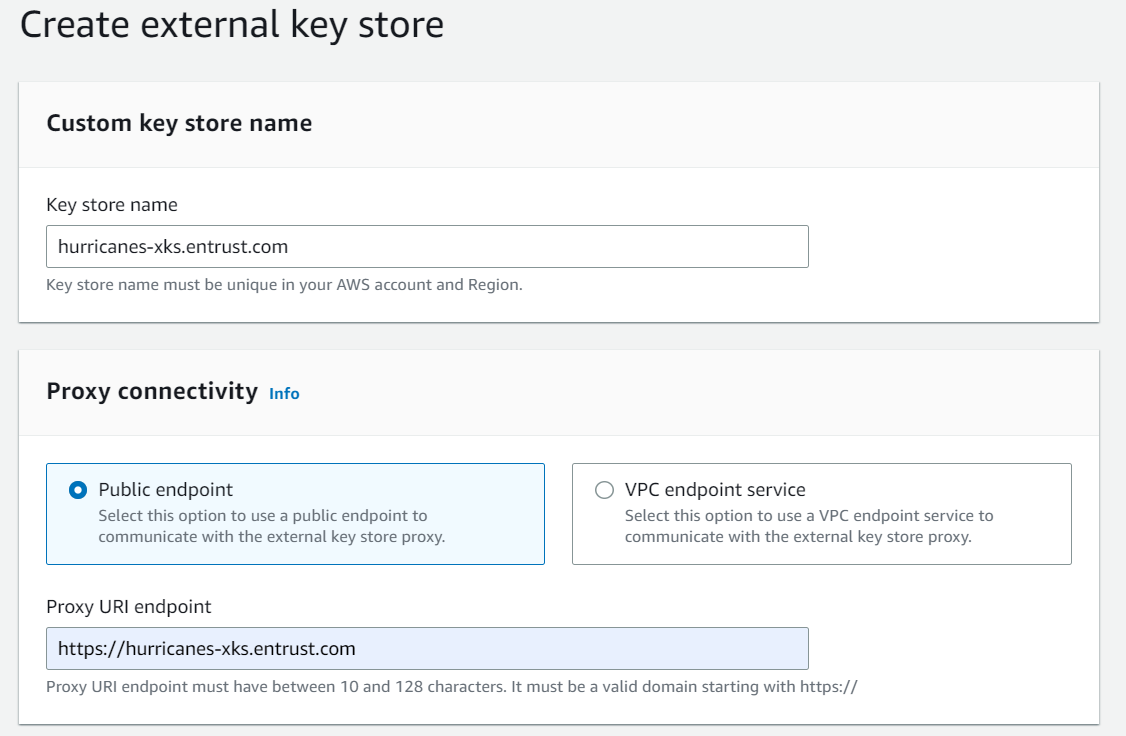
Provide the Fully Qualified Domain Name (FQDN) for the Key store name.
-
Choose the Public endpoint option.
-
Enter the HTTPS URL for the server, for example:
-
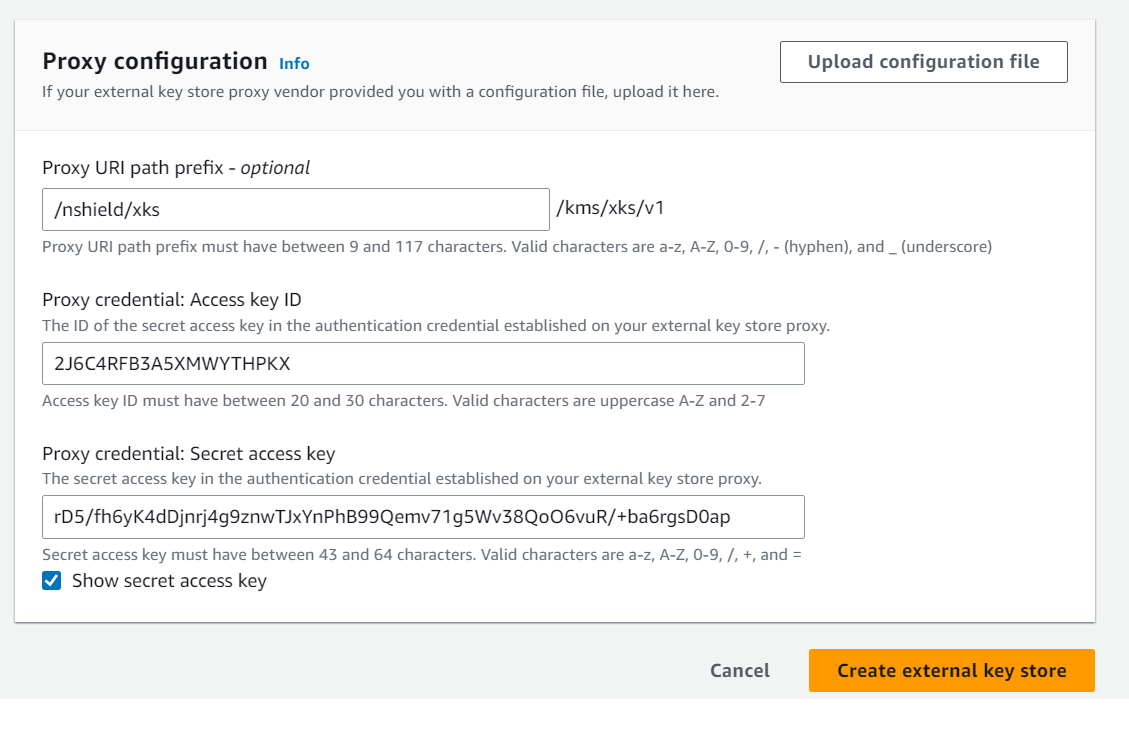
For the proxy configuration, provide the following details:
-
Enter the URI path prefix as specified in the
settings_nshield.tomlfile: "/nshield/xks". -
Enter the Access key ID generated earlier (Ensure it matches the one in
settings_nshield.toml). -
Enter the secret access key generated earlier (Ensure it matches the one in
settings_nshield.toml).
-
-
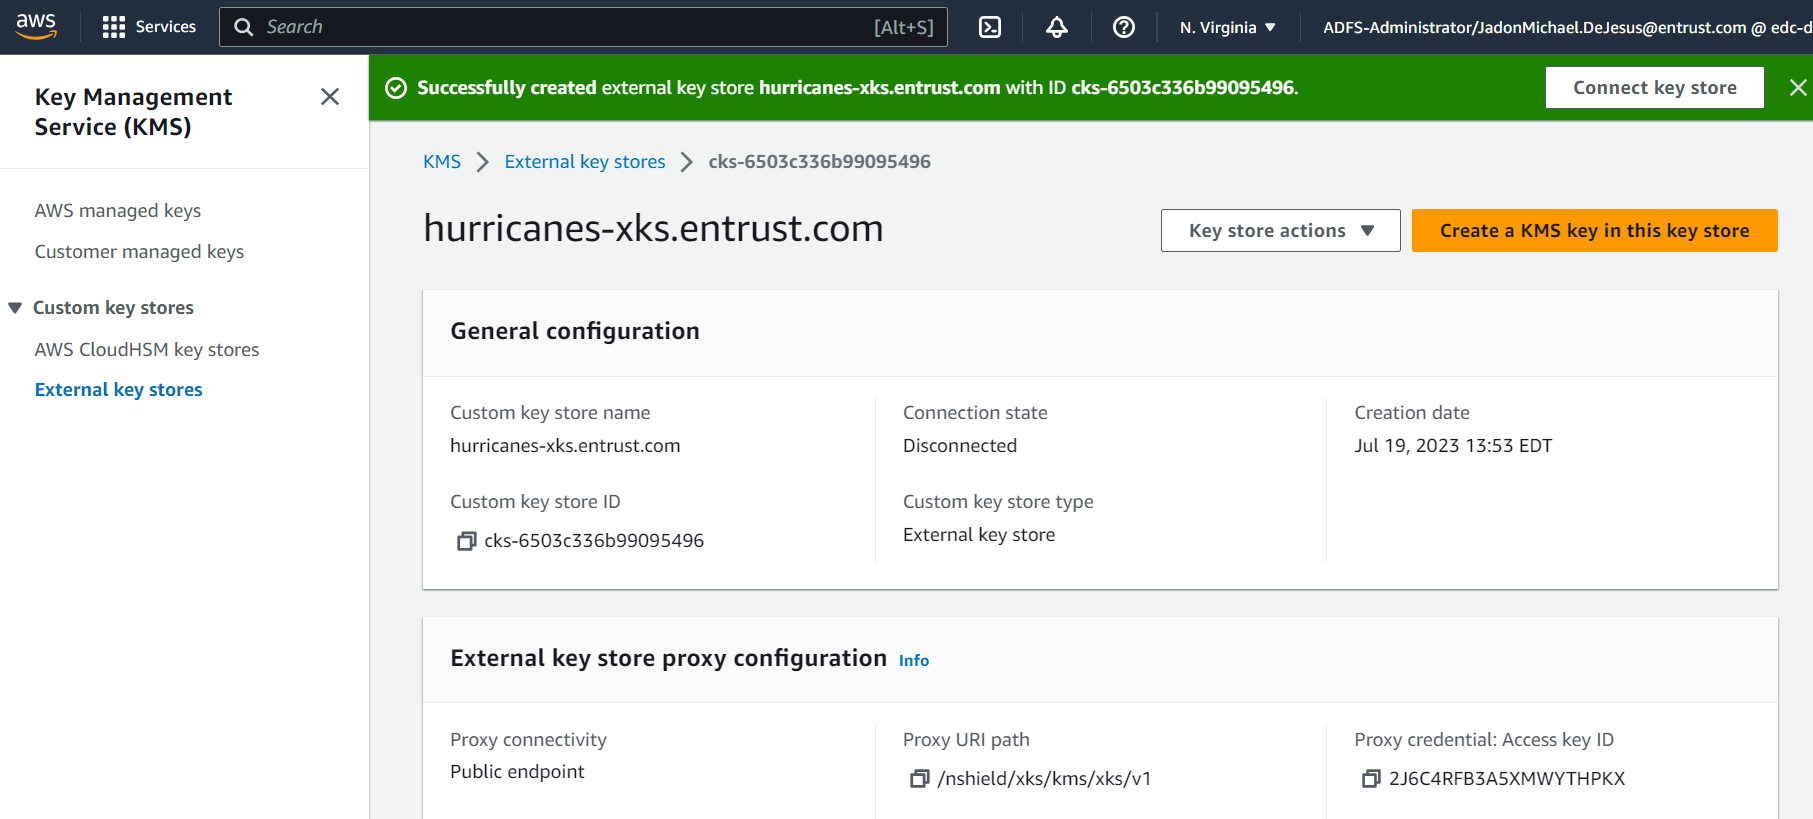
Select "Create external key store". AWS will notify you when the external keystore has been created.
-
After the external key store is created, you can view its details, including the connection state:
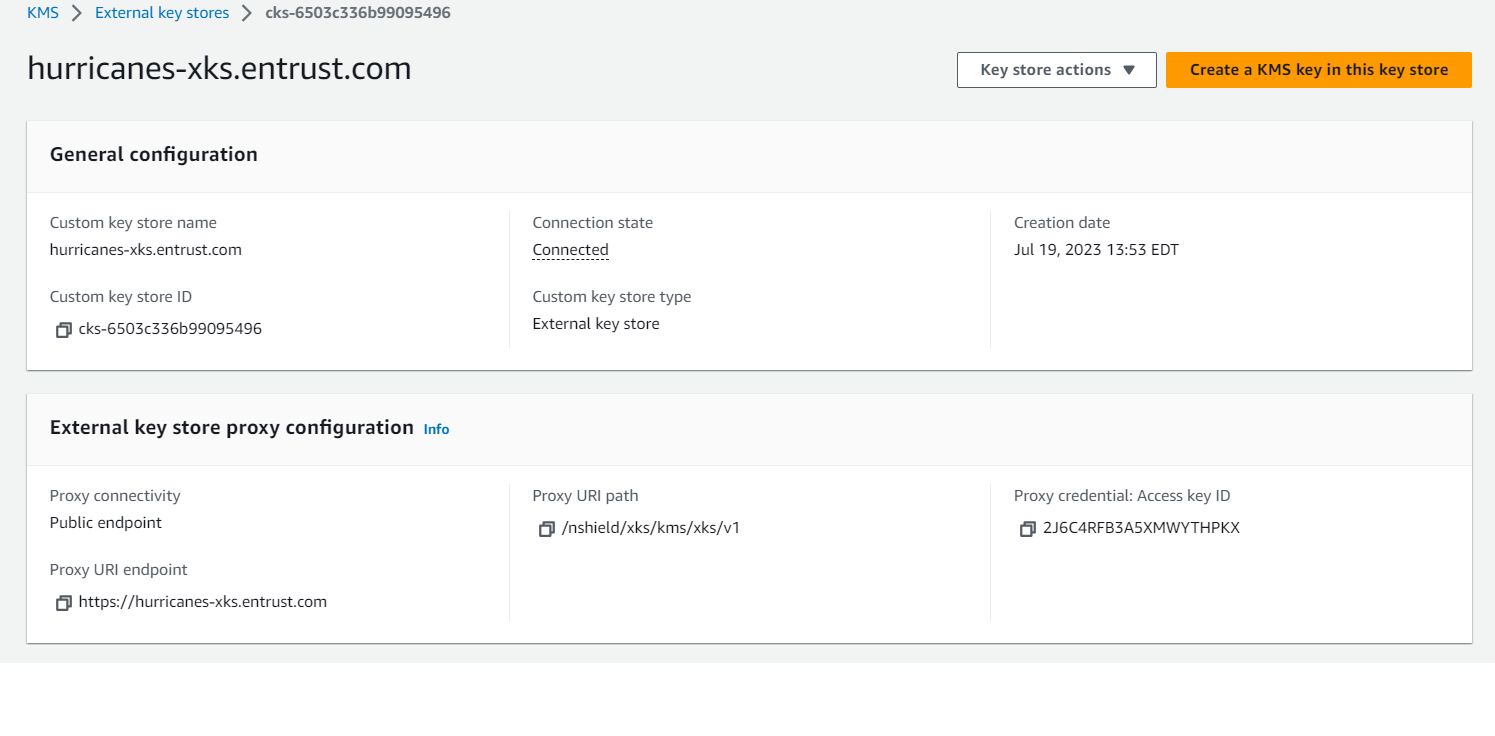
-
Connect the newly created External Keystore. Under Key store actions, select "Connect."
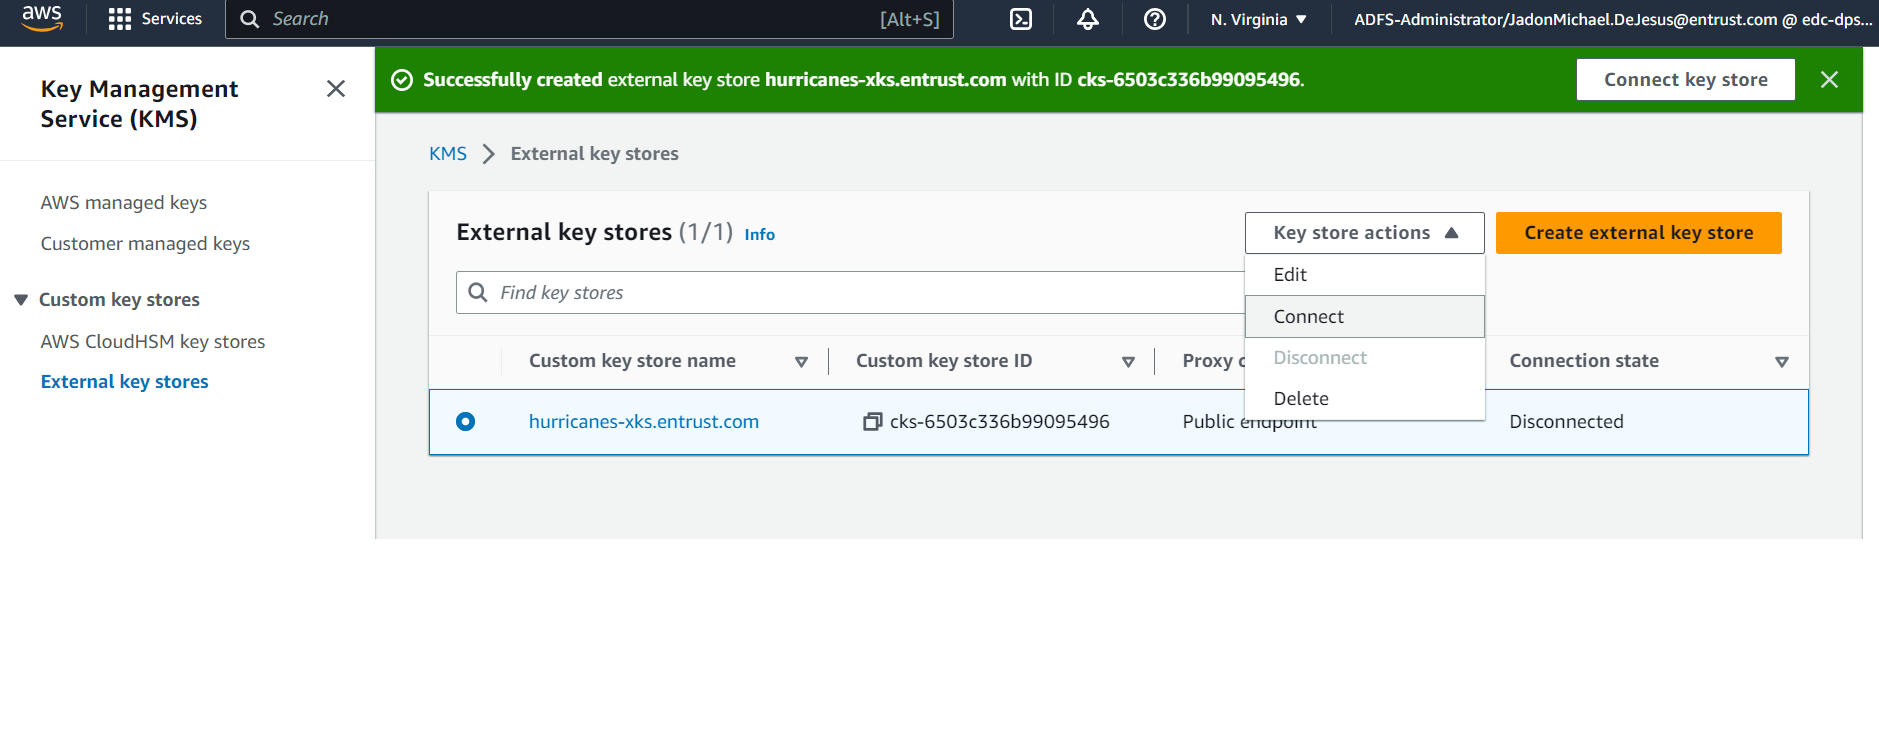
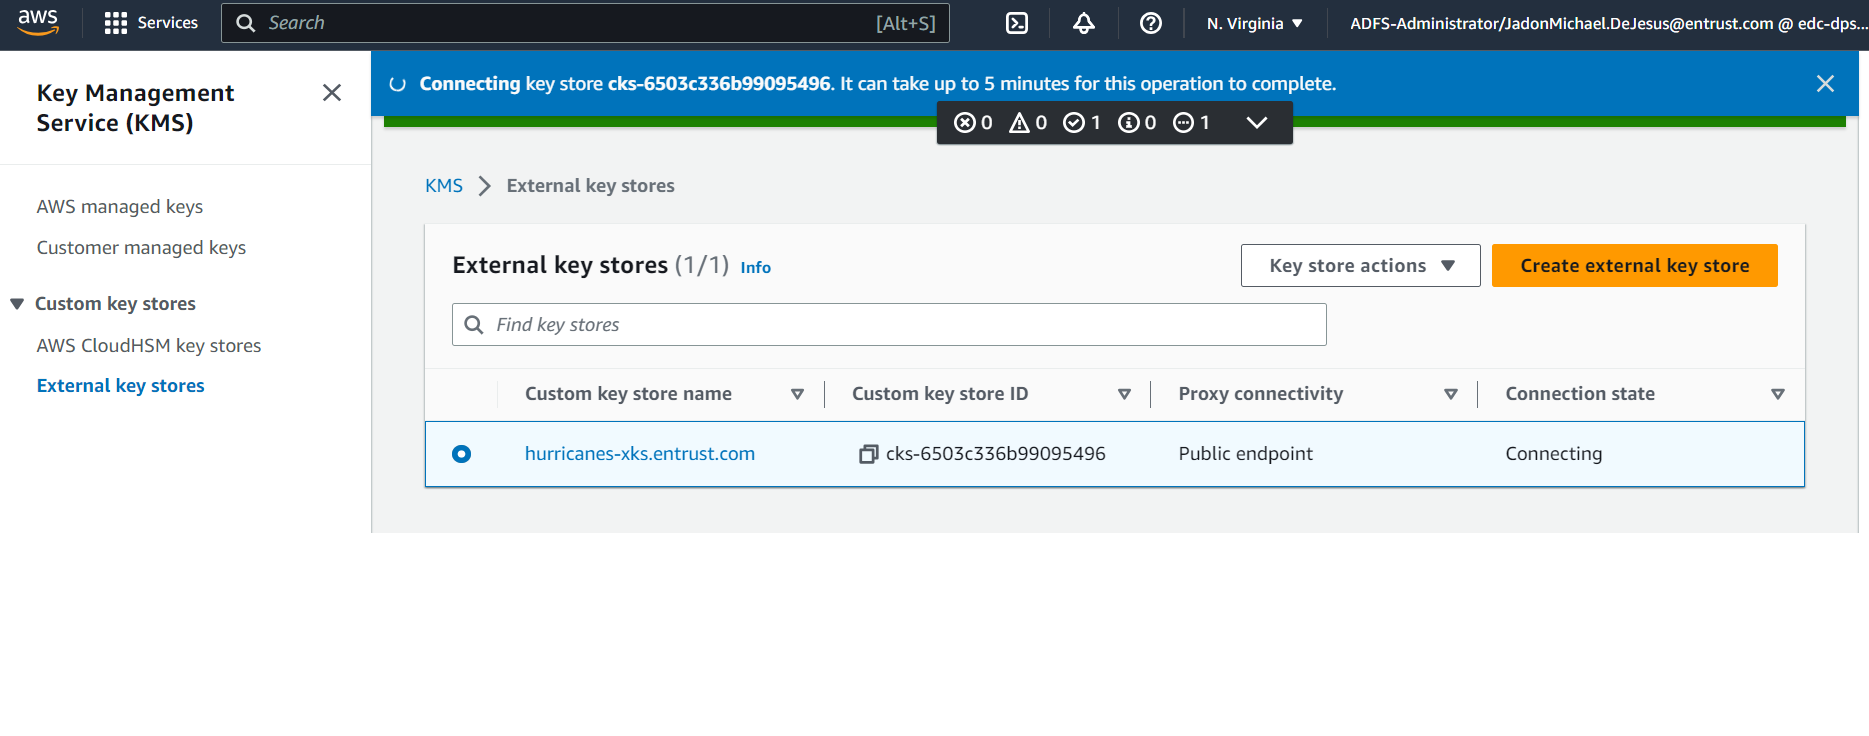
The connection process may take up to 5 minutes to complete.
-
After connection, the connection state will change to "Connected."
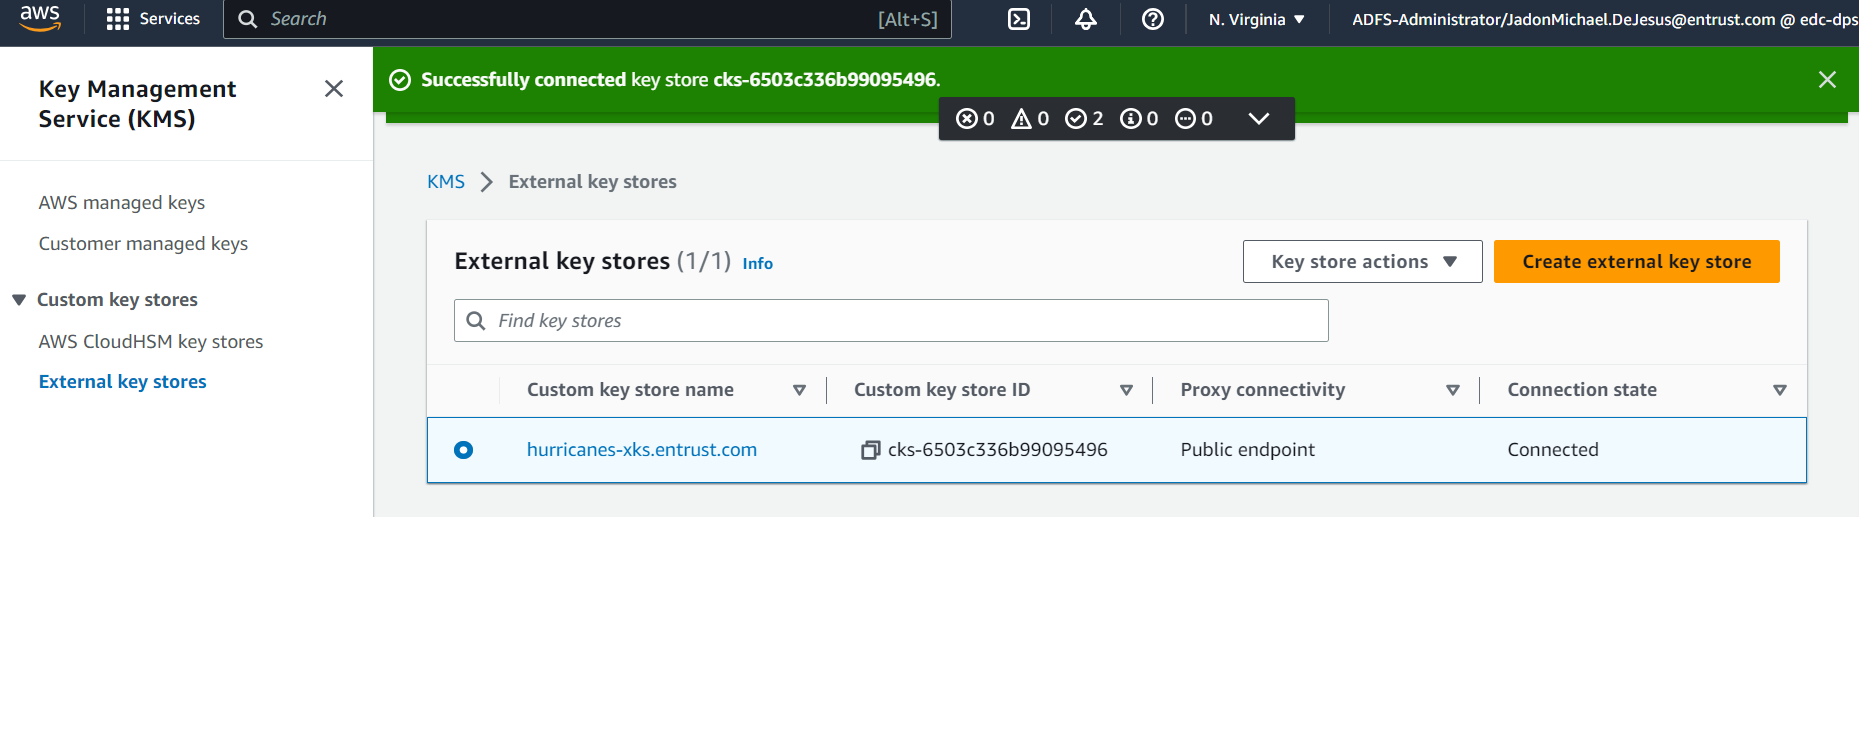
With the External Key Store successfully created and connected, you can now utilize its functionality to securely manage and store keys in your AWS environment.
Creating a key in AWS KMS
To create a new key in AWS Key Management Service (KMS), follow these steps:
-
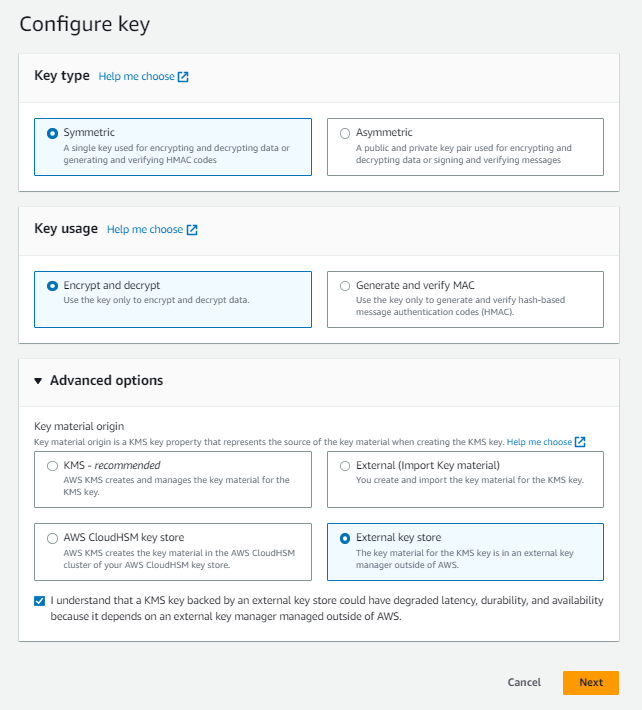
Go to the Key Management Server (KMS) section in the AWS console and select Customer managed keys.

-
Choose Symmetric as the key type.
-
Select Encrypt and decrypt for the key usage.
-
In the Advanced options, choose External key store and check the agreement.
-
Select the external key store created earlier.
-
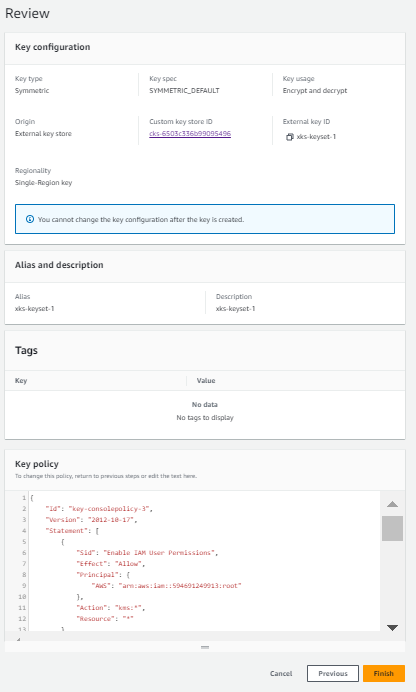
Enter the plainname that was defined for the key when it was generated, and ensure it matches the one in the
settings_nshield.tomlfile underxks_key_id_set. For this example,xks-keyset-1was used.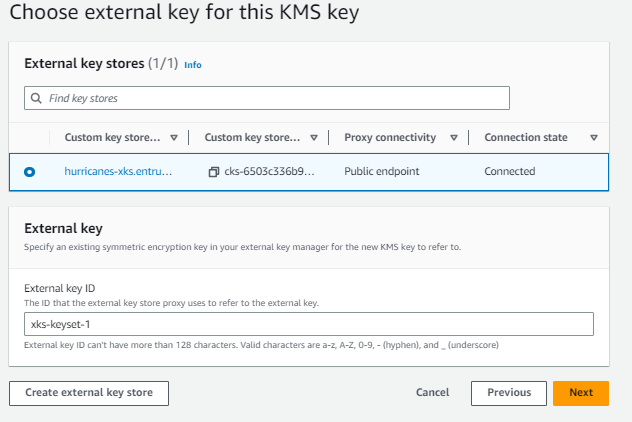
-
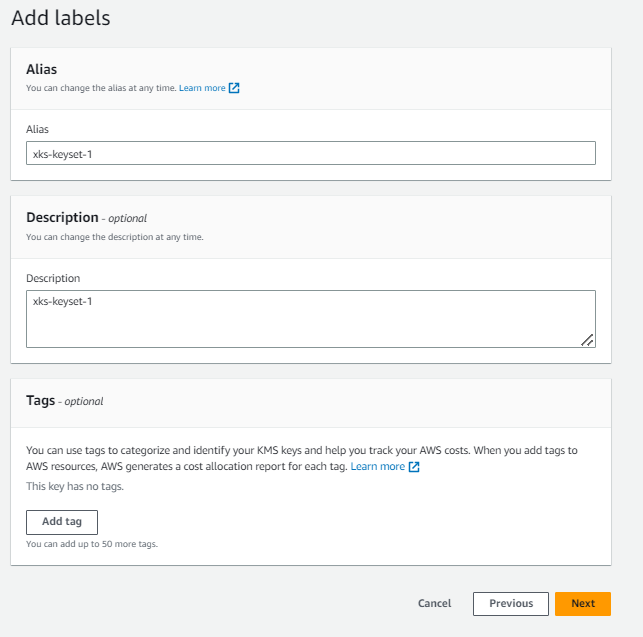
Enter the External key id for Alias and description.
-
For key administrators, select the
xks-userfrom the IAM step.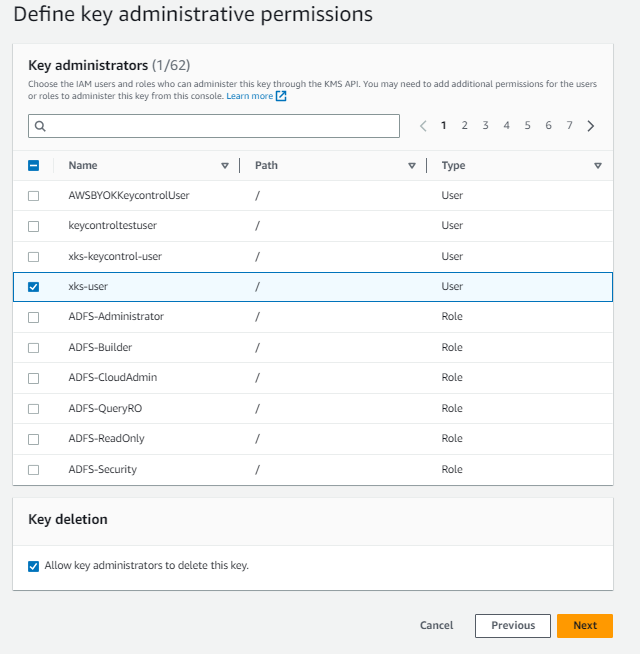
-
Select the
xks-userfor key-usage permissions as well.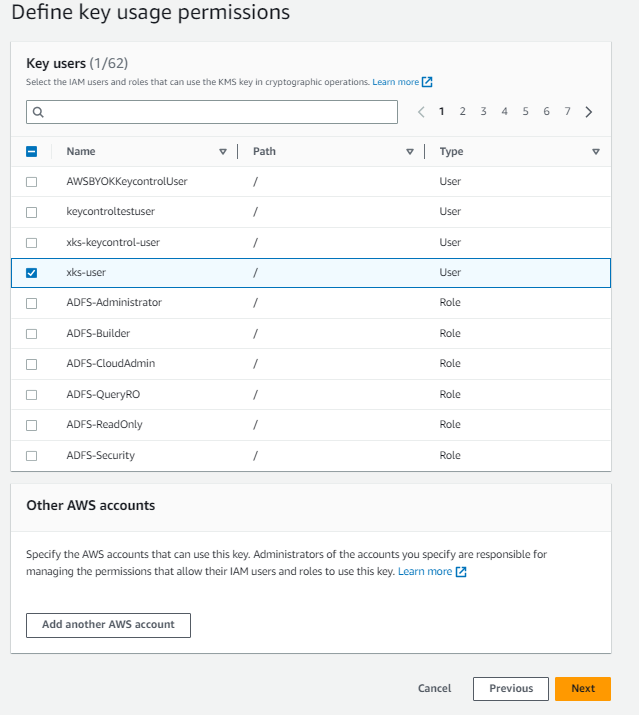
-
Review the details of the key creation and select Finish to create the key.
-
After completing the creation process, you will find your new key listed under Customer managed keys.
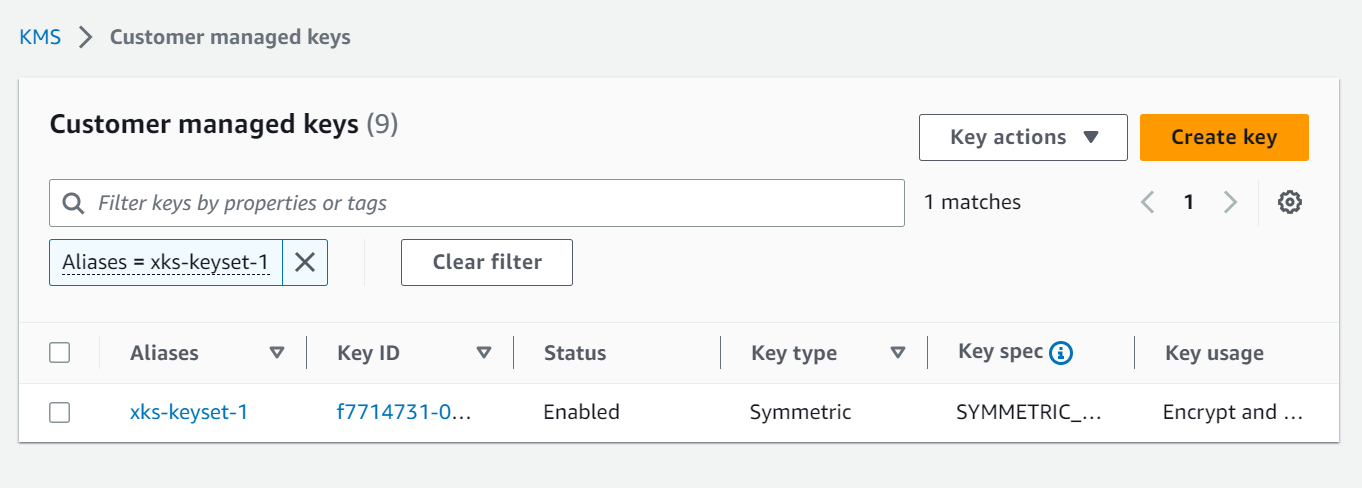
With the new key successfully created and managed by the External Key Store, you have completed the integration.