Procedures
Install Adobe Acrobat
Please refer to the Adobe Acrobat documentation and install Adobe Acrobat Pro.
Install the HSM
Install the HSM by following the instructions in the Installation Guide for the HSM.
We recommend that you install the HSM before configuring the Security World Software with your TSS Server.
Install the Security World Software and create the security world
-
On the computer that you want to make the TSS Server, install the latest version of the Security World Software as described in the Installation Guide for the HSM.
We recommend that you uninstall any existing nShield software before installing the new nShield software. -
Create the security world as described in the User Guide, creating the ACS and OCS that you require.
If you want to use an existing security world for this integration, you can only use it if it was created with the SEEDebugForAll feature enabled. This feature is visible in the world section of the
nfkminfocommand output. Check the state attribute:state 0x3737000c Initialised Usable Recovery !PINRecovery !ExistingClient RTC NVRAM FTO AlwaysUseStrongPrimes !DisablePKCS1Padding !PpStrengthCheck !AuditLogging SEEDebug AdminAuthRequiredSEEDebugForAll is not enabled so you have to create or load a new world file with that feature enabled. To create the world, use similar steps as below. The p dseeall feature has to be passed to the
new-worldcommand.% nopclearfail -I -m <module_number> % new-world -i -m <module_number> -Q <K/N> --mode=fips-140-2-level-3 --sp80056ar3 p dseeall % nopclearfail -O -m <module_number>This will create a FIPS-140-2-Level 3 world with the SEEDebugForAll feature enabled. When the world gets created, check it using the
nfkminfocommand again.% nfkminfo ``` World generation 2 state 0x3fb7000c Initialised Usable Recovery PINRecovery !ExistingClient RTC NVRAM FTO AlwaysUseStrongPrimes !DisablePKCS1Padding !PpStrengthCheck !AuditLogging SEEDebugForAll AdminAuthRequired n_modules 1 hknso 387eb6ae7b567f3f22e9ed182ef829d6f7a9d597 hkm aaf566a51e4525679f4ee95d3c17a4361ee46185 (type Rijndael) hkmwk c2be99fe1c77f1b75678e2fd2df8dffc0c969bcb hkre 3515f4f7000860ed5835673ac202538480fad9a7 hkra 0f93b48b3706057c4251435675d8b4f6879fe39d hkfips 50b8568a944b5bd02ed140048567a278f6763b4a hkmc 6f129626e352f87f13f4eedfd7a3567bbc1132ee hkp a2e6f0edc637532306a0a4bfcac598b5676a19e7 hkrtc 155ce982e5974510f104694b5df59d8ce1567354 hknv 0efd304fa2e76523b567bc8b1cb709d88835a29f hkdsee a297ab15c34f3c17248556731d16e72f61d1b3a0 hkfto 55b1b597b76df15610623905679d675cef8bdb33 hkmnull 0100000000000000000000000011100000000000 ex.client none k-out-of-n 1/1 other quora m=1 r=1 p=1 nv=1 rtc=1 dsee=1 fto=1 createtime 2024-09-30 13:51:44 nso timeout 10 min ciphersuite DLf3072s256mAEScSP800131Ar1 min pp 0 chars mode fips1402level3 Module #1 generation 2 state 0x2 Usable flags 0x10000 ShareTarget n_slots 6 esn 1000-0000-0000 hkml 3f0b8a828e30f7d02432d65673210816090d9551SEEDebugForAll is now enabled.
-
Check the world status before continuing:
% nfkmcheckFor an unrestricted (FIPS 140-2 level 2) security world, the output should resemble the following:
nfkmcheck: information: Module #1 Slot #0 Empty
nfkmcheck: everything seems to be in order
For a strict FIPS (FIPS 140-2 level 3) security world, the output should resemble the following:
nfkmcheck: information: World requires administrator authorization
nfkmcheck: information: Module #1 Slot #0 Empty
nfkmcheck: everything seems to be in order
Make sure the HSM time is synced with the TSS Server
rtc is a command available from the security world installation, so you need to have C:\Program Files\nCipher\nfast\bin in your path.
Do this from a PowerShell prompt in your TSS server.
-
Open up a PowerShell prompt.
-
Type
rtcand you will see the current time set on your HSM.% rtc time on module 1 is 2015-01-13 00:38:30 Pacific Standard Time -
If the time is not correct, then run the command
rtc -t -m1and you will be prompted to enter your ACS.% rtc -t -m1 Load Admin Card (for KRTC): Module 1 slot 0: Admin Card #11 Module 1 slot 2: empty Module 1 slot 3: empty Module 1 slot 4: empty Module 1 slot 5: empty Module 1 slot 0:- passphrase supplied - reading card Card reading complete. clock on module 1 set to 2024-09-26 13:22:24 Pacific Daylight Time -
Your HSM time should now be synced to your TSS server time if it wasn’t already.
%  rtc
time on module 1 is 2024-09-26 13:26:13 Pacific Daylight Time
Enable HSM features
To enable features in the HSM you need to get a Feature Enabling smart card into a smart-card-reader connected to the Time Stamp Server, or get a feature file that can be used to enable the features. Please contact Entrust support for this. You need to provide HSM ESN to get the feature file for the HSM.
You need to enable the following HSM features:
-
SEE Activation (Restricted)
Enables the Time Stamp Server to perform specific tasks using the SEE.
-
Elliptic Curve algorithms
If you are intending to use ECDSA-based keys.
Enable the features in a PowerShell window:
-
Make sure
C:\Program Files\nCipher\nfast\binis in your path. -
If you are using a smart card:
Insert the Feature Enabling smart card into a smart-card reader connected to the Time Stamp Server.
-
If you are using a feature file:
Transfer the file to the Time Stamp Server.
-
Start the Feature Enable Tool to see what features are enabled.
Run the following command:
% fet Feature Enable Tool =================== ISO Smart Card Support | Remote Operator | | Korean Algorithms | | | SEE Activation (EU+10) | | | | SEE Activation (Restricted) | | | | | SEE Activation (CodeSafe 5) | | | | | | Elliptic Curve algorithms | | | | | | | Elliptic Curve MQV | | | | | | | | Fast RNG for ECDSA | | | | | | | | | HSM Speed Rating Mod Electronic | | | | | | | | | | No. Serial Number 1 5F08-02E0-D947 -- N Y N N N N Y Y N Mid Speed 0. Exit Feature Enable Tool. 1. Read FEM certificate(s) from a smart card or cards. 2. Read FEM certificate from a file. 3. Read FEM certificate from keyboard. 4. Write table to file. Enter option : -
Select 2 to read the feature certificate from a file.
You can also choose the option to read the FEM certificate from a smart card if that’s what you are using. Follow the onscreen instructions. After the feature is enabled, the system returns a success message.
Enter option : 2
Enter filename: sunrisecgt2-1727383407_SEEU_5F08-02E0-D947.txt
Opened file named `sunrisecgt2-1727383407_SEEU_5F08-02E0-D947.txt' for reading successfully.
Found FEM Certificate - presenting to module ...

                         Feature Enable Tool
                         ===================

                      ISO Smart Card Support
                      |  Remote Operator
                      |  |  Korean Algorithms
                      |  |  |  SEE Activation (EU+10)
                      |  |  |  |  SEE Activation (Restricted)
                      |  |  |  |  |  SEE Activation (CodeSafe 5)
                      |  |  |  |  |  |  Elliptic Curve algorithms
                      |  |  |  |  |  |  |  Elliptic Curve MQV
                      |  |  |  |  |  |  |  |  Fast RNG for ECDSA
                      |  |  |  |  |  |  |  |  |  HSM Speed Rating
Mod   Electronic      |  |  |  |  |  |  |  |  |  |
No.  Serial Number
 1  5F08-02E0-D947 -- N  Y  N  N  Y  N  Y  Y  N  Mid Speed

0. Exit Feature Enable Tool.
1. Read FEM certificate(s) from a smart card or cards.
2. Read FEM certificate from a file.
3. Read FEM certificate from keyboard.
4. Write table to file.

Enter option : 0
If you do not enable the
SEE Activation (Restricted)feature, the Time Stamp Server cannot load the SEE machine. As a result, the Operation Status page of the Time Stamp Server web interface returns the error messageSEE_LoadMachineFailure.
Install the Java Runtime Environment (JRE)
Install a 32 bit Standard Edition Java Runtime Environment(JRE) version 1.8. Once installed, open a PowerShell and check the version:
PS C:\Users\Administrator> java -version
java version "1.8.0_421"
Java(TM) SE Runtime Environment (build 1.8.0_421-b09)
Java HotSpot(TM) Client VM (build 25.421-b09, mixed mode, sharing)
Look for the output line that starts with Java™ SE Runtime Environment. It will indicate the architecture:
-
If it mentions 64-Bit, you are running a 64-bit version of Java.
-
If it does not mention 64-Bit, it is a 32-bit version.
Install the Time Stamp Option Pack
-
Transfer the TSOP iso file to the TSS server.
-
Run the installer.
-
Open the iso file and launch the
setup.msiinstaller. -
Click Next to continue. The installer displays the license agreement.
-
Accept the license agreement.
-
The install process will automatically detect the location of the Security World Software installation and will install alongside this.
-
When prompted, enter the port settings for the HTTP and HTTPS protocols. (If not sure, leave as default - Ports: 80 and 443)
-
Follow the installer instructions until the installation process is complete.
-
-
Open up the HTTP and HTTPS ports in the firewall.
Make sure the ports used during the installation (80/443 by default) are open in the windows firewall.
Access the Time Stamp Server Web Interface
You can use the localhost or the *TSS server IP address for the Time Stamp Server web interface URL.
For example: https://localhost/TSS/index.jsp.
Keep in mind the firewall ports have to be open if you want access the URL from another host besides the TSS server and localhost has to be replaced with the IP or FQDN of the TSS server.
Check the TSOP user’s manual for default login credentials.
Activate SEE Delegation
-
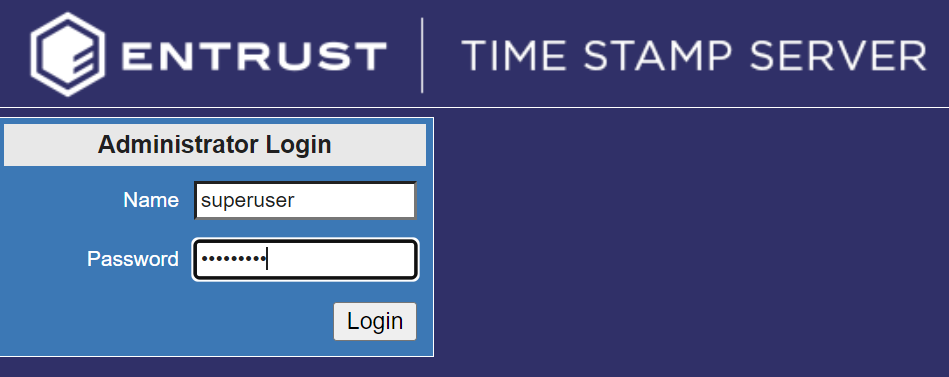
Log in to the TSS server as the security officer.
-
Select Server Management > SEE Delegation.

-
Select Next.
-
In the Loading Admin Keys dialog, select Next.

-
Enter the credentials for the Admin Card.

-
The system will ask you to reset your DSE200 Service.
Go to windows search bar and search for Services. Find the DSE200 service and restart it.

-
After you reset the DSE200 service, you will be asked to log in again to the TSS server.
Create a new TSA
Create a new TSA to be used for this integration.
-
Log in to the TSS server as the security officer.
-
Select TSA Management > Configuration, then select Add.

-
Enter a name for the TSA and the TSA policy identifier (make sure it is a different number - just increase it by one), then select Add.
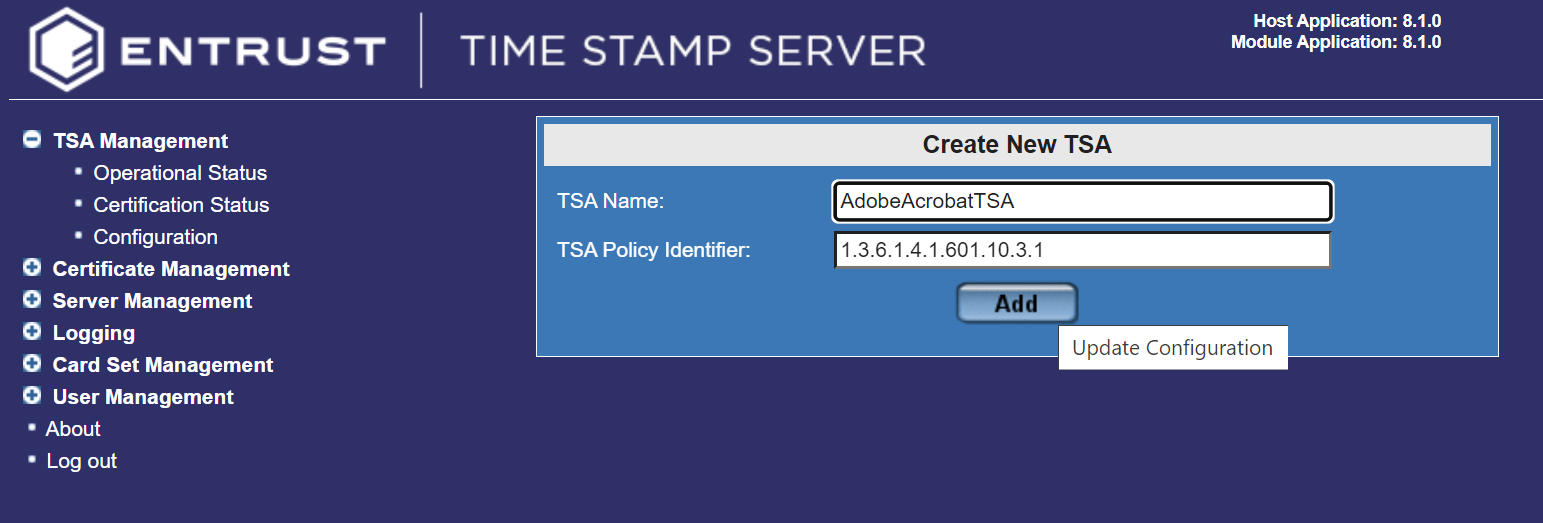
When you are asked to confirm, select OK.
-
Take the default settings for the TSA Configuration fields.
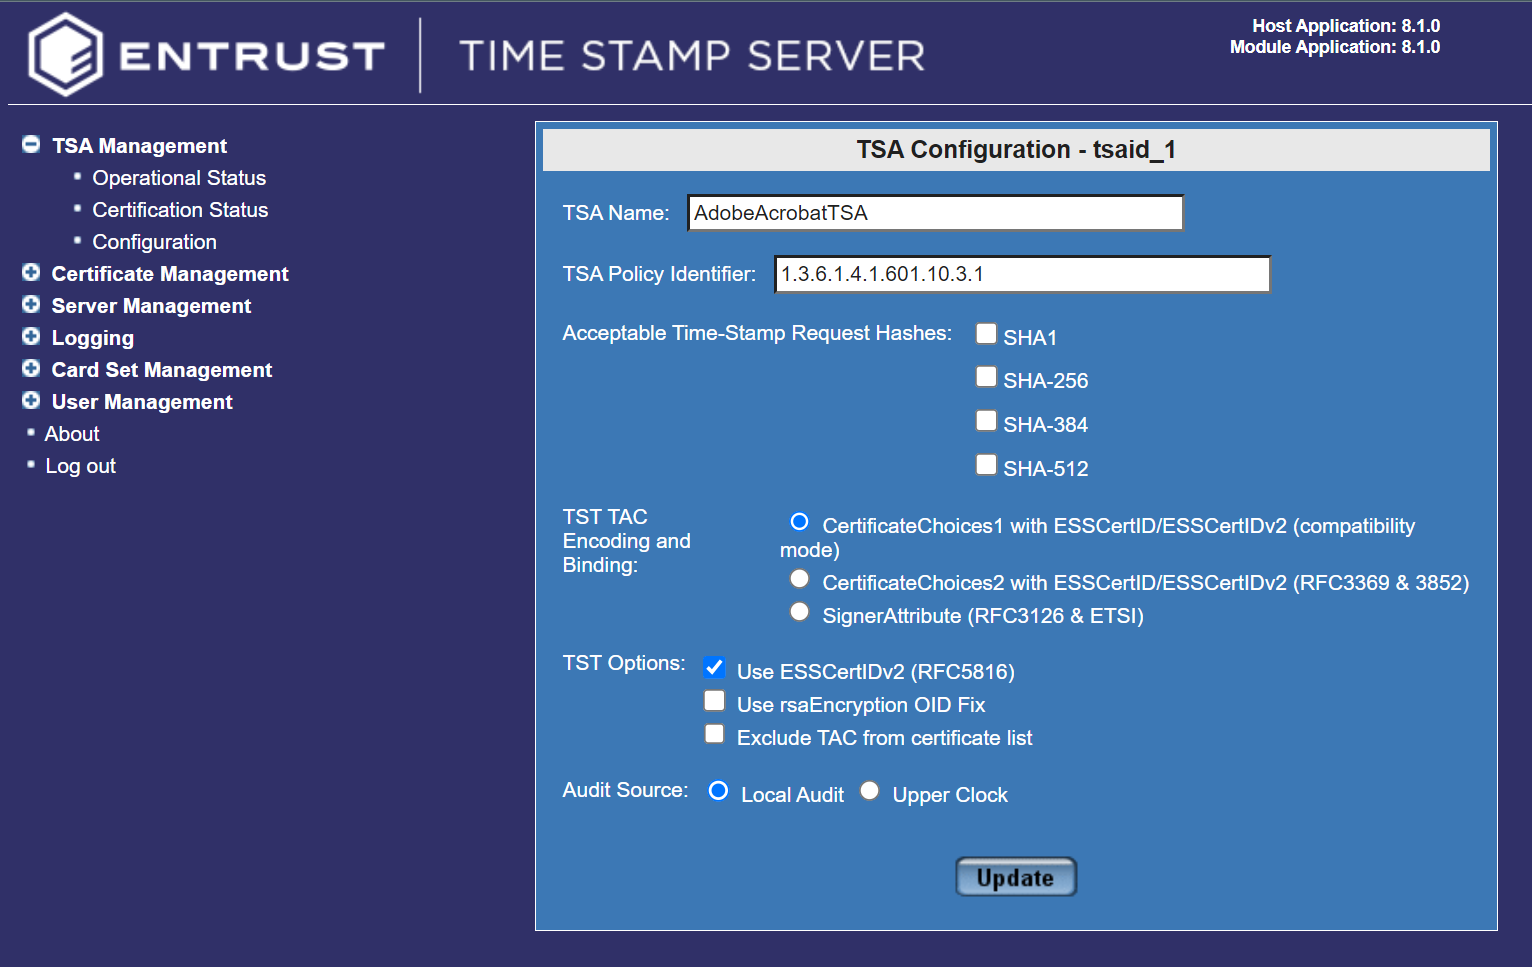
Make sure you select one of the Acceptable Time-Stamp Request Hashes. This must match the Signature Hash Algorithm that will be used by the Adobe Acrobat Digital ID certificate of the Digital ID used when signing documents. In this case is SHA-256.
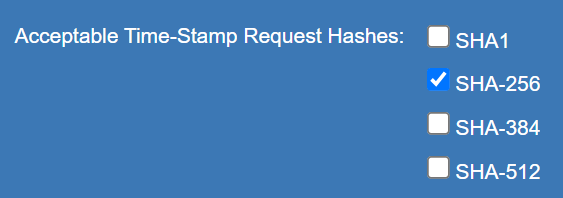
If you need to change any of the fields, make the changes and click Update to confirm the details of the TSA.
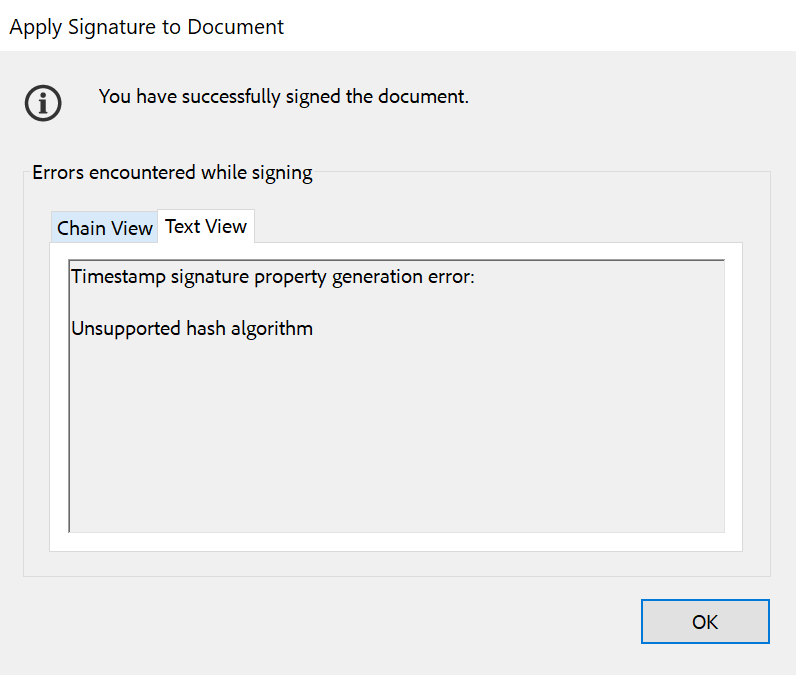
If the selected Acceptable Time-Stamp Request Hash does not match the Adobe Acrobat Digital ID Certificate Signature Hash Algorithm, you will get an error message like the one bellow when you sign a document in Adobe Acrobat:
-
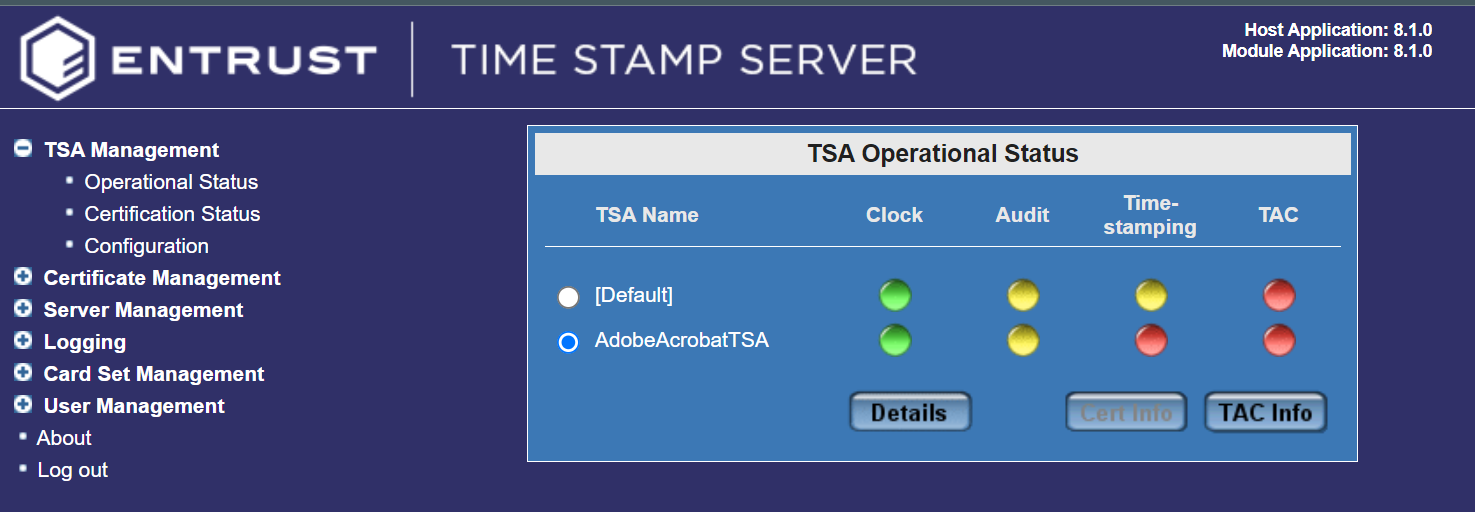
After creating the new TSA, Select TSA Management > Operational Status.
You will see the new TSA with green, yellow, and red lights at first.
Create the OCS
You can do this using the command line or through the Time Stamp Server user interface.
Create the OCS using the command line
This should be done in a PowerShell window.
-
Make sure
C:\Program Files\nCipher\nfast\binis in your path. -
Run the following command, specifying the module and slot where the blank card is located.
% createocs -m<module_number> -s<slot_number> --persist -Q (K/N) -N <ocs_card_name>Here is an example:
% createocs -m1 -s2 --persist -Q 1/1 -N testOCS

FIPS 140-2 level 3 auth obtained.

Creating Cardset:
 Module 1: 0 cards of 1 written
 Module 1 slot 0: Admin Card #1
 Module 1 slot 2: blank card
 Module 1 slot 3: empty
 Module 1 slot 4: empty
 Module 1 slot 5: empty
 Module 1 slot 2:- passphrase specified - writing card
Card writing complete.

cardset created; hkltu = c4877dce6de6ed55e3da9474886df22d58b85e39
Create the OCS using the Time Stamp Server Web interface
To be able to create an OCS using the TSS server web interface, you will have to provide the card to the HSM in the front slot of the HSM.
-
Log in to the TSS server as the security officer.
-
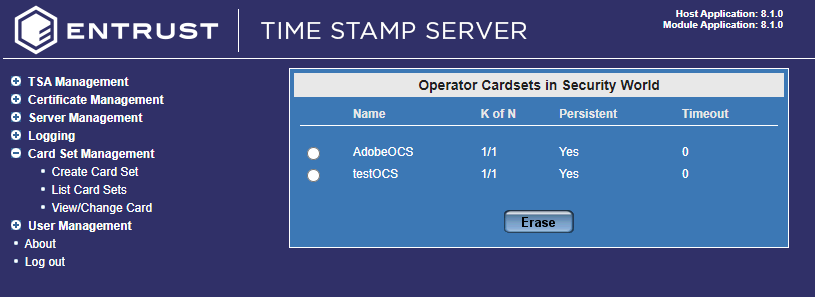
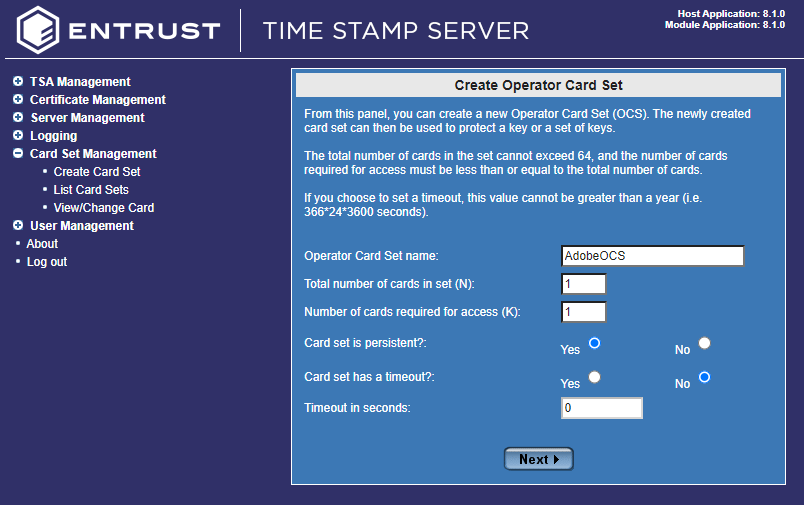
Navigate to Card Set Management > Create Card Set.
The Create Operator Card Set dialog opens. Fill in the information accordingly: Operator Card Set name, Total number of cards in set (N), Number of cards required for access, Card set is persistent, Card set has a timeout, Timeout in seconds.
-
Select Next.
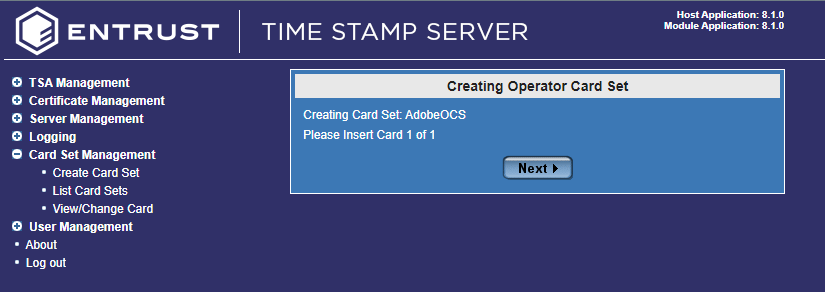
The next dialog will ask you to insert the card. Go to the HSM and insert the card in the front slot.
-
Select Next.
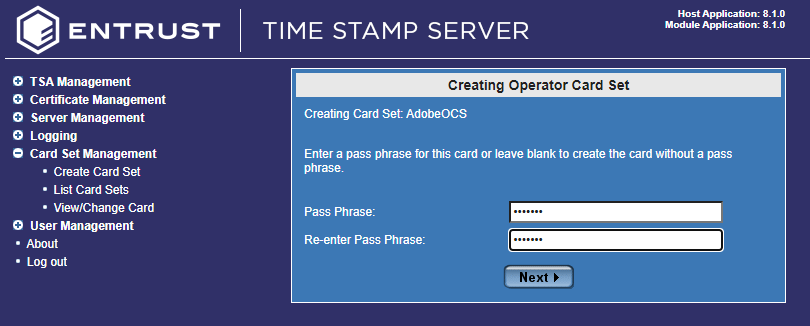
The next dialog will ask for the OCS passphrase. For each card, follow the onscreen instructions to either set a passphrase for the card or to create a card without a passphrase.
-
Select Next.
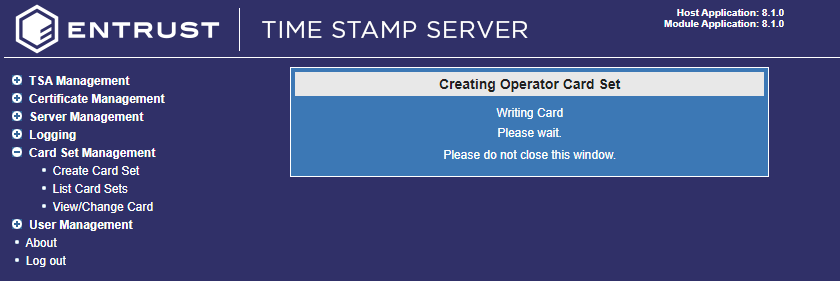
The dialog will ask you to wait until the creation of the card is complete.
-
The Card Set creation completes successfully

Initiate a TSA certificate request
-
Log in to the TSS server as the security officer.
-
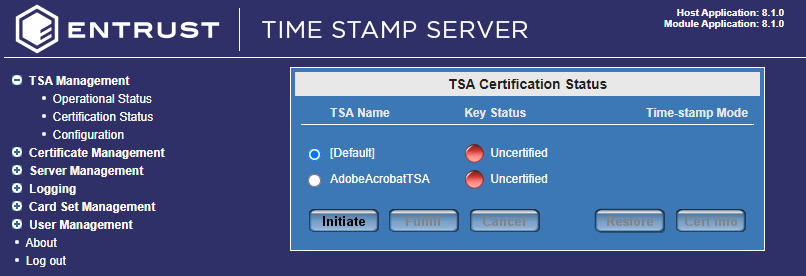
Go to TSA Management > Certification Status.
-
Select the TSA created earlier.
-
Select Initiate.
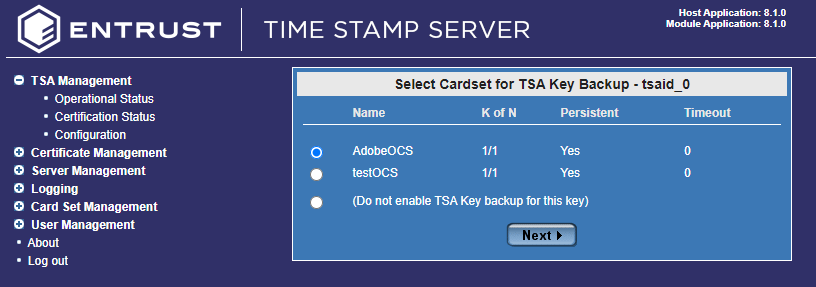
The Select Card Set for TSA Key Backup dialog windows comes up. Select the Card Set you want to use. Enable TSA Key Backup if you want (not necessary). Select Next.
-
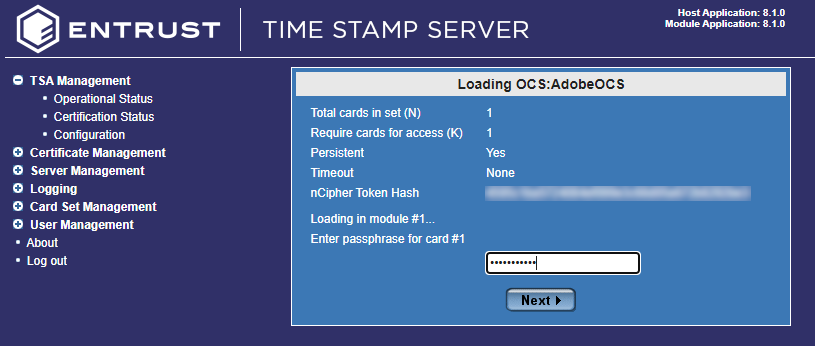
The Loading OCS dialog appears. Enter your OCS card passphrase.
-
Select Next.
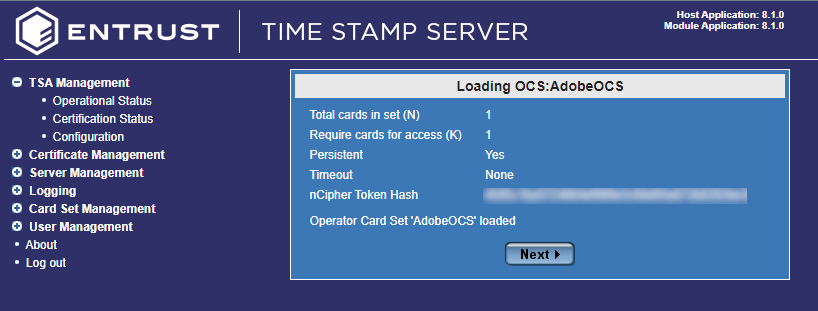
The OCS Card gets loaded.
-
Select Next.
-
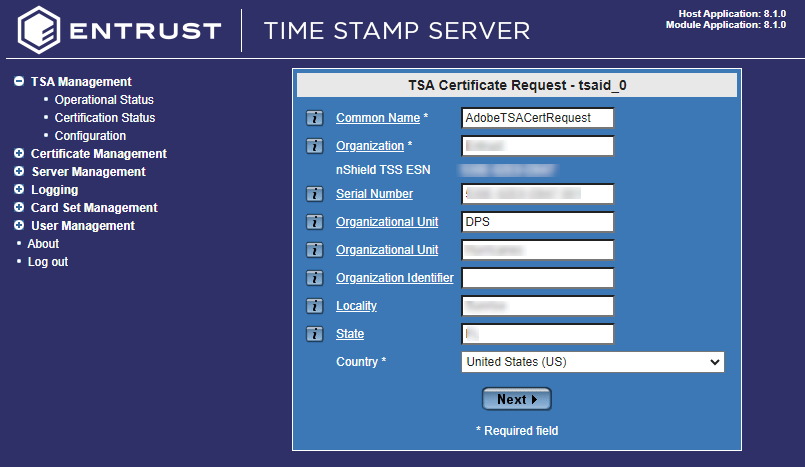
Enter in the Certificate Request details.
-
Select Next. When you are asked to confirm, select OK.
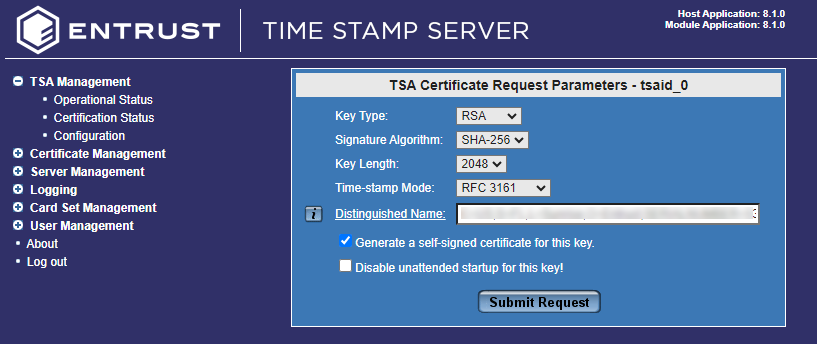
The TSA Certificate Request Parameters window comes up. Check the box that says Generate a self-signed certificate for this key.
-
Select Submit Request.
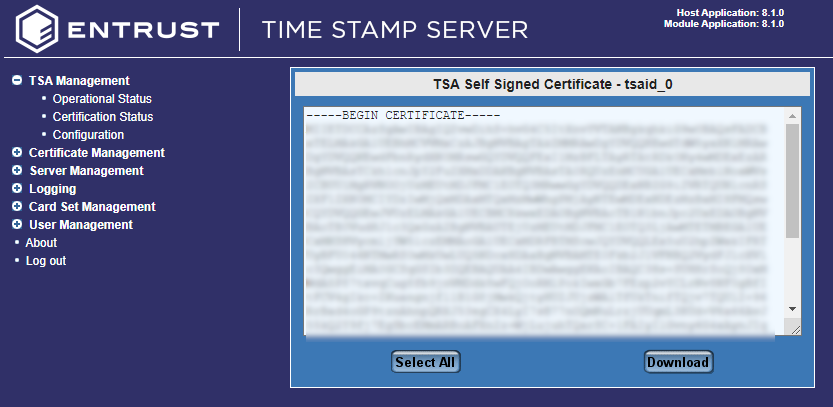
The TSA Self Signed Certificate gets displayed.
-
Select Select All to copy the contents of the certificate.
Copy and paste all the contents into a file and save the file. Make sure the file name has a
.cerextension. -
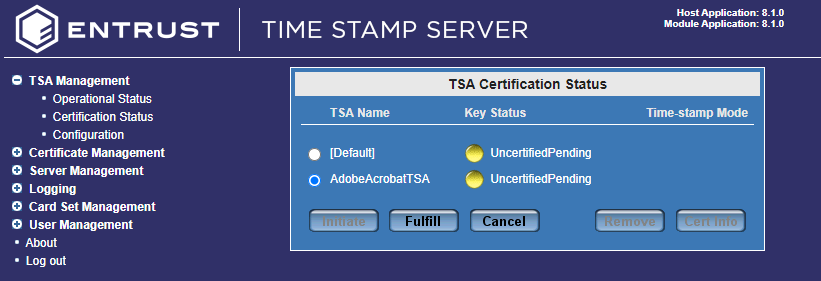
Select TSA Management > Certificate Status again, your new TSA should look similar to the one below:
Fulfil a TSA certificate request
-
Log in to the TSS server as the security officer.
-
Select TSA Management > Certificate Status
-
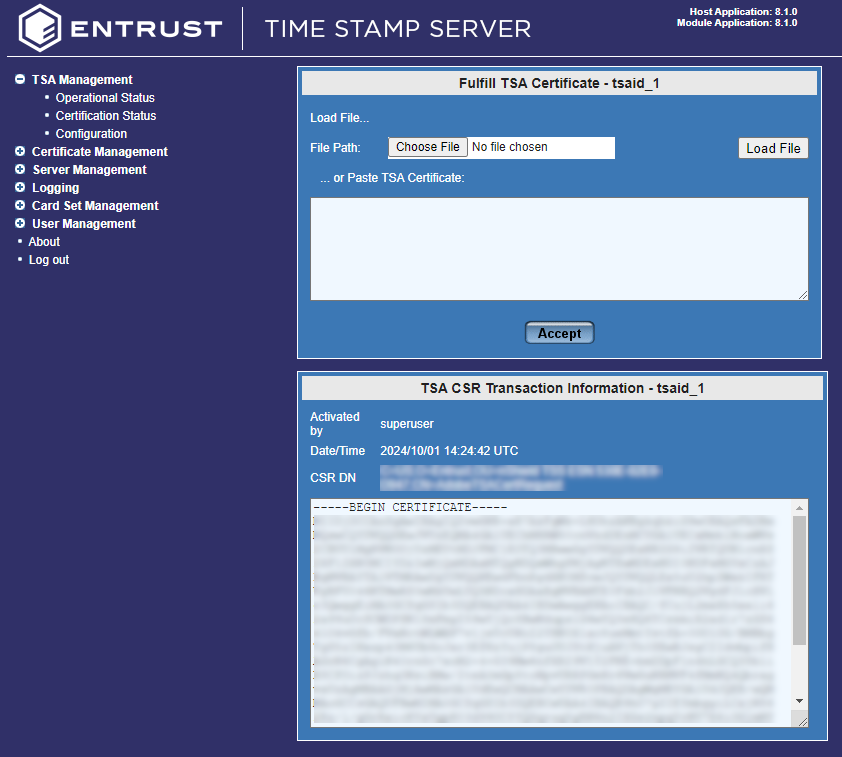
Select the TSA you just created and select Fulfill.

-
Select Choose File and select the certificate text file created earlier with the contents of the TSA self signed certificate.
-
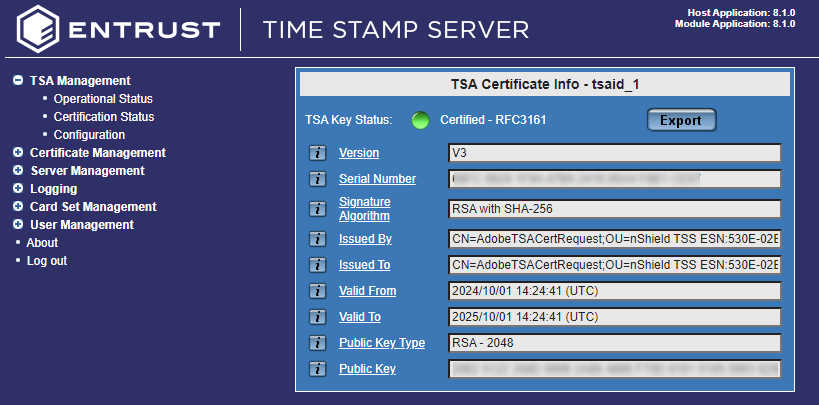
Select Accept.
-
Your TSA should now be certified.
-
Restart your DSE200 Service
You must restart the DSE200 Service. -
Log out and log back in as the superuser.
-
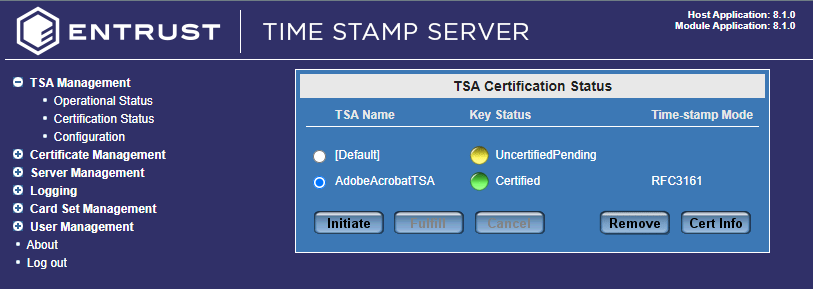
Navigate to TSA Management > Certification Status and your TSA should have a green light.
Import the TSA certificate chain
-
Log in to the TSS server as the security officer.
-
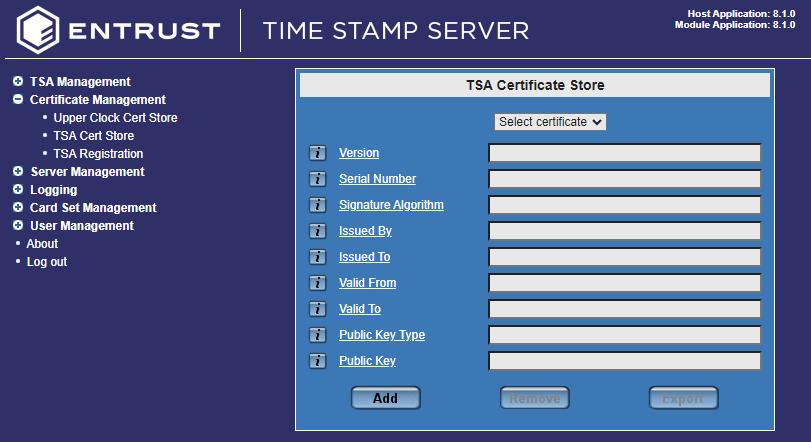
Navigate to Certificate Management > TSA Cert Store.
The TSA Certificate Store dialog opens.
-
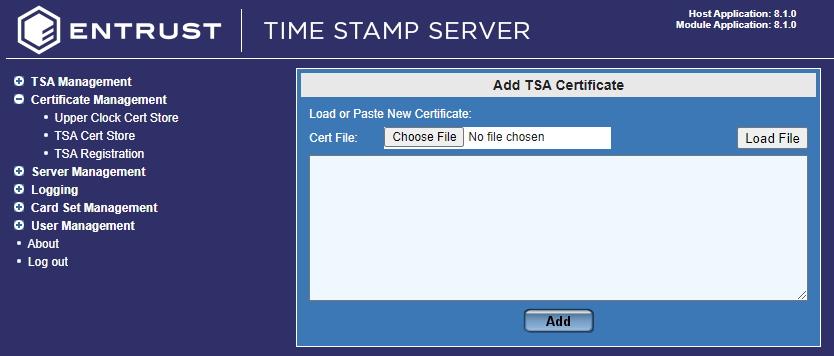
Select Add. The Add TSA Certificate dialog opens.
-
Select Choose File. Browse and locate the certificate file you saved in the previous section. Select Load File.
-
Select Add.
-
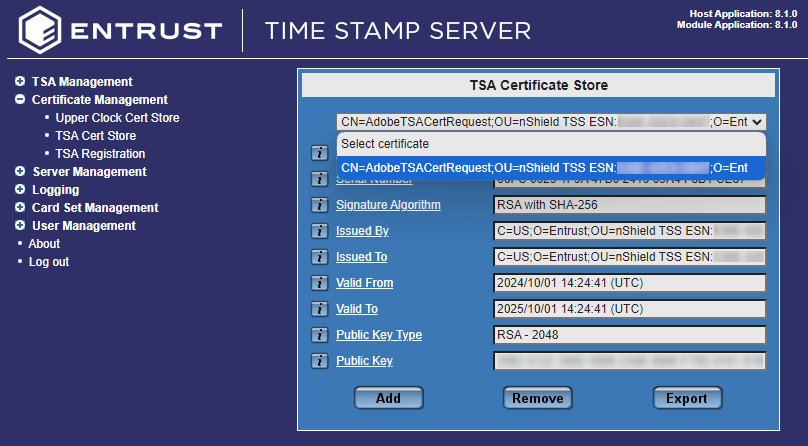
Select again Certificate Management > TSA Cert Store.
In the Select certificate drop down, you should see the certificate that got imported.
Install and configure the Windows 2022 NTP server
If you have selected Local Audit as the method by which the TSS secure clock is to be audited, this requires a running Network Time Protocol (NTP) service which has been configured to use an NTP server on the local network. Configuration of an NTP service requires a Windows Administrator to log in to the System Console. Do this in a PowerShell window running as Administrator:
-
Confirm current setting (follows are default settings):
% Get-ItemProperty -Path "HKLM:\SYSTEM\CurrentControlSet\Services\w32time\TimeProviders\NtpServer" AllowNonstandardModeCombinations : 1 ChainDisable : 0 ChainEntryTimeout : 16 ChainLoggingRate : 30 ChainMaxEntries : 128 ChainMaxHostEntries : 4 DllName : C:\Windows\system32\w32time.dll Enabled : 0 EventLogFlags : 0 InputProvider : 0 RequireSecureTimeSyncRequests : 0 PSPath : Microsoft.PowerShell.Core\Registry::HKEY_LOCAL_MACHINE\SYSTEM\CurrentControlSet\Services\w32time\TimeProviders\NtpServer PSParentPath : Microsoft.PowerShell.Core\Registry::HKEY_LOCAL_MACHINE\SYSTEM\CurrentControlSet\Services\w32time\TimeProviders PSChildName : NtpServer PSDrive : HKLM PSProvider : Microsoft.PowerShell.Core\Registry -
Enable NTP Server feature.
% Set-ItemProperty -Path "HKLM:\SYSTEM\CurrentControlSet\Services\w32time\TimeProviders\NtpServer" -Name "Enabled" -Value 1 -
Set
AnnounceFlagsto 5.% Set-ItemProperty -Path "HKLM:\SYSTEM\CurrentControlSet\services\W32Time\Config" -Name "AnnounceFlags" -Value 5 -
Restart the Windows Time service.
% Restart-Service w32Time -
If Windows Firewall is running, allow the NTP port:
% New-NetFirewallRule ` -Name "NTP Server Port" ` -DisplayName "NTP Server Port" ` -Description 'Allow NTP Server Port' ` -Profile Any ` -Direction Inbound ` -Action Allow ` -Protocol UDP ` -Program Any ` -LocalAddress Any ` -LocalPort 123 Name : NTP Server Port DisplayName : NTP Server Port Description : Allow NTP Server Port DisplayGroup : Group : Enabled : True Profile : Any Platform : {} Direction : Inbound Action : Allow EdgeTraversalPolicy : Block LooseSourceMapping : False LocalOnlyMapping : False Owner : PrimaryStatus : OK Status : The rule was parsed successfully from the store. (65536) EnforcementStatus : NotApplicable PolicyStoreSource : PersistentStore PolicyStoreSourceType : Local RemoteDynamicKeywordAddresses : {} PolicyAppId : -
Confirm current synchronization with the NTP server.
By default, Windows configures the NTP client with NTP server time.windows.com.
% w32tm /query /source time.windows.com,0x8 -
(Optional) Change the target NTP server.
Example:
% Set-ItemProperty -Path "HKLM:\SYSTEM\CurrentControlSet\Services\w32time\Parameters" -Name "NtpServer" -Value "ntp.nict.jp,0x8" -
Restart the Windows time service.
% Restart-Service w32Time -
Re-sync manually.
% w32tm /resync Sending resync command to local computer The command completed successfully. -
Verify the status.
% w32tm /query /status
Leap Indicator: 0(no warning)
Stratum: 4 (secondary reference - syncd by (S)NTP)
Precision: -23 (119.209ns per tick)
Root Delay: 0.0543284s
Root Dispersion: 0.0474017s
ReferenceId: 0xA83DD74A (source IP:  168.61.215.74)
Last Successful Sync Time: 10/1/2024 8:37:03 AM
Source: time.windows.com,0x8
Poll Interval: 7 (128s)
Check the status of TSS and the security world
Before proceeding to the Adobe Acrobat setup, check the status of TSS and the security world:
-
Ensure that your TSA is healthy and operational. To do, this, access the TSA Operational Status page, and check that the TSA shows all green lights. If you do not have all green lights after creating a new certificate, then try restarting the DSE200 service.
-
Ensure that the security world is operational and healthy:

-
On the left, select About.
-
Select Application Version.
-
Scroll down to show Module 1#.
The mode should show as operational.
-
-
Continue to scroll down to nfkminfo output: World.
The state should show as Initialised and Usable. There should be no exclamation marks (!).
If either properties are preceded by an !, ensure that the security world is available and operational.

-
Continue to scroll down to hardware status and ensure that it is reported as OK.
Configure Adobe Acrobat Pro to use TSS
-
Open up Adobe Acrobat.
-
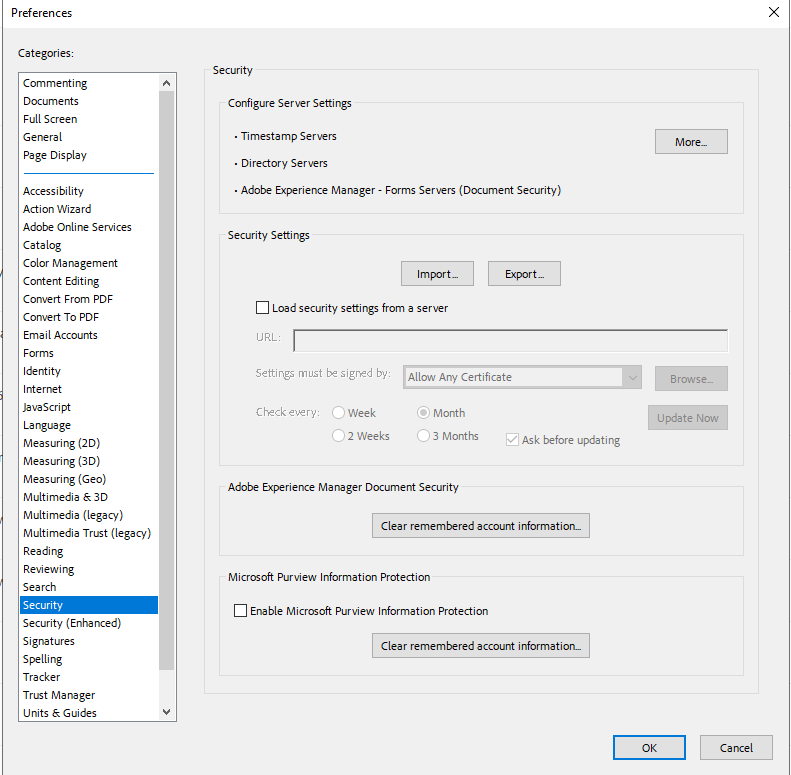
In the Menu, of Adobe Acrobat, select Preferences.
-
From the list of categories select Security.
-
In the Configure Server Settings pane, select More.
-
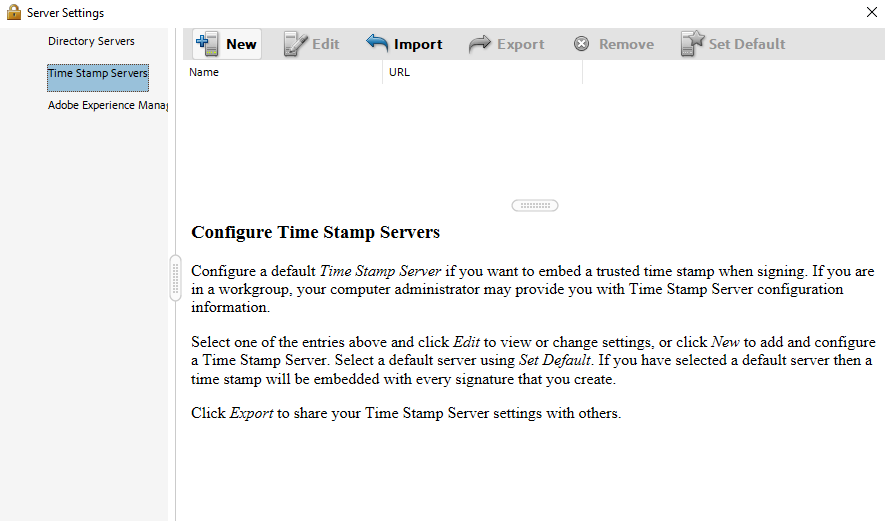
In the Server Settings dialog, from the list of options, select Time Stamp Servers, then select New in the top ribbon.
-
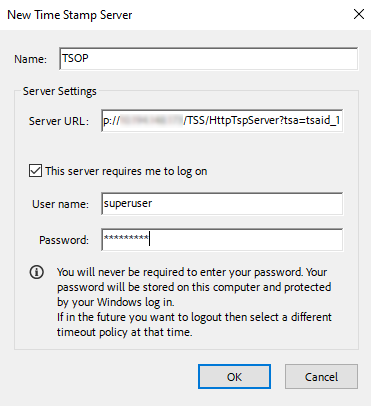
In the new Time Stamp Server dialog, enter a name and the server URL of the TSS.
Enable This server requires me to log on and enter the login credentials. Select OK. The server is now added.
Here is a URL example:
http://10.193.142.123/TSS/HttpTspServer?tsa=tsaid_1.Replace the IP Address with the IP address or FQDN of your server.
-
Select the TSOP Time Stamp Server, and in the top ribbon select Set Default (If the default is successfully set, Set Default is replaced by Clear).
-
Close the Server Settings dialog
Set up a digital ID
To set up a digital ID:
-
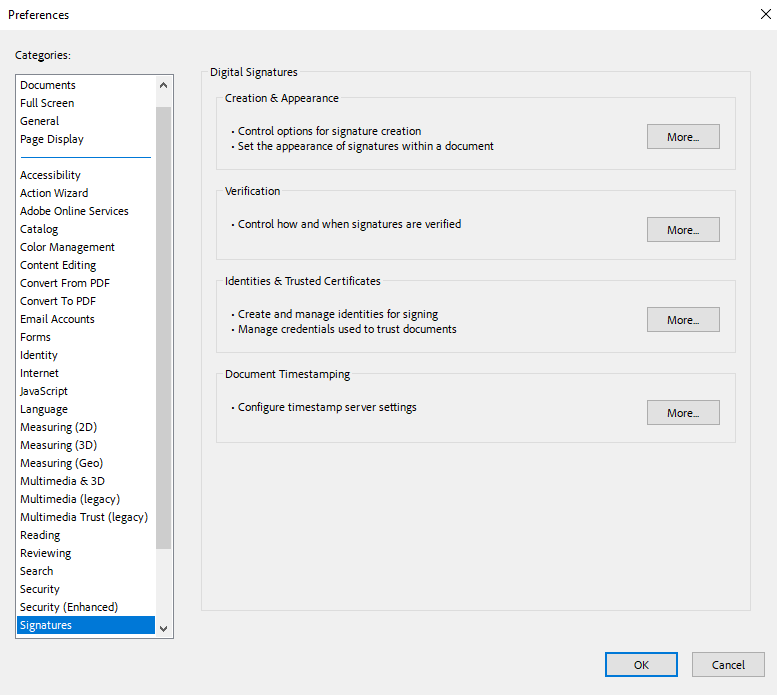
Stay in the Preferences dialog of Adobe Acrobat Pro, and from the list of categories, select Signatures.
-
In the Identities & trusted Certificates box select More.
-
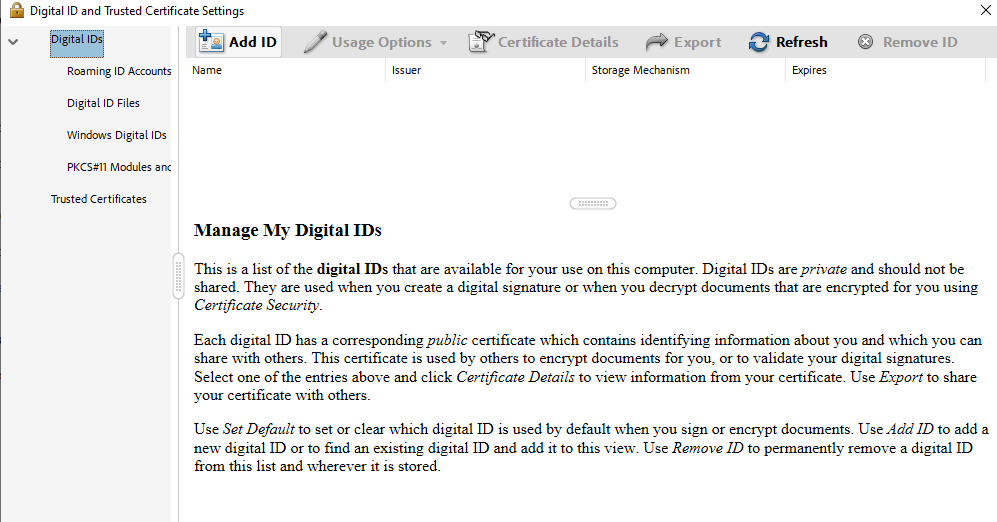
In the Digital ID and Trusted Certificate Settings dialog, select Digital IDs, then select Add ID.
-
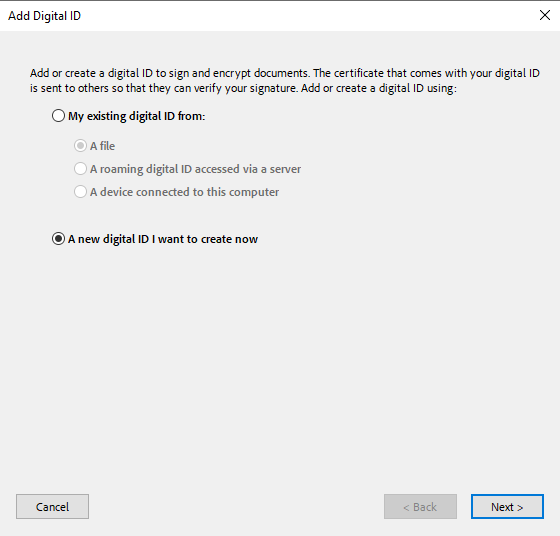
In the Add Digital ID Dialog, select A new digital ID I want to create now, then select Next.
-
The system will ask you where you want to store the ID. Select New PKCS#12 Digital ID File, then select Next.
-
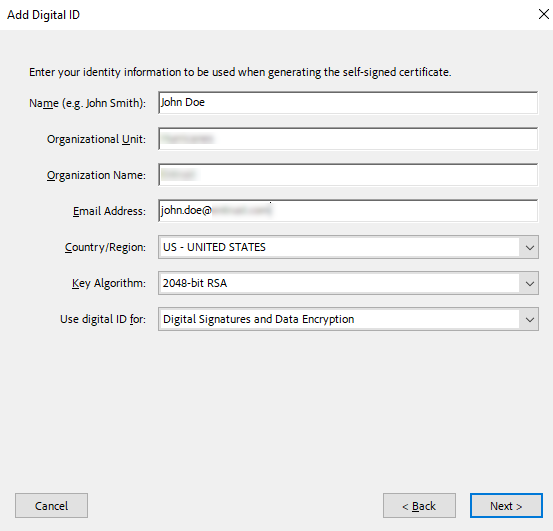
Fill in the information fields, for example name and organizational, and select Next.
-
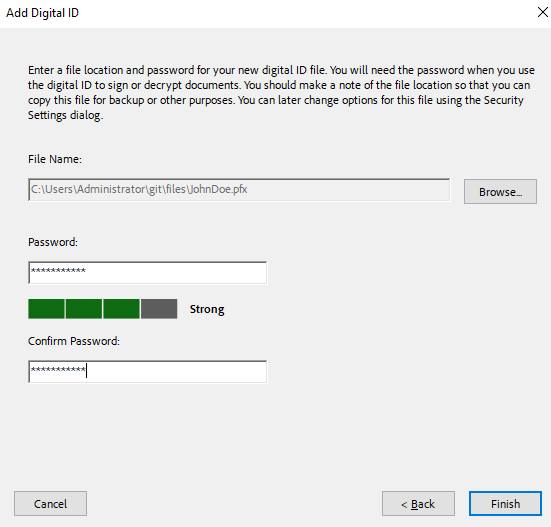
Enter the file location and password for the ID, then select Finish.
-
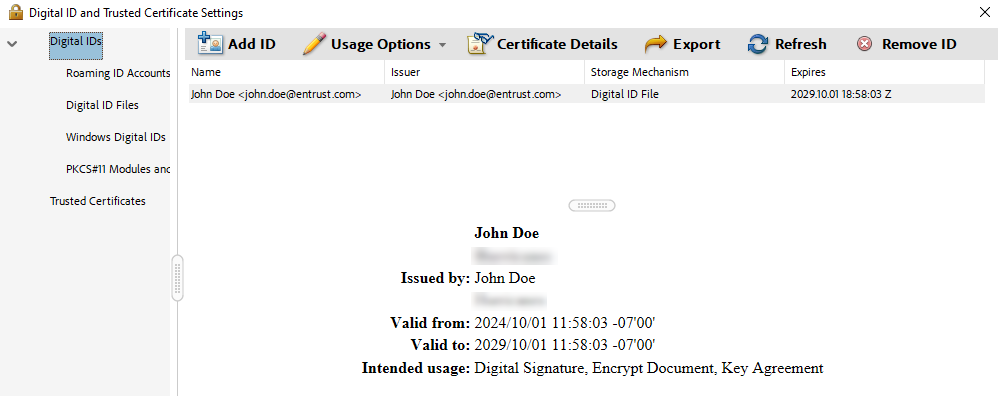
Confirm that the new ID appears in the list.
Import certificates into Adobe Acrobat Pro
To import certificates into Adobe Acrobat Pro:
-
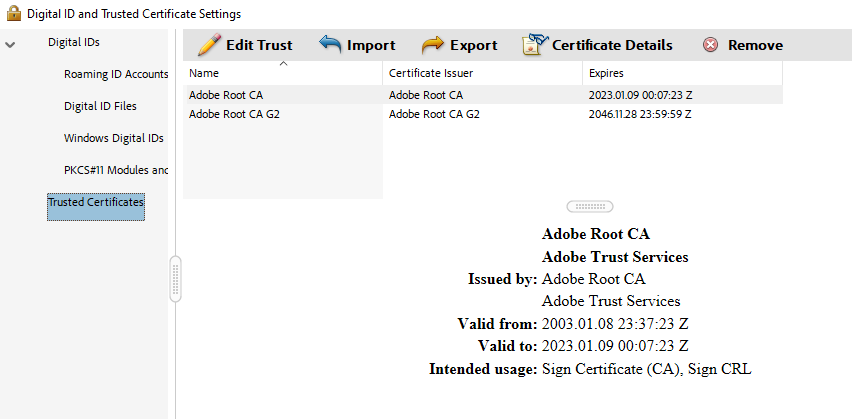
Still in the Digital ID and Trusted Certificate Settings dialog, select Digital IDs > Trusted Certificates.
-
On the Trusted Certificates tab, select Import.
Before continuing, make sure previously created certificate key text file has a
.cerextension. -
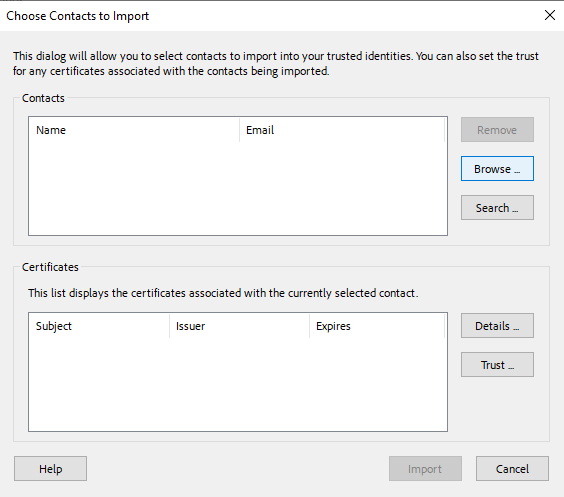
In the Choose Contacts to Import dialog, use Browse or Search to locate the Root Certificate and any Subordinate Certificates.
-
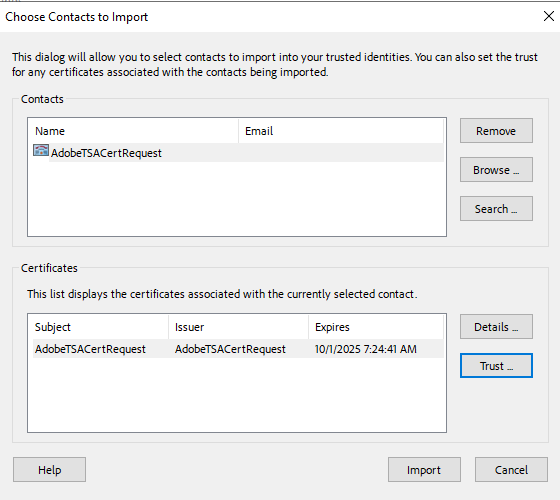
Double-click the certificates to select.
They will appear in the Contacts.
-
To add the certificates, select Import, then select OK to close the confirmation dialog about the import.
-
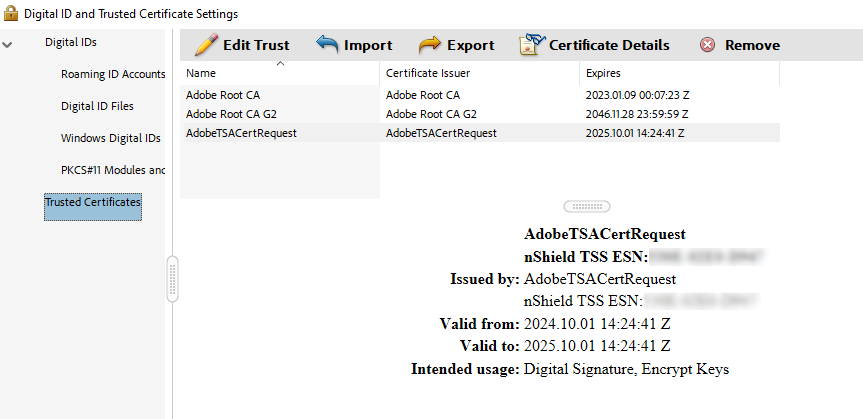
Confirm that the imported certificates appear in the list.
Configure the certificates
To configure the certificates:
-
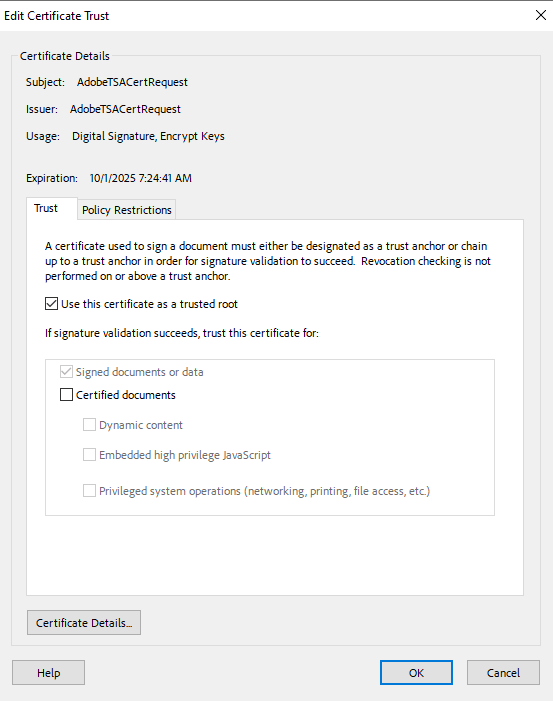
Still in the Digital ID and Trusted Certificate Settings dialog, select the imported Root CA, then in the ribbon at the top of the window select Edit Trust.
-
Select Use this certificate as a trusted root, then select OK.
-
In the ribbon at the top of the window select Certificate Details.
-
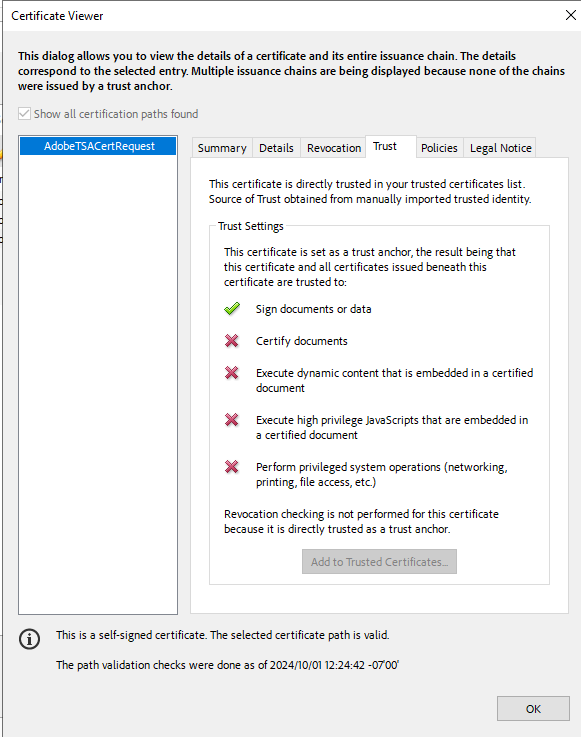
In the Certificate Viewer dialog, switch to the Trust tab.
-
Ensure that there is a green check mark next to Sign documents or data, then select OK.
-
Close the Digital ID and Trusted Certificates Settings dialog.
-
To exit the Adobe Preferences configuration settings, select OK.
Sign and time-stamp a PDF document
To sign and time-stamp a PDF document:
-
In Adobe Acrobat Pro, open the document to sign and time-stamp it digitally.
-
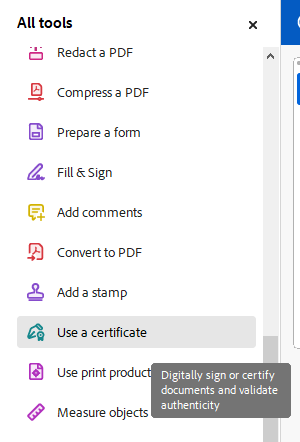
In the Tools pane on the left-hand side, select Use Certificate.
-
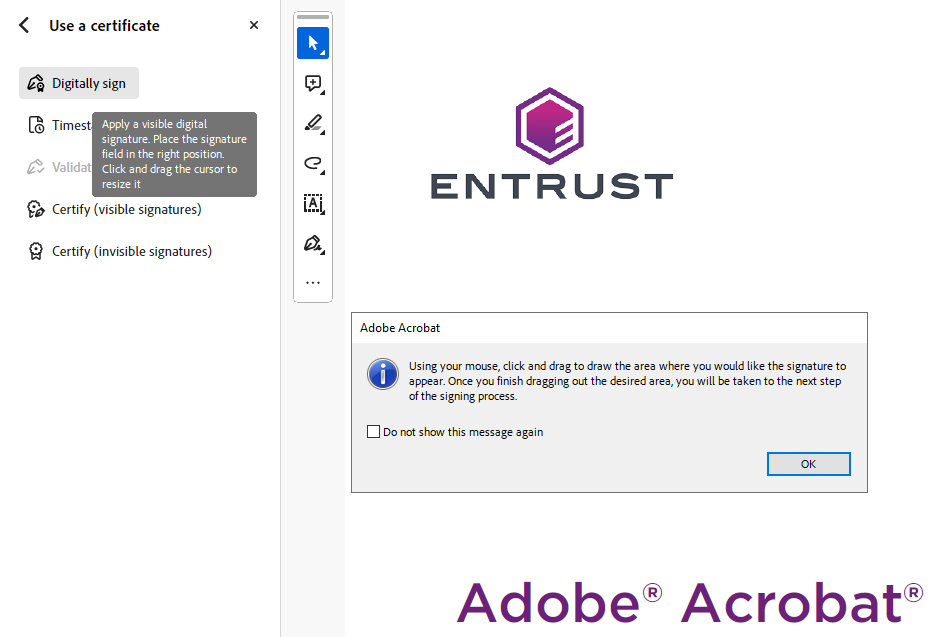
In the Certificates toolbar, select Digitally Sign.
-
Follow the information in the dialog box to select an area for signature, then select OK.
-
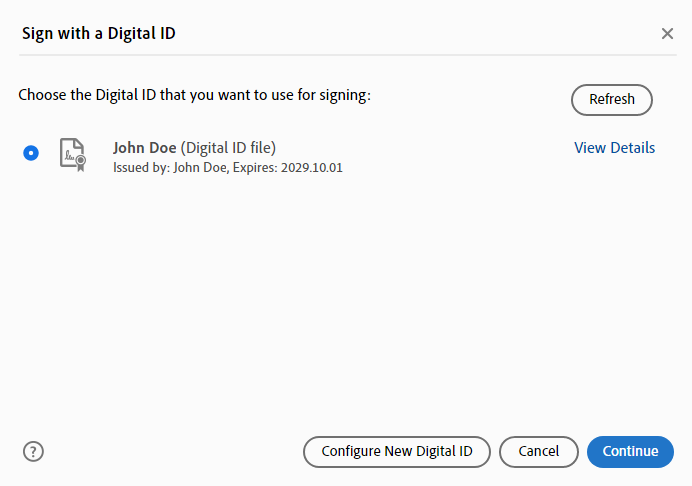
Select the Digital ID with which to sign, and select Continue.
-
Confirm all details, enter the Digital ID Pin/Passphrase, and select Sign.
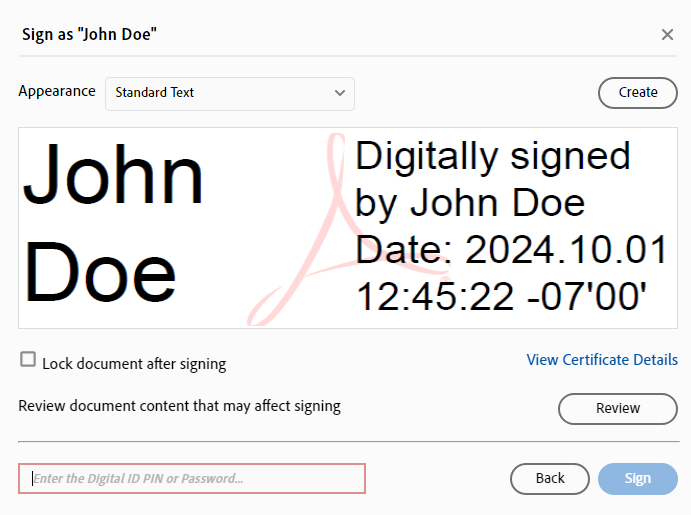
-
Choose a location to save the newly signed document.
To avoid overwriting the original file, use a different file name for the signed document.
During the Signing process a security warning may popup asking you to trust the TSOP server. Select Allow. 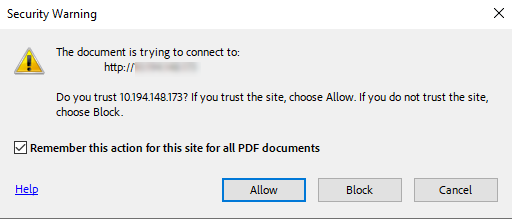
-
Once signed, the Signature is shown.
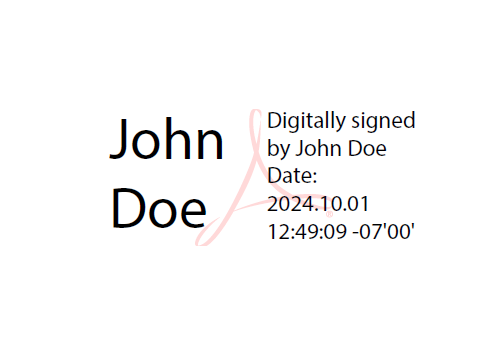
Check how many time-stamps have been issued
To check how many time-stamps have been issued:
-
Log in to the TSS server as Admin.
-
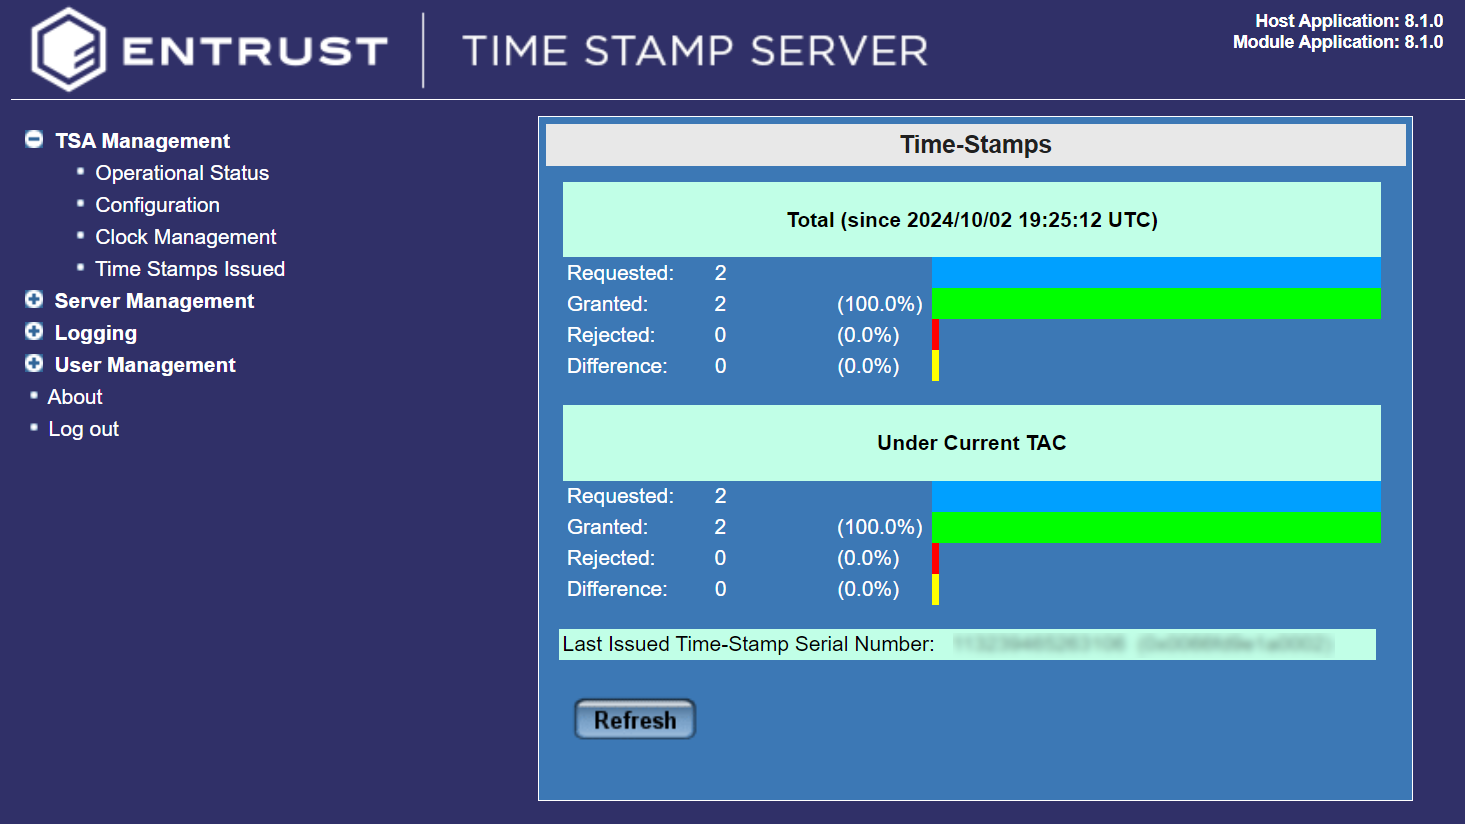
Under TSA Management, select Time Stamps Issued.

-
Check for the number of issued time-stamps under the current TAC since TSS was started up.
Select the TSA to view the details, then select Details.
