Installation
| The nShield PQC Option Pack requires that an OCS is present and usable. Please refer to the appropriate user guide for your product for further information. |
To install the nShield PQC Option Pack:
-
Sign in as a user with root privileges.
-
Open a terminal window and create a temporary directory to mount the nShield PQC Option Pack ISO to:
sudo mkdir /mnt/pqsdk -
Mount the nShield PQC Option Pack ISO to the temporary directory created above:
sudo mount -o loop pqsdk-1.1.0.iso /mnt/pqsdk -
Change to the root directory and extract the appropriate
.tar.gzfile in the mounted nShield PQC Option Pack ISO.
The following three installation files are provided in the nShield PQC Option Pack ISO:
-
pqsdk-xc-1.1.0.tar.gz : nShield XC local HSM installation with SDK sources and builder, no pre-built binaries.
-
pqsdk-n5-hsm-1.1.0.tar.gz : nShield 5 local HSM installation with SDK sources, builder and pre-built examples.
-
pqsdk-n5-client-1.1.0.tar.gz : nShield 5 remote client installation (without a local HSM installed) with pre-built examples and sources.
An installation file can be extracted as follows:
This installs all files required by nShield PQC Option Pack to /opt/nfast.
cd /
sudo tar -xzf /mnt/pqsdk/pqsdk-<VERSION>.tar.gz -C /| Only install one of the nShield PQC Option Pack installation files at a time. |
nShield XC installation
In the case of a Solo XC or a Connect XC installation, the nShield PQC Option Pack can now be installed using the following commands:
/opt/nfast/pqsdk/sbin/install_pqsdk_java_pkg
/opt/nfast/pqsdk/sbin/install_pqsdk_see_xc
The installation process can be customised for your needs. Use --help for more information.
| nShield PQC Option Pack is built from source during the installation. This may take a short while. |
| nShield PQC Option Pack is provided as a source-code release so that you may experiment with it. Changes to the code require re-installation of nShield PQC Option Pack. Repeat the last step to rebuild and reinstall the product. |
nShield 5 installation
There are two possible nShield 5 installations, the nShield 5 HSM installation and the nShield 5 remote installation. Each is described in detail in the following sections.
nShield 5 HSM installation
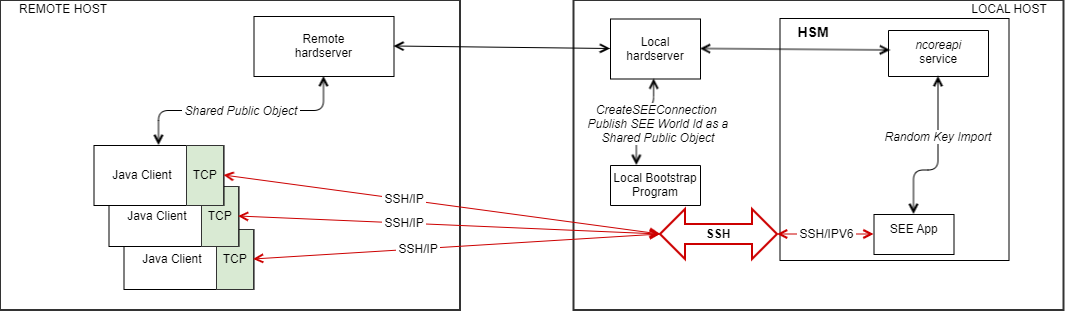
In this deployment, administration of the HSM is performed by the customer (for example, initializing the Security World on the HSM). The CodeSafe container is started from a local host and a local bootstrap program sends the CreateSEEConnection command and publishes the obtained worldid as an HSM object. After this, the client applications retrieves the published worldid and connects to the SEE machine using the IP address.
For more information about the CreateSEEConnection command, see the Codesafe Developer Guide.
|
Loading and running the SEE Machine uses HSM Keys with Combined Certs. In the case of the nShield 5 HSM installation, the nShield PQC Option Pack can now sign the SEE Machine image, install and run it using the following command:
sudo /opt/nfast/pqsdk/sbin/install_pqsdk_see_n5 --install local --askeyname codesafe-ask --devkeyname testdeveloperkey --devintcert devinter_certs.pem --bin /opt/nfast/pqsdk/bin/see/pqsdk-1.1.0.bin --sign true
The signing process will always look for the required certificates under: /opt/nfast/pqsdk/n5_signing_certs/*
|
| A signed nShield PQC Option Pack cs5 image can only be run on the same machine it was generated and signed on. |
As seen in the example above, in /opt/nfast/pqsdk/n5_signing_certs/* the intermediate and development certificates can be combined as a single file.
For example, devinter_certs.pem.
Use the --devintcert option to specify the combined cert.
/opt/nfast/pqsdk/n5_signing_certs/devinter_certs.pem
|
The --cs5 flag allows the re-running of a signed cs5 image again:
sudo /opt/nfast/pqsdk/sbin/install_pqsdk_see_n5 --install local --devintcert devinter_certs.pem --cs5 /opt/nfast/pqsdk/bin/see/pqsdk-1.1.0-signed.cs5The HSM Keys created and used for signing can be specified using --askeyname and --devkeyname
/opt/nfast/pqsdk/n5_signing_certs$ nfkminfo -k
Key list - 2 keys
 AppName simple               Ident codesafe-ask
 AppName simple               Ident testdeveloperkey
If the default names for certificates and key files are different, then they can be specified with the following option flags when executing install_pqsdk_see_n5:
-
-askeyname,--askeyname [string]: The ask key name for signing the image. -
-askeyfile,--askeyfile [string]: The ask key file for signing the image. -
-devkeyfile,--devkeyfile [string]: The developer signing key File used for signing. -
-devcert,--devcert [string]: The signed developer certificate PEM file, used for loading or signing. -
-intcert,--intcert [string]: The signed intermediate certificate PEM file, used for loading image.
Bootstrap is automatically started by the script (ie. /opt/nfast/python3/bin/python3 ./src/pqsdk/source/python/n5/bootstrap.py --cs5file /opt/nfast/pqsdk/bin/see/<pqsdk.cs5> --uuid <uuid>)
|
nShield 5 client installation
In this scenario, administration of the HSM and the CodeSafe container is performed by Entrust. The remote client application will need to have a Hardserver that is remotely connected to the Hardserver at the HSM location. The client installation will retrieve the published worldid via a shared public object and connect to the SEE Machine using the remote IP address to the SEE machine container.
For reference, the java examples could be run using the following command:
java -cp .:/opt/nfast/pqsdk/bin/java/pqsdk.jar com.entrust.pqsdk.examples.<example> <IP_ADDRESS> <PORT>nShield 5 client SSH configuration
For security, an SSH tunnel is to be configured between the Java Client and the CodeSafe container running the SEE Machine. The container SSHD will only start when the state for that container has been set to enabled. By default, it is disabled. It can be enabled with the csadmin SSHD state enable subcommand. The enable subcommand will also return the port and address on which the SSHD is listening on. Example output is shown below:
csadmin sshd state enable -u 81c4f72f-586d-48c8-8020-7a6975159b37
F973-CCA4-370B        SUCCESS
SSHD PORT: 3006
LISTENING ADDRESS: fe80::53:89ff:fe92:3260
Once the container SSHD is enabled, started, and its keys are set, to forward connections to the container SSHD, the user will establish port forwarding on the host machine. Use of a secure tunnel over an open TCP connection to communicate with the container is recommended and so we use local port forwarding to enable SSH tunneling. This is done with the SSH local port forward command (can be IPv4 or IPv6 depending on the required network configuration). The basic usage is as follows:
ssh -i [PATH_TO_PRIV_KEY] -L [LOCAL_IP]:[LOCAL_PORT]:[CONTAINER_IP_ADDR%lxcbr0]:[CONTAINER_PORT] -f -N -p [SSHD_PORT] launcher@[LISTENING_ADDRESS]%nshield0Where:
-
PRIV_KEY is the private key to the public client key that was set with the
setclientcommand. -
LOCAL_PORT is the port on the local client where traffic to be forwarded will be sent.
-
CONTAINER_IP_ADDR is the ip address of the container. This is the address returned when the container is started.
-
CONTAINER_PORT is the port on the container that is listening for forwarded traffic which is set in the network-conf.json file as "ssh_tunnel" (note valid range 1024-65535).
-
SSHD_PORT is the port the SSH daemon is listening on. This port is returned when SSHD is enabled and can also be found with the
csadmin sshd state getcommand. -
LISTENING_ADDRESS is the address the host clients use to communicate with the HSM (on the hsm side). This address is returned when SSHD is enabled and can also be found with the
csadmin sshd state getcommand.
As an example, in the local host, using an IPv4 LOCAL_IP and LOCAL_PORT:
ssh -i /home/.../test_key -L [10.194.147.71]:6000:[fe80::216:3eff:fe41:995%lxcbr0]:8888 -f -N -p 3000 launcher@fe80::53:89ff:fe92:3260%nshield0And in the remote host:
java -cp /opt/nfast/pqsdk/bin/java/pqsdk-examples.jar com.entrust.pqsdk.examples.KEM 10.194.147.71 6000Further information on enabling SSH port forwarding is available in the CodeSafe 5 Developer Guide.