Set up the WSOP TLS connection
The Certificate Authority (CA) that is trusted by clients to sign the WSOP corecrypto server certificate can be either an external commercial CA, or an internal CA owned by the customer’s organization and widely trusted within the organization.
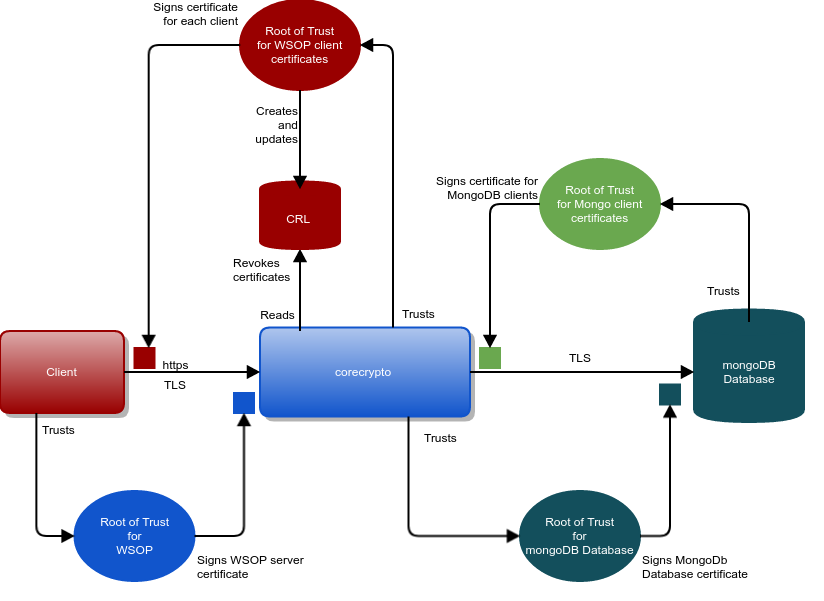
Before deploying WSOP in a production environment the external interface between corecrypto (WSOP) and external clients must be properly configured.
The private TLS key for the external interface can be an HSM-protected Security World key, but the internal TLS connection will use private TLS keys that are stored in the file system.
To configure WSOP for production use, there are four steps to follow:
-
Create a server certificate (signed by a CA) for the external interface.
-
Create WSOP client certificates.
-
Create MongoDB Database Certificate.
-
Create MongoDB Database Client Certificate.
Create Web Services server certificate and private key
The two main options available for creating the Web Services server certificate for the external interface between corecrypto (WSOP) and WSOP clients and for protecting its associated private key:
-
Using the HSM to create and store the Web Services server’s private key. This is achieved by generating a key pair on the HSM, exporting the public key, and then generating a CSR to request the Web Services Server’s certificate. The CSR can be sent either to an external CA, or processed in your organization.
-
Using WSOP’s file system store the Web Services server’s private key. This is achieved by generating a key pair, and then generating a Web Services server’s certificate, signed by the private key of your own Web Services server root certificate. (OpenSSL can be used for both these operations). This means you will need to give the client read-access to a trusted copy of your Web Services server root certificate, so that the client can verify the Web Services server’s certificate correctly.
Once you have created a private key and server certificate you will need to update the corecrypto configuration file located at /opt/nfast/webservices/corecrypto/conf/config.yaml to include information about the location of the certificate and the private key.
If the default locations are not used, you must ensure that the access to these files is restricted to wsopd user.
It is strongly recommended that the Web Services server’s private TLS key, which is used to secure communications with WSOP clients, is protected by the nShield HSM.
Use an HSM-protected key for the Web Services server
To generate a certificate with an HSM-protected key you should use the nShield OpenSSL that is shipped with nShield Security World Software.
This version of OpenSSL is installed to /opt/nfast/openssl/bin/openssl by default.
Before proceeding you need to ensure that the nShield distributed openssl shared libraries in /opt/nfast/openssl/lib are loaded and available, and the nShield openssl engine is also available.
To do this, run the following command:
/opt/nfast/openssl/bin/openssl engine -c -t nfkm
(nfkm) nShield NFKM engine
[RSA, rsaEncryption, id-ecPublicKey]
    [ available ]
For further information on the nShield OpenSSL NFKM engine consult the User Guide shipped with your nShield Security World software.
Use a certificate signed by a CA for production deployments
For production deployments, the Web Services server’s TLS certificate should be signed by a Certificate Authority, either external or part of your own organization. To generate an HSM-protected certificate signed by a CA:
-
Generate the WSOP server’s TLS private key:
generatekey -q simple protect=module type=RSA size=2048 \
ident=wsop-server-key plainname=wsop-server-key nvram=no pubexp=""
WSOP only supports module-protected TLS private keys. -
Generate the certificate signing request (CSR):
/opt/nfast/openssl/bin/openssl req -engine nfkm -keyform engine \ -key simple_wsop-server-key -new -subj \ "/C=US/ST=CA/O=Acme, Inc./CN=example.com" -reqexts SAN \ -config <(cat /opt/nfast/openssl/openssl.cnf <(printf \ "\n[SAN]\nsubjectAltName=DNS:example.com,DNS:www.example.com")) -
Submit the CSR to your CA to obtain a CA-signed certificate.
-
Import the signed certificate, with the full certificate chain into the WSOP external TLS folder.
-
Migrate the WSOP TLS key into the database using the Database Management Tool:
dbmt migrate --config config.yaml --library /opt/nfast/bin/libcknfast.so -A simple -K wsop-server-keyFor more information about the migration of a key, see the Database Management Tool section of this User Guide.
-
Change the corecrypto configuration
/opt/nfast/webservices/corecrypto/conf/config.yamlto use the new certificate and the generated HSM key. In theexternal_tlssection of the config file:-
Set
key_appname_ident: simple:wsop-server-key -
Set
cert_file: /opt/nfast/webservices/corecrypto/tls/external/server-corecrypto-cert.crt -
Unset (comment out)
key_file
-
-
Restart the
corecryptoservice for the change to take effect.
Use a non-HSM-protected key for the Web Services server
If it has been decided not to use the HSM to protect Web Services server’s private key, this key must be stored in WSOP’s file system. You will need to manually generate the server’s private key and TLS server certificate file using tools such as OpenSSL (without using the OpenSSL nShield NFKM engine).
A script is provided with the WSOP installation to create a Web Services server’s TLS root certificate and generate the server private key and certificates using OpenSSL. Alternatively, use the TLS root certificate of your own Web Services server, and generate the server TLS private key and certificate using other tools.
To use the provided script, first create two directories, one to store the generated TLS root certificate of your own Web Services server, and one to store the generated server private key and certificate.
Then run the mkcerts_externalcorecrypto.sh script located in /opt/nfast/wsop/scripts.
mkdir -p ca_dir server_dir
/opt/nfast/webservices/scripts/mkcerts_externalcorecrypto.sh --cadir ca_dir \
--hostname <hostname> --serverdir server_dir <validity in days>
You can optionally replace --cadir ca_dir with --deleteca to delete the private key of the server’s TLS root certificate, used to sign the server certificate, but if you do this you will not be able to generate a new server certificate with the same Web Services server’s TLS root certificate.
The consequence of this is, when your Web Services server’s TLS certificate expires, a new Web Services server certificate hierarchy will need to be generated.
It is therefore recommended to either use your own CA, or save the generated server TLS root certificate’s private key.
After execution the server_dir folder will contain two sets of server certificates available for use, one based on an RSA key, the other one using an ECDSA key.
The certificates and the keys parameters, like curve or size, can be altered by changing the scripts or by generating the certificates directly.
Use a self-signed certificate for testing the setup
To test your setup, you can generate a temporary self-signed certificate and private key. This is not recommended for use in a production deployment.
-
Generate the WSOP TLS key:
generatekey -q simple protect=module type=RSA size=2048 \ ident=wsop-server-key plainname=wsop-server-key nvram=no pubexp="" -
Generate the certificate:
/opt/nfast/openssl/bin/openssl req -engine nfkm -keyform engine \ -key simple_wsop-server-key -new -x509 \ -subj "/C=US/ST=CA/O=Acme, Inc./CN=example.com" -reqexts SAN \ -config <(cat /opt/nfast/openssl/openssl.cnf <(printf \ "\n[SAN]\nsubjectAltName=DNS:example.com,DNS:www.example.com")) \ -out server-corecrypto-cert.crt -
Copy the file
server-corecrypto-cert.crtto/opt/nfast/webservices/corecrypto/tls/external. -
Migrate the WSOP TLS key into the database using the Database Management Tool:
dbmt migrate --config config.yaml --library /opt/nfast/bin/libcknfast.so -A simple -K wsop-server-keyFor more information about the migration of a key, see the Database Management Tool section of this User Guide.
-
Change the
corecryptoconfiguration/opt/nfast/webservices/corecrypto/conf/config.yamlto use the new certificate and the generated HSM key. In theexternal_tlssection of the config file:-
Set
key_appname_ident: simple:wsop-server-key. -
Set
cert_file: /opt/nfast/webservices/corecrypto/tls/external/server-corecrypto-cert.crt. -
Unset (comment out)
key_file.
-
-
Restart the
corecryptoservice for the change to take effect.
Revocation of Web Services server’s certificates and key
If any of the private keys for the Web Services server’s certificate hierarchy are compromised, immediately replace the existing Web Services server’s certificate hierarchy and keys with new values, using the procedures indicated in the previous sections.
Create MongoDB database certificate
MongoDB database TLS transport requires that the mongo cluster be configured to use TLS and the certificate provisioned. Refer to MongoDB documentation Configure mongod and mongos for TLS/SSL for a detailed presentation of how to configure TLS transport security.
The corecrypto service will need to be configured to use the TLS transport by setting the disable_tls field from database section to false.
The CA certificate needs to be made accessible to the corecrypto and its path needs to be configured, by setting the db_ca_file field from database section.
Create MongoDB database client certificate
MongoDB supports mutual TLS authentication as described in MongoDB documentation.
In this case, the corecrypto service will authenticate to the MongoDB database using by using TLS client certificates.
| For details of how the public certificates are generated and the required MongoDB configuration, refer to the MongoDB documentation. |
After generating the client certificates, it will be necessary to configure the following fields in the corecrypto configuration file:
-
Set the client certificate path
db_cert_file, or copy the certificate file to its default location. -
Set the client private key path
db_key_file, or copy the private key file to its default location.
File permissions must be set so that they can only be accessed by authorized users. This means that only the file owner has read permission to private TLS certificate keys.
| If the MongoDB client certificate private key is compromised, refer to the steps in the MongoDB documentation. |
| Entrust recommends that the default ownerships and permissions that the installer sets should not be changed. |
Use the TLS certificate to authenticate clients when X.509 authentication is enabled
MongoDB supports X.509 certificate authentication for use with a secure TLS connection. The X.509 client authentication allows clients to authenticate to servers with certificates rather than with a username and password.
Follow this tutorial as guidance of how to use X.509 for client authentication with a standalone mongod instance.
In this case the client certificates must have the following properties:
-
A single Certificate Authority (CA) must issue the certificates for both the client and the server.
-
Client certificates must contain the following fields:
-
keyUsage = digitalSignature -
extendedKeyUsage = clientAuth
-
-
Each unique MongoDB user must have a unique certificate.
-
A client X.509 certificate’s
subject, which contains the Distinguished Name (DN), must differ from that of a member X.509 certificate, as presented in MongoDB documentation. -
The X.509 certificate must not be expired.
Once the clients certificates are generated and the corecrypto configuration file is set, ensure that:
-
WSOP server configuration file has the TLS transport security enabled, by setting the
disable_tlsfield fromdatabasesection tofalse. -
The
auth_typefield fromdatabasesection is set toX509.