Installation
This chapter describes how to install and setup the nShield Database Security Option Pack for both standalone and clustered deployments.
The installation described here assumes the Microsoft SQL Server software and Entrust nShield Security World software are already installed.
| Ensure that all the latest service packs, updates and hotfixes for Microsoft SQL Server software have been added. |
| A SQL Server login and appropriate permissions are required for all users who wish to install, configure or use the SQLEKM provider. Suitable permissions can be granted by a system administrator according to your company access policy. |
To install the SQLKM provider as a stand-alone service, refer to Setting up as stand alone service. To install the SQLKM provider within a database cluster environment, refer to Usage with database failover clusters.
Setting up as stand alone service
To install the nShield Database Security Option Pack:
-
Log in as Administrator or as a user with local administrator rights.
-
Using the provided installation media, launch
setup.msimanually. -
Follow the onscreen instructions. Accept the license terms, and click Next to continue.
-
The SQLEKM provider will be installed to
%NFAST_HOME%. Click Install to initiate installation. -
Click Finish to complete the installation.
Before using the SQLEKM provider (see Using the SQLEKM provider), you should confirm that a Security World exists and that the HSM is usable: run nfkminfo and confirm that the World state returned shows Usable and that the desired Module n state (where n is the number of the module) shows 0x2 Usable.
For more information, see "Creating and managing a Security World" in the User Guide for your HSM.
Then, create an OCS or softcard (see Security Worlds, key protection and failover recovery).
Usage with database failover clusters
The nShield SQLEKM provider can function as part of a Microsoft SQL Server database failover cluster. Three typical configurations are shown as examples.
-
Two incorporate a two-node failover cluster using a shared disk. The active server is the cluster server currently in ownership of the shared drive. See Failover cluster using nShield Solo+ HSMs and Failover cluster using nShield Connect XC HSMs.
-
The third example is an AlwaysOn availability group with no shared disk for TDE encryption. The active server is the one acting as the primary replica. See Failover cluster with HSMs in an AlwaysOn availability group.
User access to the failover cluster will typically be through a virtual server that will have its own name and IP address.
When deploying in a clustered environment, the same Security World should be used across all HSMs.
If using Java cards, the cardlist file should be the same on all servers.
Failover cluster using nShield Solo+ HSMs
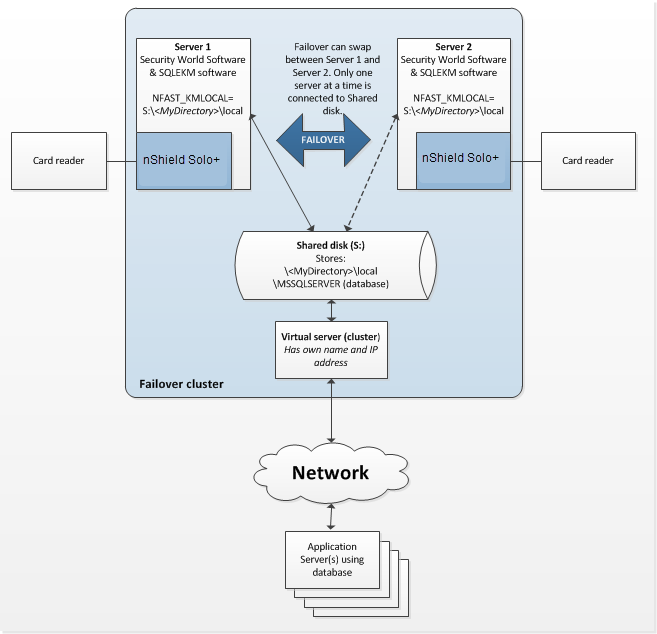
Figure 3.1: SQL Server database failover cluster using nShield Solo+
Figure 3.1 shows a two node database failover cluster example, using nShield Solo+ HSMs. To implement this configuration:
-
On Server 1, complete the installation instructions in Setting up as stand alone service, ensuring a Security World exists.
-
On Server 2, complete the installation instructions in Setting up as stand alone service, but do not create a Security World.
-
For the database cluster to function correctly in failover mode, the Security World data must be held in the shared network drive for the cluster. If the shared network drive is
S:then create the following directory path on that drive, through the active server:S:\<MyDirectory>\local -
On Server 1 and Server 2, do the following:
-
Create the environment variable
%NFAST_KMLOCAL%and set its value to that of the shared directory path, e.g.NFAST_KMLOCAL=S:\<MyDirectory>\local.The Security World should already exist on Server 1, and be loaded onto its HSM. -
Make Server 1 active in the cluster. From Server 1 the contents of the directory
%NFAST_KMDATA%\localmust be copied to the shared directoryS:\<MyDirectory>\local.
-
-
Make Server 2 active in the cluster. Load the Security World onto the HSM. See the User Guide for your HSM if you require help.
Before using the SQLEKM provider (see Using the SQLEKM provider), you should confirm that a Security World exists and that the HSM is usable: run nfkminfo and confirm that the World state returned shows Usable and that the desired Module n state (where n is the number of the module) shows 0x2 Usable.
For more information, see "Creating and managing a Security World" in the User Guide for your HSM.
Then, create an OCS or softcard (see Security Worlds, key protection and failover recovery).
Failover cluster using nShield Connect XC HSMs

Figure 3.2: SQL Server database failover cluster using nShield Connect HSMs
Figure 3.2 shows a two node database failover cluster example using a shared disk that is configured to use nShield Connect HSMs. You will need a separate host to act as the RFS in this configuration. An example of configuring an AlwaysOn availability group with no shared disk for TDE encryption is given in Failover cluster with HSMs in an AlwaysOn availability group.
| In this example, if there is failure of the entire system (for instance a temporary power loss) then the RFS and nShield Connect HSMs should be re-powered before the failover cluster. |
To implement this configuration:
-
Install Security World software on the RFS. See the appropriate User Guide for your HSM.
-
On the RFS, make the directory
%NFAST_KMDATA%\locala shared directory that is visible on the network. Grant permissions on the shared network folder for all users of the SQL Server database who will also need to use the SQLEKM provider.As well as permissions to use the shared folder, the users will also require remote access permissions to the RFS. If your SQL Server process is running as an autonomous service user, this must be granted similar permissions. Check your company security policies before making changes to permissions. -
On Server 1 and Server 2, complete the installation instructions in Setting up as stand alone service, but do not create a Security World.
-
On Server 1 and Server 2, set the system environment variable
%NFAST_KMLOCAL%to point to the shared network folder on the RFS. e.g.NFAST_KMLOCAL=\\<RFS IP address>\localorNFAST_KMLOCAL=\\<RFS Name>\local.-
Check that you can see the remote folder from Server 1 and Server 2 by running:
dir "%NFAST_KMLOCAL%" -
Ensure that all users granted permission to use the SQL Server and SQLEKM provider can see the remote folder in this way.
-
-
Set up the RFS to use the nShield Connect(s), and the nShield Connect(s) to use the RFS. See the nShield Connect User Guide for help.
-
Set up the nShield Connect(s) to use Server 1 and Server 2 as clients, and for the clients to use the nShield Connect(s). See the nShield Connect User Guide for help.
-
Create or load the desired Security World on the RFS or an nShield Connect. Ensure the Security World is loaded onto each nShield Connect used in the configuration. See the User Guide for your HSM if you require help.
Before using the SQLEKM provider (see Using the SQLEKM provider), you should confirm that a Security World exists and that the HSM is usable:
run nfkminfo and confirm that the World state returned shows Usable and that the desired Module n state (where n is the number of the module) shows 0x2 Usable.
For more information, see "Creating and managing a Security World" in the User Guide for your HSM.
Then, create an OCS or softcard (see Security Worlds, key protection and failover recovery).
Failover cluster with HSMs in an AlwaysOn availability group
These procedures have been tested for an availability group that used two servers. Server 1 held a (nominal) primary replica, Server 2 held a (nominal) secondary replica. Primary and secondary replicas were read/write. The configuration used nShield Connect HSMs, and no shared disk. Each server could be logged into directly, or through a cluster availability group (virtual) address. The configuration also required a third server to act as RFS.
The procedures described here are based on this configuration.
Setting up and switching on TDE
The following steps should be performed for each database, the primary, and each secondary, that is part of the availability group, and for which you wish to switch on TDE encryption.
Before starting, it is assumed that the database you wish to encrypt:
-
Already exists
-
Is already part of an availability group within a cluster
-
Is not currently encrypted, and includes no database encryption key (TDEDEK)
-
Has never been encrypted before. If it has, you may see errors and a request or a log backup. In this case, refer to Taking a log backup.
In the examples shown here, the database to be encrypted is called SourceDatabase, and the database wrapping key is called ekmWrappingKey in the SQLEKM provider, and dbWrappingKey in the master database.
Change names or other parameters to your own requirements.
Also, these steps assume that a wrapping key of the same name does not already exist in either the SQLEKM provider or the master database.
The examples show T-SQL code options for using either an OCS or else a softcard credential. Select which option you prefer and maintain that choice throughout the examples (comment out the option you do not wish to use). In these examples the OCS option is chosen.
Assuming that your servers and database(s) are already configured within an availability group, and you will use nShield Connects as your HSM modules, please prepare by making sure:
-
You have SQL Server logins and appropriate permissions to configure or access the SQL Server and nShield software to be installed. This may include remote access authorization. If your SQL Server process is running as an autonomous service user, this must be granted appropriate permissions. You may need your system administrator to provide consent.
-
Your nShield Security World and nShield Database Security Option Pack software is installed and configured in the same manner as that described in Failover cluster using nShield Connect XC HSMs (for this case, you may ignore the shared disk, as an availability group cluster can function without one).
-
Your SQLEKM provider is enabled as described in Enabling the SQLEKM provider, you have created a suitable Security World on the RFS and which is loaded onto the nShield Connects. See the nShield Connect User Guide for help.
-
You have created an OCS cardset, or softcard, as credential. Please refer to the User Guide for your HSM for further information about creating an OCS or a softcard. If you are using OCS cards, they must have a 1/N quorum, all be programmed with the exact same passphrase, and be from the same OCS cardset. We recommend a strong passphrase. Check your organization’s security policies.
-
If you are using OCS cards, you must have at least the same number (N) as HSMs you will be using. An OCS card must be inserted into the card reader of each HSM.
-
The person managing or setting up the TDE encryption keys must use the same OCS or softcard for their login credential as is used for the tdeCredential below.
Before proceeding with the following steps:
-
Make sure your database is recently backed up
-
Make sure that primary and secondary replicas are synchronized within the availability group, and that failover can occur without any data loss
-
If you prefer a particular server for the primary role, then you are failed over to that server
-
You should also remember the roles (primary/secondary) that each server node starts with.
Perform the following steps in the order shown. The following description is written as if the server nodes retain the initial primary or secondary roles they begin with. You can use the availability group cluster virtual address, and manually failover between the nodes in order to access them, but bear in mind this description refers to the initial (starting) role of each node, even if its actual role later changes.
-
On Primary: Set up the database wrapping key, TDE credential and login:
--Make sure you are running this on the PRIMARY. --This script sets up a TDE wrapping key, login and credential on the primary. --Create wrapping key USE master CREATE ASYMMETRIC KEY dbWrappingKey FROM PROVIDER SQLEKM WITH PROVIDER_KEY_NAME='ekmWrappingKey', CREATION_DISPOSITION = CREATE_NEW, ALGORITHM = RSA_2048; GO --Create wrapping key credential. Select one of OCS card, or else softcard. --Comment out option you do not want to use. --OCS card example USE master CREATE LOGIN tdeLogin FROM ASYMMETRIC KEY dbWrappingKey; CREATE CREDENTIAL tdeCredential WITH IDENTITY = 'OCS1', SECRET = '+453X7V]MR' FOR CRYPTOGRAPHIC PROVIDER SQLEKM; ALTER LOGIN tdeLogin ADD CREDENTIAL tdeCredential; GO --Softcard example. Not used here, so commented out. --Use master --CREATE LOGIN tdeLogin FROM ASYMMETRIC KEY dbWrappingKey; --CREATE CREDENTIAL tdeCredential WITH IDENTITY = 'scard1', SECRET = '0O*dG0ffz2' --FOR CRYPTOGRAPHIC PROVIDER SQLEKM; --ALTER LOGIN tdeLogin ADD CREDENTIAL tdeCredential; -
On (each) secondary: Restart the SQL Server instance. Set up the database wrapping key, TDE credential and login.
--Make sure you are running this on the SECONDARY. --NOTE the wrapping key must already exist, as created by the primary. --This script opens a wrapping key, TDE login and credential on a secondary. --The credential must match (same OCS cardset/softcard and password) as primary. --Create wrapping key USE master CREATE ASYMMETRIC KEY dbWrappingKey FROM PROVIDER SQLEKM WITH PROVIDER_KEY_NAME='ekmWrappingKey', CREATION_DISPOSITION = OPEN_EXISTING; --Wrapping key should already have been created on the primary. GO --Create wrapping key credential. Select one of OCS card, or else softcard. --Comment out option you do not want to use. --OCS card example USE master CREATE LOGIN tdeLogin FROM ASYMMETRIC KEY dbWrappingKey; CREATE CREDENTIAL tdeCredential WITH IDENTITY = 'OCS1', SECRET = '+453X7V]MR' FOR CRYPTOGRAPHIC PROVIDER SQLEKM; ALTER LOGIN tdeLogin ADD CREDENTIAL tdeCredential; GO --Softcard example. Not used here, so commented out. --Use master --CREATE LOGIN tdeLogin FROM ASYMMETRIC KEY dbWrappingKey; --CREATE CREDENTIAL tdeCredential WITH IDENTITY = 'scard1', SECRET = '0O*dG0ffz2' --FOR CRYPTOGRAPHIC PROVIDER SQLEKM; --ALTER LOGIN tdeLogin ADD CREDENTIAL tdeCredential; -
On both primary and secondary, check the database remains synchronized. To do this, in SQL Server Management Studio, look at
Server name > Name of your database. If after the previous steps you find that the database is now 'Not Synchronized', resynchronize by running the following query:--Run on primary/secondary that appears to be unsynchronized with availability group. USE master; GO ALTER DATABASE [SourceDatabase] SET HADR RESUMEIf the database remains unsynchronized after performing this step, you may have configuration problems. Attempt to correct this before proceeding.
-
On primary: Create the database encryption key and switch on TDE encryption.
--Make sure you are running this on PRIMARY
--Create actual database encryption key (TDEDEK)
USE SourceDatabase;
CREATE DATABASE ENCRYPTION KEY WITH ALGORITHM = AES_256
ENCRYPTION BY SERVER ASYMMETRIC KEY dbWrappingKey;
GO
--A short delay may be required here before switching on encryption.
WAITFOR DELAY '00:00:05'; -- Set delay period as required. One second = '00:00:01'
-- Break any connection with the SourceDatabase so that encryption can commence.
USE [master];
GO
-- Enable TDE (switch on encryption) on the SourceDatabase:
ALTER DATABASE SourceDatabase SET ENCRYPTION ON;
GO
If your database has previously been encrypted you may see errors at this point. If you are asked to take a pending log backup please perform the query shown in Taking a log backup. Then, repeat the following:
-- Break any connection with the SourceDatabase so that encryption can commence. USE [master]; GO -- Enable TDE (switch on encryption) on the SourceDatabase: ALTER DATABASE SourceDatabase SET ENCRYPTION ON; GO -
After performing the above steps, check the TDE encryption is switched on and the database is functioning correctly.
First check the encryption state on the primary by running the following Encryption state check query:
-- Encryption state check. Returns the encryption state of databases.
SELECT DB_NAME(e.database_id) AS DatabaseName, e.database_id, e.encryption_state, CASE e.encryption_
state
WHEN 0 THEN 'No database encryption key present, no encryption'
WHEN 1 THEN 'Unencrypted'
WHEN 2 THEN 'Encryption in progress'
WHEN 3 THEN 'Encrypted'
WHEN 4 THEN 'Key change in progress'
WHEN 5 THEN 'Decryption in progress'
END AS encryption_state_desc, c.name, e.percent_complete FROM sys.dm_database_encryption_keys
AS e
LEFT JOIN master.sys.certificates AS c ON e.encryptor_thumbprint = c.thumbprint
The encryption state for your database should be marked as Encrypted (if it is marked as Encryption in progress, wait a while and try again).
You should now be able to failover to a secondary with no data loss. After failing over to the secondary, run the same query above to check the encryption state for your database is also Encrypted on the secondary.
Failover between the nodes in your configuration, and attempt some database queries while connected to each. Add data to the database, query that same data, then, delete the data you just added, or whatever other queries you think appropriate.
Satisfy yourself that all is functioning correctly before continuing to use the TDE encrypted database.
Taking a log backup
If you get an error requesting that you take a log backup, try adapting the following code to your own requirements, and then run it.
USE master;
GO
ALTER DATABASE <Name-of-your-database>
SET RECOVERY FULL;
GO
USE master;
GO
-- Note. You should have provided a path to your backups when setting up your
-- availability group.
EXEC sp_addumpdevice 'disk', '<Name-of-your-device>',
'<Path-to-your-backups>\<Name-of-your-log-backup-file>';
GO
-- Back up the log
BACKUP LOG <Name-of-your-database> TO <Name-of-your-device>;
GO
--Drop backup device
EXEC sp_dropdevice '<Name-of-your-device>';
Example:
USE master;
GO
ALTER DATABASE SourceDatabase
SET RECOVERY FULL;
GO

USE master;
GO
EXEC sp_addumpdevice 'disk', 'EncryptedSourceDatabaseBackupLog',
'\\Server-2\NetWorkShareFolder\SourceDatabase_20160210122459';
GO
-- Back up the log
BACKUP LOG SourceDatabase TO EncryptedSourceDatabaseBackupLog;
GO
--Drop backup device
EXEC sp_dropdevice 'EncryptedSourceDatabaseBackupLog';
Removing TDE encryption from an AlwaysOn availability group
This procedure assumes you have already successfully set up TDE encryption in a similar manner to that described in Setting up and switching on TDE.
Perform the following steps in the order shown.
-
On primary: Switch off TDE encryption.
--Run this on PRIMARY in high availability group environment. --Switch off TDE encryption. USE [master]; ALTER DATABASE SourceDatabase SET ENCRYPTION OFF; GO -
On primary: Wait until decryption has finished. Check this by using the Encryption state check. When decryption has completed, continue to next step.
-
On primary: Drop the database encryption key (TDEDEK).
--Drop the database encryption key (TDEDEK) USE SourceDatabase DROP DATABASE ENCRYPTION KEY; -
On (each) secondary: Drop TDE login and credential, and wrapping key (TDEKEK) from database.
--You must have switched off TDE encryption on primary before running this script. --Run this on SECONDARY in high availability group environment. USE master; GO --Drop the TDE credential and login ALTER LOGIN tdeLogin DROP CREDENTIAL tdeCredential; DROP LOGIN tdeLogin; DROP CREDENTIAL tdeCredential; --Drop the wrapping key from database only DROP ASYMMETRIC KEY dbWrappingKey; -
On primary: Drop TDE login and credential, and wrapping key (TDEKEK) from database. If you also wish to drop the wrapping key (TDEKEK) from the SQLEKM provider, be sure it is safe to do so.
--Run this on PRIMARY in high availability group environment. USE master; GO --Drop the TDE credential and login on primary. ALTER LOGIN tdeLogin DROP CREDENTIAL tdeCredential; DROP LOGIN tdeLogin; DROP CREDENTIAL tdeCredential; --Select option below to remove wrapping key from database only, or both database --and SQLEKM provider. --If you remove the wrapping key copy from the SQLEKM provider, it will be lost --forever. If you do this, be sure this is what you want to do. --Drop the wrapping key from database only DROP ASYMMETRIC KEY dbWrappingKey; --Drop the wrapping key from both database and SQLEKM provider --DROP ASYMMETRIC KEY dbWrappingKey REMOVE PROVIDER KEY; -
After performing the above steps, check the TDE encryption is switched off on the primary by running the same Encryption state check query as shown above. The previously encrypted database should no longer be listed.
You may see the tempdb database remains shown as Encrypted. To remove this, restart the SQL Server instance.
Failover to a secondary, and check that there is no data loss. Run the same Encryption state check query on the secondary as shown above. The previously encrypted database should no longer be listed.
Security Worlds, key protection and failover recovery
This section highlights some considerations when choosing Security World and key protection options for use with the SQLEKM provider. It focusses on recovery of Security World authorization where a system has temporarily failed (for instance after a power outage) and is then returned to operation. This does not apply to other failure recovery functions. These considerations are applicable to both standalone systems and database failover clusters. For a fuller explanation of Security Worlds and key protection please refer to the User Guide for your HSM.
| Module protected keys are not supported by the SQLEKM provider. Therefore, direct protection of encryption keys that can be used without requiring further authorization mechanisms is not possible. |
In the event of a temporary failure of the SQLEKM provider, there may be a consequent loss of:
-
Credential authorization.
-
FIPS authorization (only if using a FIPS 140-2 Level 3 Security World).
A credential authorization can be granted using either a softcard or an OCS card, with passphrase. In the case of an OCS, a card must be always available in a valid HSM card reader in order to grant reauthorization after a failure, and permit automatic recovery. See Creating a credential for more information.
Where FIPS authorization is required, this can be granted either by using an operator card specifically for this purpose, or through an operator card that is also used for credential authorization. A card from the OCS must be always available in a valid HSM card reader in order to grant re-authorization after a failure, and permit automatic recovery.
| Never use ACS cards for FIPS authorization, as they will not support automatic recovery. |
Using these options, a summary of the authorization recovery behavior of the SQLEKM provider after a temporary outage is given in the table below.
| Security World type | Protection / Credential | Standalone system | Database cluster |
|---|---|---|---|
FIPS 140-2 Level 2 CC-CMTS |
Softcard |
Recovers automatically. |
Recovers automatically. |
OCS |
Use OCS for credential authorization:
Recovers automatically. |
Use OCS for credential authorization:
Recovers automatically. |
|
FIPS 140-2 Level 3 |
Softcard |
Use OCS for FIPS authorization (only):
Recovers automatically. |
Use OCS for FIPS authorization (only):
Recovers automatically. |
OCS |
Use OCS for both credential and FIPS authorization:
Recovers automatically. |
Use OCS for both credential and FIPS authorization:
Recovers automatically. |
If you are using an OCS to facilitate automatic recovery of the SQLEKM provider:
-
If you are using the OCS for credential authorization, all must be members of the same cardset for the same credential, and the same passphrase must be assigned to every card in the set.
-
If you are using the OCS for FIPS authorization purposes only, the quorum automatically defaults to 1/N, and (any) passphrase is ignored.
| Authorization acquired through a persistent operator card will not automatically reinstate itself after loss due to a temporary failure. |